


To insert tables into the ContentTools editor:
- Click the “Edit” button to start editing the editable area of the page.
- Click the location where you want to insert a new table.
- Click on the “Table” icon from the editor toolbox to display the “Insert Table” dialog.
-
-
- Choose if you want to have a table header or not.
- Enter the number of columns you want to have on your table.
- Choose if you want to have a table footer or not.
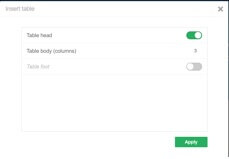
4 .Click on the “Apply” button.
- Click on a table cell to select the table.
- Click on the “Table” icon from the editor toolbox to display the “Edit Table” dialog.
On the columns option, enter the number of columns you need.
The ContentTools editor doesn’t allow you to specify which column you want to delete, but you can use the “Columns” option from the “Edit Table” dialog to enter the number of columns you need to delete, which will be less than the current number of columns. Then, the editor will automatically delete the columns according to the number you specified.
When you insert a new table, only one row is created by default, along with a header if the “Table head” option is turned on. To fill your table, click on a cell and type inside it. To move to the next cell, press “Tab” or “Enter” on your keyboard. If the cell you are on is the last cell on the table and you press “Tab” or “Enter”, a new row will be inserted.
- Click on a cell of the row you want to delete.
- Click on the “Delete” icon from the editor toolbox.
The ContentTools editor allows you to add a table header. The table header style is like the table row style but with a border at the bottom of the header row:
- Click on a table cell to select the table.
- Click on the “Table” icon from the editor toolbox to display the “Edit Table” dialog.
- Turn on the table header option.
The ContentTools editor allows you to add a table footer. The table footer style is like the table row style, nothing special. To add a table footer:
- Click on a table cell to select the table.
- Click on the “Table” icon from the editor toolbox to display the “Edit Table” dialog.
- Turn on the table footer option.
The ContentTools editor allows you to:
- Align text within a cell
- Italicize text within a cell
- Add a link to a text within a cell
ContentTools doesn’t allow you to insert images inside a table cell.
Tables can’t be moved from their initial position.
- Select all table cells.
- Click on the “Delete” icon from the editor toolbox.
- Click the “Edit” button to start editing the editable area of the page.
- Click the location where you want to insert a new table.
- Click on the “Table” icon from the editor toolbox to display the “Insert Table” dialog.
-
-
- Choose if you want to have a table header or not.
- Enter the number of columns you want to have on your table.
- Choose if you want to have a table footer or not.
-
-
- Click on a table cell to select the table.
- Click on the “Table” icon from the editor toolbox to display the “Edit Table” dialog.
- Click on a cell of the row you want to delete.
- Click on the “Delete” icon from the editor toolbox.
- Click on a table cell to select the table.
- Click on the “Table” icon from the editor toolbox to display the “Edit Table” dialog.
- Turn on the table header option.
- Click on a table cell to select the table.
- Click on the “Table” icon from the editor toolbox to display the “Edit Table” dialog.
- Turn on the table footer option.
- Align text within a cell
- Italicize text within a cell
- Add a link to a text within a cell
- Select all table cells.
- Click on the “Delete” icon from the editor toolbox.
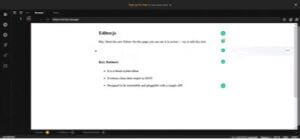 To insert tables into the Editorjs editor:
- Click the location where you want to insert a new table.
- Click on the “Table” icon from the editor toolbar. This will insert a (2×2) table into the selected location.
- Hover over the border of the column which you want to precede the new one. The new column will be inserted after it.
- A plus sign (“+”) icon will appear above it.
- Click on the plus sign icon and a new column will be inserted.
Unfortunately, you can’t delete a table column, so be sure you need that column before adding it.
- Hover over the bottom border of the row which you want to precede a new one. The new row will be inserted under it.
- A plus sign (“+”) icon will appear at the left side.
- Click on the plus sign icon and a new row will be inserted.
Unfortunately, you can’t delete a table row, so be sure you need that row before adding it.
There is no option for adding headers or footers.
You can’t edit text format on a table cell
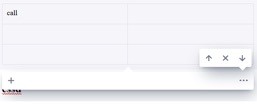
- Click on the table.
- Click on the 3 dots at the right side of the table.
- Move the table up by clicking on the “Up” arrow icon or move the table down by clicking on the “Down” arrow icon.
- Click on the table.
- Click on the 3 dots at the right side of the table.
- Click on the “Remove” button.
To insert tables into the Editorjs editor:
- Click the location where you want to insert a new table.
- Click on the “Table” icon from the editor toolbar. This will insert a (2×2) table into the selected location.
- Hover over the border of the column which you want to precede the new one. The new column will be inserted after it.
- A plus sign (“+”) icon will appear above it.
- Click on the plus sign icon and a new column will be inserted.
Unfortunately, you can’t delete a table column, so be sure you need that column before adding it.
- Hover over the bottom border of the row which you want to precede a new one. The new row will be inserted under it.
- A plus sign (“+”) icon will appear at the left side.
- Click on the plus sign icon and a new row will be inserted.
Unfortunately, you can’t delete a table row, so be sure you need that row before adding it.
You can’t edit text format on a table cell
- Click on the table.
- Click on the 3 dots at the right side of the table.
- Move the table up by clicking on the “Up” arrow icon or move the table down by clicking on the “Down” arrow icon.
- Click on the table.
- Click on the 3 dots at the right side of the table.
- Click on the “Remove” button.
 To insert a new table into the Summernote editor:
- Click the location where you want to insert a new table.
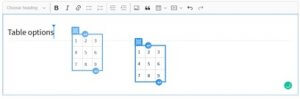
- Click on the table icon from the editor toolbar.
- Choose the number of columns and rows.
You can copy a table from an outer source and paste it on the editor.
 By clicking on a table cell, a pop-up menu will appear with the following options:
- Add row below.
- Add row above.
- Add column left.
- Add column right.
- Delete row.
- Delete column.
- Delete table.
There is no option for adding a table header or footer.
Images can be inserted inside a table cell.
Tables can be dragged to a new position.
Cell width is automatically adjusted according to the content of the cell.
The Summernote editor enables selecting chosen cells and copying their contents.
<table class=“table table-bordered”>
<tbody>
<tr><td>1<br></td><td>2<br></td></tr>
<tr><td>3<br></td><td>4<br></td></tr>
</tbody>
</table>
<br>
To insert a new table into the Summernote editor:
- Click the location where you want to insert a new table.
- Click on the table icon from the editor toolbar.
- Choose the number of columns and rows.
You can copy a table from an outer source and paste it on the editor.
By clicking on a table cell, a pop-up menu will appear with the following options:
- Add row below.
- Add row above.
- Add column left.
- Add column right.
- Delete row.
- Delete column.
- Delete table.
Cell width is automatically adjusted according to the content of the cell.
<table class=“table table-bordered”>
<tbody>
<tr><td>1<br></td><td>2<br></td></tr>
<tr><td>3<br></td><td>4<br></td></tr>
</tbody>
</table>
<br>
 To insert a new table into CKEditor:
- Click the location where you want to insert a new table.
- Click on the “Table” icon from the editor toolbar.
- Choose the number of columns and rows.
You can copy a table from an outer source and paste it on the editor.
By clicking on a table cell, a pop up menu will appear with the following options:
- Column options:
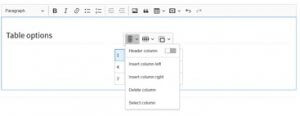
- Set column as a header.
- Insert column left.
- Insert column right.
- Delete column.
- Select column.
- Row options:
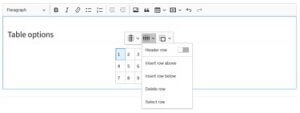
- Set row as a header.
- Insert row above.
- Insert row below.
- Delete row.
- Select row.
- Merge cells:
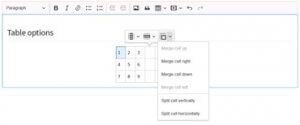
- Merge cell up.
- Merge cell right.
- Merge cell down.
- Merge cell left.
- Split the cell vertically.
- Split the cell horizontally.
Images can be inserted inside a table cell.
 By hovering over a table, a drag handler will appear at the top left corner. Clicking on it will allow you to drag the table to a new position.
To make it easy to separate tables from their surrounding content, hover over the top or bottom of a table to reveal a break button. Click this button to add a line break.
By hovering over a table, a drag handler will appear at the top left corner. Clicking on it will allow you to drag the table to a new position.
To make it easy to separate tables from their surrounding content, hover over the top or bottom of a table to reveal a break button. Click this button to add a line break.
Cell width is automatically adjusted according to the content of the cell.
CKEditor enables selecting cells and copying their contents.
- Select all table cells.
- Click on the “Delete” or “Backspace” key from the keyboard.
To insert a new table into CKEditor:
- Click the location where you want to insert a new table.
- Click on the “Table” icon from the editor toolbar.
- Choose the number of columns and rows.
You can copy a table from an outer source and paste it on the editor.
- Column options:
- Set column as a header.
- Insert column left.
- Insert column right.
- Delete column.
- Select column.
- Row options:
- Set row as a header.
- Insert row above.
- Insert row below.
- Delete row.
- Select row.
- Merge cells:
- Merge cell up.
- Merge cell right.
- Merge cell down.
- Merge cell left.
- Split the cell vertically.
- Split the cell horizontally.
By hovering over a table, a drag handler will appear at the top left corner. Clicking on it will allow you to drag the table to a new position.Cell width is automatically adjusted according to the content of the cell.
- Select all table cells.
- Click on the “Delete” or “Backspace” key from the keyboard.
To insert a new table into CKEditor:
- Click the location where you want to insert a new table.
- Use one of these methods:
- From the quick insert buttons toolbar
- Click on the “Table” icon, and this will automatically insert a (2×2) table.
- From toolbar:
- Click on the “Table” menu item
- Click on the “Table” submenu item
- Choose the number of columns and rows.
You can copy a table from an outer source and paste it on the editor.
By clicking on a table, a pop-up menu will appear with the following options:
- Column options:
- Insert column before.
- Insert column after.
- Delete column.
- Row options:
- Insert row before.
- Insert row after.
- Delete row.
- Table options:
- Table properties.
- Delete table.
1. General
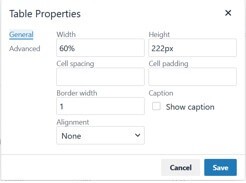 From the “General” tab, you can set or edit these properties:
-
-
- Width
- Height
- Cell spacing
- Cell padding
- Border width
- Alignment
-
- None
- Left
- Center
- Right
2. Advanced
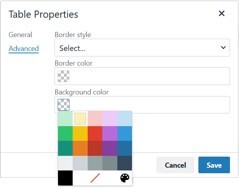 From the “Advanced” tab, you can set or edit these properties:
- Border style
- Default
- Solid
- Dotted
- Dashed
- Double
- Groove
- Ridge
- Inset
- Outset
- None
- Hidden
- Border style
- Background color
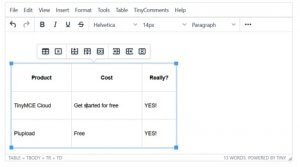
TinyMCE has many features for handling tables. They can be accessed through the “Table” menu on the toolbar or by right-clicking(or Ctrl-clicking for Mac OS) on the selected table.
Here is the full list of items, with the items that aren’t accessible outside this menu being highlighted in yellow
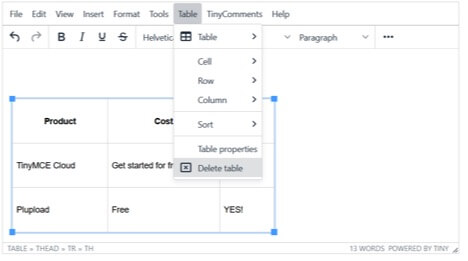
- Table
Insert a new table
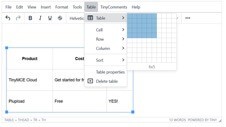
TinyMCE allows inserting tables inside another table.
- Cell
- Cell properties
■ General
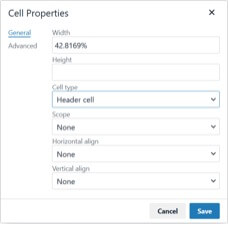
From the “General” tab, you can set or edit these properties:
- Width
- Height
- Cell Type
- Cell
- Header cell
- Scope
- None
- Row
- Column
- Row group
- Column group
- Horizontal align
- None
- Left
- Center
- Right
- Vertical align
- None
- Top
- Middle
- Bottom
■ Advanced
From the “Advanced” tab, you can set or edit these properties:
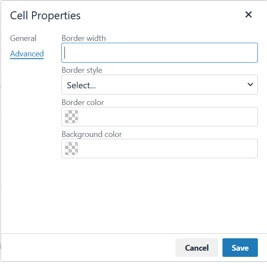
- Border width
- Border style
- Default
- Solid
- Dotted
- Dashed
- Double
- Groove
- Ridge
- Inset
- Outset
- None
- Hidden
- Border color
- Background color
- Merge cells
Merge two or more selected cells.
- Split cell
Split merged cells.
- Row
- Insert row before.
- Insert row after.
- Delete row.
■ General
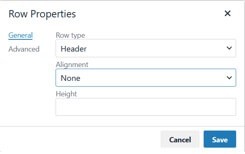
From the “General” tab, you can set or edit these properties:
- Row type
- Header
- Body
- Footer
- Alignment
- None
- Left
- Center
- Right
- Height
■ Advanced
From the “Advanced” tab, you can set or edit these properties:
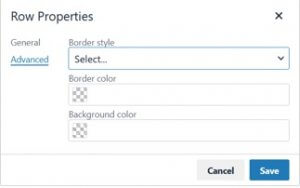
- Border style
- Default
- Solid
- Dotted
- Dashed
- Double
- Groove
- Ridge
- Inset
- Outset
- None
- Hidden
- Border color
- Background color
- Cut row
- Copy row
- Paste row before
- Paste row after
- Column
- Insert column before.
- Insert column after.
- Delete column.
- Cut column.
- Copy column.
- Paste column before.
- Paste column after.
- Sort
- Sort table by column (ascending)
- Sort table by column (descending)
- Advanced Sort
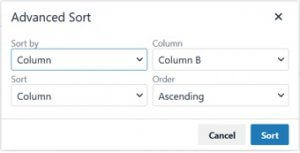
The ‘Advanced Sort’ feature allows you to do complex types of sorting using these fields:
- Sort by
- Column
- Row
- Sort
- Column
- Selection
- Table
- Column
- Depends on the number of the columns on the selected table.
- Order
- Ascending
- Descending
- Table properties
- Delete table
You can select table cells using by one of these methods:
- Hold the left key of the mouse and move it over the cells you want to select.
- When you click on the table, the HTML structure of the table is displayed at the editor footer. You can then click on the HTML element you want to select.
 Images can be inserted inside a table cell.
Tables can’t be dragged, but you can cut and paste them in a new position.
Images can be inserted inside a table cell.
Tables can’t be dragged, but you can cut and paste them in a new position.
- Select all cells.
- Click on the “Table” menu item.
- Click on the ‘column’ or ‘row’ submenu item.
- Choose ‘cut column’ or ‘cut row’ from the opened menu.
- Paste the table in the new location.
When a table is inserted into the editor, it takes its full width, and column width is equally distributed according to the number of columns in the table.
Table size can be adjusted using one of these methods:
- Hold the table from one of its corner edges and drag it until it reaches the size you want.
- Enter table width and height in the “Table Properties” dialog box.
Column width can be adjusted using one of these methods:
- Hold the column border and drag it until it reaches the width you want.
- Enter cell width in the “Cell Properties” dialog box.
Row height can be adjusted using one of these methods:
- Hold the row border and drag it until it reaches the height you want.
- Enter the cell height in the “Cell Properties” dialog box.
- Enter the row height in the “Row Properties” dialog box.
<table style=”border-collapse: collapse; width: 100%;” border=”1″>
<tbody>
<tr>
<td style=”width: 48.0992%;”>1</td>
<td style=”width: 48.0992%;”>2</td>
</tr>
<tr>
<td style=”width: 48.0992%;”>3</td>
<td style=”width: 48.0992%;”>4</td>
</tr>
</tbody>
</table>
- Click the location where you want to insert a new table.
- Use one of these methods:
- From the quick insert buttons toolbar
- Click on the “Table” icon, and this will automatically insert a (2×2) table.
- From toolbar:
- Click on the “Table” menu item
- Click on the “Table” submenu item
- Choose the number of columns and rows.
- From the quick insert buttons toolbar
You can copy a table from an outer source and paste it on the editor.
- Column options:
- Insert column before.
- Insert column after.
- Delete column.
- Row options:
- Insert row before.
- Insert row after.
- Delete row.
- Table options:
- Table properties.
- Delete table.
From the “General” tab, you can set or edit these properties:
-
-
- Width
- Height
- Cell spacing
- Cell padding
- Border width
- Alignment
-
- None
- Left
- Center
- Right
-
From the “Advanced” tab, you can set or edit these properties:
- Border style
- Default
- Solid
- Dotted
- Dashed
- Double
- Groove
- Ridge
- Inset
- Outset
- None
- Hidden
- Border style
- Background color
TinyMCE has many features for handling tables. They can be accessed through the “Table” menu on the toolbar or by right-clicking(or Ctrl-clicking for Mac OS) on the selected table.
Here is the full list of items, with the items that aren’t accessible outside this menu being highlighted in yellow
- Table
Insert a new table
TinyMCE allows inserting tables inside another table.
- Cell
- Cell properties
- Cell
- ■ General
From the “General” tab, you can set or edit these properties:
- Width
- Height
- Cell Type
- Cell
- Header cell
- Scope
- None
- Row
- Column
- Row group
- Column group
- Horizontal align
- None
- Left
- Center
- Right
- Vertical align
- None
- Top
- Middle
- Bottom
- ■ Advanced
From the “Advanced” tab, you can set or edit these properties:
- Border width
- Border style
- Default
- Solid
- Dotted
- Dashed
- Double
- Groove
- Ridge
- Inset
- Outset
- None
- Hidden
- Border color
- Background color
- Merge cells
Merge two or more selected cells.
- Split cell
Split merged cells.
- Row
- Insert row before.
- Insert row after.
- Delete row.
- ■ General
From the “General” tab, you can set or edit these properties:
- Row type
- Header
- Body
- Footer
- Alignment
- None
- Left
- Center
- Right
- Height
- ■ Advanced
From the “Advanced” tab, you can set or edit these properties:
- Border style
- Default
- Solid
- Dotted
- Dashed
- Double
- Groove
- Ridge
- Inset
- Outset
- None
- Hidden
- Border color
- Background color
- Cut row
- Copy row
- Paste row before
- Paste row after
- Column
- Insert column before.
- Insert column after.
- Delete column.
- Cut column.
- Copy column.
- Paste column before.
- Paste column after.
- Sort
- Sort table by column (ascending)
- Sort table by column (descending)
- Advanced Sort
The ‘Advanced Sort’ feature allows you to do complex types of sorting using these fields:
- Sort by
- Column
- Row
- Sort
- Column
- Selection
- Table
- Column
- Depends on the number of the columns on the selected table.
- Order
- Ascending
- Descending
- Table properties
- Delete table
- Hold the left key of the mouse and move it over the cells you want to select.
- When you click on the table, the HTML structure of the table is displayed at the editor footer. You can then click on the HTML element you want to select.
- Select all cells.
- Click on the “Table” menu item.
- Click on the ‘column’ or ‘row’ submenu item.
- Choose ‘cut column’ or ‘cut row’ from the opened menu.
- Paste the table in the new location.
- Hold the table from one of its corner edges and drag it until it reaches the size you want.
- Enter table width and height in the “Table Properties” dialog box.
- Hold the column border and drag it until it reaches the width you want.
- Enter cell width in the “Cell Properties” dialog box.
- Hold the row border and drag it until it reaches the height you want.
- Enter the cell height in the “Cell Properties” dialog box.
- Enter the row height in the “Row Properties” dialog box.
<table style=”border-collapse: collapse; width: 100%;” border=”1″>
<tbody>
<tr>
<td style=”width: 48.0992%;”>1</td>
<td style=”width: 48.0992%;”>2</td>
</tr>
<tr>
<td style=”width: 48.0992%;”>3</td>
<td style=”width: 48.0992%;”>4</td>
</tr>
</tbody>
</table>
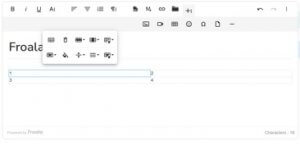
 To insert a new table into Froala:
- Click the location where you want to insert a new table.
- Use one of these methods:
- From the quick insert buttons toolbar:
- Click on the table icon, automatically inserting a (2×2) table.
- From toolbar:
- Click on the “Table” icon under the “More Rich” menu.
- Choose the number of columns and rows.
You can copy a table from an outer source and paste it on the editor.
By clicking on a table, a pop-up menu will appear with the following options.
- Table header

Add/Remove top row to/from the table as a table header:
- Remove table

- Row options

- Insert row above
- Insert row below
- Delete row
- Column options

- Insert column before
- Insert column after
- Delete column
- Table style

A predefined set of classes which can be applied to a table once a user selects any of them from a dropdown. By default, Froala comes with these styles:
- Dashed borders
- Alternate rows
- Cell options

- Merge cells
- Vertical split
- Horizontal split
- Cell background color

Select a color from the color palette or enter a custom Hex value.
- Vertical align

- Top
- Middle
- Bottom
- Horizontal align

- Left
- Center
- Right
- Justify
- Cell style

A predefined set of classes which can be applied to a table cell once a user selects any of them from this dropdown. By default, Froala comes with these styles:
- Highlighted
- Thick
 Hover over the top border of the column which you want to precede the new column to reveal a quick insert column button. Click this button to add a new column.
Similarly, hover over the left border of the row which you want to precede the new row to reveal a quick insert row button. Click this button to add a new row.
Hover over the top border of the column which you want to precede the new column to reveal a quick insert column button. Click this button to add a new column.
Similarly, hover over the left border of the row which you want to precede the new row to reveal a quick insert row button. Click this button to add a new row.
Hold the left key of the mouse and move it over the cells you want to select.
Images can be inserted inside a table cell.
Tables can’t be dragged to a new position.
When a table is inserted on the editor, it takes the editor’s full width, and column width is equally distributed according to the number of the columns of the table.
Column width could be adjusted by holding the column border and dragging it until it reaches the width you want.
Cell height is automatically adjusted according to the content of the cell, and the table row height is equal to the tallest cell in the row.
To make it easy to separate tables their surrounding content, hover over the top or bottom of a table to reveal a break button. Click this button to add a line break. This option is only available when there is not already a line above or below the table.
<table style=”width: 100%;”>
<tbody>
<tr>
<td style=”width: 50.0000%;”>1
<br>
</td>
<td style=”width: 50.0000%;”>2
<br>
</td>
</tr>
<tr>
<td style=”width: 50.0000%;”>3
<br>
</td>
<td style=”width: 50.0000%;”>4
<br>
</td>
</tr>
</tbody>
</table>
To insert a new table into Froala:
- Click the location where you want to insert a new table.
- Use one of these methods:
- From the quick insert buttons toolbar:
- Click on the table icon, automatically inserting a (2×2) table.
- From toolbar:
- Click on the “Table” icon under the “More Rich” menu.
- Choose the number of columns and rows.
- From the quick insert buttons toolbar:
You can copy a table from an outer source and paste it on the editor.
- Table header
- Remove table
- Row options
- Insert row above
- Insert row below
- Delete row
- Column options
- Insert column before
- Insert column after
- Delete column
- Table style
- Dashed borders
- Alternate rows
- Cell options
- Merge cells
- Vertical split
- Horizontal split
- Cell background color
- Vertical align
- Top
- Middle
- Bottom
- Horizontal align
- Left
- Center
- Right
- Justify
- Cell style
- Highlighted
- Thick
Hover over the top border of the column which you want to precede the new column to reveal a quick insert column button. Click this button to add a new column.
Similarly, hover over the left border of the row which you want to precede the new row to reveal a quick insert row button. Click this button to add a new row.Hold the left key of the mouse and move it over the cells you want to select.
<table style=”width: 100%;”>
<tbody>
<tr>
<td style=”width: 50.0000%;”>1
<br>
</td>
<td style=”width: 50.0000%;”>2
<br>
</td>
</tr>
<tr>
<td style=”width: 50.0000%;”>3
<br>
</td>
<td style=”width: 50.0000%;”>4
<br>
</td>
</tr>
</tbody>
</table>