


Quickly Design 5 Bootstrap Login Pages That Look Amazing

Your bootstrap, login, and registration pages are some of the most important pages on your site when it comes to customer experience. No matter what your business does, these are the first steps your visitors need to complete before they can use your online products or services. Because of this, the way you create each user’s digital identity on your site has a huge impact. Providing a smooth user experience as well as efficiently preserving and retrieving your user’s data is critical.
As a real-world example, if you are using an online resume builder, you need to ensure that the CV information each user enters persists. That way they can return and edit their document whenever they need to. After all, there is no point in using a site where every time you want to make a change to your resume you need to recreate the entire document rather than simply edit it.
Obviously, creating an effective, usable login interface is the first prerequisite to creating a great user experience. That is why Froala gives you the WYSIWYG tools like Froala’s Design Block Builder, quickly creates awesome login pages of your own, and does exactly that in no time at all.
What are Froala Design Blocks?
The Froala Design Block Builder is a website design tool that gives you 170+ responsive design blocks. Each block is tested and proven ready to help you develop your web or mobile apps quickly and easily. Froala Design Blocks are based on the Froala Bootstrap Library. They give you everything you need to create beautiful websites.
Here are the 5 best login page design concepts that you can quickly create by using Froala’s Design Blocks Builder.
How can I build a simple login in Bootstrap?
We have all seen conventional login pages — they simply expect you to enter your email address and a password. Once you provide your credentials, you just click on the Submit button and the application signs you in. In addition to the two email and password textboxes, most websites have a Forgot Password or Recover Password option. This lets you regain access to the website if you get locked out of your account or forget your password. It may be all you need for your site. Let’s see how just easily you can make it happen with Froala’s Design Block Builder.
When it comes to designing your page, it is a matter of personal preference. Some online products or services prefer to adding a header and footer to their login page designs. It is really up to you whether you want to add them or not. To be sure, many businesses will a/b test to find out what works for them. Thankfully, it is easy to create both in Design blocks. All you need to do is head over to the Headers and Footers menu items section. From there, just select the style you prefer for your use case.
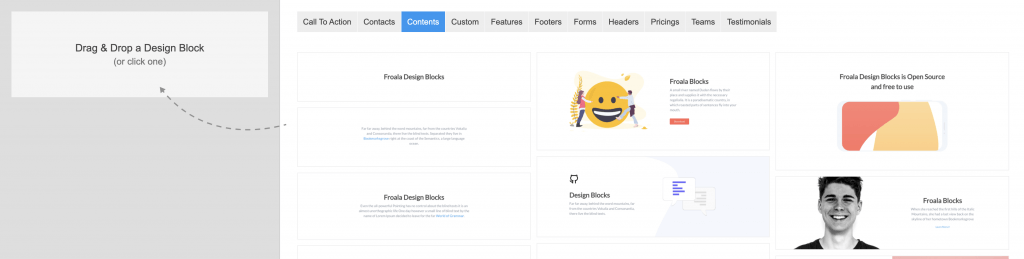
After that, navigate to the Forms tab in the design blocks builder menu. Choose the block that has fields for all the items we discussed above — the email address textbox, password textbox, recover password link, and a submit button. Once you have found the design block perfect for you, it takes minimal effort to alter it to suit your use case. Then it is basically ready to go, all the styling and responsiveness is taken care of by the Froala Bootstrap Library.

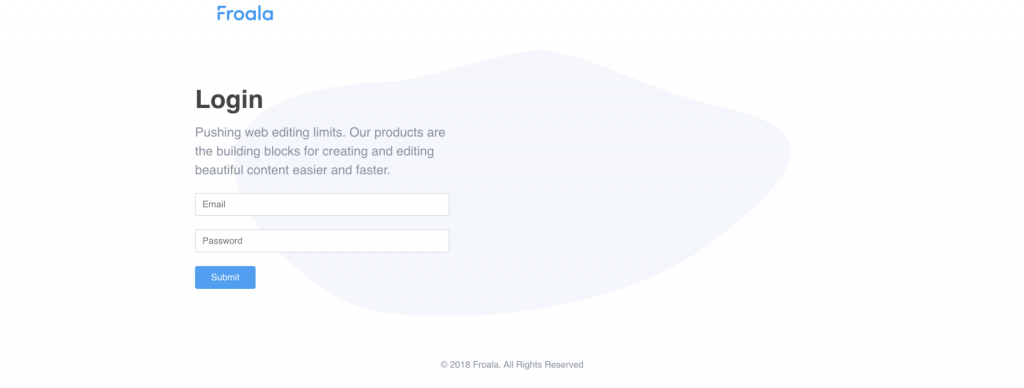
How can I build a login page design with a center-aligned background?
If your site design calls for it, you may want to add background graphics to your login page. You can also place your login block anywhere you want. Depending on the user experience you are creating you can locate the login block to the right in the center or anywhere else on the page.
Whatever your design choice, Froala design blocks are there to support you. Take a look at the example below to see how simple it is to create a right-aligned login page, or how easy it is to shift it to a centre-aligned one. All you need to do is drag and drop the block in the design blocks editor.

What is a great way to design an OTP-based login page?
When it comes to login and registration pages, some services or products do not use the conventional email address and password confirmation model to log users in. Instead, they only ask for a pre-verified email address and send the user an OTP (One Time Password). One example of a site that uses this model is Medium, the online blog publishing platform. If this is the login model that you want to adopt for your site, Froala design blocks can help you make it happen. Check it out in the example below!
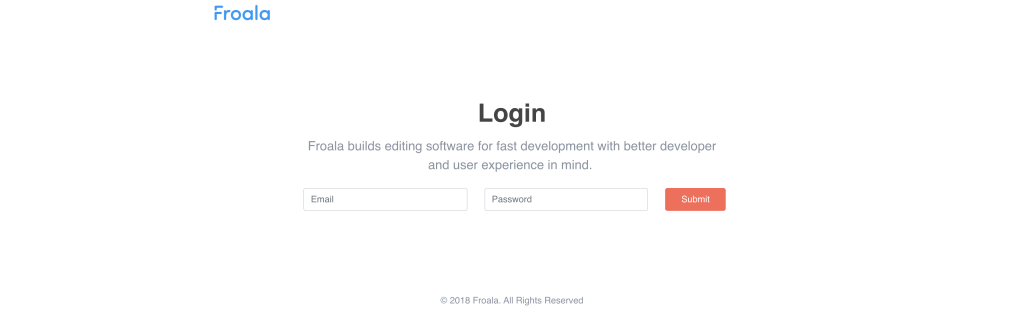
How can I design a simple left-aligned login page?
Similar to the conventional login, you can use Froala design blocks builder rich library of blocks to design a login page with any layout or orientation you prefer. If want you your login page left-aligned, simply make it happen by dragging and dropping the block to the correct location.
How can I easily build an inline login page bootstrap?
Usually, services use vertically-styled login pages, with the password box located beneath the email field. So far the pages we have discussed in the examples above have conformed to the vertically-stacked email textbox, password textbox, and submit button style. If, however, you want to take a different, more progressive approach, consider having your fields in line. That way you can save your website’s vertical space for other important content.
If this is the way forward for you, Froala design blocks give you everything you need to make it so.
As you can see creating login pages design with Froala design blocks is pretty easy. Not only that, designing with Design Blocks takes much less time and produces more reliable and higher-quality results. Most importantly, Froala design blocks are thoroughly tested and are guaranteed to be quick and responsive, saving you even more time on your website development.
Let us know in the comment section which amazing login pages have you successfully created with design blocks. Happy designing!
Head over to Froala’s free Design Blocks Builder tool and start building incredible login pages!
FAQs about login pages
How do I make login pages responsive using Bootstrap?
Bootstrap is all about responsiveness, so creating a responsive login page Bootstrap project is easy. After including the necessary Bootstrap files in your HTML file, wrap the login form in a container class (e.g., <div class=”container”><form></form></div>). This limits the form’s width and makes it responsive. But what about the form elements? For those, you can use Bootstrap’s grid system in combination with form layout classes (e.g., form-group, form-control, form-label, etc.). After that, your entire login form should look consistent across different screen sizes. This is how you can easily create a responsive Bootstrap login page.
How do I create login pages in HTML?
To create the simplest login page, you will need a form with at least two <input> elements. The first is for the username while the second is for the password. You will also need a button for logging in. The idea is to pass the user’s information to a server through a back-end language like PHP. You can do this by either having PHP in your code or communicating with a server via JavaScript. For more details, check out this tutorial.
How do I center a login form in Bootstrap?
There are several ways to center a login form in Bootstrap, but one of the best ways is to wrap the form with the classes “d-flex” and “justify-content-center” (e.g., <div class=”d-flex justify-content-center”><form></form></div>. You can also center a login form vertically by appending the class “align-items-center” (you should specify a vh value for your div, though).


No comment yet, add your voice below!