Text Editor to Download and Boost Your Productivity
- Posted on
- By Justin Imperial
- In General,
Table of contents
- Introduction
- Which Text Editor to Download: Why Choose Froala
- HTML
- JavaScript
- Step-by-Step Guide to Getting Started witth Froala
- HTML
- Getting Started with Froala: Your First Code
- Writing and Formatting Text
- Adding Headings and Paragraphs
- Adding Images
- Exploring the Advanced Features of Froala
- Tips and Tricks for Maximizing Efficiency with Froala
- HTML
- CSS
- JavaScript
- HTML
- CSS
- JavaScript
- Conclusion

Introduction
The importance of knowing which text editor to download is essential to software development because they provide programmers with a strong foundation for effectively writing, editing, and managing code. Finding the best editor is crucial for productivity and code quality whether you’re working on a small personal project or a large-scale software application. In this post, we’ll examine one of the most popular text editors on the market, Froala, and talk about the unique features that make it a great option for developers. This should also help you in getting started with Froala so you can immediately start creating amazing content!
Which Text Editor to Download: Why Choose Froala
Because of its remarkable features and benefits designed especially for developers, Froala stands out above other text editors. Its strong and simple user interface, which offers a seamless coding experience, is one of its main advantages. Furthermore, Froala provides a clutter-free environment for developers to concentrate on their code thanks to its slick design and adaptable layout.
One cool feature of Froala is its ability to integrate with 3rd Party software which pretty much makes Froala have an endless amount of features. One example is its integration with Tribute.js. Tribute.js is an autocomplete plugin for entering usernames into input fields, text areas, or any element that supports content editable fields by typing the @ symbol.
HTML
<div id="froala-editor">
  <p>Froala WYSIWYG Editor can easily be integrated with the awesome <a href="https://github.com/zurb/tribute" target="_blank" rel="nofollow">Tribute.js library</a>. Type an @ to display the autocomplete list.
  </p>
</div>
JavaScript
  var tribute = new Tribute({
    values: [
              { key: 'Phil', value: 'pheartman' },
              { key: 'Gordon', value: 'gramsey' },
              { key: 'Jacob', value: 'jacob' },
              { key: 'Ethan', value: 'ethan' },
              { key: 'Emma', value: 'emma' },
              { key: 'Isabella', value: 'isabella' }
            ],
    selectTemplate: function(item) {
      return '<span class="fr-deletable fr-tribute">' + item.original.key + '</a></span>';
    }
  })

  new FroalaEditor('#froala-editor', {
    events: {
      initialized: function() {
        var editor = this;

        tribute.attach(editor.el)

        editor.events.on('keydown', function(e) {
          if (e.which == FroalaEditor.KEYCODE.ENTER && tribute.isActive) {
            return false;
          }
        }, true);
      }
    }
  })
Step-by-Step Guide to Getting Started witth Froala
- Visit the Froala website and click the “Download” button.
- On the download page, you will see a form. Fill out the form with your Name, Email, and Country to start your trial today. By signing up, you will receive 30 days of FREE technical support when you get started. When you’re done filling up the form, you can click the “Download Now” button to download the ZIP file.
- Once the download is complete, locate the ZIP archive on your computer and unzip the package. After unzipping the package, you will have access to the Froala source code and examples. The index.html file shows you the different features of Froala as well as its examples. While the README.md will show you how to install Froala in different environments but you can also check out this documentation.
- After extracting the files, you can copy them to the directory of your web project or app. Froala’s CSS as well as JavaScript files are already included in the folder. You might want to make a folder within your project.
- Add the Froala resources to your project. Add the CSS and Javascript files to your HTML file. The <head> portion of your HTML file should contain the following:
HTML
<link rel=”stylesheet” href=”/path/to/froala-editor/css/froala_editor.pkgd.min.css”>
<link rel=”stylesheet” href=”/path/to/froala-editor/css/froala_style.min.css”>
<script src=”/path/to/froala-editor/js/froala_editor.pkgd.min.js”></script>
Note: Make sure to replace “/path/to/” with the actual path to the Froala Editor files within your project. Here’s an example.
- Initialize Froala by either including a script in your HTML file or creating a separate JavaScript file to initialize the Froala Editor by adding the following:
JavaScript
$(function() {
  $(‘textarea’).froalaEditor();

});
Note: This code initializes the Froala Editor on all <textarea> elements within your page. You can modify the selector to target specific text areas if needed.
- You should be done but you can check out the documentation for further customization.
By following these steps, you will be able to download Froala and start exploring its powerful features and capabilities. Enjoy your coding journey with Froala!
Getting Started with Froala: Your First Code
Froala is a robust WYSIWYG (What You See Is What You Get) HTML editor that makes it easy to write and edit text. In addition, we’ll walk you through composing and editing text in Froala, as well as showing you how to add photos in the content you create.
Writing and Formatting Text
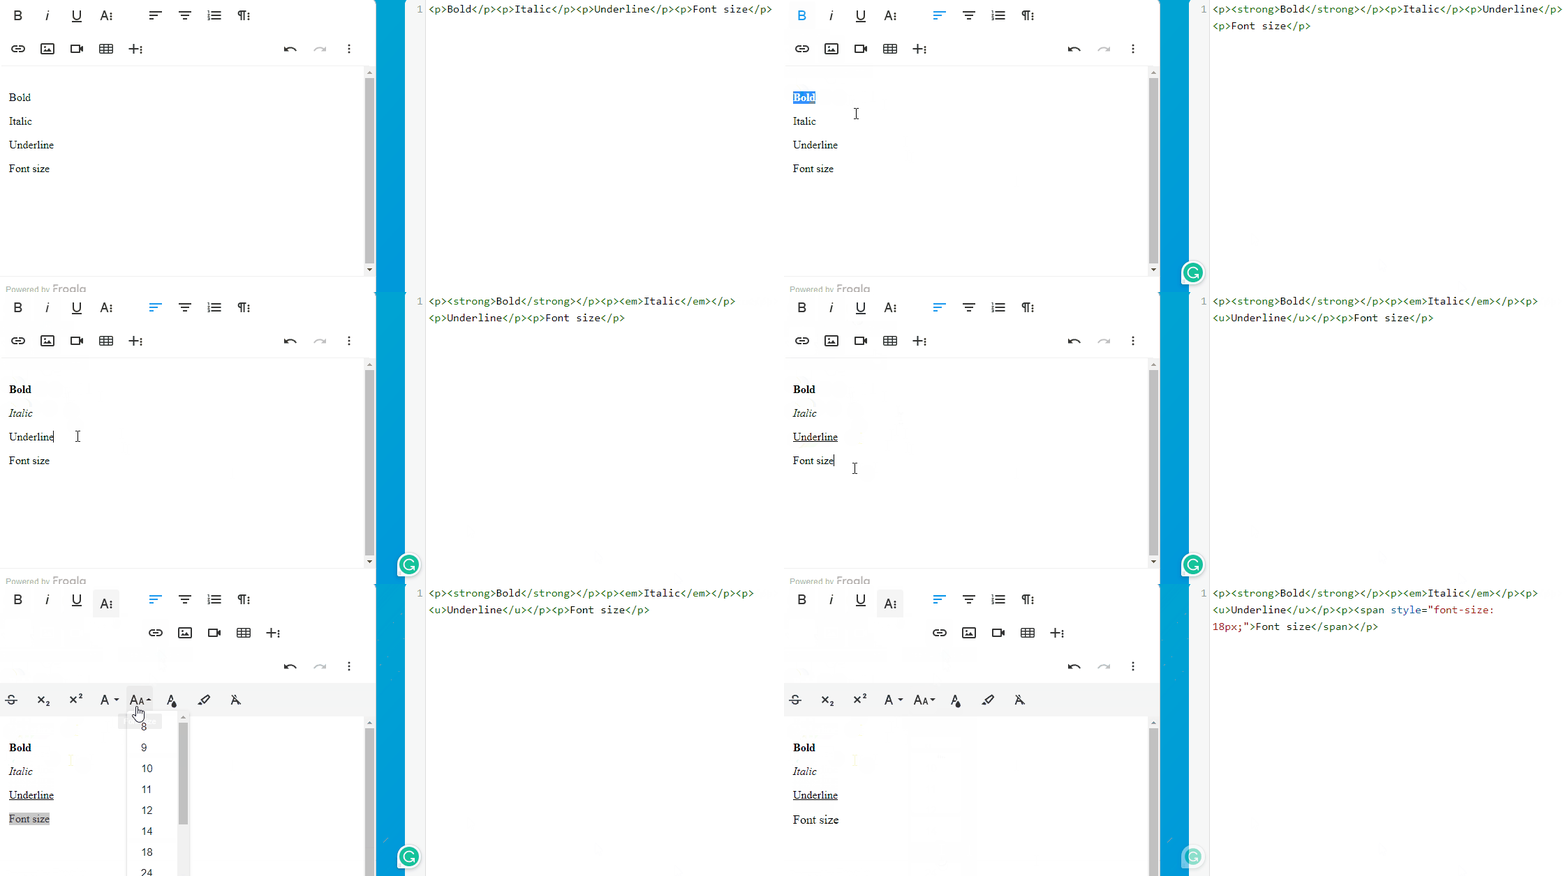
You may format your text in a variety of ways with Froala’s toolbar, including applying bold or italic formatting, changing fonts, adjusting sizes, and more.
Adding Headings and Paragraphs
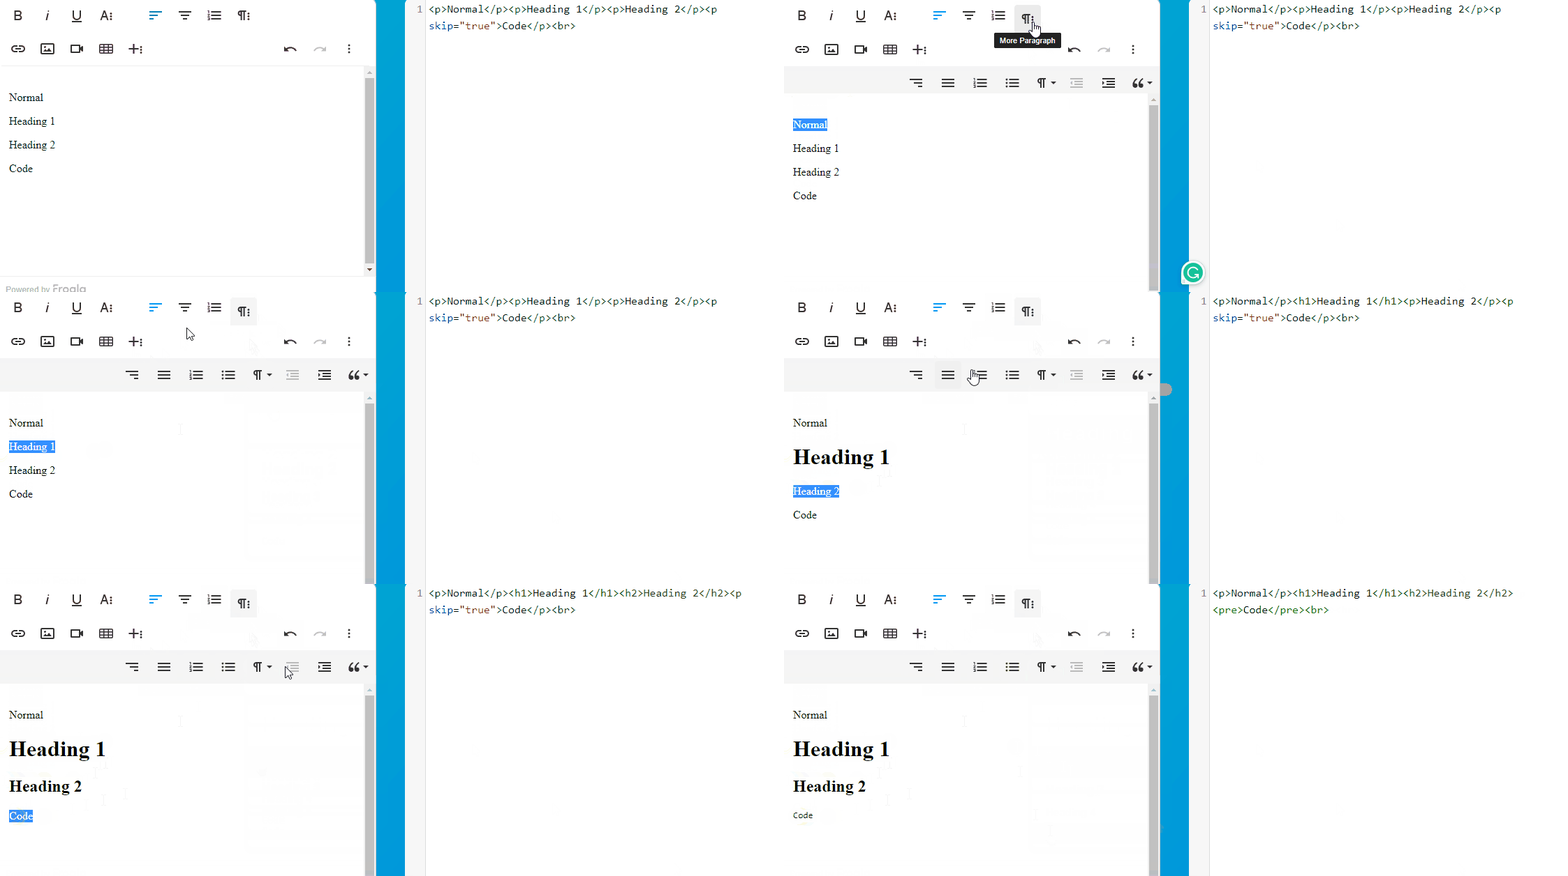
In Froala, you can format text by selecting the chosen text and using one of the formatting options from the toolbar. Various heading levels, such as H1, H2, and others, are available, or you can use the paragraph style in your writing.
Adding Images
To add images to your content, follow these steps:
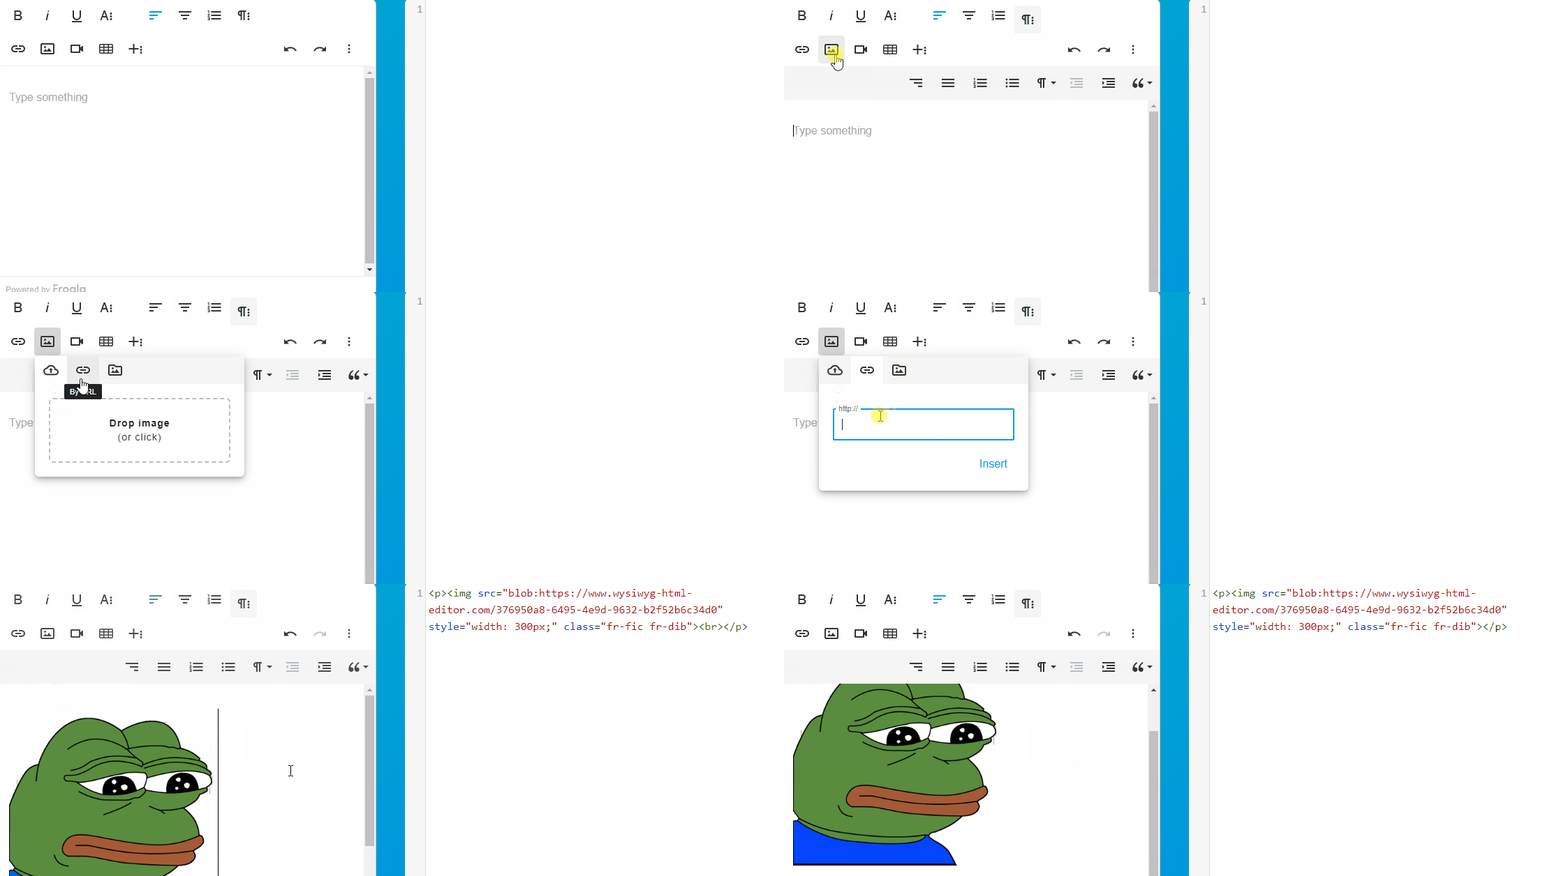
- Put the cursor at the desired location in your text where you want to insert the image.
- Click on the “Insert Image” button in the toolbar. It’s the one that looks like an icon of a mountain in a picture frame.
- Another box will appear, allowing you to select an image either from your computer or provide the URL of an image hosted online. Choose the option you like and insert the image into your document.
Congratulations! You’ve now learned the fundamentals of writing and modifying text in Froala. With a variety of formatting options, the editor offers a seamless and simple experience for creating HTML content.
You can now explore more sophisticated tools and functions to improve your content creation process now that you are familiar with text editing in Froala.
Exploring the Advanced Features of Froala
Developers can delve into the extensive documentation supplied by Froala to learn more about the advanced features of Froala and unlock its full potential. The documentation is an excellent resource for understanding the editor’s capabilities and learning how to use its advanced features.
Firstly, users can find a multitude of information and guidance on the Froala documentation page. The documentation covers a variety of topics related to working with Froala, such as installation, configuration, usage, and customization.
Next, users can visit the concepts page to gain a better knowledge of how to do various tasks. This page explains how to add elements, manipulate content, and use the editor’s functions effectively.
One of the most important areas that developers can explore is customizing the editor to meet their particular needs. Froala has a plethora of customization possibilities, allowing users to customize the design and behavior of buttons, dropdowns, icons, and other elements.
Visit the documentation and the concepts page to begin your adventure of learning and experimenting with Froala. Make the most of this powerful editing tool by unleashing your creativity, increasing your productivity, and making the most of it.
Tips and Tricks for Maximizing Efficiency with Froala
Froala HTML editor is jam-packed with extensive capabilities, making it a valuable tool for developers. Here are some of the key features for example:
- Online Document Editor: Enabling the Document Ready mode transforms Froala into an online document editor. This mode, similar to Google Docs, provides all of the required tools for editing documents on the fly. Here’s how to enable it:
HTML
<p>By enablind the document mode, the Froala WYSIWYG HTML Editor sets by default the best options for creating online documents. After editing the content, the print and export as PDF buttons are perfect so you to take the content and use it further just as you'd do with any Word processor such as Microsoft Word or Google Docs.</p>
<div id="froala-editor"></div>
CSS
<!-- Include all Editor plugins CSS style. -->
<link rel="stylesheet" href="../css/froala_editor.pkgd.min.css">
JavaScript
<!-- Include all Editor plugins JS files. --> <script type="text/javascript" src="../js/froala_editor.pkgd.min.js"></script> <!-- Include PDF export JS lib. --> <script type="text/javascript" src="https://raw.githack.com/eKoopmans/html2pdf/master/dist/html2pdf.bundle.js"></script> <script> new FroalaEditor('div#froala-editor', { documentReady: true }) </> - Custom Popups: Froala allows you to build modern-looking custom popups that provide quick access to your favorite tools. You can, for example, use the toolbar’s star symbol to create a custom popup. Here’s an illustration:
HTML
<div id="froala-editor">
  <p>Click on the "Show Popup" star icon to see the custom popup.</p>
</div>
CSS
<style>
  .custom-layer {
    text-align: center;
    padding: 10px;
  }
</style>
JavaScript
<script> // Define popup template. FroalaEditor.POPUP_TEMPLATES["customPlugin.popup"] = '[_BUTTONS_][_CUSTOM_LAYER_]'; // Define popup buttons. Object.assign(FroalaEditor.DEFAULTS, { popupButtons: ['popupClose', '|', 'popupButton1', 'popupButton2'], }); // The custom popup is defined inside a plugin (new or existing). FroalaEditor.PLUGINS.customPlugin = function (editor) { // Create custom popup. function initPopup () { // Popup buttons. var popup_buttons = ''; // Create the list of buttons. if (editor.opts.popupButtons.length > 1) { popup_buttons += '<div class="fr-buttons">'; popup_buttons += editor.button.buildList(editor.opts.popupButtons); popup_buttons += '</div>'; } // Load popup template. var template = { buttons: popup_buttons, custom_layer: '<div class="custom-layer">Hello World!</div>' }; // Create popup. var $popup = editor.popups.create('customPlugin.popup', template); return $popup; } // Show the popup function showPopup () { // Get the popup object defined above. var $popup = editor.popups.get('customPlugin.popup'); // If popup doesn't exist then create it. // To improve performance it is best to create the popup when it is first needed // and not when the editor is initialized. if (!$popup) $popup = initPopup(); // Set the editor toolbar as the popup's container. editor.popups.setContainer('customPlugin.popup', editor.$tb); // This will trigger the refresh event assigned to the popup. // editor.popups.refresh('customPlugin.popup'); // This custom popup is opened by pressing a button from the editor's toolbar. // Get the button's object in order to place the popup relative to it. var $btn = editor.$tb.find('.fr-command[data-cmd="myButton"]'); // Set the popup's position. var left = $btn.offset().left + $btn.outerWidth() / 2; var top = $btn.offset().top + (editor.opts.toolbarBottom ? 10 : $btn.outerHeight() - 10); // Show the custom popup. // The button's outerHeight is required in case the popup needs to be displayed above it. editor.popups.show('customPlugin.popup', left, top, $btn.outerHeight()); } // Hide the custom popup. function hidePopup () { editor.popups.hide('customPlugin.popup'); } // Methods visible outside the plugin. return { showPopup: showPopup, hidePopup: hidePopup } } // Define an icon and command for the button that opens the custom popup. FroalaEditor.DefineIcon('buttonIcon', { NAME: 'star', SVG_KEY: 'star'}) FroalaEditor.RegisterCommand('myButton', { title: 'Show Popup', icon: 'buttonIcon', undo: false, focus: false, plugin: 'customPlugin', callback: function () { this.customPlugin.showPopup(); } }); // Define custom popup close button icon and command. FroalaEditor.DefineIcon('popupClose', { NAME: 'times', SVG_KEY: 'back' }); FroalaEditor.RegisterCommand('popupClose', { title: 'Close', undo: false, focus: false, callback: function () { this.customPlugin.hidePopup(); } }); // Define custom popup 1. FroalaEditor.DefineIcon('popupButton1', { NAME: 'bell-o', SVG_KEY: 'help' }); FroalaEditor.RegisterCommand('popupButton1', { title: 'Button 1', undo: false, focus: false, callback: function () { alert("popupButton1 was pressed"); } }); // Define custom popup 2. FroalaEditor.DefineIcon('popupButton2', { NAME: 'bullhorn', SVG_KEY: 'cogs' }); FroalaEditor.RegisterCommand('popupButton2', { title: 'Button 2', undo: false, focus: false, callback: function () { alert("popupButton2"); } }); // Initialize the editor. new FroalaEditor('#froala-editor', { toolbarButtons: ['bold', 'italic', '|', 'myButton'], pluginsEnabled: ['customPlugin'] }) </script> - Plugin Integration: Froala is compatible with over 30+ plugins that extend its functionality. You can use these plugins to add features like spell-checking, tracking changes, and graphic embellishments. Integrating plugins with Froala is straightforward. Simply include the necessary JJavaScript and CSS files to add a plugin. You can utilize the table plugin, for example, by including the following lines after the editor code JS file:
<!-- Include the Tables plugin CSS file -->
<link rel="stylesheet" href="../css/plugins/table.min.css">

<!-- Include the Tables plugin JS file -->
<script src="../js/plugins/table.min.js"></script>
These are just a few of the extensive features provided by Froala. Developers may create rich editing experiences and tailor the editor to their needs by taking advantage of these features.
Conclusion
Throughout this post, we’ve looked at the advantages and possibilities of Froala as a text editor designed exclusively for developers. Froala includes a number of features that are intended to boost productivity, improve coding operations, and give a unified editing experience.
We invite readers to experiment with Froala on their own to fully see its possibilities. Froala is a versatile and powerful tool for coding and content development, whether you’re a newbie or an expert developer. Dive into the official documentation, tutorials, and resources for Froala to better understand and master its features:
- Documentation – for resources extensive information.
- Blog – for tutorials and guides.
- Examples – to check out further examples to try for yourself.
Remember that the more you explore and experiment with Froala, the more you will learn about its potential and how it may improve your coding and content production experience. Hopefully this should jumpstart you on getting started with Froala.
Embrace Froala as your go-to text editor and you’ll open up a world of possibilities in your development adventure. Have fun creating amazing content!
Justin Imperial
Justin is a web developer, writer, graphic designer and everything in between! He loves technology, philosophy, astronomy and more. He loves learning new thins and his curiosity is insatiable. On his free time, you can find him isolating himself while reading a book or playing video games or out with his friends.
-
Hide Show





No comment yet, add your voice below!