Days
Hours
Minutes
Seconds
x

New Froala Editor v4.5.1 is here – Learn More

Skip to content

A WYSIWYG Editor Angular Developers Can Use to Make Coding

Angular-Froala

A WYSIWYG Editor Angular Developers Can Use to Make Coding Easy

We live in a time where developers need to rapidly yet carefully build and deploy applications or websites. To get ahead of the competition and accomplish goals, they must find ways to save as much time as possible. At the same time, they must deliver a high quality product or service as well. Angular is a framework that makes SPA (Single-Page Application) development easier. Similarly, a WYSIWYG editor is another useful and powerful tool for smoothing up development and enhancing user experience. In this article, we’ll talk about using a WYSIWYG editor Angular apps can integrate with to simplify development. 

Before we proceed, let’s review what a WYSIWYG, or “what you see is what you get” editor is. Chances are, you’ve probably already used one already because of how widespread they are. A WYSIWYG editor is a type of HTML editor. It allows users to interact with an interface to change a website or app’s contents without having to code. These changes range from writing rich text (think Google Docs) to uploading images or even building pages. Therefore, these editors are highly versatile and can be integrated into various apps. These include CMS (Content Management Systems) like WordPress, word processing software, blogs, social media sites, and more. 

To see how WYSIWYG editors can have a positive effect on the development process, we’ll first look at the steps in creating an Angular project. After that, we’ll add an Angular rich text editor module. Finally, we’ll look at some WYSIWYG editors in the market and compare them with the Angular rich text editor module. 

Requirements

To make a basic rich text editor within an Angular application, you would only need the following tech stack: 

  • Angular (4+): Angular is a TypeScript-based development platform that focuses on building scalable, fast, and modern applications with fluid navigation and routing. It is component-based and includes different libraries that can be integrated for various requirements. 
  • TypeScript (2.6+): Put simply, TypeScript is an object-oriented programming language that’s a superset of JavaScript. It’s like JavaScript, but with optional types. 

Let’s now move towards installing Angular and creating an application for our simple rich text editor. 

Setting up the Angular project

An Angular project setup is pretty straightforward. Using a command window, enter the following line: 

npm install -g @angular/cli

Doing so will install the AngularCLI, which is used for creating, testing, and deploying projects, among other things. 

Creating the workspace

To create the application, run the following command: 

ng new rich-text-app

The ng new command creates a new Angular workspace, which is also the name of the initial project. In this case, our project is named “rich-text-app”. Note that by default, the CLI creates a CSS-based application. To create one that’s SCSS-based, add “–style=SCSS” (without the quotations) at the end of the line. Next, we’ll be including a basic rich text editor package that’s necessary to implement an Angular WYSIWYG Editor. 

A rich text editor package for Angular

To build an Angular app with a simple rich text editor component, we can use the Syncfusion rich text editor package. 

Syncfusion rich text editor package

Syncfusion for Angular currently has two types of package structures, which are shown in the subsections that follow. 

Ivy library distribution package

This package format includes the Syncfusion Angular packages that support Angular’s standard Ivy rendering engine (read more here). The following command installs the Syncfusion’s Ivy package: 

npm install @syncfusion/ej2-angular-richtexteditor --save

Angular compatibility compiled package

On the other hand, the Angular compatibility compiled package is the legacy package for Syncfusion components. This is for those who are using earlier versions of Angular. To install this package, enter the following command: 

npm install @syncfusion/ej2-angular-richtexteditor@ngcc --save

After installing the Angular rich text editor package of your choice, you can start loading its modules within your application. 

Including rich text editor module

To import Syncfusion’s RichTextEditorModule, follow the snippet below: 

// import other modules (NgModule, AppRoutingModule, …), then add:
import{RichTextEditorModule} from ‘@syncfusion/ej2-angular-richtexteditor’;

@NgModule({
declarations: [
AppComponent
],
imports: [
BrowserModule,
AppRoutingModule,
RichTextEditorModule
],
providers: [],
bootstrap: [AppComponent]
})

Afterwards, you can add the rich text editor component by declaring a component with the following template: 

// …
@Component({
selector: ‘app-root’,
template: ‘<ejs-richtexteditor id=’myRichTextEditor’>
<ng-template #valueTemplate>
<!--Write your default rich text editor contents here-->
</ng-template>
</ejs-richtexteditor>’,
providers: [ToolbarService, LinkService, ImageService, HtmlEditorService]
})
// …

The providers property corresponds to the editor features you want to include. In this case, users can interact with the editor and toolbar to perform basic editing and handle links and images. 

Other features require additional module injections. Here are the modules you can add into your application to extend Syncfusion’s capabilities: 

  • Toolbar
  • Link
  • Image
  • Resize
  • Table
  • HtmlEditor
  • MarkdownEditor
  • Count (character count)
  • QuickToolbar
  • FileManager (file browsing)
  • PasteCleanup

Finally, let’s run it

After loading the rich text editor module, you can run the application with the ng-serve command. The command window will then direct you to a browser showing your application. You should be able to see an output, specifically a rich text editor containing the default content within the <ng-template> tags. For example, the image below shows a demo from Syncfusion’s rich text editor documentation page

A demo of Syncfusion Angular rich text editor from their docs page

As you can see, it’s a decent enough rich text editor for Angular. It has the basic features your users will need, and it looks acceptable in terms of design. However, I’m sure you’ve noticed how numerous the number of steps are in implementing a basic editor. But what if I told you that there’s a better and faster way to implement a modern, feature-rich editor? Let’s see what that is in the next section. 

Using a third-party Angular WYSIWYG Editor

Instead of using the basic Angular rich text editor component, you can opt to choose a ready-made WYSIWYG editor. Doing so will give you a lot of advantages, which may include (depending on the editor):

  • All rich text editing features, both basic and advanced
  • A modern design and intuitive interface
  • Superior image handling
  • Real-time collaboration, mentions, and version history
  • Math capabilities
  • Autosaving
  • Different editing modes (standard, inline, document)
  • Support for other languages
  • Accessibility
  • Little to no maintenance needed
  • Plenty of documentation and a reliable customer support (if any)
  • SEO-ready

Implementing all or even some of these features would be tough, even when using an Angular rich text editor component. By choosing a third-party editor, you’ll cut down plenty of time, allowing you to integrate it in minutes or seconds. And in agile environments, that translates to more time focusing on your core features. 

So, in most cases, using a third-party WYSIWYG editor would be more beneficial (unless you have the time and resources). But now you’re left with one problem–there are plenty of them, and you need to choose just one. Well, don’t worry too much. Continue reading to see the most popular WYSIWYG editors in the market. All of them are great, but surely there would be one that’s better suited for your use case. 

Froala

The first on our list is a powerful, lightweight, and sleek WYSIWYG editor for every purpose. Used by big companies like Amazon and Apple as well as startups and freelancers, Froala has about everything. And yet, it weighs like nothing, with an initialization speed of less than 40ms and a small size. Froala puts user experience at the top with its elegant, intuitive, and organized design, despite its numerous (100+) features. Froala can also be easily integrated into Angular apps (among other frameworks), making it a good choice for developers. 

Although it is a premium editor, Froala is actually one of the most affordable editors in the market. Firstly, it doesn’t charge you extra according to the monthly number of users or editor loads/usage. It also doesn’t keep a few great features behind a paywall, as all features are available across all plans. Lastly, Froala just has a lower base price compared to other premium editors, along with discounts for new businesses. 

CKEditor

Up next is CKEditor, another popular, customizable, and versatile WYSIWYG editor. It has powerful core features and some additional paid features. These features allow it to be used in plenty of different apps. It also has a nice modern design, especially when it comes to real-time collaboration. CKEditor is used by big and small businesses alike, including Volvo, Disney, and various others. 

When it comes to pricing, there are different options. You can get it for free as it is open-source, but that would mean fewer features and benefits. Its paid prices are slightly higher than other premium editors’, with each tier having more benefits than the previous one. However, one downside CKEditor has is that it segregates some seemingly important features as premium ones. These include its importing from Word, exporting to PDF and Word, spelling and grammar checking, pagination, math equations, and even its elaborate real-time collaboration. 

AngularEditor

AngularEditor is a simple WYSIWYG editor for simpler use cases. Its interface is hardly modern or sleek, looking like a mid-2000s editor. Still, it’s quite robust, and it’s easier to implement than an Angular rich text editor component. The best part is that it’s completely free, being downloadable from npm. At this article’s time of writing, it has about 37k+ downloads per week. 

AngularEditor is also well-maintained. It even has a demo you can play with. Sadly but as expected, its documentation is not as complete as paid editors’ documentation, being open-source. For those who prefer having complete editing features and beautiful interfaces for big apps such as social media platforms, this editor might not be for you. But the good news is that it’s great for those who are just starting out and need a capable and easy WYSIWYG editor for free. 

Quill.js

Quill is one of the most popular and feature-rich open-source editors available. It has a modular architecture, much like the other premium editors. This means that developers would only need to call plugins to include the features they want. It’s also cross-platform. Slack, Lever, and Slab are some of the known companies that use and trust Quill. It also has a sufficiently modern look to it despite being free. 

Trumbowyg

Trumbowyg is like a breath of fresh air in open-source editors. It’s very rich in features for a free WYSIWYG editor. Not only that, but it also has a simple yet modern interface. Trumbowyg is also one of the fastest and most lightweight editors available and is customizable at the same time. It currently supports over 40 languages, which is great for a free editor. Surprisingly, it also has a detailed, well-written documentation. One disadvantage that Trumbowyg has, however, is that it might not be as mature or popular as others. This could translate to more bugs, difficulty in resolving issues. 

TinyMCE

This WYSIWYG editor is another very popular one. It’s a developer-oriented editor that promises control. It boasts more than 60 features, making it one of the most feature-rich editors in the market. It also comes with a sleek, modern, although sometimes overcrowded, interface. Thankfully, its customizability lets developers change its toolbar layout to be more intuitive. Like a few of these editors, it’s used by big and small companies (Atlassian and Shopify, to name a few). 

Being one of the most popular editors, it unfortunately bears a high price. And unless you opt for the Flexible plan, you’ll have editor load limitations per month. Another factor you should consider is whether you’re willing to pay more for premium features. While it includes most features in its paid plans, its Mentions and Comments features are only available on the Flexible plan. Nevertheless, it offers a free, open-source plan. TinyMCE is powerful, but it would be better-suited to those who have a bigger budget for rich text editing. 

Conclusion

In this article, we looked at rich text editing in Angular through the Syncfusion component. Implementing a basic rich text editor using the component is easier than making your own, but it still involves some steps. We also looked at candidates for a WYSIWYG editor Angular developers can use. 

All WYSIWYG editors I’ve shown you save a great deal of time and make coding easier for developers. They also make editing easier and better for users. So, to choose the right editor for your Angular projects, you would have to assess your requirements. Choosing an editor with plenty of features is always safer and more future-ready. Affordability is also a huge factor when picking the right editor. In the end, the choice is all yours.

Froala Blog Call To Action


Know The Best React Markdown Editor Components for Your App

You might not notice it, but Markdown is a huge part of the internet today. Whenever people send stylish messages or post formatted content, they use Markdown. Various popular platforms support Markdown, including messaging platforms like Discord and MS Teams, forums like Reddit, email platforms, and more. And who wouldn’t want them on their content-based app or website? After all, they let users format and style text easily (and in a fun way) without HTML knowledge. 

So, if you’re planning to build an app where users can interact with one another using text editors, you might want to implement a Markdown editor. These editors allow users to write Markdown in their messages. One of the best ways to include one is using the React library, specifically by loading a Markdown editor component. Another of the best ways is using a React-compatible WYSIWYG editor (“what you see is what you get” editor). 

For your convenience, I’ve gathered some popular Markdown editor components in this article. I’ll also show you a React WYSIWYG editor for Markdown. After reading this, you should have an idea of what the best React Markdown editor for your use case is. But first, how about some Markdown concepts? 

What is Markdown? 

Markdown is a lightweight markup (yes, Markdown is ironically markup) language introduced by John Gruber in 2004. It’s used for formatting plain text to create better-looking, dynamic, and expressive rich text content on applications. 

Markdown involves using a special syntax to change the way text looks. For example, to make a text bold, you would wrap the text inside two asterisks on each side (e.g., **bold text**). This is different from other markup languages wherein you would place text between tags. Markdown is also different from WYSIWYG editors for the same reason. In these editors, you would only have to click buttons to apply the formats. 

One of the great things about Markdown is that users won’t have to resort to coding to format text. In other words, it’s very intuitive and can appeal to blog authors, forum users, or anyone who uses an app that supports it. But how do you implement Markdown in your application, exactly? Like I said earlier, you can use the React library and a good Markdown component, which we’ll explore next. 

What is react-markdown? 

To make developing your React apps easier, you should use premade components for the functions you want to add. This is the same for Markdown functionality. Currently used by more than 116,000 developers, the react-markdown package is a component that converts a Markdown text into a React element. Developers can even integrate plugins into react-markdown. This allows developers to customize the way Markdown text is rendered as a React element. 

What are the benefits of using react-markdown? 

The react-markdown component is one of the most popular components for adding Markdown functionality in React apps. So, you can expect it to be filled to the brim with extra benefits aside from cutting down development time:

  1. It avoids security issues from using dangerouslySetInnerHTML

    Most React Markdown libraries rely on a property called dangerouslySetInnerHTML to render Markdown content inside an HTML element. And like its appropriately created name, the dangerouslySetInnerHTML property is dangerous to use. This is because it can make your app vulnerable to cross-site scripting (XSS) attacks. These attacks involve manipulating a site to compromise a user’s interaction with it, allowing attackers to steal sensitive data. Now, react-markdown doesn’t use dangerouslySetInnerHTML by default. Thus, it can protect your apps against XSS (at least when it comes to Markdown). 

  2. It’s completely compliant with CommonMark

    In 2014, Markdown’s contributors standardized it. Markdown then became clearer and more consistent, resulting in the formal CommonMark specification. It removed some ambiguities that stemmed from differences in Markdown implementation. By default, react-markdown fully complies with the CommonMark standards. With this, users who are familiar with the CommonMark specification won’t have to learn a new set of Markdown syntax to use your app. 

  3. It has plugins to support other syntax specifications

    Some syntax extensions such as strikethroughs, tables, and task lists are not supported by default. Thankfully, developers can integrate plugins (e.g., remark-gfm) with react-markdown. This allows you to change and customize the Markdown experience according to your users’ needs. 

What are some of the best React Markdown editor components?

The react-markdown component might be great, but it’s not the only component that transforms Markdown content into React elements. To assist you further in making a decision about what you’ll use for Markdown, I’ve listed some of the best React Markdown editor components below. 

  1. React SimpleMDE Editor

    This editor is a user-friendly component for providing Markdown features in React applications. It depends on React and EasyMDE, a JavaScript Markdown editor. SimpleMDE provides both Markdown syntax typing support and an interface that supports Markdown through button clicks. Here’s how it looks like in action: 


    A sample simplemde implementationAs you can see in the image above, there’s a toolbar for those who aren’t too familiar with Markdown syntax. This makes this component user-friendly or easy to use. This also seems similar to how WYSIWYG editors work. SimpleMDE is a good choice for those looking to add Markdown features and a bit more to their apps. However, if you’re looking for more features (emojis, tables, real-time editing, etc.) or just plain Markdown without the editor, this might not be for you. 

  2. React Markdown Preview

    Sample usage of React Markdown PreviewReact Markdown Preview is a unique Markdown component that allows users to preview Markdown text in a web browser. It replicates Github’s style of rendering Markdown and supports the following features: 

    • Dark/Night mode
    • Footnotes, strikethrough, task lists, and tables
    • Using comments to define styles
    • Automatic code block highlighting

    This component is useful if you want your users to have a chance to preview their Markdown before posting it. This makes sure that blog entries, comments, or messages will have the right Markdown when posted. And that’s something your users would appreciate. 

  3. markdown-to-jsx

    markdown-to-jsx double window sampleThe “most lightweight, customizable React Markdown component”, markdown-to-jsx is significantly improved from the simple-markdown package to have better Markdown features. Like react-markdown, it doesn’t use dangerouslySetInnerHTML, making it safe from XSS attacks. Developers can also override any HTML tags rendered by the component, making markdown-to-jsx more customizable than others. 

    Not only does it boast helpful Markdown-focused features, but it also has a more complete and easy to read documentation. It’s also one of the most popular Markdown components for React. And with a split-screen view and Markdown preview, markdown-to-jsx certainly doesn’t ignore user experience. 

  4. react-md-editor

    Sample usage of React MD EditorLastly, we have react-md-editor, a simple yet functional Markdown editor. Like SimpleMDE, it supports both a toolbar and Markdown syntax for formatting text. It’s fairly simple yet useful for basic Markdown or formatting tasks. It generates the Markdown preview as users type on the editor. However, react-md-editor is a work in progress at the moment. This means that it’s not as feature-rich, modern-looking, or compliant with CommonMark as the others on this list yet. It does take care of simple Markdown needs, though. 

Now that we’ve gone through some of the best React Markdown components, it’s time to look at an alternate solution.  

A WYSIWYG editor as a React Markdown editor alternative

A WYSIWYG editor is a tool that allows users to create and edit content (pages, posts, comments, etc.). It lets non-developers publish content on an application without changing the HTML. Developers use WYSIWYG editors in every application that involves user-generated content because of their versatility. And because of this widespread use, they usually have tons of rich text editing capabilities for different use cases. Markdown is one such example.

Leading WYSIWYG editors support Markdown that’s compliant with CommonMark specifications. They let users effortlessly write Markdown syntax to add some flavor to their text. Additionally, they allow users to format content using buttons on a toolbar. But how different are they from the other WYSIWYG-like Markdown editors I mentioned earlier? 

  • WYSIWYG editors offer a lot more features. These include tables, image handling, collaboration and real-time editing, math equations support, languages support, accessibility, export as PDF, and more. 
  • They are much more customizable. They allow you to organize the toolbar and features as needed and design the editor based on your app’s theme. 
  • The best of these editors have clear and complete documentation pages that you won’t find in any React Markdown component. 
  • They have better support and are better maintained. 

Froala's markdown feature and editorFroala is one of the best WYSIWYG editors for implementing Markdown in React. It has every Markdown functionality your users need and a lot more with its 100+ features. It is plugin-based, which means that you only need to include its Markdown plugin (learn more here) to receive full Markdown capabilities. Despite its generous features, it’s surprisingly lightweight, organized, and sleek, leading to a great user experience. Another nice thing about Froala is that it can be easily integrated into your React app. So if you want a future-ready and robust Markdown solution, it would be wise to use Froala.

Conclusion

In this article, we explored the world of Markdown components for React, discovering some great solutions for our Markdown needs. We also got to meet a WYSIWYG editor as an alternative to Markdown editor components. 

Before I leave you to your Markdown editing journey, you should know that there is no perfect component among the ones we discussed. They will always have areas where they’ll excel more compared to others. Your choice will then depend on the features your users will love more. 


Froala Blog Call To Action


Sencha GRUI for React Applications

When it comes to displaying a large amount of data, you have to make sure your application renders the data very fast, has a great UI, and is reliable. Grids are the most popular way to display a large amount of data in a web application, whether they are used to render a large spreadsheet or a map with dozens of markers. GRUI by Sencha is a high-performance grid solution for React apps. It can efficiently deal with a massive amount of data. Also, it is very easy to integrate with React. In this article, we will tell you why you should consider using Sencha GRUI in your application.

What is a Grid?

In web development, a grid is a collection of rows and columns containing multiple elements. A perfect grid should have features such as sorting, filtering, and even virtualization data that make representing complex data straightforward.

What Is GRUI By Sencha?

Sencha GRUI is a powerful enterprise-grade grid solution for React applications. It not only can efficiently handle millions of records, but also it loads huge amounts of data with incredible speed. It has all the power and capabilities of Sencha’s Ext Grid but has been rebuilt from the ground up with a focus on higher quality and developer productivity. GRUI is designed for modern JavaScript applications with ES6 classes and modules and “use strict” mode support.Sencha GRUI

Why Should You Use GRUI By Sencha?

100+ amazing data grid features

Besides filtering and grouping features, Sencha GRUI supports many advanced grid features such as:

  • Virtual Columns:

Only render the data that will be visible on the screen. This positively impacts your application performance by not wasting any resources loading information that is not displayed. For example, let’s say you have a list that has 50000 items on it but you only want to display 20 of them on screen at a time. Using the virtual column feature your application will render only the 20 items and the other items will be rendered when you scroll to display them.

  • Infinite scroll

Sencha GRUI infinite scroll is another key feature that will improve your application performance. Unlike default scrolling, infinite scrolling uses a virtual store to create and manage active range records. This will monitor the scrolling in the grid, refreshing the views rows from the page cache as needed.

  • Column/rows Drag and Drop

Easily rearrange the data making the most important ones appear first. reordering columns and rows with drag and drop involve fewer clicks. Therefore, it boosts productivity as a whole.

There are a lot of features to be included in a single blog post. Explore them here.

Easy integration:

Sencha GRUI can simply integrate with React. To get you started quickly, GRUI has included rich documentation, including Storybook examples to highlight each feature and configuration. These live coding examples are provided both in JS and in TypeScript, making it easier to copy and paste the features that you need.

Fully customizable

Sencha GRUI offers complete customizing options. To tailor the view to your needs, you can select from the pre-made themes or design a custom theme.

Take your data with you

You can export data from Sencha GRUI in a number of formats, including CSV, XLS, PDF, etc. You can always show your data in a way that works best for your team.

Why Not Just Use a Custom Grid Solution?

Using Sencha GRUI saves your team many months of planning, development, and testing. Furthermore, Sencha GRUI offers the best long-term support from professional data grid developers, eliminating the need to maintain your own data grid team. Sencha GRUI allows you to scale for a growing business without worrying about whether your code can keep up. Benefit from all of these features at a fee that is affordable and transparent.

How Can You Create A Grid In Sencha GRUI?

First, create a react application using the create-react-app command

Run npx create–react–app my-grid-app

Run cd my–grid–app

Next, you must install the sencha sencha-grid component package using the following command.

Run npm add @sencha/sencha–grid

Then, after importing the React component from the beginning, you need to import the SenchaGrid and Column Components, the main components you can use to create the grid layout.

import React from “react”;
import { SenchaGrid, Column } from “@sencha/sencha-grid”;

After importing them, extend the React component class and create a default component class to start using SenchaGrid. Note that you can use the components in a React app differently, but in our example, we will create a class-based component. Next, define some values to include in the grid. Use the data property of the SenchaGrid Component to load the data to the grid.

export default class App extends React.Component {

render() {

const data = [

{ col1: “val1”, col2: “data1”, col3: 1.01 },

{ col1: “val2”, col2: “data2”, col3: 1.02 },

{ col1: “val2”, col2: “data3”, col3: 1.03 },

];

return (

<SenchaGrid data={data}>

<Column field=“col1” text=“Column 1” flex=“1” />

<Column field=“col2” text=“Column 2” />

<Column field=“col3” text=“Column 3” align=“right” />

</SenchaGrid>

);

}

}

This code will create a grid with three columns containing data. As you can see, creating a React grid in Sencha is pretty straightforward, and it is easier to understand what you are designing. Take a look at GRUI demos.

Conclusion

With Sencha GRUI you can load large amounts of data while providing responsive and ultimate performance. It offers the customization and configuration that your consumers demand and is packed with more than 100 fantastic data grid capabilities. Features data binding, sorting, grouping, and more. Overall, it possesses all the essential components of a high-performance, robust grid.


React WYSIWYG HTML Editor – Why it’s helpful for developers

react-developer

React WYSIWYG HTML Editor – How helpful is it for developers?

Photo by Lautaro Andreani on Unsplash

React, an open source JavaScript library developed by Meta (formerly Facebook), is one of the most popular front-end tools. It allows developers to build Single-Page Applications (SPAs) easily with its stateful component support, versatility, and JSX (JavaScript XML) support. Developers can also implement a React WYSIWYG HTML Editor (what you see is what you get) for rich text editing. This makes React perfect for various applications with tons of content that needs to be shared and modified. 

For instance, use of React is widespread among social media apps. In these apps, feature-rich editors are necessary for posting content, adding comments, or sending messages. Users expect features like emojis, file uploads, image handling, advanced formatting, and so on to be available in most in-app text editors nowadays. Because of the heavy content needs of most apps, developers almost always need to include a rich text editor of some kind. 

A WYSIWYG HTML editor is a versatile tool just for this. It lets end users make changes to a page without explicitly changing the code. These changes include content posting/editing, document handling, and even website building. Wherever content is, you can expect to see such an editor in the app. 

React developers need to build on the basic textarea and add more features. They can either programmatically add these features themselves or integrate a third-party React WYSIWYG HTML editor. In this post, we’ll explore both of these options. More importantly, we will be looking at how these editors can help developers make React applications with superb content capabilities. 

How does React handle content editing?

Content editing in React involves using a textarea component that’s slightly different from HTML’s textarea. Its value is placed in the “value” attribute instead of within the textarea tags. This allows developers to easily handle changes within the textarea. To learn more about React textareas, click here

Like in most web frameworks and libraries, the default textarea would be insufficient for complete or modern editing requirements. Developers would then need to transform a standard textarea (or an equivalent component) into a full-blown WYSIWYG HTML editor. 

Making your own vs integrating a ready-made React WYSIWYG HTML editor

So how exactly do you turn a normal textarea or other HTML component into a WYSIWYG HTML editor? As we said earlier, there are two options, which are making your own and using a third-party editor. Just to be clear, there is no better option between the two, but there are areas where one excels more than the other. You will just have to assess your requirements and the factors that come with implementing each of these choices. 

  1. WYSIWYG editor from scratch

The most seasoned developers with time and resources in their hands may benefit more from creating their own WYSIWYG editor. It could take them longer, but in the end, they’ll have the exact editor that they want. To build their own modern React editor, they will have to add a lot more features to a basic component. These may include basic rich text formatting, exporting to PDF, browser compatibility, tables, file uploads, real-time editing, autosaving, and more. Now, let’s explore the pros and cons of making a WYSIWYG editor from scratch: 

  • Advantages
      • You can customize the editor to have just the features and look you want
      • You can reuse the same editor for as many future projects as you need
      • You’ll have no extra cost right away
  • Disadvantages
    • Lots of maintenance that you’d have to handle (bug fixes, compatibility, new features, etc.). 
    • The more features and better quality you want for your editor, the more time you’ll have to spend developing
    • If you choose to include a lot of features, you would have to take time optimizing the editor to prevent severe slowdowns 
    • It might take you more time to implement accessibility and language support for compliance
  1. Third-party WYSIWYG editor

Alternatively, developers can opt to integrate a ready-made WYSIWYG editor in their React app. Unlike making one from scratch, implementing a third-party editor doesn’t require much coding proficiency. These are usually easy to integrate, with some needing you to load some scripts that load the editor through CDN. These are some of the advantages and disadvantages of using a third-party editor: 

  • Advantages
      • Leading WYSIWYG editors already have every feature that users currently need for editing
      • No maintenance necessary
      • You can integrate and implement a full-featured editor in minutes or even seconds, cutting plenty of development time
      • You’ll be able to focus on your more important features
      • A few editors can be very fast despite the generous number of features
      • Most already comply with regulations such as Section 508 Accessibility Program (click here to learn more about this)
      • Some third-party editors are just as customizable in terms of styling and theming as the ones made from scratch
      • The best editors today are usually using a modular architecture, meaning you can include only the plugins for the features that you need, which further increases customizability and extensibility
      • Some are open source, while others offer a free trial or free plan
      • Access to helpful documentation
  • Disadvantages
    • Some editors might not be optimized, having plenty of features at the cost of performance
    • Open source editors usually have very basic features
    • Some high-end editors charge you more based on usage

What makes React WYSIWYG HTML editors helpful? 

Whichever way you choose to implement an editor is not much of a concern. What matters is that you have a fast, reliable, and intuitive editor with the features you want for your users. And when you obtain that, you’ll have the best platform for your users to share and consume content. 

In this section, however, we’ll focus more on third-party WYSIWYG editors. This is because these editors are more widespread, being used by individual developers, small businesses, and big names in the industry alike. Furthermore, third-party WYSIWYG editors usually have more editing features. This makes it easier to see what they can bring to React applications compared to ones made from scratch. 

1. React WYSIWYG HTML editors can take care of your app’s content editing, whatever the requirements. 

From social media to email software, Content Management Systems, Learning Management Systems, and more, WYSIWYG HTML editors have the editing features needed for every type of application. So whatever your React application is, as long as there’s content involved, you can use these editors to quickly implement a better way for users to content. 

2. They go very well with React’s principles. 

The best WYSIWYG editors and React have some things in common. One is that they follow modular architecture, meaning developers can control just how much React or WYSIWYG features they use. Another is that they allow your apps to be more scalable. Furthermore, they reduce the lines of code in your apps and make development easier. For these reasons, and the fact that they provide a fast experience for developers and users alike, WYSIWYG editors are a good match for your React applications. 

3. They greatly enhance user experience. 

Leading WYSIWYG editors make user experience a priority. This means that they provide a lightweight, sleek, organized, intuitive, and modern interface. This also means that users will have a seamless editing experience, being able to do their content tasks without difficulty. With proper editor customization, you can make editing in your React application a lot more efficient and enjoyable. 

4. They reduce the amount of maintenance needed. 

Finally, since using third-party WYSIWYG editors means that you’re only linking to some premade files, they significantly reduce the maintenance that you have to do. You won’t have to worry about exerting more effort to fix editor bugs. Similarly, you don’t have to think too much about whether your editor is compatible with some browsers and platforms. A solid WYSIWYG editor should do all these things for you, keeping you focused and free of stress (at least when it comes to content editing). 

Summary

In this article, we discussed how React WYSIWYG HTML editors can be helpful to your applications. These editors, much like React, help developers do more in less time without sacrificing product quality. Whenever you have content requirements for your React application, you should always ask yourself if you need a WYSIWYG editor. Chances are, you’ll benefit a lot from integrating one. 

We also compared making your own editor with choosing a third-party editor. Choosing either is very situational, but you will definitely get more (and save more time) by picking a ready-made one. On the other hand, you’ll have total control over your editor’s features and style when you make your own. 

If you do choose to integrate a third-party editor, then Froala is what we recommend. It’s a simple yet powerful, feature-rich yet lightweight, and sleekly designed editor that prioritizes user experience. It has over 100 features, both basic and advanced, and is widely used for various websites and applications. Froala can be loaded in less than 40ms. It has also been used by leaders in the industry like Amazon, Samsung, Apple, and Ebay, to name a few. 

Froala is currently the most affordable paid WYSIWYG editor for React. Its base price is low, for one, and all its features are available for every plan (even the free one). Froala also doesn’t charge per user/developer or usage. Essentially, what you see in its pricing page is quite literally what you get. In the end, whether you choose a ready-made editor like Froala or end up making your own editor matters less. If you use a WYSIWYG editor in your React application, you’ll be improving it in terms of experience and efficiency. 

Froala Blog Call To Action

Froala Editor 4.0.15 Released: XSS vulnerability resolved

Froala v4.0.15

Froala is continuously updating its editor to make it more secure and intuitive so that everyone can enjoy a great content editing experience.

4.0.15 Release

The long-awaited 4.0.15 release of Froala is now available! This release contains a number of quality enhancements, usability improvements, and fixes for customer-reported issues. This includes:

  • Resolving XSS vulnerability in the Markdown feature.
  • Improvements for content pasting from different sources.
  • Improvements for resizing images that have a caption.
  • And more!

Froala WYSIWYG Editor New Release

Resolving XSS vulnerability within the Markdown plugin

When developing applications, web developers must be cognizant of security issues. Cross-site scripting (XSS) is one particular issue that can occur when user input is not properly sanitized before being shown on a page.

XSS is a major security flaw. Additionally, if you are using an earlier version of the Markdown plugin, you should be aware of a potential XSS vulnerability. This can be exploited if an attacker injects malicious code into the markdown content that the plugin subsequently processes. The good news is that the Froala team is always trying to improve the editor’s security, and they’ve introduced certain capabilities to the Markdown plugin that help to mitigate XSS attacks. They’ve introduced an escaping mechanism, for example, that automatically escapes specific code parts that could be utilized in an attack.

To mitigate this issue, ensure that you are using the latest version of the Markdown plugin. You can do this by updating your editor using the instructions in the “Updating your editor” section below.

If you are loading the editor plugins separately, not using the editor pkgd script, make sure to replace the Froala editor version on the Markdown plugin script link with 4.0.15. For example,

https://cdn.jsdelivr.net/npm/[email protected]/js/plugins/markdown.min.js

If you’re not aware of the Froala markdown feature, It’s a highly requested feature that was introduced in version 4. It allows users to format words and text using code shortcuts through predefined, easy-to-remember markdown syntax. Get a deeper look at the Markdown plugin here.

Improvements in content pasting from different sources

If you’ve ever tried copying and pasting content from a Word document or another website into your Froala editor, you know how well it works. Sometimes, though, the result wouldn’t be exactly what you want it to be. So we’ve made some improvements:

  • Convert the font size unit of the pasted content.

When you paste the content into Froala, it will now automatically convert the font size unit to the unit you set using the fontSizeUnit option, making it easier to keep your text style looking consistent. For example, If you paste content from MS Excel that has a 12px font size and the fontSizeUnit of your Froala is set to ‘pt‘, the content will have a 9pt font size after being pasted to the editor.

The fontSizeUnit is one of the many options that Froala provides to control the editor’s font style. You can use it to set the unit to be used for the font size. By default, it is set to ‘px’.

  • Keep complex table structure after pasting from MS Excel.

We’ve also made improvements to pasting complex tables inside the editor – so now you can do it without worrying about losing any formatting or breaking the table structure after pasting it from MS Excel or any other source. We understand that tables are crucial for representing data, and we don’t want you to waste any more time fixing the table structure after you paste it into the editor. So update your editor now and enjoy pasting content into the editor without any hassle!


Improvements for resizing images that have a caption.

Images are extremely important to include when creating content  – especially if you want people to remember it! In fact, studies have shown that we’re more likely to recall information and engage with content when there are images involved. That’s why Froala makes it easy to add and edit images. It has been proven that Froala is one of the best WYSIWYG editors that handle images. With Froala, you get a lot of options for editing and enhancing your images, including the ability to resize, add an ALT attribute, set the display property, change the alignment, add a caption, and much more.

With Froala, you can resize images either by clicking on the “Change Size” button and entering a custom value into the width and height inputs that appear or by clicking on the image and dragging the blue border that appears around it. Resizing images by dragging allows you to see the new image size while editing, which makes it easy to adjust the image size to best fit your content. In the latest release, images with captions can also be resized by dragging correctly, just as it works for images without captions.


… and much more!

Several bugs were fixed with this release in a constant effort to make the user experience even better.

  • Fixed deleting the last character on a line makes the cursor jump to the previous line with ENTER_BR config.
  • Fixed the issue wherein the Font Family gets reset when pressing enter even after enabling the keepFormatOnDelete option
  • Fixed crash when editing content: Uncaught TypeError: Cannot read property ‘classList’ of null.

Please find the complete changelog list here.

Get Froala V4.0.15

How Do I Upgrade to V4.0.15?

Super easy! Follow the steps below to update to the latest version.

For Froala Editor Version 3 and Version 4 Users

Follow the table below to know the proper way of downloading the latest Froala Editor release and how to include it in your project based on your preferred method.

Method How to download Include in your project
CDN
<!-- Include Editor stylesheet-->
<link href="https://cdn.jsdelivr.net/npm/[email protected]/css/froala_editor.pkgd.min.css" rel="stylesheet" type="text/css" />

<!-- Include Editor JavaScript file-->
<script type="text/javascript" src="https://cdn.jsdelivr.net/npm/[email protected]/js/froala_editor.pkgd.min.js"></script>
CDN (Always the latest version)
<!-- Include Editor stylesheet-->
<link href="https://cdn.jsdelivr.net/npm/froala-editor@latest/css/froala_editor.pkgd.min.css" rel="stylesheet" type="text/css" />

<!-- Include Editor JavaScript file-->
<script type="text/javascript" src="https://cdn.jsdelivr.net/npm/froala-editor@latest/js/froala_editor.pkgd.min.js"></script>
NPM
npm install froala-editor
<!--

Replace the {download-folder-path} in the following example with the path to the folder containing the stylesheet file e.g.

../css/froala_editor.pkgd.min.js

-->

<link href="{download-folder-path}/froala_editor.pkgd.min.css" rel="stylesheet" type="text/css" />

<!--

Replace the {download-folder-path} with the path to the folder containing the JS file e.g.

../js/froala_editor.pkgd.min.js

-->

<script type="text/javascript" src="{download-folder-path}/froala_editor.pkgd.min.js"></script>
bower
bower install froala-wysiwyg-editor
NO Package Manager Download Froala WYSIWYG Editor files using the download form here.
Integrated with a Framework Select your preferred framework from 17 different popular frameworks like React, Angular, and Vue.
Other options Check here for other options to use Froala WYSIWYG Editor in your project.

For Froala Editor Version 2 Users:

Follow this migration guide to get step-by-step upgrade instructions.

Try The Latest Froala Editor

Explore a variety of examples that show you the functionality in Froala HTML Editor.

If you like to see the HTML output while trying Froala, use Froala Online HTML Editor.

Are you ready to use Froala in production?

Level up your rich text editing capabilities today with the plan that best suits your needs.

Change Log

Get Started

  • You can download and start using Froala in less than five minutes following our get started guide.

Support and Feedback

  • We’d love to hear what you think of the latest release! Join us on GitHub Community to chat with product managers, developers, and other members of the Froala team.

Technical Questions

What’s next?

Development continues to make Froala a safe, secure, and feature-rich WYSIWYG editor. More changes and improvements are coming up in the next release! Stay tuned and subscribe to our newsletter to be the first to know about the updates!

Text Editors in 2022: Why It’s Still Important for Editing

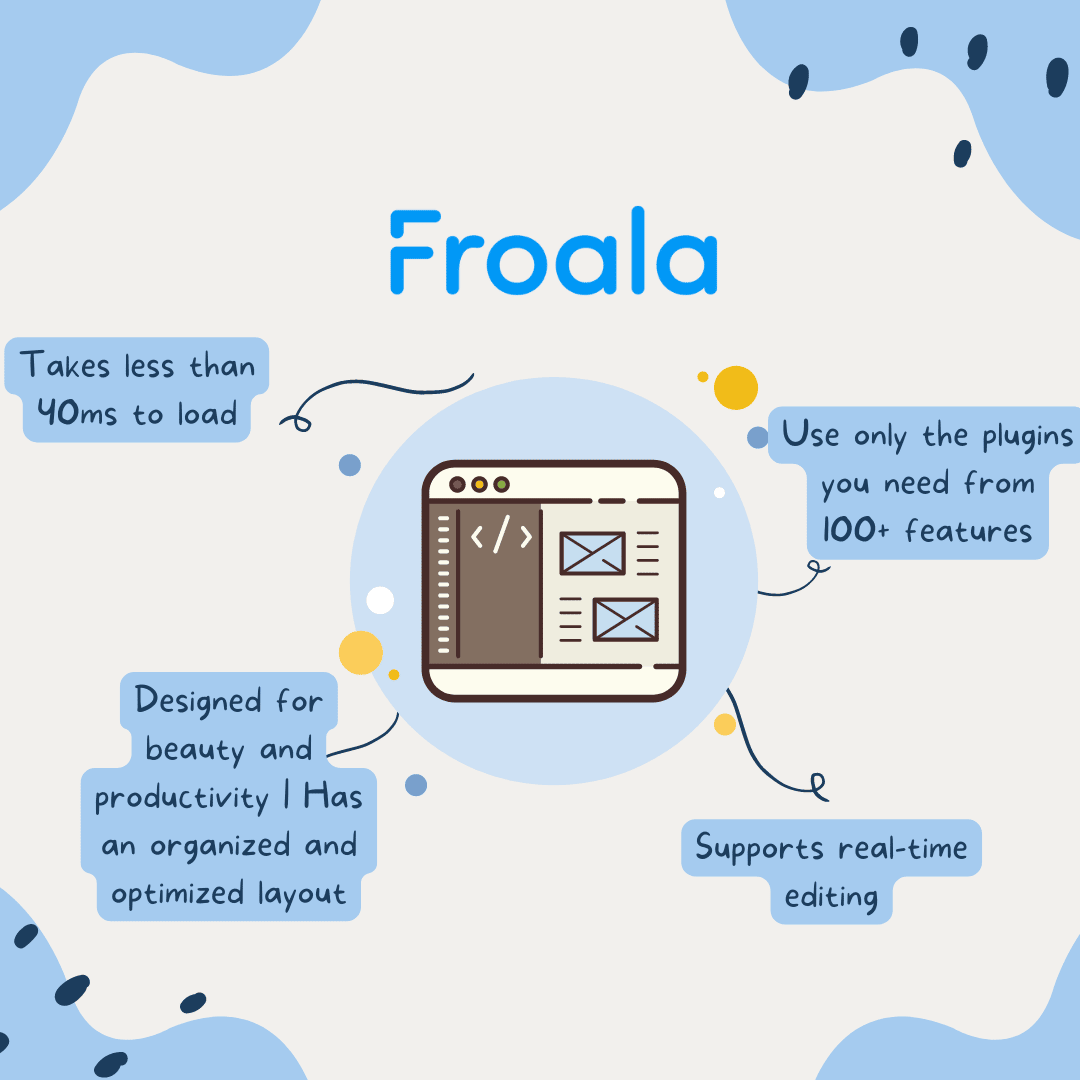
Introduction

A text editor is one of the most popular and relevant pieces of software. And that still applies today, because making software nowadays involves using plenty of tools that increase efficiency and product quality. Test automation software, APIs, and frameworks are among these helpful tools. Each one has its own uses and benefits, and having a combination of them in your development can be beneficial. But today, we’ll be talking about text editors and why they’re still important in 2022. Before we get to that, though, let’s define what a text editor is. 

What is a Text Editor? 

A text editor is a software application that, like its name suggests, lets users edit text. They’ve been around for decades and have been improved and changed drastically throughout the years. Text editors may refer to pure text editors or WYSIWYG (What You See Is What You Get) HTML editors. However, they can often be used interchangeably. 

The former allows for the creation and modification of code and provides syntax highlighting, keyboard shortcuts, toolbars, and other features that revolve around making coding easier. It’s recommended for more experienced developers and those who prefer coding first then reloading a page to see any changes in code. 

On the other hand, WYSIWYG HTML editors show users what a page will look like through an editing interface. That is, they allow users to see changes in code as they will appear in a rendered browser page. They also require little to no coding. This makes them a solid choice for new developers or those with little time to code but plenty to do.

In this article, we will focus more on WYSIWYG HTML editors, so whenever you read “text editor”, you’ll know we’re referring to them. To determine the importance of using text editors, we need to review their features. 

Basic and advanced features of a Text Editor

Every text editor has unique characteristics, but all of them have common editing features. These help developers process text and layouts (like in word applications), add/edit images and other files, collaborate, and more. The ideal HTML editor features consist of the following: 

  • Basic rich text editing features (font and paragraph styling and formatting, highlighting, undo/redo, etc.)
  • Adding and handling tables
  • Math equation support
  • Word and character count
  • Spelling and grammar checker
  • Seamless copy/paste (with or without preserving format) or drag and drop into editor
  • Uploading and processing (crop, rotate, flip, etc.) images and other files
  • Markdown and HTML support
  • Emoticons 
  • Multiple language support
  • Accessibility features
  • Autosaving 
  • Real-time editing and mentions
  • Tracking changes in editor content
  • Exporting as PDF
  • Quick insert

Having all or many of these features in your text editor will greatly enhance the user experience of your application. This means that your users will be capable of doing more with the editor, which leads to better enjoyment and trust. 


Now that you have seen the features you can find in the best text editors, we can discuss how text editors impact the success of software applications in 2022. 


Importance of using a Text Editor in 2022

Just how important is an HTML text editor in 2022? The fact that you can see them almost anywhere on the internet tells us that they’re very important and relevant. Here are some of the reasons why you need a text editor in your application in 2022. 

1. It improves user experience by going beyond regular text editing

Do your users need to write and publish content, make comments, send emails, or message others within a single application? Then you might need a text editor. These editors are mostly used for content creation and editing, and offer far more benefits than regular text components. 

For example, in social media, text editors are used for posting content, adding comments, and sending messages (3 features that one component can handle!). They usually allow users to not only send text data to the platform but also control how text is displayed. Users can even add links, emojis, GIFs, images, and other files, and edit media files before uploading the post. This holds true for posts, comments, and messages alike. 

You can always use regular text components such as basic text input and textarea fields, but can you imagine using a social media site with just those? It would bore and tire users with all the repetitive reading they would do. What’s even worse is that you would have to have a separate element for uploading files, which is not user-friendly and would be hard to maintain. 

By giving your users a text editor with plenty of features, you’ll give them the freedom to be creative with what they share. Furthermore, users will be delighted that they can make multiple things (write, upload images, add emojis, etc.) using just one component. This also makes your application a lot more user-friendly and enjoyable to use, helping you retain your users and attract new ones. 

2. It has a place on most websites and web apps

As I’ve said earlier, text editors are everywhere on the internet. This means that they are applicable to different types of websites and applications. Because of the content-centric nature of text editors, developers implement them whenever they need a way for users to post content. So whatever your project is, as long as you allow your users to create and share content, you can always include a text editor in it. 

You will often find text editors in the following platforms: 

  • Social media
  • CMS (Content Management Systems)
  • Website builders
  • Blogs
  • Forums
  • LMS (Learning Management Systems)
  • Email software
  • Online collaboration and productivity tools (including online word processors)
  • Other content-heavy apps 

Text editors empower your users to share their thoughts and ideas (which you should regulate for your community through strong policies, of course). And in this day and age, users appreciate platforms that let them express themselves. 


3. It allows non-technical users to build pages or make content with little or no coding

Finally, what makes text editors so important in 2022 is that they make web content creation, publishing, and editing widely available. The start of the pandemic in 2020 made things difficult for most businesses, especially smaller ones. At the same time, many new businesses across various industries emerged. For these small and new businesses, setting up or building a web presence, especially a website, is important. Fortunately, they can use text editors for this. 

Non-technical users can make use of third-party text editors integrated into an application (e.g., website builders and CMS) to build the website that they envision and need. This will take them considerably shorter time compared to studying web development and coding from scratch. By using website creation tools with built-in text editors, non-technical business owners, or those looking to save time, can quickly establish their presence online. On the other hand, developers and technical business owners can implement their own text editors in their content-heavy applications for others to use. 

Text editors make sure that as many people as possible can create their own web content and websites without a lot of effort. Because of this, they have become an integral part of the new normal and will continue to do so for many years to come. 

From what we discussed, we can now see the importance and popularity of text editors today. And with that, you should know that there’s an easier way to implement a text editor within your application. This refers to the use of ready-made or third-party text editors. 


Benefits of third-party Text Editors

Third-party text editors are carefully designed and complete solutions for HTML editing. Some are open-source while others are paid (some of them offer a free trial or free plan, though), but all of them are worth exploring. Here are some of the ways third-party text editors can help: 


  • They save you a lot of time – Since third-party text editors already have all the features your users need, there’s no need for you to go reinventing the wheel. Instead, you only have to install or load the editor of your choice, make customizations and adjustments, and you’re good to go. After that, you can focus on your application’s primary features. 
  • You don’t have to maintain them – Third-party text editors are automatically updated and continually tested, reducing the number of things you have to maintain. 
  • They come with language and accessibility features – Third-party text editors usually support plenty of languages and offer accessibility, making sure that your app will cater to as many users as possible. It will also be easier to comply with regulations such as WCAG 2.0 (Web Content Accessibility Guidelines 2.0) when you include an editor that’s already compliant. 


Conclusion

In this article, we tackled the importance of using a text editor for applications in 2022. Text editors are highly important tools in software development. That’s why they’re still relevant. They increase the quality of software and make users happy. So why not use one the next time you need content editing in your website or application? 


Code Better with Froala’s Enhanced Documentation

online text editors


We’ve recently refreshed the Froala docs to provide you a better reading experience. The documentation pages should now be able to give you the information you need faster with various improvements in page design, wordings, and examples/step-by-step guides.  In this blog post, we’ll show you how Froala’s latest docs refresh makes concepts easier to follow. Along the way, we’ll also discuss the reasons why good documentation can make good code. 

Introduction

It is important to keep records. Almost every programmer who has written code for a program has read some kind of documentation. Documentation is used every day, whether it’s a tutorial page for people learning a programming language, an API reference with useful events, or a guide that people can follow. Users of a piece of software would not know what to do without documentation. They would have to learn and train by doing things by hand. Because of this, most applications, APIs, and languages today make their documentation easy for everyone to find and use. Documentation saves both users and providers a lot of time and money.


Why do we need to keep documentation up-to-date and make it better?

It isn’t enough to have “acceptable” documentation in place and leave it alone for years. People who want to give their users a documentation page should keep it up to date and look for ways to make it better. This is because out-of-date, unclear, or wrong documentation could make it harder for users to learn. Imagine reading through documentation that was put together quickly and has grammatical or, even worse, code syntax mistakes, bad navigation, and missing or wrong information. That would be very frustrating for users, who might think they are doing everything right but still can’t get what they want. What will happen if that does happen? Back to support tickets, which can take a lot of time for everyone.

Why does good documentation lead to good code?

As developers, we need to ensure that our codes should ultimately be of good quality. This practice leads to easier code refactoring, faster debugging, faster performance, better readability, and reusability. In short, it makes the development cycle a lot easier. But did you know that documentation actually has an impact on code quality? This is what we’ll explore in this section. 

Based on what we’ve said about how documentation directly affects the quality of code, poor documentation should also affect the quality of code. For example, leaving out best practices or leaving out details could lead to code that is messy and hard to keep up with. This makes it very hard to refactor or release new versions of an application, an API, or a language. This could also cause a number of errors in the code, some of which could happen when the program is running.

Also, documentation with incomplete examples (like only explaining the basic use case) could make users get stuck and not be able to use the software’s features to their full potential. This forces them to deal with most of their problems on their own. And when any of the above happens, it will be too late, and users will wish they hadn’t followed the badly written instructions.


A Developer’s Best Friend

On the other hand, good code can come from good documentation. A developer’s best friend can be a well-made docs page that is updated often, easy to navigate, complete but simple, and full of complete information and examples. It can cut down on the number of times a developer needs to call for help or browse the internet because everything they need can be found there quickly. Developers can write better code with the help of good documentation because:

  • It doesn’t leave much room for doubt. – By being straightforward and clear, a documentation page lets readers learn and work right away without thinking whether they’re on the right track or not. For example, let’s say that a docs page gives users plenty of ways to accomplish a task (e.g., installation, adding images, etc.). Users should be able to easily differentiate between these methods and determine which are appropriate for their case. 
  • It makes less mistakes – Documentation should have as few mistakes as possible, whether they are grammatical or with the way the sentences are put together. Grammar mistakes, typos, and duplicate content could slow readers down in the same way that missing content could. On the other hand, users could copy mistakes from code examples into their own code.
  • It lets programmers write code more quickly. – Learners can find what they want quickly and easily on a Docs page that has a search bar and is well-designed for page navigation. So, developers can spend less time writing code.
  • It lets first time learners progress naturally – Isn’t it annoying when you visit a documentation page for the first time only to find scattered, unstructured information? A good documentation provides a “path” for beginners to follow, starting from high-level information and narrowing down to specific information, references, and examples. 
  • It makes it easier to take care of. – Documentation makes code easier to maintain by telling people about best practices, content that has been removed or will be removed soon, and important changes. This means that people who read the code will always know what should be kept, changed, and made better.


Froala updates its docs often to make them easier to comprehend and help you produce quality code.

What’s new in the Froala docs? 

The latest revision in the comprehensive documentation of our HTML editor consists of the following improvements:

Adding labels and information that will help

The latest Froala docs now have additional helpful information, including labels for steps and “What’s Next” sections on some pages. 

Rephrasing vague wordings

Some phrases, sentences, and labels have been improved to be clearer. This helps readers understand concepts more easily. 

Enhancing navigation

How the Froala docs get around has changed a lot. The navigation menu on the page is now better organized, going from big to small ideas. The first steps, tips for getting to know the site, and most important examples are now closer to the top of the menu. The changelog, migration guidelines, and other less-used pages have been moved to the end of the menu.

Froala docs’ WYSIWYG Editor SDKs page is another great example of excellent navigation in documentation. It contains the various SDKs in which Froala can be integrated in the form of button icons. By clicking on them, a user will be taken to the specific Server SDK page. Users can get to the SDK page using the left menu. Users can choose the easier option.

Making titles more consistent

Some titles in the Froala docs have now been made more consistent with one another, contributing to the docs’ readability. They have similar structures (verb + subject on all titles) and lengths. In the graphic above, steps 1 through 3 have similar titles but different meanings.

Beautifying the search bar

A search bar is an important part of any docs. It makes it easy for people to find the information or content they need without having to look through dozens of pages. The search bar on Froala docs has been moved to a more standard place, making it look better and be easier to use.

Making the navigation menu items easier to understand

We’ve moved the navigation menu items around and made them easier to understand. They are now easier to click on and use carets and the right amount of indentation to show which subject or idea is now expanded.

Getting the layout right

Lastly, the layout has a big impact on how easy it is for people to understand the information. A messy design can make it hard for people to read, while a clean, well-organized one makes it easier. Froala has made sure that its responsive layout has enough space for people to read.


We Take It Seriously

Froala takes documentation seriously. We want you to understand Froala and use it to its fullest to improve your app and make sure your users are happy. Because of this, we keep adding to and improving our documentation page. Rest assured that we will keep optimizing, rewriting, and adding new, helpful content in the years to come. You’ll never get lost in paperwork again with Froala. We’ll be there to help you figure things out.

Pricing is another important thing to Froala, just like documentation. We want developers to get as much as possible out of the editor they choose. That includes the best price-to-quality ratio. Some editors charge extra for crucial features or for loading more than a specific amount of pages. Froala is neither of these. All of our plans, even the free one, have all of Froala’s powerful features. There are no limits on the number of users or uses. Talk about total freedom to change things. Because of this, Froala is a lot cheaper than other editors on the market.


Conclusion

In this blog post, we talked about the update to Froala’s documentation. We also talked about how important good documentation is and how it can help make code better. Documentation should be something that is easy to find and understand. It’s one of the most important parts of making software, and it can have a direct effect on how well a project works and how long it takes to make. The docs page for Froala is a good example of good documentation that is clear, helpful, and easy for developers to understand. And we make it that way because we care about you and what you’ll make.