
How to Integrate Froala with Angular
Before diving in, it’s crucial to understand why you might want to use Froala. Apart from its rich set of features, it’s customizable, intuitive, and plays well with frameworks like Angular. The Froala community is active, ensuring that the editor keeps improving and that you receive support when needed with angular wysiwyg editors.

1. Create a New Angular Project (If you haven’t already):
For those who are starting fresh:
npm install -g @angular/cli

ng new your-project-name

cd your-project-name
2. Installation
Begin by integrating the angular-froala-wysiwyg package:
npm install angular-froala-wysiwyg
3. Styling the Froala Editor
Ensure that Froala’s style resources are linked. In your project’s index.html, paste:
<link href="node_modules/froala-editor/css/froala_editor.pkgd.min.css" rel="stylesheet">
Icon styling boosts the editor’s appeal. Use Font Awesome:
npm install font-awesome
4. Setting Up in Angular
Head to app.module.ts and import necessary modules:
import { FroalaEditorModule, FroalaViewModule } from 'angular-froala-wysiwyg';
Update your @NgModule:
@NgModule({
   ...
   imports: [
     ...,
     FroalaEditorModule.forRoot(),

     FroalaViewModule.forRoot()
   ],
   ...
})
5. Ensure All Styles are Loaded:
In angular.json, add:
"styles": [

  "styles.css",
   "node_modules/froala-editor/css/froala_editor.pkgd.min.css",
   "node_modules/froala-editor/css/froala_style.min.css"
]
6. Using Froala in a Component
Let’s see this in action. Navigate to your component, like app.component.html:
<div [froalaEditor]>Hello, Froala!</div>
For two-way data binding:
public editorContent: string = 'My initial content';

<div [froalaEditor] [(froalaModel)]="editorContent"></div>
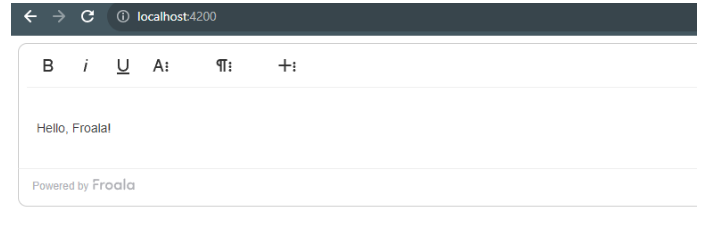
7. Test it out by running:
ng serve
If you have default settings, it will be running on localhost:4200/ and you should see this:
Here’s where the fun begins! We can expand Froala’s capabilities by adding our own custom buttons. Let’s dive into a real-world example:
Firstly, import Froala and define the component structure:
import FroalaEditor from 'froala-editor';
import { Component, OnInit  } from '@angular/core';
@Component({
  selector: 'app-demo',
  template: `<div class="sample">
               <h2>Sample: Add Custom Button</h2>
               <div [froalaEditor]="options" [(froalaModel)]="content" ></div>
             </div>`,
  ...
})
Within the component, implement the OnInit method:
export class AppComponent implements OnInit{
  ngOnInit () {
    FroalaEditor.DefineIcon('alert', {NAME: 'info'});
    FroalaEditor.RegisterCommand('alert', {
      title: 'Hello',
      ...
      callback: () => {

        alert('Hello!');
      }
    });
  }
  public options: Object = {
    ...
    toolbarButtons: ['bold', 'italic', ...,'alert'],
    ...
  };
}
9. Events and Methods
Froala events allow you to run specific actions in response to editor activities. For instance, you can run a function when the editor’s content changes.
public options: Object = {
  events : {
    'froalaEditor.contentChanged' : function(){
      console.log('Content updated!');
    }
  }
};
Methods provide control over the editor’s behavior. For instance:
// Initialize the editor first
editor = new FroalaEditor('div#editor');
// Use a method
editor.html.set('<p>New HTML content</p>');
With regards to Manual Initialization
Get the functionality to operate on the editor: create, destroy and get editor instance. Use it if you want to manually initialize the editor.
(froalaInit)="initialize($event)"
// Where initialize is the name of a function in your component that will receive an object with different methods to control the editor initialization process.
public initialize(initControls) {
  this.initControls = initControls;
  this.deleteAll = function() {
    this.initControls.getEditor()('html.set', '');
  };
}
The object received by the function will contain the following methods:
- initialize: Call this method to initialize the Froala Editor
- destroy: Call this method to destroy the Froala Editor
- getEditor: Call this method to retrieve the editor that was created. This method will return null if the editor was not yet created
Displaying HTML
To display content created with the Froala editor use the froalaView directive.
[froalaView]="editorContent"
<div [froalaEditor] [(froalaModel)]="editorContent"></div>
<div [froalaView]="editorContent"></div>
Use Cases for Froala and Angular Integration
- Dynamic CMS: Make a content management system where users can edit and publish content in real time, while the backend (which is powered by Angular) handles and stores data efficiently.
- Educational Platforms: Froala can be used to create and edit rich-text course content, quizzes, and assignments on platforms that offer courses, while Angular can be used to manage user data, track progress, and do other things.
- E-Commerce Platforms: Froala can be used to change product descriptions, customer reviews, and any other text on e-commerce platforms. Angular, on the other hand, can handle the cart, user authentication, and managing products.
- Collaborative Tools: Tools like document editors or design platforms that let more than one person edit at the same time. Froala can handle the editing, and Angular can handle user sessions, updates in real time, and resolving conflicts.
Why choose Froala with Angular?
Angular is one of the most powerful front-end frameworks because it is scalable, modular, and has a responsive ecosystem. On the other hand, Froala has a rich-text editor that is sleek, easy to use, and powerful. When put together, the two can make applications that are very interactive and dynamic.
1. Reactive Forms with Froala
Reactive forms in Angular are a powerful way to react to form inputs. When developers combine Froala with Angular’s reactive forms, they can easily link the editor’s content to the form controls. This makes sure that when users change content in Froala, the form control underneath is updated automatically, and vice versa.
To integrate Froala with Angular’s reactive forms, you’ll first set up your form and then bind the Froala editor content to a form control:
// In your component.ts
import { Component } from '@angular/core';

import { FormBuilder, FormGroup } from '@angular/forms';

@Component({
  selector: 'app-editor',
  templateUrl: './editor.component.html'
})
export class EditorComponent {
  editorForm: FormGroup;
  constructor(private fb: FormBuilder) {
    this.editorForm = this.fb.group({
      content: ['Initial content']
    });
  }
In your HTML:
<form [formGroup]="editorForm">
  <textarea [froalaEditor] formControlName="content"></textarea>
</form>
2. Dynamic Content Loading
Similarly, you can easily get content from a backend service and bind it to the Froala editor using Angular’s dynamic content loading features. In other words, this means that for CMS-based applications, the content can be fetched, edited in Froala, and then saved back in a very responsive way.
3. Custom Directives with Froala
Above all, with Angular’s powerful directive system, developers can give DOM elements their own custom behaviors. With Froala, you can make your own directives to give the editor special features. For example, you could use a directive to automatically format content, add custom validations, or even work with plugins from other sites.
4. Component-Based Architecture
In addition, the modularity of Angular is ensured by its component-based architecture. You can make a Froala editor component that works on its own and can be used in other parts of your application. This makes sure all instances of the editor behave and look the same.
Example:
Create a standalone Froala editor component:
editor.component.ts:
import { Component, Input } from '@angular/core';

@Component({

  selector: 'app-froala-editor',

  templateUrl: './froala-editor.component.html'

})

export class FroalaEditorComponent {

  @Input() content: string;

}
In your froala-editor.component.html:
<textarea [froalaEditor] [(ngModel)]="content"></textarea>
Then, you can reuse this component throughout your application:
<app-froala-editor [content]="myContent"></app-froala-editor>
When you use this Angular wysiwyg editor, adding these features will help improve the dynamic capabilities of your Angular application, making it both efficient and easy to use.
5. AOT Compilation and Lazy Loading
Furthermore, by converting Angular components and templates into JavaScript code that the browser can immediately execute, Angular’s Ahead-of-Time (AOT) compilation optimizes the application. When you combine this with Froala, the editor is quick and the user experience is improved. With lazy loading, the editor and its assets can be loaded only when they are needed, making the first load time faster.
6. Event-Driven Architecture
Both Angular and Froala are heavily event-driven. In other words, this makes it easy to set up event listeners that respond to certain actions. For example, you could set up an event that happens when the content in Froala reaches a certain number of words or when a certain style is used. Use the best angular wysiwyg editor to do all of these things.
Ready to build more with Froala and its Angular Wysiwyg Editor?
Because of this, the integration of Froala with Angular isn’t just about embedding a text editor within an Angular application. It’s about harnessing the combined power of a world-class text editor and a leading front-end framework. Whether you’re building a small blog or a full-fledged web application, this combination ensures scalability, reactivity, and a top-notch user experience with an angular wysiwyg editor.


2 Comments
hello, how can i enter the license key in this setup? i tried entering key: MY_KEY inside options but no luck the message still displays
Hello Charbel,
To remove the “Powered By Froala” message, you need to add the attribution:false inside the options too.