Building a Support System Using Laravel PHP Framework and Froala Rich Text Editor – Part 1
- Posted on
- By Mostafa Yousef
- In Editor, Tutorials
Table of contents
- What should you expect to learn from this tutorial?
- Prerequisites
- Create a new Laravel project.
- Configure the Project Database
- Setup the Database Tables
- Create a Support Table Model
- Create the Request Page
- Integrate the Froala WYSIWYG Editor into your Laravel application
- Customize the Froala Editor
- Handle the Form Submission
- Form Validation
- Conclusion

Laravel, a popular PHP framework, provides a robust and efficient platform for building web applications. It offers various features and tools to make development easier and faster.
We will use Laravel and the Froala Rich-text editor to create a comprehensive support system for your web application. In this series of tutorials, we will cover how to set up the Laravel project, integrate the Froala editor, save data to a MySQL database, manage support tickets, and more. Let’s dive in and start building!
What should you expect to learn from this tutorial?
This series of articles will include:
In this article, we will create a page with a form that lets users submit requests to the support team. We will integrate the Froala editor to support rich text requests. Finally, we will store the submitted data in the MYSQL database.
The second article will explain how to configure the Froala Editor to upload images and files and how to store them on our PHP server. We may cover this topic over multiple articles.
In the last article, we will create a page for the support team to view all submitted requests. They can access these requests from that page and modify, update, or delete them.
Prerequisites
In this tutorial, I will use XAMPP as my local PHP development environment. XAMPP includes Apache, MySQL, and PHP, which allows you to set up a local server on localhost to test PHP web applications. You can also use alternatives such as WAMP or LAMP, as long as you install and configure them properly.
Also, make sure you install Composer, a dependency manager for PHP, on your computer.
Create a new Laravel project.
After installing PHP and Composer, open your XAMPP server “htdocs”, and create a new Laravel project in your terminal using the command:
composer create-project laravel/laravel support-app
This command downloads the Laravel framework and creates a new project for you.
Once you create the project, navigate to the project directory using the cd command:
cd support-app
Configure the Project Database
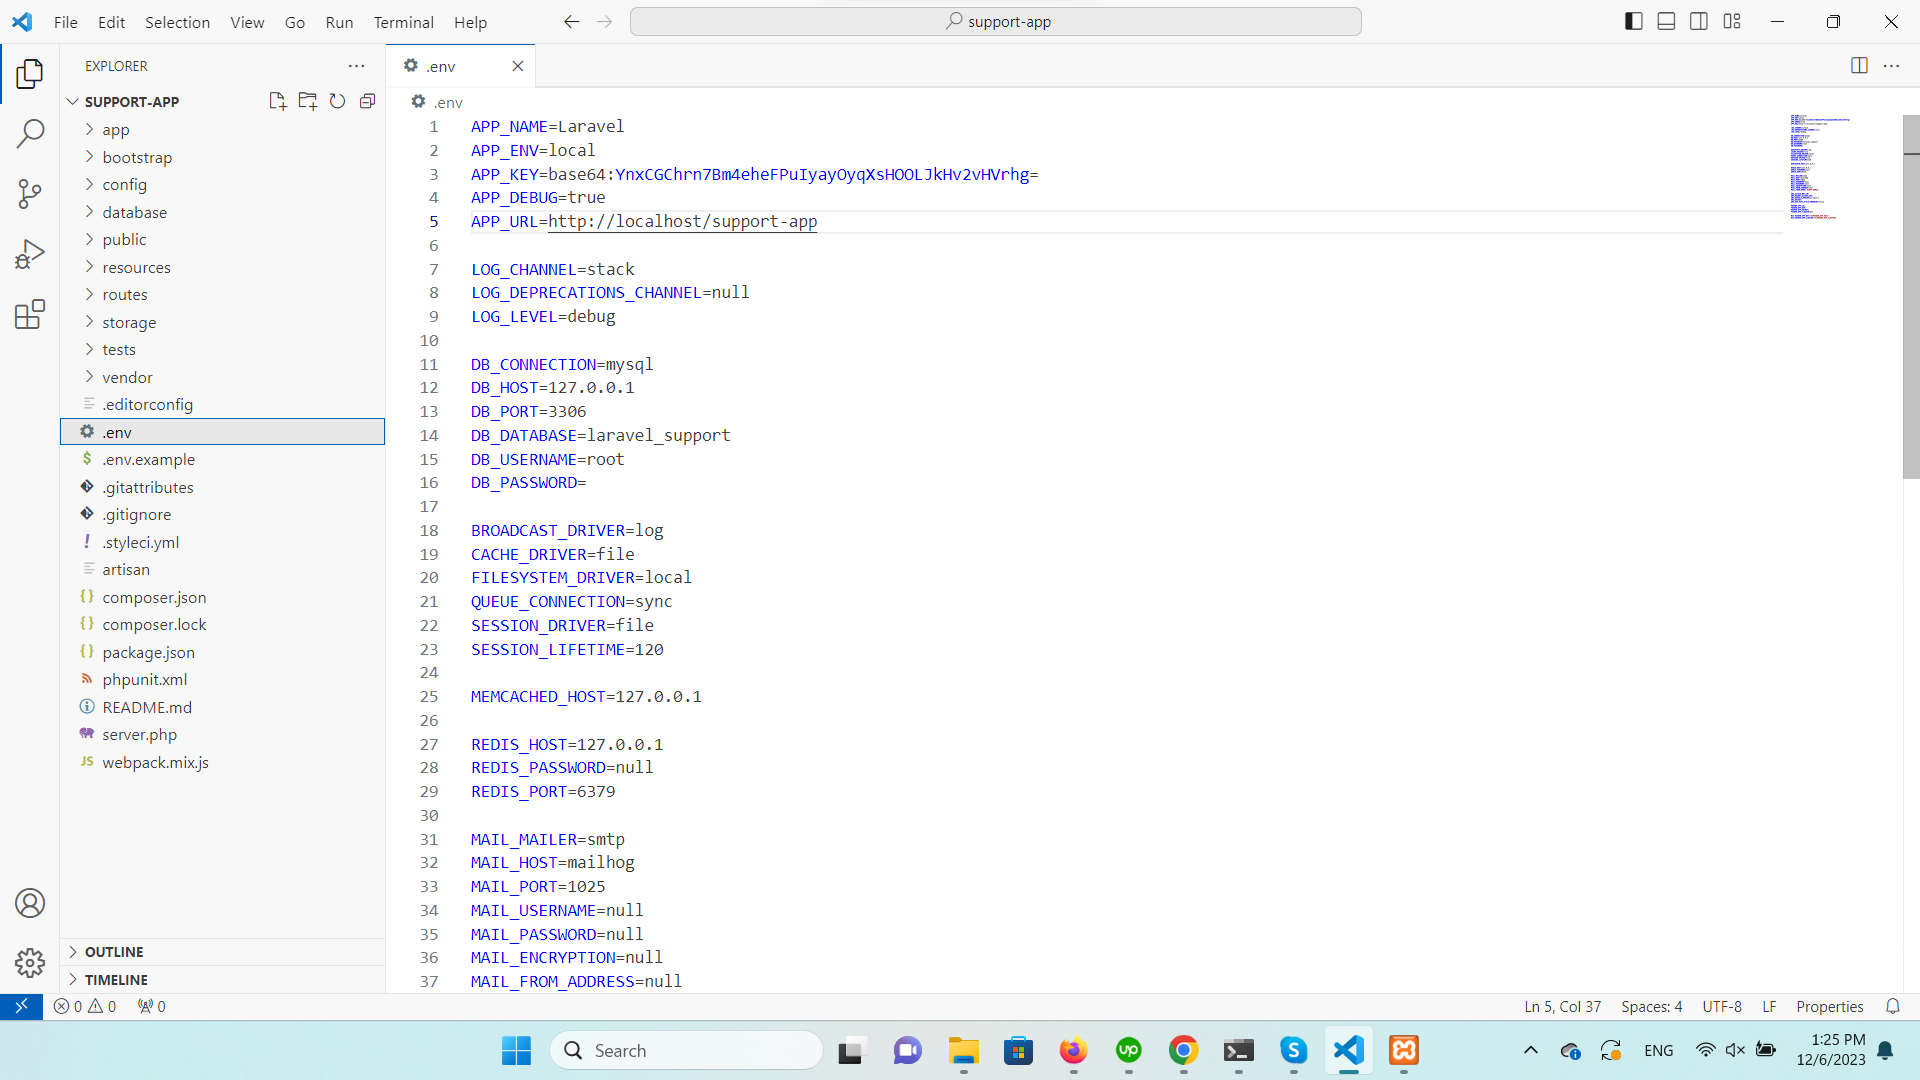
Use your preferred IDE, such as Visual Studio Code, to open the project folder. Open the .env file at the root of your application. Update the database configuration values.
DB_CONNECTION=mysql

DB_HOST=127.0.0.1

DB_PORT=3306

DB_DATABASE=laravel

DB_USERNAME=root

DB_PASSWORD=
Setup the Database Tables
Run this command in your terminal to create a migration file for the table that will store the support requests:
php artisan make:migration create_requests_table
This above command creates a new migration file in the database/migrations directory. Open the file and define the requests table schema inside the up function.
/**

* Run the migrations.

*

* @return void

*/

public function up()

{

   Schema::create('requests', function (Blueprint $table) {

     $table->id();

     $table->string('name');

     $table->string('email');

     $table->string('subject');

     $table->text('request');

     $table->timestamps();

  });

}
This will create a table with the following columns:
- id (auto-incrementing integer)
- name (string) to store the username
- email (string) to store the user’s email
- subject (string) – the subject of the request
- request (text) – the request details
- created_at (timestamp)
- updated_at (timestamp)
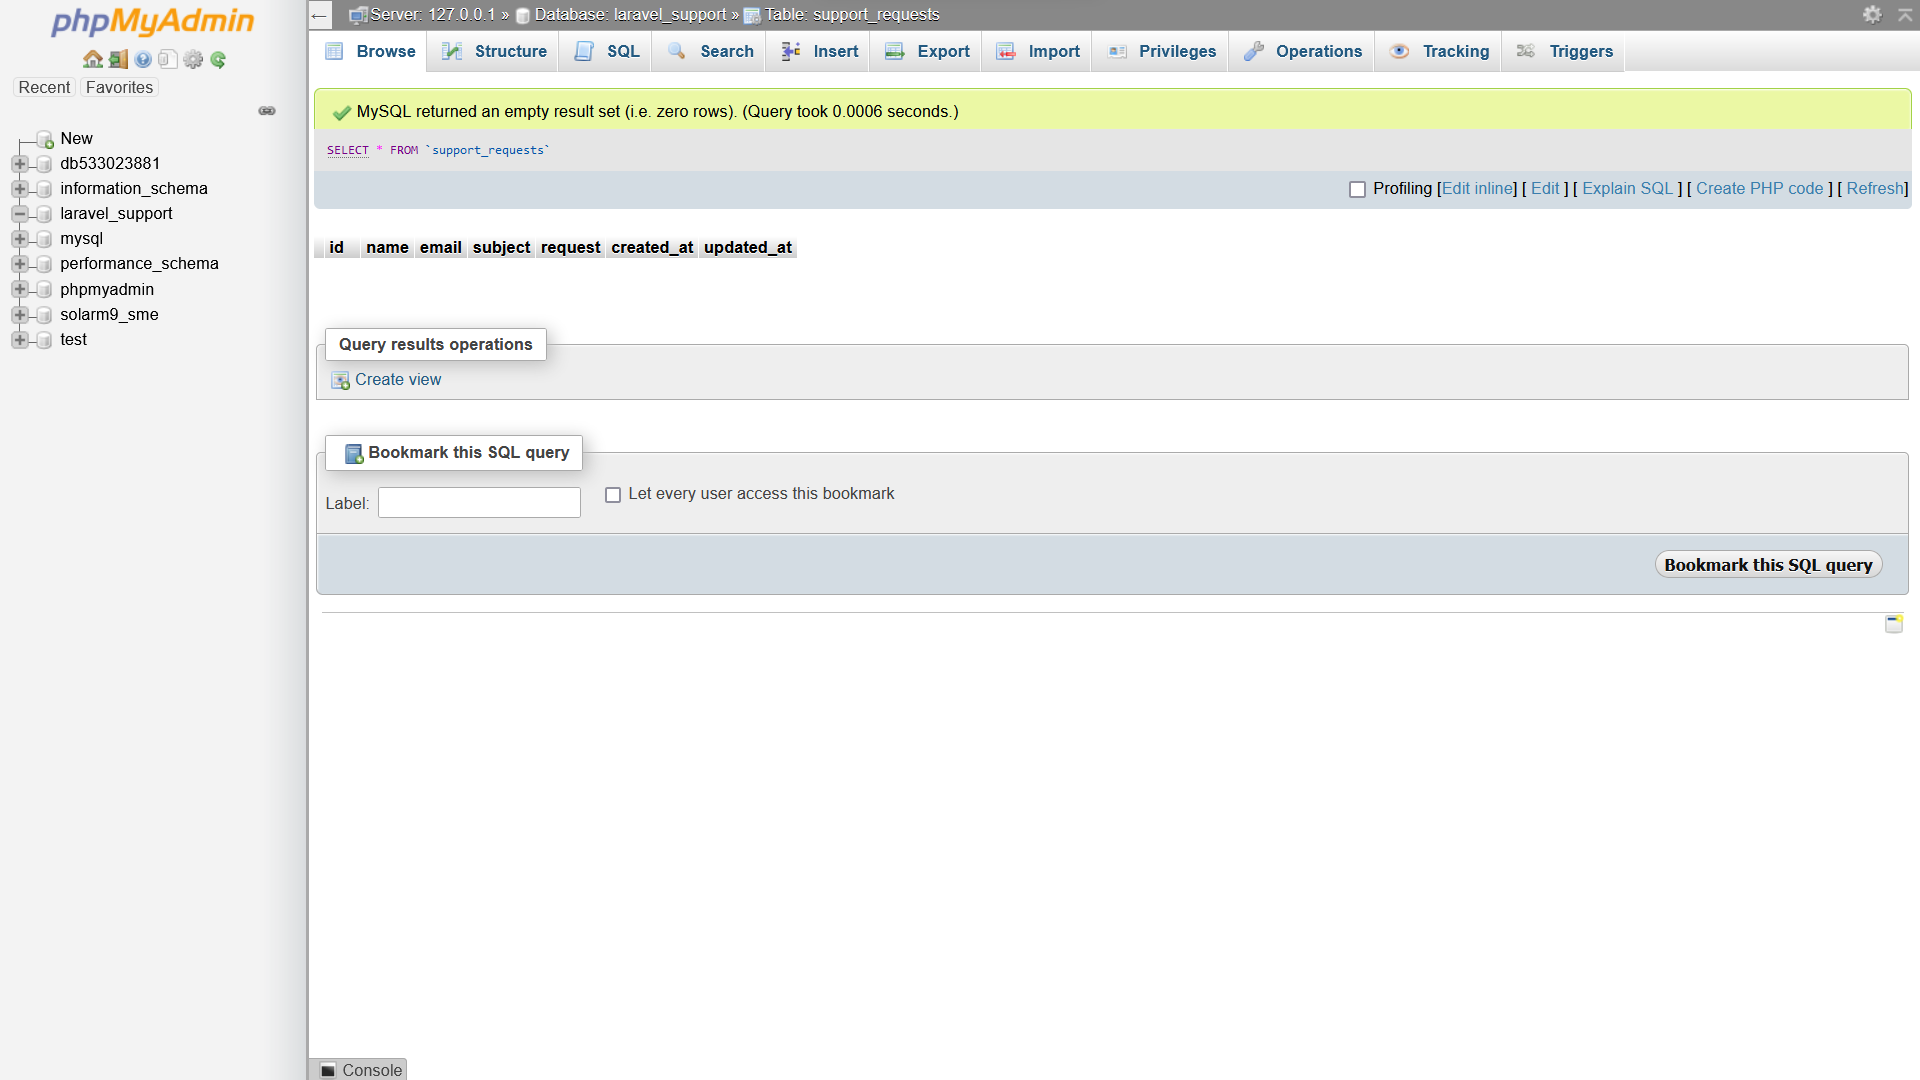
Once you have defined the schema, ensure your MySQL server runs and contains a database with the name you specified in the .env file.
Run the following command in your terminal to migrate the database and create the table:
php artisan migrate
This command will execute the migration and create the “requests” table in your database.
Create a Support Table Model
Create an Eloquent model to interact with the “requests” table by running the command
php artisan make:model Request -crR
The -crR code instructs Laravel to generate model, controller, and request files for the “request” table.
Create the Request Page
We will add a request page to the homepage. Navigate to resources/views/welcome.blade.php, and replace the existing code with the form code. We will use a Bootstrap form to save time.
<!DOCTYPE html>
<html lang="{{ str_replace('_', '-', app()->getLocale()) }}">
    <head>
        <meta charset="utf-8">
        <meta name="viewport" content="width=device-width, initial-scale=1">

        <title>Support App.</title>

        <!-- Fonts -->
        <link href="https://fonts.googleapis.com/css2?family=Nunito:wght@400;600;700&display=swap" rel="stylesheet">

        <!-- Styles -->
        <link href="https://cdn.jsdelivr.net/npm/[email protected]/dist/css/bootstrap.min.css" rel="stylesheet" integrity="sha384-T3c6CoIi6uLrA9TneNEoa7RxnatzjcDSCmG1MXxSR1GAsXEV/Dwwykc2MPK8M2HN" crossorigin="anonymous">

        <script src="https://cdn.jsdelivr.net/npm/[email protected]/dist/js/bootstrap.bundle.min.js" integrity="sha384-C6RzsynM9kWDrMNeT87bh95OGNyZPhcTNXj1NW7RuBCsyN/o0jlpcV8Qyq46cDfL" crossorigin="anonymous"></script>
    </head>
    <body>
        <div class="container">
            <div class="row justify-content-center">
                <h1 class="col-md-8 my-5 text-center">
                    Welcome To Our Support App
                </h1>
            </div>
            <div class="row justify-content-center">
                <div class="col-md-8">
                    <div class="card">
                        <div class="card-header">Submit a Support Request</div>

                        <div class="card-body">
                            <form method="POST" >
                                @csrf
                                <div class="mb-3">
                                    <label for="name" class="form-label">Full Name</label>
                                    <input type="text" class="form-control" id="name">
                                </div>
                                <div class="mb-3">
                                    <label for="exampleInputEmail1" class="form-label">Email address</label>
                                    <input type="email" class="form-control" id="exampleInputEmail1" aria-describedby="emailHelp">
                                    <div id="emailHelp" class="form-text">We'll never share your email with anyone else.</div>
                                </div>
                                <div class="mb-3">
                                    <label for="subject" class="form-label">Subject</label>
                                    <input type="text" class="form-control" id="subject">
                                </div>

                                <div class="mb-3">
                                    <label for="request" class="form-label">Request Details</label>
                                    <textarea class="form-control" id="request" rows="5"></textarea>
                                </div>

                                <button type="submit" class="btn btn-primary">Submit</button>

                            </form>
                        </div>
                    </div>
                </div>
            </div>
        </div>
    </body>
</html>
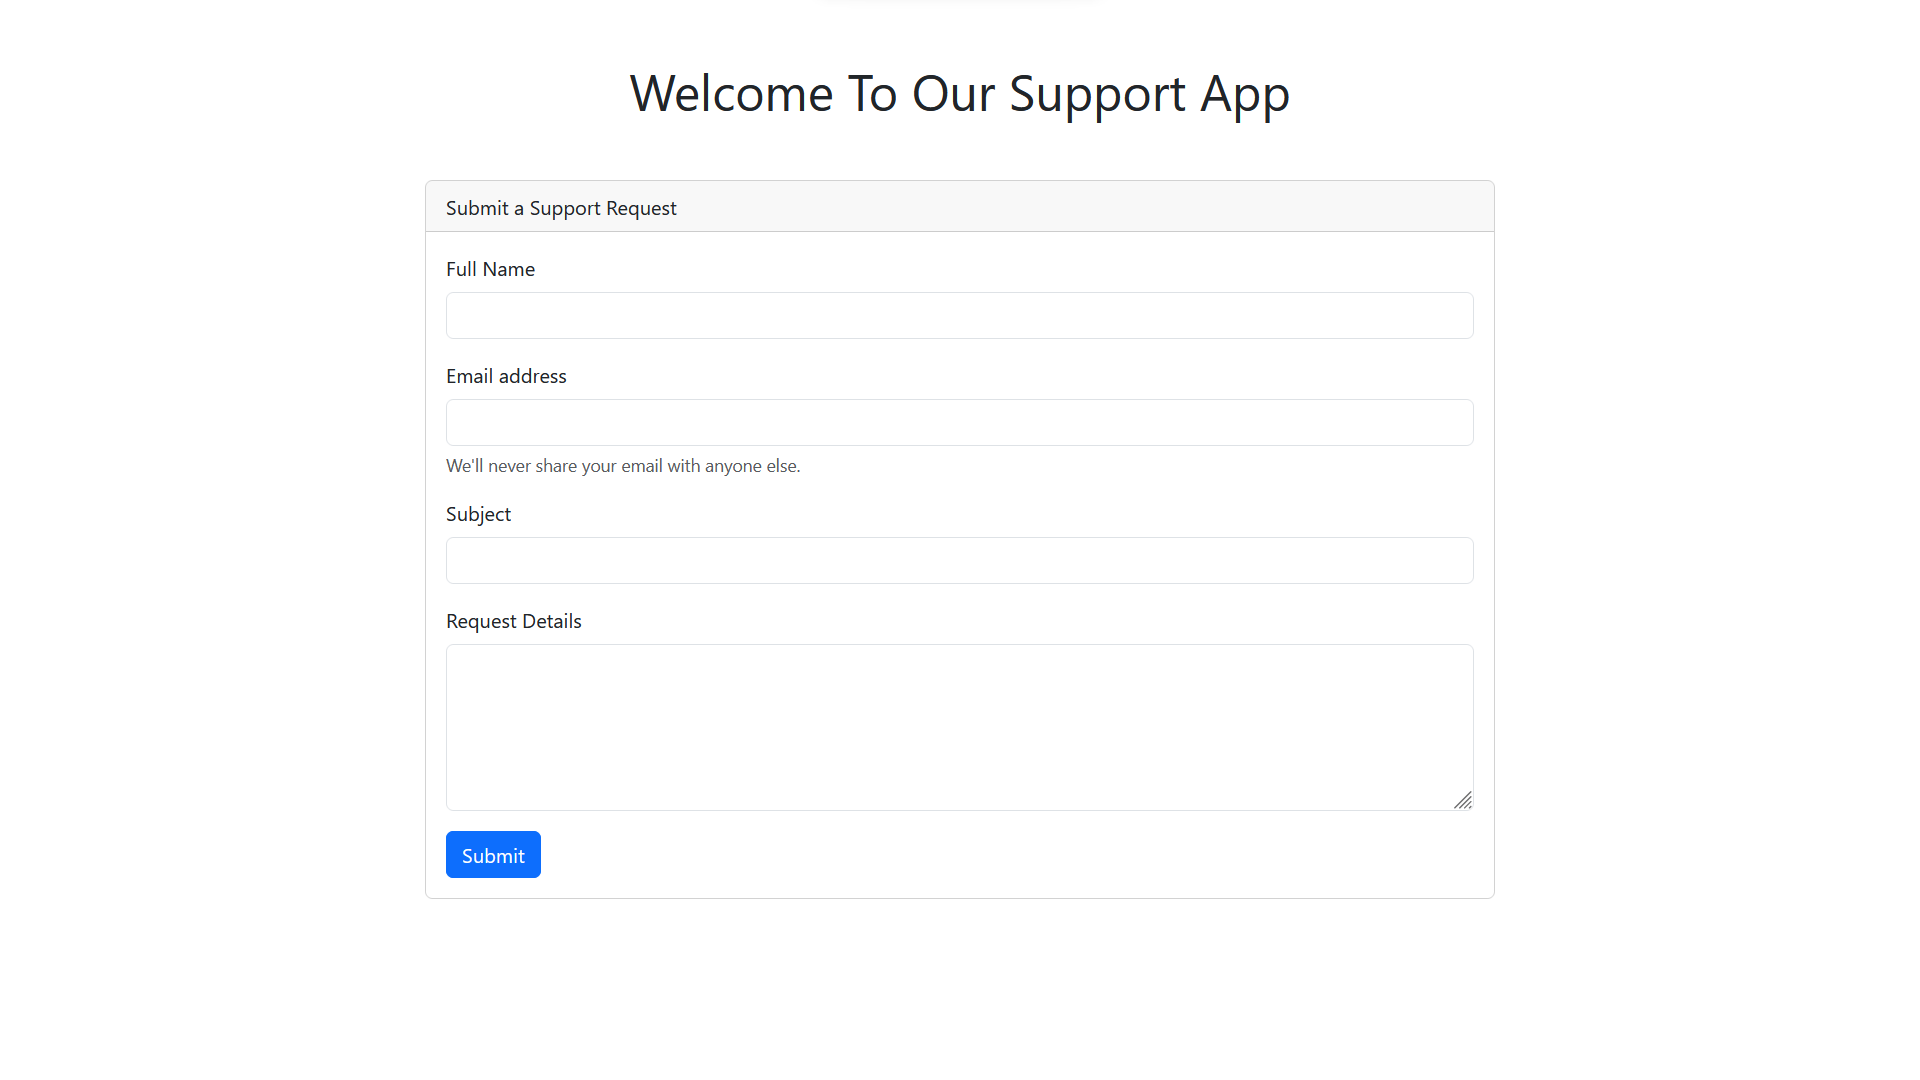
The above code creates a basic HTML form for submitting a support request, including input fields for the user’s name, email, subject, and request details.
Open “http://localhost/support-app/public/“ on your browser to see the page in action.
Integrate the Froala WYSIWYG Editor into your Laravel application
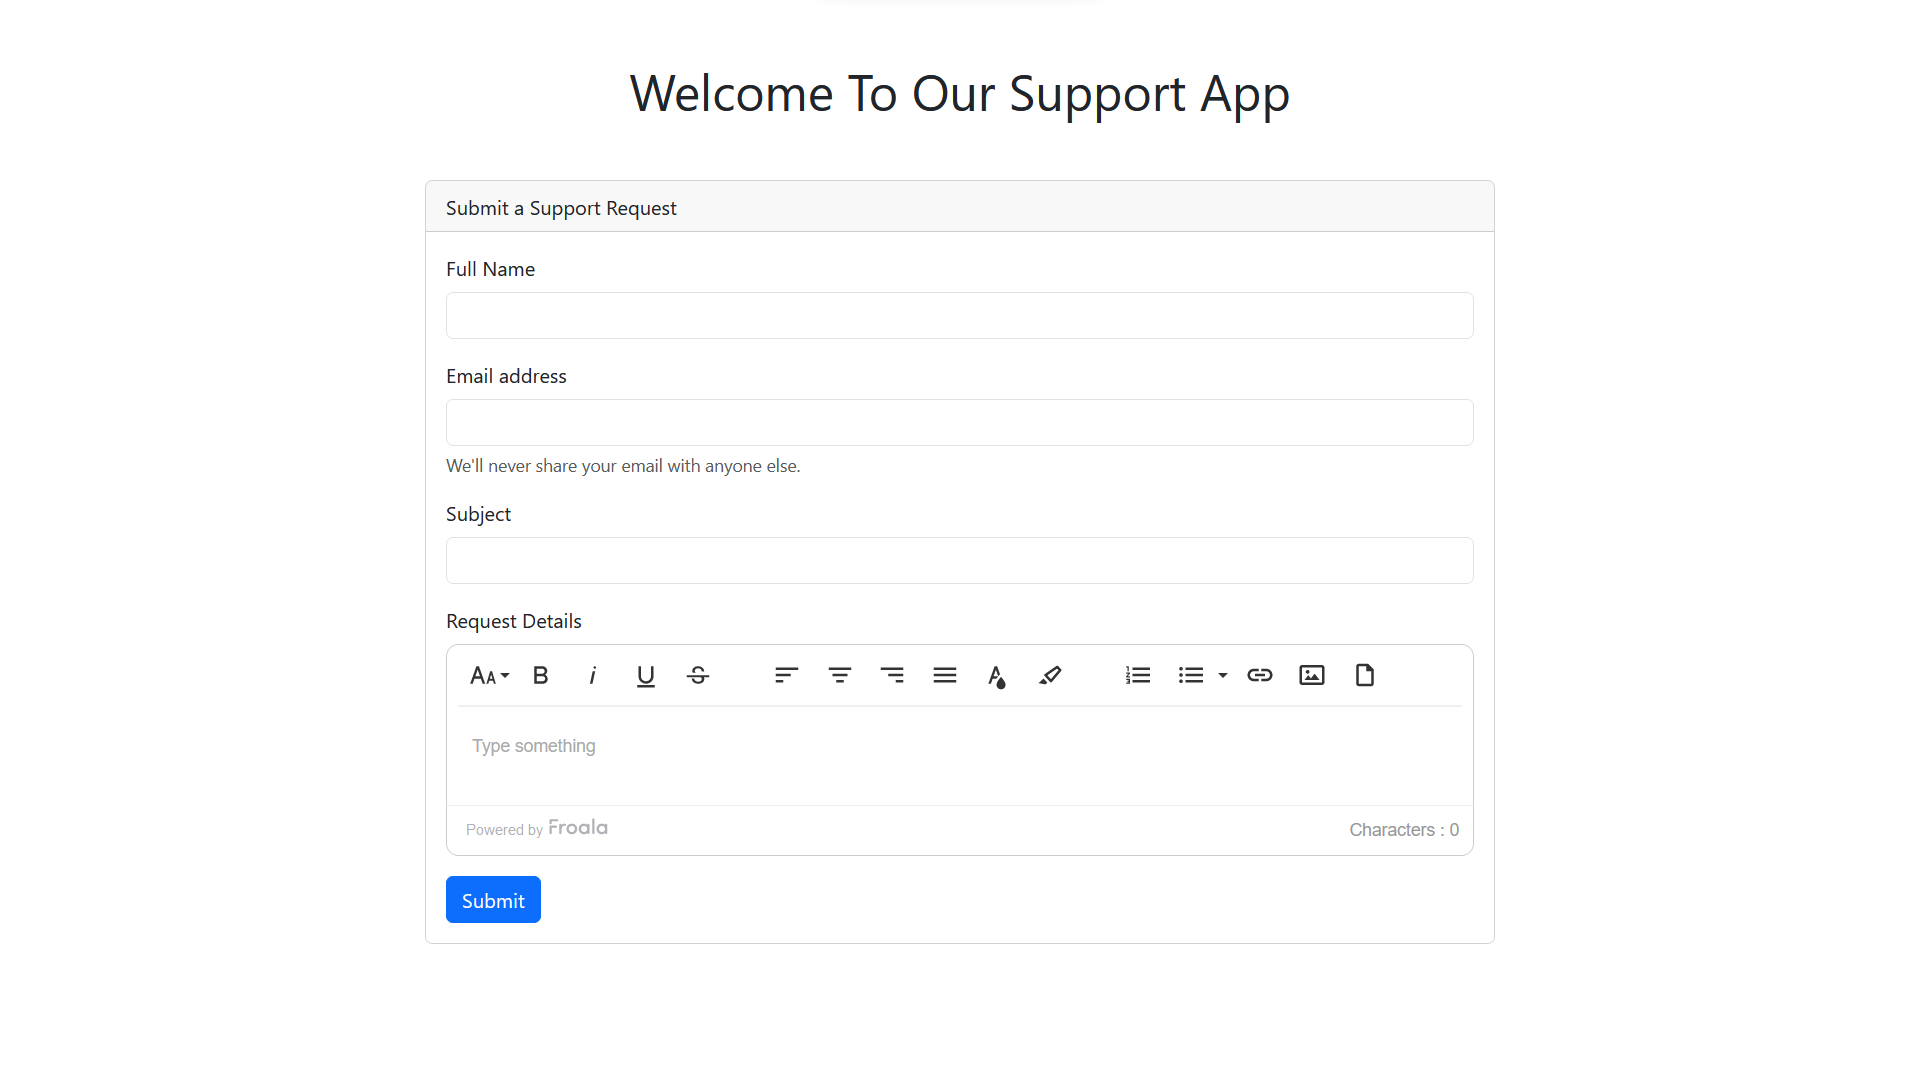
Integrate the Froala WYSIWYG Editor into our Laravel application to transform the “More Details“ field into one that accepts rich-text editing, which lets users format their requests with advanced styling and formatting options. In the welcome.blade.php file, perform the following steps
- Add the Froala stylesheet and scripts to the page.
<link href='https://cdn.jsdelivr.net/npm/froala-editor@latest/css/froala_editor.pkgd.min.css' rel='stylesheet' type='text/css' />

<script type='text/javascript' src='https://cdn.jsdelivr.net/npm/froala-editor@latest/js/froala_editor.pkgd.min.js'></script>
- Initialize the editor by using the constructor function FroalaEditor and pass the ID value of the requested field as the first parameter.
<script>
   new FroalaEditor("#request");
</script>
- Reload your page to display the Froala rich text editor instead of the request field.
Customize the Froala Editor
The Froala editor’s API provides powerful customization options. Refer to the documentation to discover options, events, and methods that will help you adapt the editor to your needs. In this tutorial, we will use the toolbarButtons API option to customize the editor’s toolbar buttons.
<script>
   new FroalaEditor("#request", {

       toolbarButtons: [
            ['fontSize', 'bold', 'italic', 'underline', 'strikeThrough'],
            [ 'alignLeft', 'alignCenter', 'alignRight', 'alignJustify','textColor', 'backgroundColor'],
            ['formatOLSimple', 'formatUL', 'insertLink','insertImage','insertFile'],
       ]

    });
</script>
Handle the Form Submission
Create a route for the RequestController in routes/web.php to manage form submissions. Since the RequestController is a resource controller, add the following route definition.
Route::resources(['requests' => App\Http\Controllers\RequestController::class]);
We will use the store method in the RequestController to process the form submission. In the welcome.blade.php file, add the action attribute to the form tag, like:
<form method="POST" action="{{ route('requests.store') }}" >
In the store method, add the following code to save the submitted data to the database:
    /**
     * Store a newly created resource in storage.
     *
     * @param  \App\Http\Requests\StorerequestRequest  $request
     * @return \Illuminate\Http\Response
     */
    public function store(StorerequestRequest $request)
    {
        // Retrieve form data and save it to the database

        $model = new Request;

        $model->name = $request->input('name');
        $model->email = $request->input('email');
        $model->subject = $request->input('subject');
        $model->request = $request->input('request');

        $model->save();

        // Redirect back to the form page with a success message
        return redirect()->back()->with('success', 'Your support request has been submitted successfully.');

    }
Make sure the authorize method in the StorerequestRequest.php file returns true to allow visitors to submit the form.
<?php

namespace App\Http\Requests;

use Illuminate\Foundation\Http\FormRequest;

class StorerequestRequest extends FormRequest
{
    /**
     * Determine if the user is authorized to make this request.
     *
     * @return bool
     */
    public function authorize()
    {
        return true;
    }

    /**
     * Get the validation rules that apply to the request.
     *
     * @return array
     */
    public function rules()
    {

    }
}
Now, upon form submission, data will be saved in the database, including content from the Froala editor. Then, it redirects the user back to the form page and displays a success message.
Form Validation
To avoid errors when saving the form data to the database, we need to add validation rules. Update the rules method in the StorerequestRequest class found in the App\Http\Requests namespace.
    public function rules()
    {
        return [
            'name' => 'required',
            'email' => 'required|email',
            'subject' => 'required|max:255',
            'request' => 'required',
        ];
    }
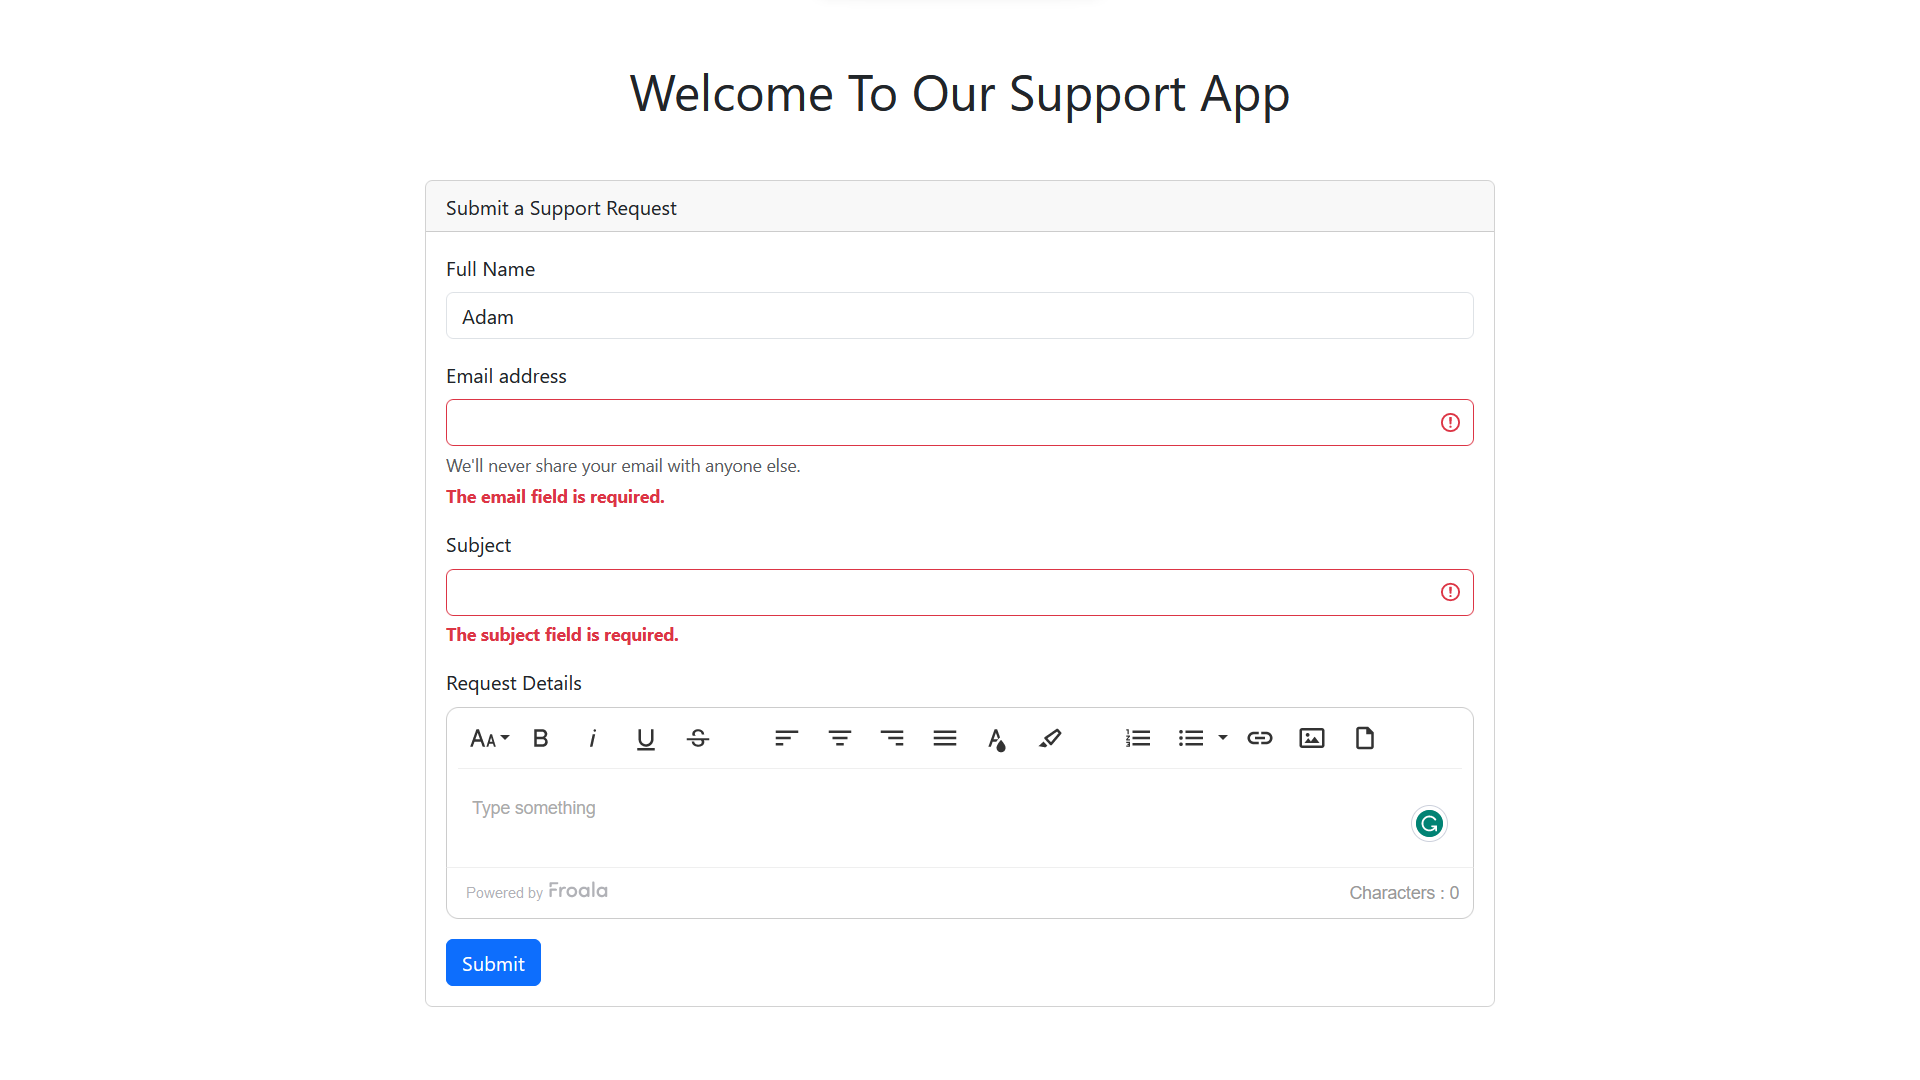
In this example, we added validation rules for the “name”, “email”, “subject”, and “request” fields. The “name” field is mandatory, the “email” must be valid, and both the “subject” and “request” fields must be filled. The “subject” field must not exceed 255 characters.
When an invalid input is submitted via the form, the Laravel blade @error and old methods can be used to identify and display an error message as well as repopulate the form fields with previously entered values. This prevents the user from having to re-enter values incorrectly in the fields without having an error.
Update the code in the welcome.blade.php file like the following
<!DOCTYPE html>
<html lang="{{ str_replace('_', '-', app()->getLocale()) }}">
    <head>
        <meta charset="utf-8">
        <meta name="viewport" content="width=device-width, initial-scale=1">

        <title>Support App.</title>

        <!-- Fonts -->
        <link href="https://fonts.googleapis.com/css2?family=Nunito:wght@400;600;700&display=swap" rel="stylesheet">

        <!-- Styles -->
        <link href="https://cdn.jsdelivr.net/npm/[email protected]/dist/css/bootstrap.min.css" rel="stylesheet" integrity="sha384-T3c6CoIi6uLrA9TneNEoa7RxnatzjcDSCmG1MXxSR1GAsXEV/Dwwykc2MPK8M2HN" crossorigin="anonymous">

        <script src="https://cdn.jsdelivr.net/npm/[email protected]/dist/js/bootstrap.bundle.min.js" integrity="sha384-C6RzsynM9kWDrMNeT87bh95OGNyZPhcTNXj1NW7RuBCsyN/o0jlpcV8Qyq46cDfL" crossorigin="anonymous"></script>

        <link href='https://cdn.jsdelivr.net/npm/froala-editor@latest/css/froala_editor.pkgd.min.css' rel='stylesheet' type='text/css' />

    </head>
    <body>
        <div class="container">
            <div class="row justify-content-center">
                <h1 class="col-md-8 my-5 text-center">
                    Welcome To Our Support App
                </h1>
            </div>
            <div class="row justify-content-center">
                <div class="col-md-8">
                    <div class="card">
                        <div class="card-header">Submit a Support Request</div>

                        <div class="card-body">
                            <form method="POST" action="{{ route('requests.store') }}" >
                                @csrf
                                <div class="mb-3">
                                    <label for="name" class="form-label">Full Name</label>
                                    <input type="text" class="form-control @error('name') is-invalid @enderror" id="name" name="name" value="{{(old('name') ? old('name')  : '')}} ">
                                    @error('name')
                                    <span class="invalid-feedback">
                                            <strong>{{ $errors->first('name') }}</strong>
                                        </span>
                                     @enderror
                                </div>
                                <div class="mb-3">
                                    <label for="email" class="form-label">Email address</label>
                                    <input type="email" class="form-control @error('email') is-invalid @enderror" name="email" id="email" value="{{(old('email') ? old('email')  : '')}} " aria-describedby="emailHelp">
                                    <div id="emailHelp" class="form-text">We'll never share your email with anyone else.</div>
                                    @error('email')
                                    <span class="invalid-feedback">
                                            <strong>{{ $errors->first('email') }}</strong>
                                        </span>
                                     @enderror
                                </div>
                                <div class="mb-3">
                                    <label for="subject" class="form-label">Subject</label>
                                    <input type="text" class="form-control @error('subject') is-invalid @enderror" id="subject" name="subject" value="{{(old('subject') ? old('subject')  : '')}} " >
                                    @error('subject')
                                    <span class="invalid-feedback">
                                            <strong>{{ $errors->first('subject') }}</strong>
                                        </span>
                                     @enderror
                                </div>

                                <div class="mb-3">
                                    <label for="request" class="form-label">Request Details</label>
                                    <textarea class="form-control @error('request') is-invalid @enderror"
                                    id="request" name="request" rows="5">{{(old('request') ? old('request')  : '')}}</textarea>

                                    @error('request')
                                    <span class="invalid-feedback">
                                            <strong>{{ $errors->first('request') }}</strong>
                                        </span>
                                    @enderror
                                </div>

                                <button type="submit" class="btn btn-primary">Submit</button>

                            </form>
                        </div>
                    </div>
                </div>
            </div>
        </div>
        <script type='text/javascript' src='https://cdn.jsdelivr.net/npm/froala-editor@latest/js/froala_editor.pkgd.min.js'></script>

        <script>
            new FroalaEditor("#request", {

                toolbarButtons: [
                    ['fontSize', 'bold', 'italic', 'underline', 'strikeThrough'],
                    [ 'alignLeft', 'alignCenter', 'alignRight', 'alignJustify','textColor', 'backgroundColor'],
                    ['formatOLSimple', 'formatUL', 'insertLink','insertImage','insertFile'],
                ]

            });
        </script>
    </body>
</html>
Once you submit the form, the data will be validated using the specified rules. If validation fails, the user will be returned to the form page with error messages displayed, and the form inputs will be repopulated with the previously entered values.
Conclusion
In this tutorial, we explored the powerful combination of Laravel and the Froala Rich-text editor to create a comprehensive support system for web applications. By following this series, you learned how to set up the Laravel project, set up your MySQL database, and integrate the Froala editor. We also implemented form submission handling and form validation.
Utilizing Laravel’s robust features and the flexibility of the Froala editor enhances the user experience, empowers your support team, and streamlines the process of handling support requests.
Stay tuned for the next part of this series where you will learn how to save images uploaded with the Froala Editor and store them on a PHP server. We will use the Froala PHP SDK for a smooth experience.
If you have any questions or need further assistance, leave a comment below. Happy coding!



No comment yet, add your voice below!