Simplify Froala Image Management in Express Framework with Froala Node.JS SDK
- Posted on
- By Mostafa Yousef
- In Editor, Tutorials
Table of contents
- Install Froala Node.JS SDK
- Configure the Froala Editor
- Handle the Image Upload Request
- Test the Image Upload Functionality
- Image Validation
- Deleting Images with Froala Node.JS SDK
- Unlocking the other capabilities of the Froala Node.JS SDK
- Streamlining the editor Image handling in Express with Froala Node.JS SDK

Express framework is a popular web application framework for Node.JS. It provides a simple and minimalistic approach to building web applications. Froala is an advanced WYSIWYG editor for effortless content creation and editing. We discussed the integration between Froala and Express framework before. However, uploading images and files into the Node server needs additional configuration. The Froala Node.js SDK simplifies uploading images and files to Froala in an Express application. With this SDK, you can easily handle image uploads, validate them, store them, and delete them on your server. This makes it incredibly convenient to integrate Froala into your Express application and provide a seamless image-uploading experience for your users.
Throughout this tutorial, we will cover the steps to set up the uploading image process in your Express application using the Froala Node.JS SDK. We will continue from where we left off in the integration article. We recommended reading the integration guide first.
Install Froala Node.JS SDK
You can install the Froala Node.JS SDK by running the following command in your terminal:
npm install wysiwyg-editor-node-sdk
Import the SDK into your Express application after installing it by adding this line of code in the app.js file.
var FroalaEditor = require(__dirname+'/node_modules/wysiwyg-editor-node-sdk/lib/froalaEditor.js');
Configure the Froala Editor
We will need to configure the Froala initialization function to assign the image upload options and events. There are six API options and five events related to this feature.
imageUploadParam: is the name of the parameter that contains the image file information in the upload request. The default value is “file” but you can change it to whatever name you want.imageUploadURL: is the URL where the upload request is being made.imageUploadParams: are additional parameters that are passed in the upload request to the server.imageUploadMethod: is the HTTP request type. It is ‘POST’ by default.imageMaxSize: sets the upper limit for image size during uploading.image.beforeUpload: Froala triggers this event before starting the upload request and it can be used to change the upload params or cancel the action.image.uploaded: Froala triggers this event after a successful image upload request, but before inserting the image into the editor.image.inserted: Froala triggers this event after inserting the image into the editor.image.replaced: Froala triggers this event after replacing the image in the editor.image.error: Froala triggers this event if any errors occur during the upload process.
In the “editor.ejs” file, change the initialization method to
var editor = new FroalaEditor("#example", {

imageUploadURL: '/upload_image'

});
The above code will configure the Froala Editor to upload images to the ‘/upload_image’ URL.
Handle the Image Upload Request
We need to define the ‘/upload_image’ route in our Express application to handle the image upload request. It will receive the image file and save it on the server using the FroalaEditor.Image.upload method.
Add the following code to your app.js file:
app.post('/upload_image', function (req, res) {
    // Store image.

    FroalaEditor.Image.upload(req, '/uploads/', function(err, data) {

    // Return data.

    if (err) {

         return res.send(JSON.stringify(err));

     }

     res.send(data);

   });

});
The above code will create a POST route in your Express application at ‘/upload_image’. When this route receives a request, it will use the FroalaEditor.Image.upload method to store the uploaded image in the ‘/uploads/’ directory on the server. If there are any errors during the upload process, it will return the error as a JSON string. Otherwise, it will send the data object containing information about the uploaded image as the response.
Create an “uploads” folder in the root of our Express app to store uploaded images.
Also, add the below code to the “app.js” file to give the server access to the static files in the root directory. This will allow images and files in ‘/uploads/’ to be accessed.
app.use(express.static(__dirname + '/'));
Now, when you upload an image with the Froala Editor, it will be saved in the ‘/uploads/’ directory and accessible through the ‘/uploads/’ URL.
The full app.js code is
var express = require('express');

var FroalaEditor = require(__dirname+'/node_modules/wysiwyg-editor-node-sdk/lib/froalaEditor.js');

var app = express();

// Set EJS as the view engine

app.set('view engine','ejs');

//Froala editor CSS & JS files

app.use('/froalacss',express.static(__dirname+'/node_modules/froala-editor/css/froala_editor.pkgd.min.css'));

app.use('/froalajs',express.static(__dirname+'/node_modules/froala-editor/js/froala_editor.pkgd.min.js'));

//So images can be displayed after stored

app.use(express.static(__dirname + '/'));

// Define routes

app.get('/',(req,res)=>{

  res.render('editor');

});


// Path to upload image.

app.post('/upload_image', function (req, res) {

     // Store image.

     FroalaEditor.Image.upload(req, '/uploads/', function(err, data) {

    // Return data.

    if (err) {

    return res.send(JSON.stringify(err));

    }

    res.send(data);

   });

});

var port = process.env.PORT || 3000;

app.listen(port,()=>console.log('server run at port '+port));
Test the Image Upload Functionality
Now that we have configured the Froala Editor and created a route to handle the image upload request, we can test the functionality. Start your Express application by running the following command:
node app.js
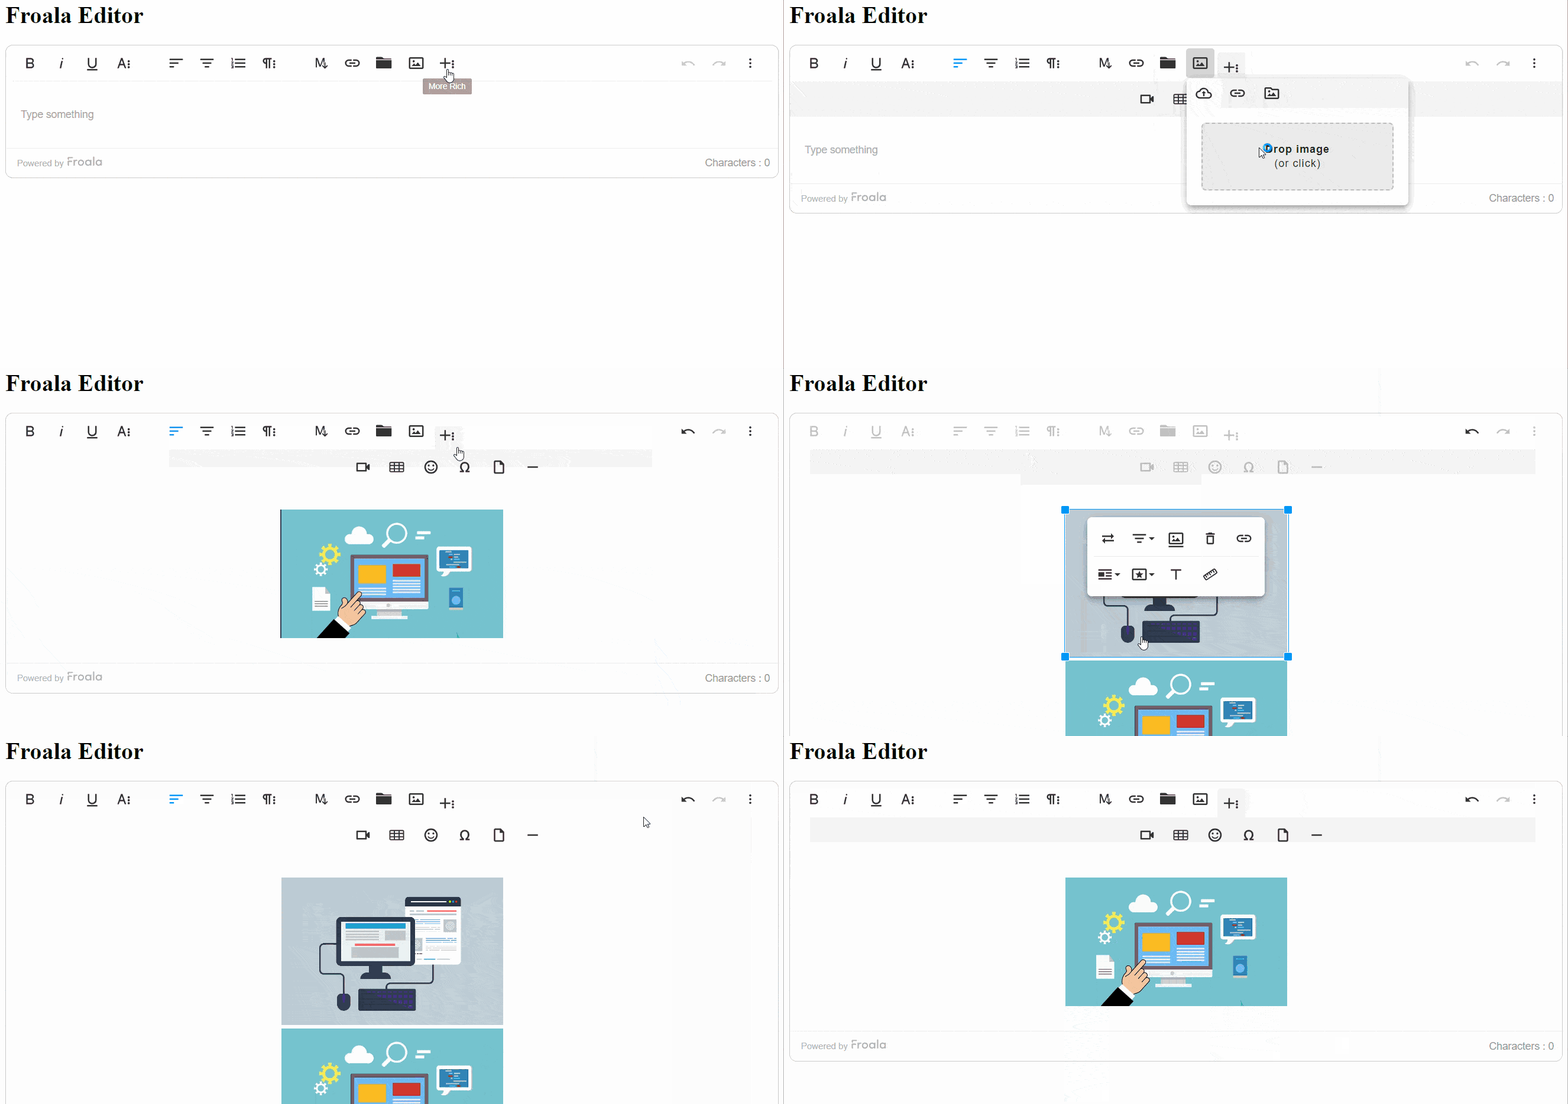
Once your application is running, open http://localhost:3000/ and start working with the editor. Upload an image using the editor and see if it gets stored in the “uploads” directory. You should be able to successfully upload and store images using the Froala Editor in your Express application.
Image Validation
To further enhance the image upload functionality, you can add validation to ensure that only specific image types and sizes are allowed. Froala Node.JS SDK simplifies the image validation process.
Using the SDK, you can pass an object with the validation roles at the third parameter of the FroalaEditor.Image.upload method. The supported validation rules are:
allowedExts: Contains the allowed image extensionsallowedMimeTypes: Contains the allowed mime types
In the following code, we altered the “/upload_image“ route handler to allow only JPEG and JPG image types to be uploaded through Froala editor
// Path to upload image.

app.post('/upload_image', function (req, res) {

var options = {

  validation: {

   'allowedExts': [ 'jpeg', 'jpg'],

   'allowedMimeTypes': [ 'image/jpeg', 'image/pjpeg']

  }

}

// Store image.

FroalaEditor.Image.upload(req, '/uploads/', options, function(err, data) {

   // Return data.

   if (err) {

     return res.send(JSON.stringify(err));

   }

   res.send(data);

  });

});
However, if you want to perform other validation, it is possible too. You can pass a custom method instead of the validation object with filePath, mimetype, and callback parameters. This gives you full control over what types of images you want to store on disk. Learn how the custom validation works.
Deleting Images with Froala Node.JS SDK
The Froala Node.JS SDK also simplifies deleting images on the editor from the server. When You click on an image in the editor, a pop-up appears. On that pop-up, there is a delete image button. When a user clicks on that button, the editor triggers two events: froalaEditor.image.beforeRemove and froalaEditor.image.removed. You can use either option to delete the image from the server, but it’s recommended to use the second one to ensure that the image is removed from the editable area.
In the froalaEditor.image.removed event, we will send a request to the server to delete the image. In the “app.js” you will need to define a route to handle the delete request. This handler will use the FroalaEditor.Image.delete() method from the Node.JS SDK to remove the image from the server.
Unlocking the other capabilities of the Froala Node.JS SDK
The Froala Node.JS SDK will help you also store images on the Amazon S3 bucket, display the uploaded images on Froala Image Manager, and handle other files on your Node.JS server.
Streamlining the editor Image handling in Express with Froala Node.JS SDK
With these configurations and code in place, you have successfully simplified uploading images to Froala Editor in an Express framework application using the Froala Node.js SDK. The Froala Node.JS SDK provides a convenient way to handle image uploads, validate them, and store them on your server. This integration allows you to provide a seamless image-uploading experience for your users. You can now continue building your Express application with the enhanced functionality of Froala Editor.


No comment yet, add your voice below!