How to integrate Froala With Vue 3
- Posted on
- By Mostafa Yousef
- In Editor, Tutorials
Table of contents
- Step 1: Create a simple Vue project
- Step 2: Install Vue WYSIWYG editor (the Froala Editor Package)
- Step 3: Integration
- 3.1 Import Froala Editor in main.js
- 3.2 Initializing the Editor
- Step 4: Run the project
- Step 5 Displaying HTML
- Step 6: Customizing Your Froala’s Vue WYSIWYG editor
- Options
- Events
- Methods
- Custom Buttons
- Ready to build more with Froala and its Vue WYSIWYG Editor?
- Test Froala’s Vue Wysiwyg Editor
We are pleased to announce that Froala version 4.1 has been released. This new version of Froala also provides users with an improved experience, better performance and accessibility. It also includes new features such as support for Vue.js 3.x.
Vue.js 3.0 is a popular JavaScript framework for developing highly reactive user interfaces. Froala improves application user interfaces by offering an intuitive, feature-rich WYSIWYG editor that comes with numerous styling options, image management features, in-built support for rich text editing, video embedding, SEO-friendly, and many other features. That’s why I’m excited to show you how easy it is to integrate the Froala WYSIWYG editor with a Vue 3 application.
Before diving in, we assume you have a working knowledge of:
- JavaScript (including some of the newer, es2015 features)
- Vue 3
- How to use the terminal/command line
- Node and npm
We will create a simple application and guide you step-by-step through this tutorial. There will be a working demo at the end of the article.
Step 1: Create a simple Vue project
Skip this step if you already have a Vue 3 project setup. If not, head over to your terminal/console.
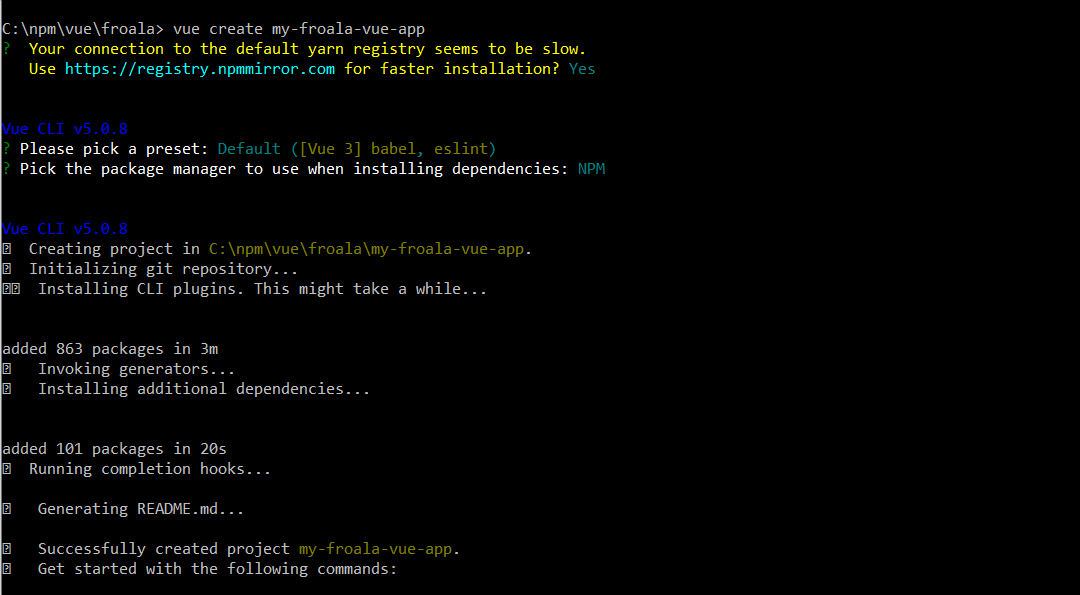
Using your terminal, you can create a new Vue.js project with vue-create:
1.1 Install the Vue CLI
npm install -g @vue/cli
1.2 Inside the folder where you want to create your new Vue project run the Vue create command for a basic Vue project
vue create my-froala-vue-app
1.3 The terminal will prompt some configuration questions. Carefully answer them with your preferred set-up settings. I selected `Default ([Vue 3] babel, eslint)` for a simple Vue 3 project. I also picked ‘NPM‘ as the package manager to use when installing dependencies.
Step 2: Install Vue WYSIWYG editor (the Froala Editor Package)
Step inside the project directory:
cd my-froala-vue-app
Once inside, install Froala’s Vue WYSIWYG editor by running the following command:
npm install vue-froala-wysiwyg --save
| Note: |
This installs the latest Froala Vue SDK which supports Vue 3. If you are using an earlier Vue version, use the following command instead
npm install [email protected] --save Unfortunately, this command will not install the latest version of Froala. Therefore, we recommend updating Vue and installing Froala using the first command. |
Congratulations, you have successfully installed Froala in your Vue application. This means you can now use the VueFroala component in your project. To use the editor component in your application, you need to import it into main.js. Let’s see how to do that!
Step 3: Integration
3.1 Import Froala Editor in main.js
Open your main.js file and import the imperative bits for Froala Editor. Here’s what your file should include:
import { createApp } from 'vue'
import App from './App.vue'

//Import Froala Editor plugins
import 'froala-editor/js/plugins.pkgd.min.js';


// Import Froala Editor css files.
import 'froala-editor/css/froala_editor.pkgd.min.css';
import 'froala-editor/css/froala_style.min.css';


// Import Froala Editor component
import VueFroala from 'vue-froala-wysiwyg';

const app = createApp(App);

app.use(VueFroala);
app.mount('#app');
3.2 Initializing the Editor
From within your project directory, open the src/App.vue file. By default, it makes use of a HelloWorld component:
<template>

  <img alt="Vue logo" src="./assets/logo.png">

  <HelloWorld msg="Welcome to Your Vue.js App"/>

</template>


<script>

import HelloWorld from './components/HelloWorld.vue'


export default {

  name: 'App',

  components: {

    HelloWorld

  }

}

</script>


<style>

#app {

  font-family: Avenir, Helvetica, Arial, sans-serif;

  -webkit-font-smoothing: antialiased;

  -moz-osx-font-smoothing: grayscale;

  text-align: center;

  color: #2c3e50;

  margin-top: 60px;

}

</style>
Remove the importing and declaring the HelloWorld component within the <script> tags since we will use the Froala editor component instead.
In the App component definition, add the data function that defines the component’s data properties. Inside the data function, add the following properties:
config: is an object that contains the editor API optionsmodel: a string containing the editor’s default HTML content displayed by the editor.
<script>

export default {

  name: 'App',

  data () {

    return {

      config: {

        //documentReady: true,

        //direction: 'rtl',

        heightMin: 300,

        events: {

          initialized: function () {

            console.log('initialized')

          }

        }

      },

      model: '<i>Edit Your Content Here!</i>'

    }

  }

}

</script>
Finally, replace the HelloWorld component within the <template> tags with the editor component :
<template>

  <img alt="Vue logo" src="./assets/logo.png">

  <froala id="edit" :tag="'textarea'" :config="config" v-model:value="model"></froala>

</template>
:tagattribute is used to tell on which tag the editor is initialized.:configattribute is used to configure the editor optionsv-model:valueUsed to load editor content. This value is affected by editor HTML changes.
:config and v-model:value are using the config and model data properties we defined previously.
Note: There will be changes to the model value if you want to initialize the editor based on a, button, img, or input tags. We will cover these special tags in detail in another article since they change the editor’s interface.
Step 4: Run the project
After the integration is complete, it’s time to run your project to see the editor in action.
To start your local development server and see your application, run the following command in your terminal:
npm run serve
This command will start the development server and mounts your application at `http://localhost:8080`
You can always stop the server by using the `CTRl + C` command.
That should reveal your new Froala editor within your Vue 3 Project.
Step 5 Displaying HTML
To display content created with the Froala editor use the froalaView component.
<froalaView v-model:value="content"></froalaView>
Step 6: Customizing Your Froala’s Vue WYSIWYG editor
Customizing the Froala editor is distinctively easy. The powerful Froala Editor API allows customizations by adjusting our config object. Refer to the API options, events, and methods docs to see what it offers. For instance, you can edit toolbar buttons using the toolbarButtons API option. Here is an example
<template>

  <img alt="Vue logo" src="./assets/logo.png">

  <froala id="edit" :tag="'textarea'" :config="config" v-model:value="model"></froala>

</template>

<script>

export default {

  name: 'App',

  data () {

    return {

      config: {

          toolbarButtons: {

            'moreText': {

              'buttons': [ 'italic', 'underline', 'bold', 'strikeThrough', 'subscript', 'superscript', 'fontFamily', 'fontSize', 'textColor', 'backgroundColor', 'inlineClass', 'inlineStyle', 'clearFormatting']

            },

            'moreParagraph': {

              'buttons': ['alignLeft', 'alignCenter', 'formatOLSimple']

            },

            'moreRich': {

              'buttons': ['insertLink', 'insertImage', 'insertVideo', 'insertTable', 'emoticons', 'fontAwesome', 'specialCharacters', 'embedly', 'insertFile', 'insertHR']

            },

            'moreMisc': {

              'buttons': ['undo', 'redo', 'fullscreen', 'print', 'getPDF', 'spellChecker', 'selectAll', 'html', 'help'],

              'align': 'right',

              'buttonsVisible': 2
            }

          },

        events: {

          initialized: function () {

            console.log('initialized')

          }

        }

      },

      model: '<i>Edit Your Content Here!</i>'

    }

  }

}

</script>

<style>

#app {

  font-family: Avenir, Helvetica, Arial, sans-serif;

  -webkit-font-smoothing: antialiased;

  -moz-osx-font-smoothing: grayscale;

  text-align: center;

  color: #2c3e50;

  margin-top: 60px;

}

</style>
Options
You can pass any existing Froala option within the config attribute. Vue SDK users will also be able to utilize a specific Froala option:
- immediateVueModelUpdate: (default: false) This option updates the Vue model as soon as a key is released in the editor. Note that it may affect performance.
Events
As you can see in the previous example, API Events can be passed in with the options. Events are passed as an object named “events” in which you can define all the different events you want to use. Each defined event is an object where the key is the event name and the value is the callback function.
Methods
Using the editor instance from the arguments of the event callback you can call any method described in the method docs.
Custom Buttons
Furthermore, you can extend editor functionality by defining custom buttons. Froala allows us to define and add new buttons to the toolbar very conveniently and we will describe how to do this in a separate article.
Ready to build more with Froala and its Vue WYSIWYG Editor?
Froala doesn’t just provide a WYSIWYG editor but a powerful tool that enhances the user experience and makes content creation a breeze. With support for Vue, you can integrate Froala into various Vue projects ensuring a consistent user experience.
From the way you configure it, to the way you handle events or even create custom functionality, Froala’s Vue WYSIWYG Editor is remarkably simple and efficient.
Remember that an effective user interface yields better user engagement. Use Froala’s Vue WYSIWYG Editor for your content creation and enjoy the difference it makes.
Test Froala’s Vue Wysiwyg Editor
We built a Vue demo application showcasing the editor’s capabilities. You can use this as a starting point to test and understand how it works and fits your project requirements. Play with our demo and share your feedback in the comments.




2 Comments
How can I use Froala in a local vue component, not using main.js?
The reason why I am asking is that we are using the Quasar Framework on yop of Vuejs3, and this does not have a main.js.
In vue2 I was able to use Froala locally, but in Vuejs3 we failed.
So, how can we use Froala locally?
Hello Ronald,
You can inject the Froala component before the root Vue app is instantiated using Quasar’s “boot files” feature. This will make the Froala Vue component available globally in your application. Read more about integrating Froala into the Quasar framework.