Days
Hours
Minutes
Seconds
x
Skip to content

Froala v5.3.1: Real-Time Collaborative Editing Plugin, Svelte.js Support, and More

Froala 5.3.1 release
Froala Editor v5.3.1 is our biggest release in recent memory, headlined by the brand-new Collaborative pluginย that brings real-time editing, comments, suggestions, and version control directly into the editor. This version also adds first-class Svelte.js support, a customizable font-size input, module-friendly Word import, and a reworked clipboard storage mechanism that keeps copied content out of localStorage by default.

Key Takeaways

  • The new Collaborative plugin adds real-time editing, comments, suggestions, and version control.
  • Real-time collaboration and persistence require a backend server (included in the Node SDK).
  • An official Svelte wrapper,ย svelte-froala-wysiwyg, makes Svelte integration native.
  • Custom font sizes, module-friendly Word import, and more private clipboard handling round out the release.

Heads-Up Before You Upgrade

Good news: v5.3.1 introduces no breaking API changes. Your existing configuration will continue to work as-is. There is one behavioral change worth knowing about before you deploy:

  • Clipboard storage no longer uses localStorage by default.ย Copied editor content is now written to the Origin Private File System (OPFS) in secure contexts, with an automatic localStorage fallback for non-secure contexts. This change happens automatically and requires no configuration. See the Improvements section for details.

What’s New in v5.3.1

New Features

  • Collaborative plugin.ย Real-time editing, inline comments, tracked-change suggestions, and version control, all in one plugin. This is the flagship feature of the release, covered in detail below.
  • Svelte.js support.ย An official Svelte wrapper,ย svelte-froala-wysiwyg, lets you drop the editor into a Svelte project with two-way data binding and full access to Froala’s options and events, no custom integration required.
  • Custom font sizes.ย The font-size dropdown now includes a custom option that opens a popup for entering an exact size, with configurable minimum and maximum limits so users can set the precise size they need without leaving the toolbar.

Improvements

  • Configurable Mammoth instance for Import from Word.ย A newย importFromWordMammothย option lets you pass the Mammoth library as a module, which makes the Import from Word plugin work cleanly in modern build tools like Vite, Webpack, and other ES-module bundlers instead of relying on a globalย window.mammoth.
  • More private clipboard handling.ย Copied content is no longer persisted to localStorage by default. Froala now uses the Origin Private File System (OPFS) for clipboard metadata in secure contexts, reducing exposure of potentially sensitive content. See Private Clipboard Handling below for details.

Deep Dive: The Collaborative Plugin

Editing content is rarely a solo activity. Teams co-author articles, review contracts, and approve knowledge-base updates together, and until now that meant leaving the editor to trade changes over email, exports, and Word round-trips. The result was overwritten content from simultaneous edits, slow approval cycles, and no reliable history to roll back to.

The new Collaborative plugin solves this by bringing four highly requested capabilities into the editor itself:

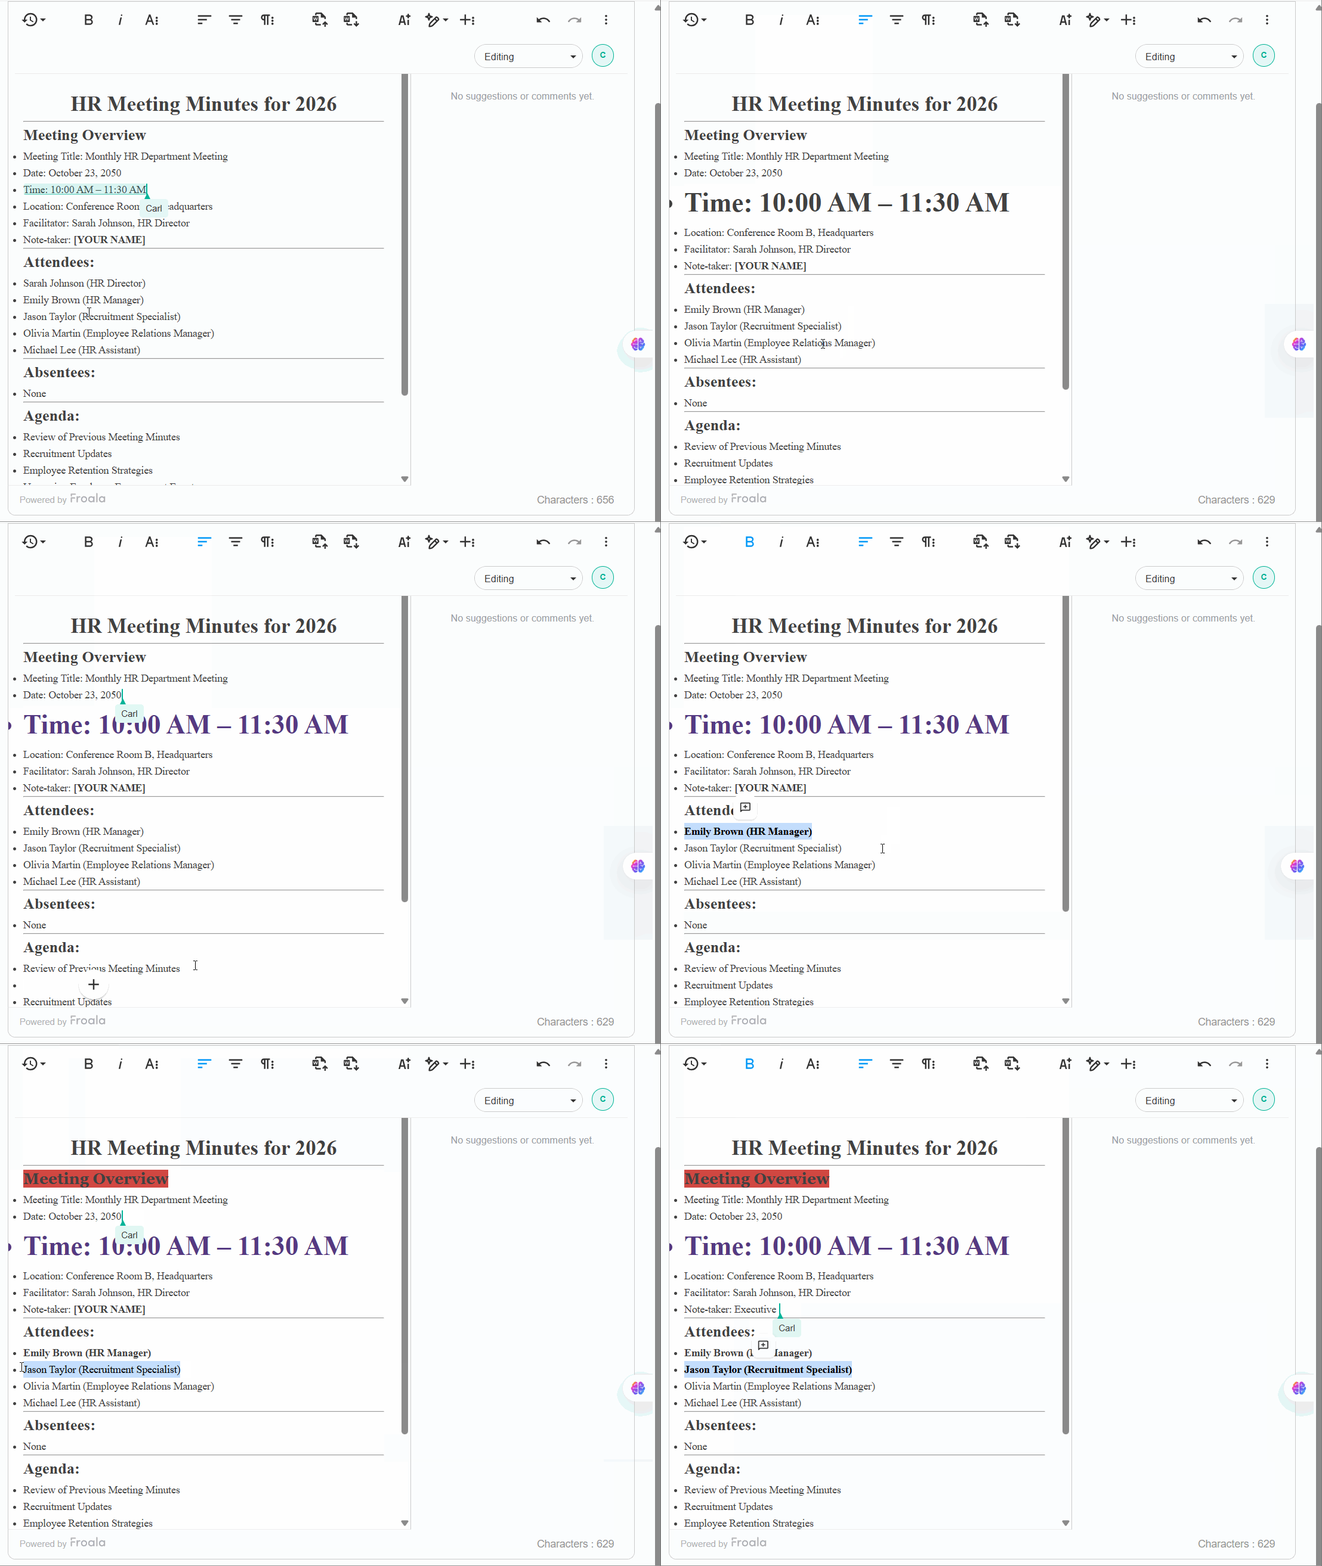
  • Real-time editing.ย Every editor instance stays in sync as users type. A conflict-free replicated data type (CRDT) engine resolves concurrent edits and presence indicators show active cursors, so two people can edit the same document without overwriting each other.

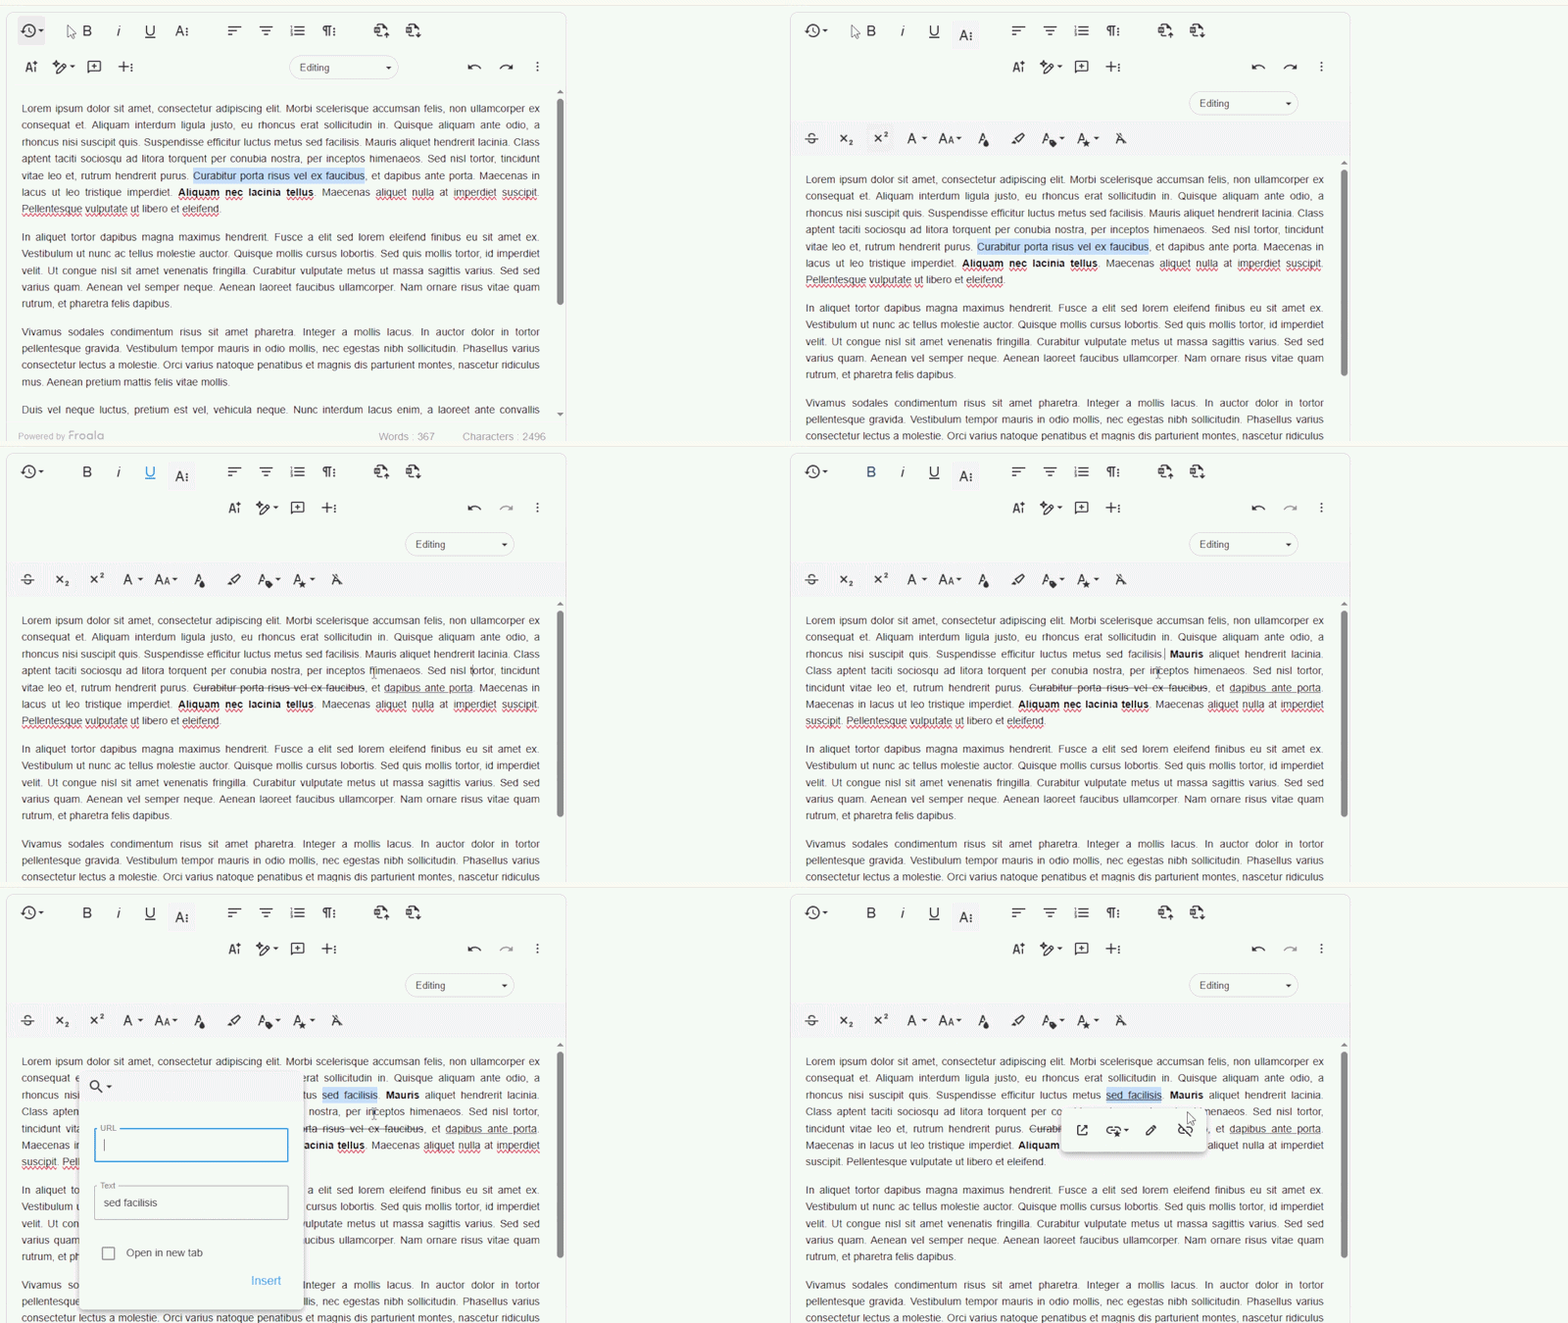
Real-time editing

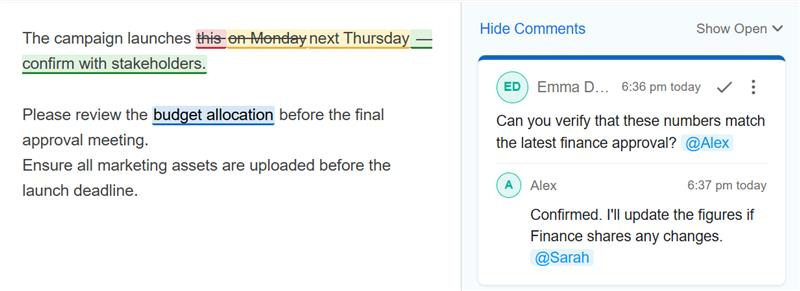
  • Comments.ย Highlight any text and attach a threaded, inline comment. Collaborators can reply, resolve threads, and @mention teammates, all anchored to the exact content under discussion.

comments

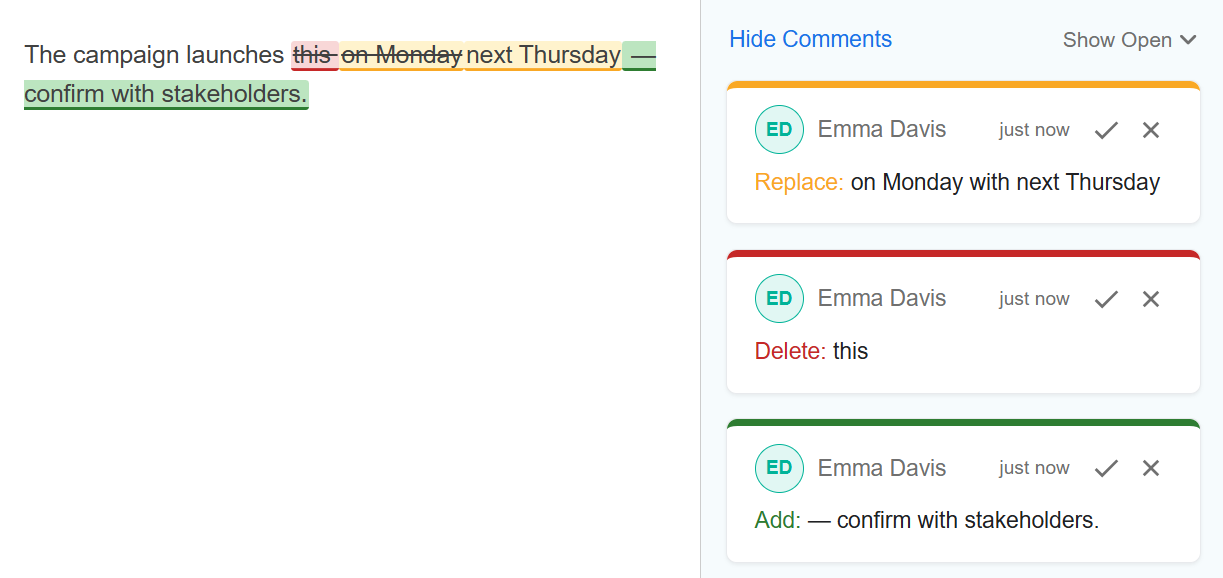
  • Suggestions.ย Reviewers propose insertions, deletions, and rewrites without touching the live document. Owners accept or reject each change individually.

Suggestions

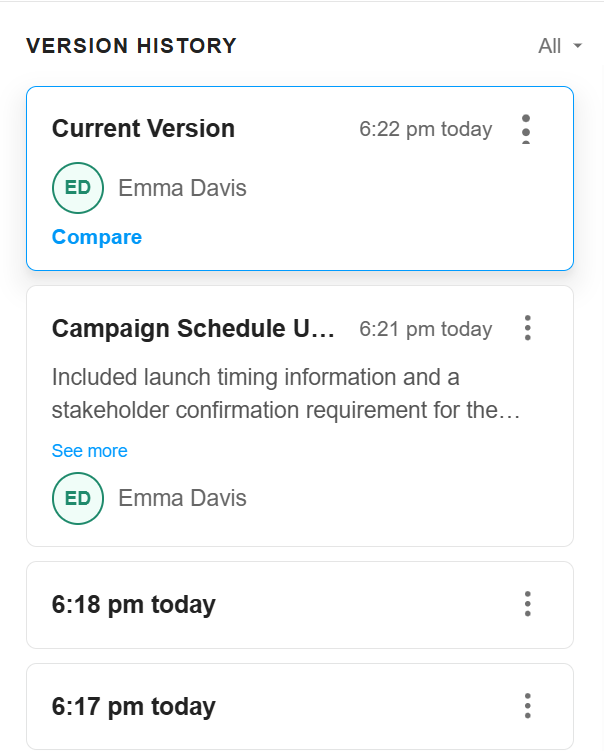
  • Version control.ย Browse timestamped snapshots with author attribution, compare any two versions side by side, and restore a prior state in one click.

Version control

How It Works

The Collaborative plugin operates in two modes. In real-time mode, editors that share the same docIdย connect to a WebSocket server and collaborate live. In asynchronous (offline-first) mode, the plugin instead reads and writes collaborative data through REST endpoints. The single switch that flips between them isย collabConfig.realTime.syncUrl: set it to enable real-time collaboration, or leave it null to fall back to async mode.

Comments, suggestions, and version history are shared live between connected users, but that live data is not persisted on its own. To store it in a database, point the editor at your backend usingย commentsUrl,ย suggestionsUrl, andย versionControl.url.

Configuring the Editor

Here is a real-time setup with a user identity, a shared document ID, persistence URLs for comments, suggestions, and versions, and periodic auto-saved snapshots:

new FroalaEditor('.selector', {
  collabConfig: {
    user: {
      id: 'user-42',
      name: 'Alice',
      role: 'editor' // 'editor' | 'suggester' | 'viewer'
    },
    docId: 'my-doc',
    commentsUrl: 'http://localhost:3000/collab/my-doc/comments',
    suggestionsUrl: 'http://localhost:3000/collab/my-doc/suggestions',
    realTime: {
      syncUrl: 'ws://localhost:3000',
      reconnectDelay: 2000
    },
    versionControl: {
      url: 'http://localhost:3000/collab/my-doc/versions',
      autoSaveEnabled: true,
      autoSaveInterval: 300000 // save a snapshot every 5 minutes
    }
  }
});

The plugin also exposes methods and events for driving collaboration from your own UI. For example, you can switch modes, add a comment on the current selection, or save a named version snapshot:

var editor = new FroalaEditor('.selector', {}, function () {
  // Switch the active collaboration mode (respects the user's role).
  editor.collaborative.setMode('suggesting');

  // Add a comment anchored to the currently selected text.
  editor.collaborative.addComment('Please clarify this sentence.');

  // Save a named version snapshot.
  editor.collaborative.saveVersion('Draft v1', 'Before major revisions')
    .then(function (record) {
      console.log('Saved version:', record.id);
    });
});

And you can react to collaboration activity through events such asย collab.connectionStatus,ย collab.remoteContentChanged, andย version:create:

new FroalaEditor('.selector', {
  events: {
    'collab.connectionStatus': function (status) {
      // 'connecting' | 'connected' | 'disconnected'
      console.log('Connection status:', status);
    },
    'collab.remoteContentChanged': function () {
      console.log('Remote content updated.');
    },
    'version:create': function (record) {
      console.log('New version saved:', record.title, 'at', record.createdAt);
    }
  }
});

Setting Up the Backend

Real-time collaboration and persistence require a backend server. The Collaborative backend ships in theย wysiwyg-editor-node-sdkย package and is split into four modules: a WebSocket relay for real-time peer sync, REST endpoints for comments and suggestions, a version history store, and an async content-save endpoint. All four can share a single HTTP server and a single SQLite file, and the requiredย better-sqlite3ย dependency installs automatically with the package.

A minimal Express server that runs the WebSocket relay and all REST routes on one port looks like this:

const http = require('http');
const path = require('path');
const express = require('express');

const FroalaEditor = require('wysiwyg-editor-node-sdk');
const Collaborative = FroalaEditor.Collaborative;
const CollabPersistence = FroalaEditor.CollabPersistence;
const VersionControl = FroalaEditor.VersionControl;
const AsyncSave = FroalaEditor.AsyncSave;

const app = express();
app.use(express.json());

// REST routes for comments + suggestions, version history, and async save.
// All three can share a single SQLite file.
const dbPath = path.join(__dirname, 'data', 'collab.db');
CollabPersistence.attachRoutes(app, { dbPath: dbPath });
VersionControl.attachRoutes(app, { dbPath: dbPath });
AsyncSave.attachRoutes(app, { dbPath: dbPath });

// Share a single HTTP server between Express and the WebSocket relay.
const server = http.createServer(app);
Collaborative.attachToServer(server);

server.listen(3000, function () {
  console.log('Collaborative backend listening on port 3000');
});

Once the server is running, clients that connect with the sameย docIdย are treated as peers: the relay broadcasts every sync message to the other members of that document, while the REST endpoints (namespaced underย /collab/:docId/) persist comments, suggestions, and version snapshots. For the full endpoint reference, request and response schemas, and configuration options, see the docs.

More in This Release

Custom Font Sizes

Users sometimes need a size that isn’t in the preset list. Addingย customย to theย fontSizeย array surfaces a Custom option in the dropdown that opens a popup for entering an exact value, so users can hit the precise size they want without a workaround. Two new options,ย fontSizeCustomMinย (default 8) andย fontSizeCustomMaxย (default 96), validate the entered value. Existing preset sizes behave exactly as before. Note that if you override the defaultย fontSizeย array and still want this feature, you must explicitly includeย 'custom'.

new FroalaEditor('.selector', {
  // Add 'custom' to expose the manual-entry option.
  fontSize: ['8', '12', '18', '24', '36', '48', 'custom'],
  fontSizeCustomMin: 8,
  fontSizeCustomMax: 96
});

Svelte.js Support

Svelte developers now have an official Svelte wrapper for Froala Editor. The svelte-froala-wysiwygย component gives you a native Svelte way to drop the editor into a project, so you no longer have to build or maintain your own integration to get the editor running in a Svelte app. It ships with two-way data binding, full access to Froala’s options and events, support for initializing on special tags, and manual control over the editor lifecycle.

To get started, run:

npm install svelte-froala-wysiwyg

Configurable Mammoth for Import from Word

The Import from Word plugin previously expected mammoth.js on the global window object, which is awkward in module-based builds. The newย importFromWordMammothย option lets you pass the library instance explicitly, so the plugin works in Vite, Webpack, and ES-module setups. It defaults toย window.mammoth, and you can set it to false to disable it. The Mammoth library must still be available before the editor initializes.

import mammoth from 'mammoth';

new FroalaEditor('.selector', {
  importFromWordMammoth: mammoth
});

Import from Word plugin docs

Private Clipboard Handling

Previously, content copied within the editor could be persisted in the browser’s localStorage, which meant user-generated content, potentially including sensitive or personally identifiable information, could linger beyond the editing session. That raised data-minimization and storage-limitation concerns under regulations such as GDPR, with no way to control the behavior.

In v5.3.1, Froala no longer persists clipboard content to localStorage by default. Clipboard metadata is now stored in the Origin Private File System (OPFS), a more isolated, browser-managed storage mechanism that reduces exposure through standard browser storage APIs. Because OPFS is only available in secure contexts, the editor checks window.isSecureContextย and automatically falls back to localStorage on non-secure domains, so copy and paste keep working reliably everywhere. Native browser copy/paste behavior and compatibility with external applications are fully preserved, and the change requires no configuration on your part.

Much Moreโ€ฆ

This release includes additional improvements and bug fixes. Including:

  • Improved:ย Enhanced the Dark theme with refined styling for popups to improve visibility and consistency.
  • Fixed:ย Browser spellcheck no longer expands the selection beyond the target word into adjacent text nodes (such as afterย <br>ย elements), preventing unintended text deletion.
  • Fixed:ย Word counter now correctly blocks input at the maximum limit even when followed by punctuation.

See the complete changelog for details.

Upgrade to v5.3.1 Today

Froala Editor v5.3.1 is a major step forward in collaboration, developer experience, and privacy. With a full real-time Collaborative plugin, native Svelte.js support, customizable font sizes, module-friendly Word import, and more private clipboard handling, this release delivers tangible value for developers and end users alike.

Key Benefits

  • Collaborate in real time.ย Real-time editing, comments, suggestions, and version control let teams co-author in the editor instead of trading exports and email threads, with no overwrites from simultaneous edits.
  • Drop into modern stacks.ย Native Svelte.js support and a module-friendly Import from Word option mean Froala fits cleanly into Svelte, Vite, Webpack, and ES-module builds.
  • Give users precise control.ย The custom font-size input lets users enter an exact size, with configurable min and max limits, without leaving the toolbar.
  • Keep content more private.ย Clipboard data stays out of localStorage by default, reducing exposure of potentially sensitive content while copy and paste keep working reliably everywhere.
  • Upgrade with confidence.ย No breaking API changes, so your existing configuration keeps working as-is.

Whether you are building the next generation of content management systems, developing collaborative enterprise applications, or simply want the most reliable and feature-rich editing experience available, v5.3.1 has something for you.

Upgrade to the latest version and start collaborating in real time.

Ready to Upgrade?

Check ourย getting-started guide to know how to download the latest Froala Editor release and how to include it in your project based on your preferred method.ย As always, our support team is here to help if you have any questions or need assistance with the upgrade process.

Upgrade to Froala Editor v5.3.1 today and unlock new possibilities.

Try the Latest Froala Editor

Explore a variety of examples that demonstrate the functionality of the Froala HTML Editor.

Thank you for being part of the Froala community. We are committed to continuously improving and delivering the tools you need to build exceptional content experiences.

Froala vs AIEditor: Which Rich Text Editor Should You Choose in 2026?

Froala vs AIEditor: Which Rich Text Editor Should You Choose in 2026?

If you’re adding a rich text editor to your app, you’ve probably come across AIEditor and Froala.

AIEditor is a newer, open-source editor built with AI in mind. Froala has been around for over a decade and is used in CMS platforms, CRMs, email builders, and other applications.

So, which one should you choose?

There isn’t one answer that works for every project. In this article, we’ll compare AIEditor and Froala based on pricing, built-in features, AI support, and what it’s actually like to use them as your app grows.

Let’s get into it.

Key Takeaways

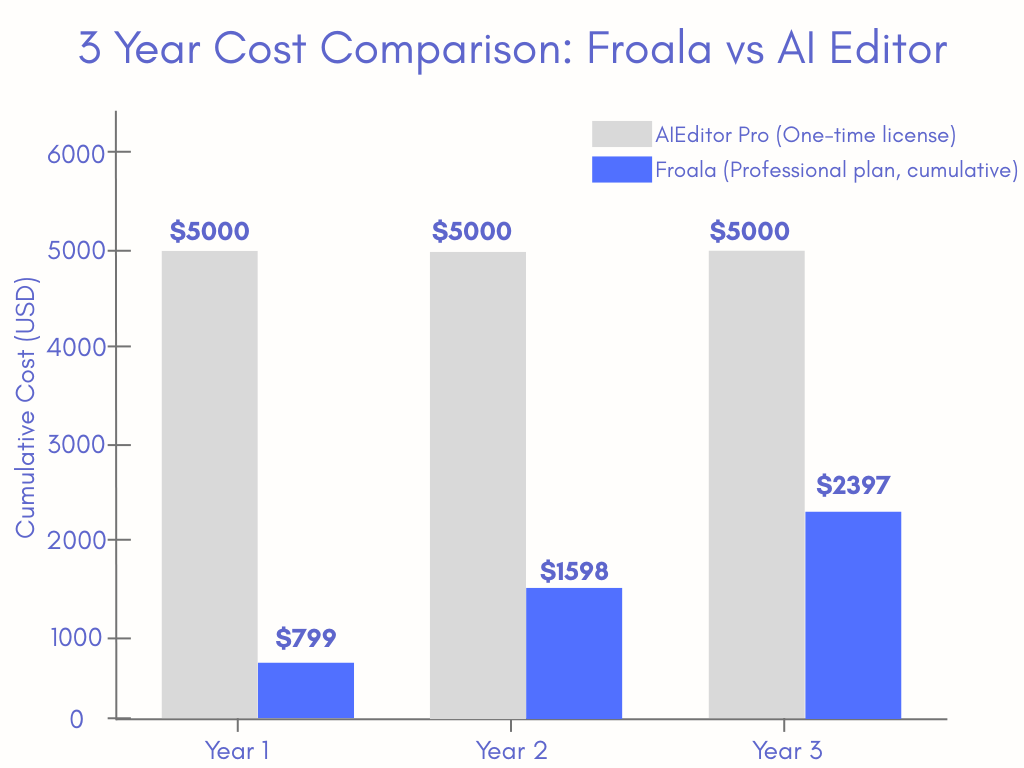
  • AIEditor is an open-source, AI-focused editor with a generous free version, but its Pro version costs $5,000โ€“$8,000.
  • Froala starts at around $799/year and includes unlimited editor loads, unlimited users, built-in plugins, and technical support.
  • Both editors support AI, but Froala’s AI Assist works with multiple AI providers and gives you more control over AI-generated content.
  • AIEditor works well for small projects, while Froala is a better fit for products that need to scale and be maintained long-term.
  • Both editors are quick and easy to integrate.

Quick Comparison Table

Before we get into the setup and code, here’s a quick side-by-side comparison of AIEditor and Froala.

This table gives you a quick look at their pricing, features, AI support, plugins, and more. We’ll cover each of these points in more detail later in the article.

Feature AIEditor Froala
License model LGPL (open source) + paid Pro tiers Commercial subscription/perpetual license
Starting price Free (open source) / $5,000+ for Pro ~$799/year (Professional plan)
Users & editor loads Yes, on both open source and Pro Yes, on every paid plan
Framework support React, Vue, Angular, Svelte, and more React, Angular, Vue with maintained LTS SDKs
Plugin ecosystem Built-in features Full plugin library included on all plans
File management Manual setup Native Filestack integration (uploads, CDN, image editing)
AI features AI writing, translation, chat, and code tools AI Assist plugin, works with any LLM provider
Support Community + direct contact for Pro Dedicated technical support
Best for Small projects and developers who prefer open source Teams shipping production apps that need predictable cost and support


At first glance, AIEditor and Froala look quite similar. Both are capable rich text editors with AI features and modern framework support.

The biggest difference is pricing. AIEditor Pro uses a one-time license fee, while Froala offers annual and perpetual license options. So, itโ€™s worth looking at the long-term cost rather than just the starting price. Identifying these pricing structures is a vital step toward selecting the best WYSIWYG editors for developers who need to reconcile immediate budget constraints with long-term scalability.

A visual diagram showing 3 year cost comparison of Froala and AI editor

With that in mind, let’s see how easy each editor is to set up and use.

Setting Up AIEditor

AIEditor is easy to add to a simple HTML page. You don’t need npm or any build tools to get started.

<!DOCTYPE html>

<html>

ย ย <head>

ย ย ย ย <link rel="stylesheet" href="<https://cdn.jsdelivr.net/npm/aieditor/dist/style.css>" />

ย ย </head>

ย ย <body>

ย ย ย ย <div id="editor-container" style="height: 400px;"></div>

ย ย ย ย <script type="module">

ย ย ย ย ย ย import { AiEditor } from "<https://esm.run/aieditor>";

ย ย ย ย ย ย const editor = new AiEditor({

ย ย ย ย ย ย ย ย element: "#editor-container",

ย ย ย ย ย ย ย ย placeholder: "Start typing here...",

ย ย ย ย ย ย });

ย ย ย ย </script>

ย ย </body>

</html>

That’s it. AIEditor gives you a Notion-style block editor with drag-and-drop, Markdown support, and basic formatting, all loaded directly from a CDN.

You can find the full option list and more advanced examples in the AIEditor GitHub repository.

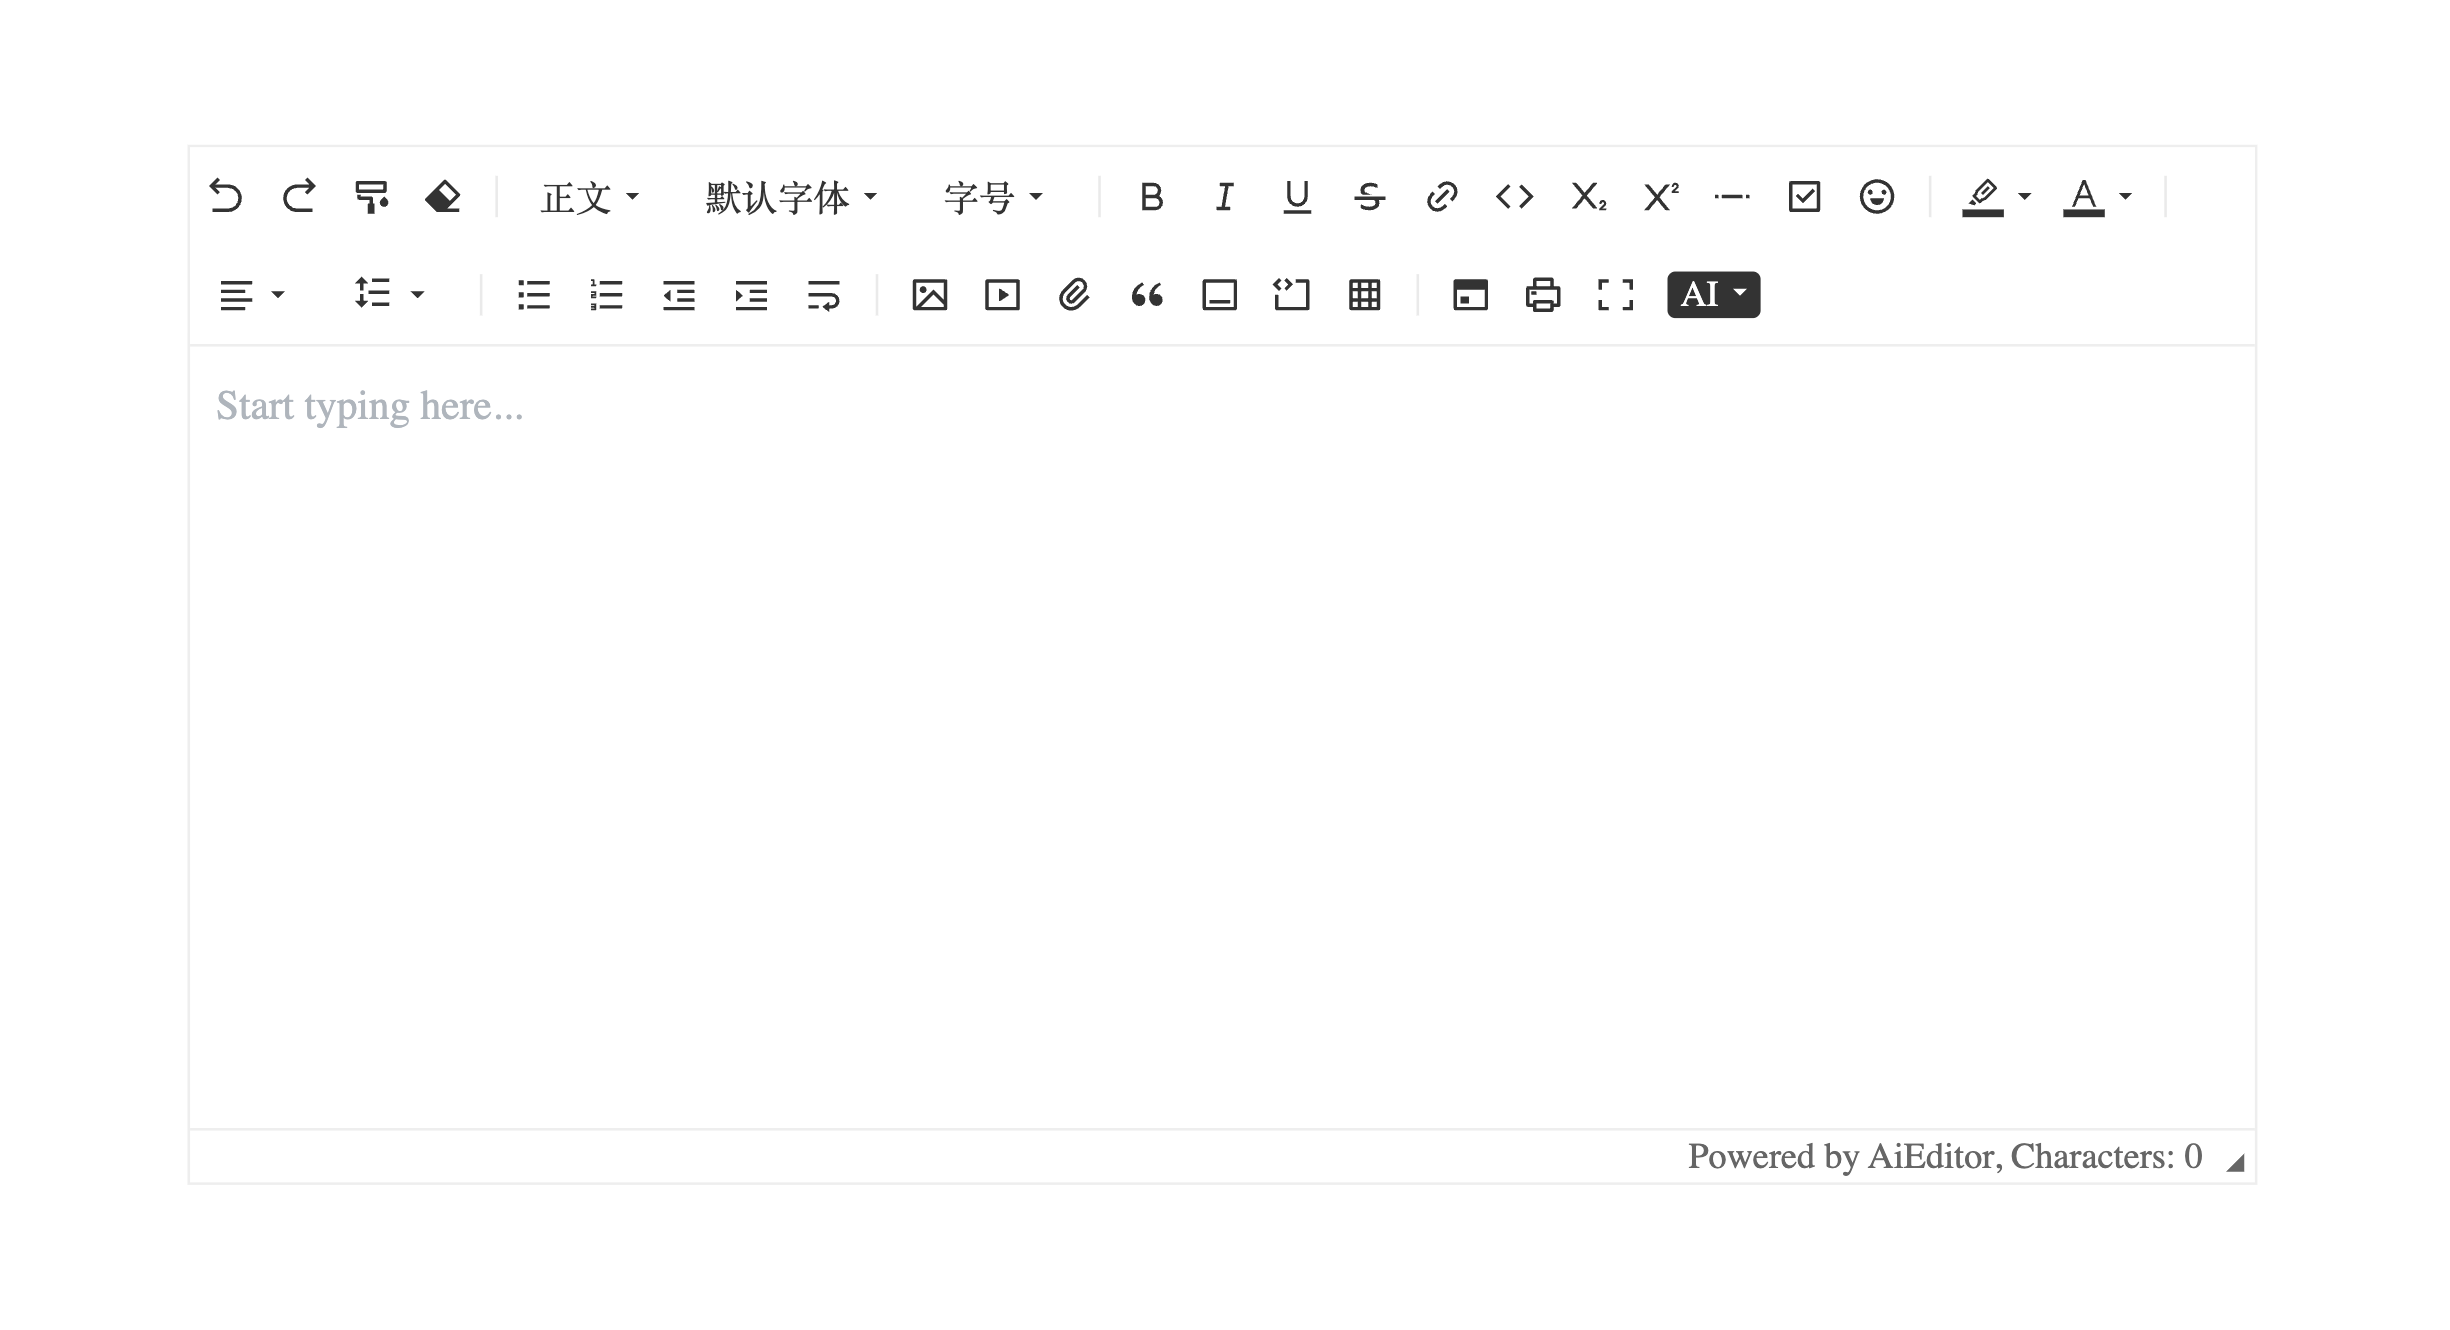
A visual diagram showing AI editor interface

AI features require some additional setup. You’ll need to connect an AI model and configure how requests are handled.

Froala takes a similar approach. Its AI Assist plugin provides the AI interface and built-in actions for generating content, changing tone, and translating text. You still need to connect an AI endpoint or handle requests yourself, but you don’t have to build the AI editing interface from scratch.

Setting Up Froala

Now, let’s try the same with Froala. The setup is just as quick, and the Froala documentation includes examples for almost every common use case.

Like AIEditor, Froala can also be loaded directly from a CDN, so you only need a simple HTML page to get started:

<!doctype html>

<html>

ย ย <head>

ย ย ย ย <link

ย ย ย ย ย ย href="<https://cdn.jsdelivr.net/npm/froala-editor@latest/css/froala_editor.pkgd.min.css>"

ย ย ย ย ย ย rel="stylesheet"

ย ย ย ย ย ย type="text/css"

ย ย ย ย />

ย ย </head>

ย ย <body>

ย ย ย ย <div id="editor-container"></div>

ย ย ย ย <script

ย ย ย ย ย ย type="text/javascript"

ย ย ย ย ย ย src="<https://cdn.jsdelivr.net/npm/froala-editor@latest/js/froala_editor.pkgd.min.js>"

ย ย ย ย ></script>

ย ย ย ย <script>

ย ย ย ย ย ย new FroalaEditor("#editor-container", {

ย ย ย ย ย ย ย ย placeholderText: "Start typing here...",

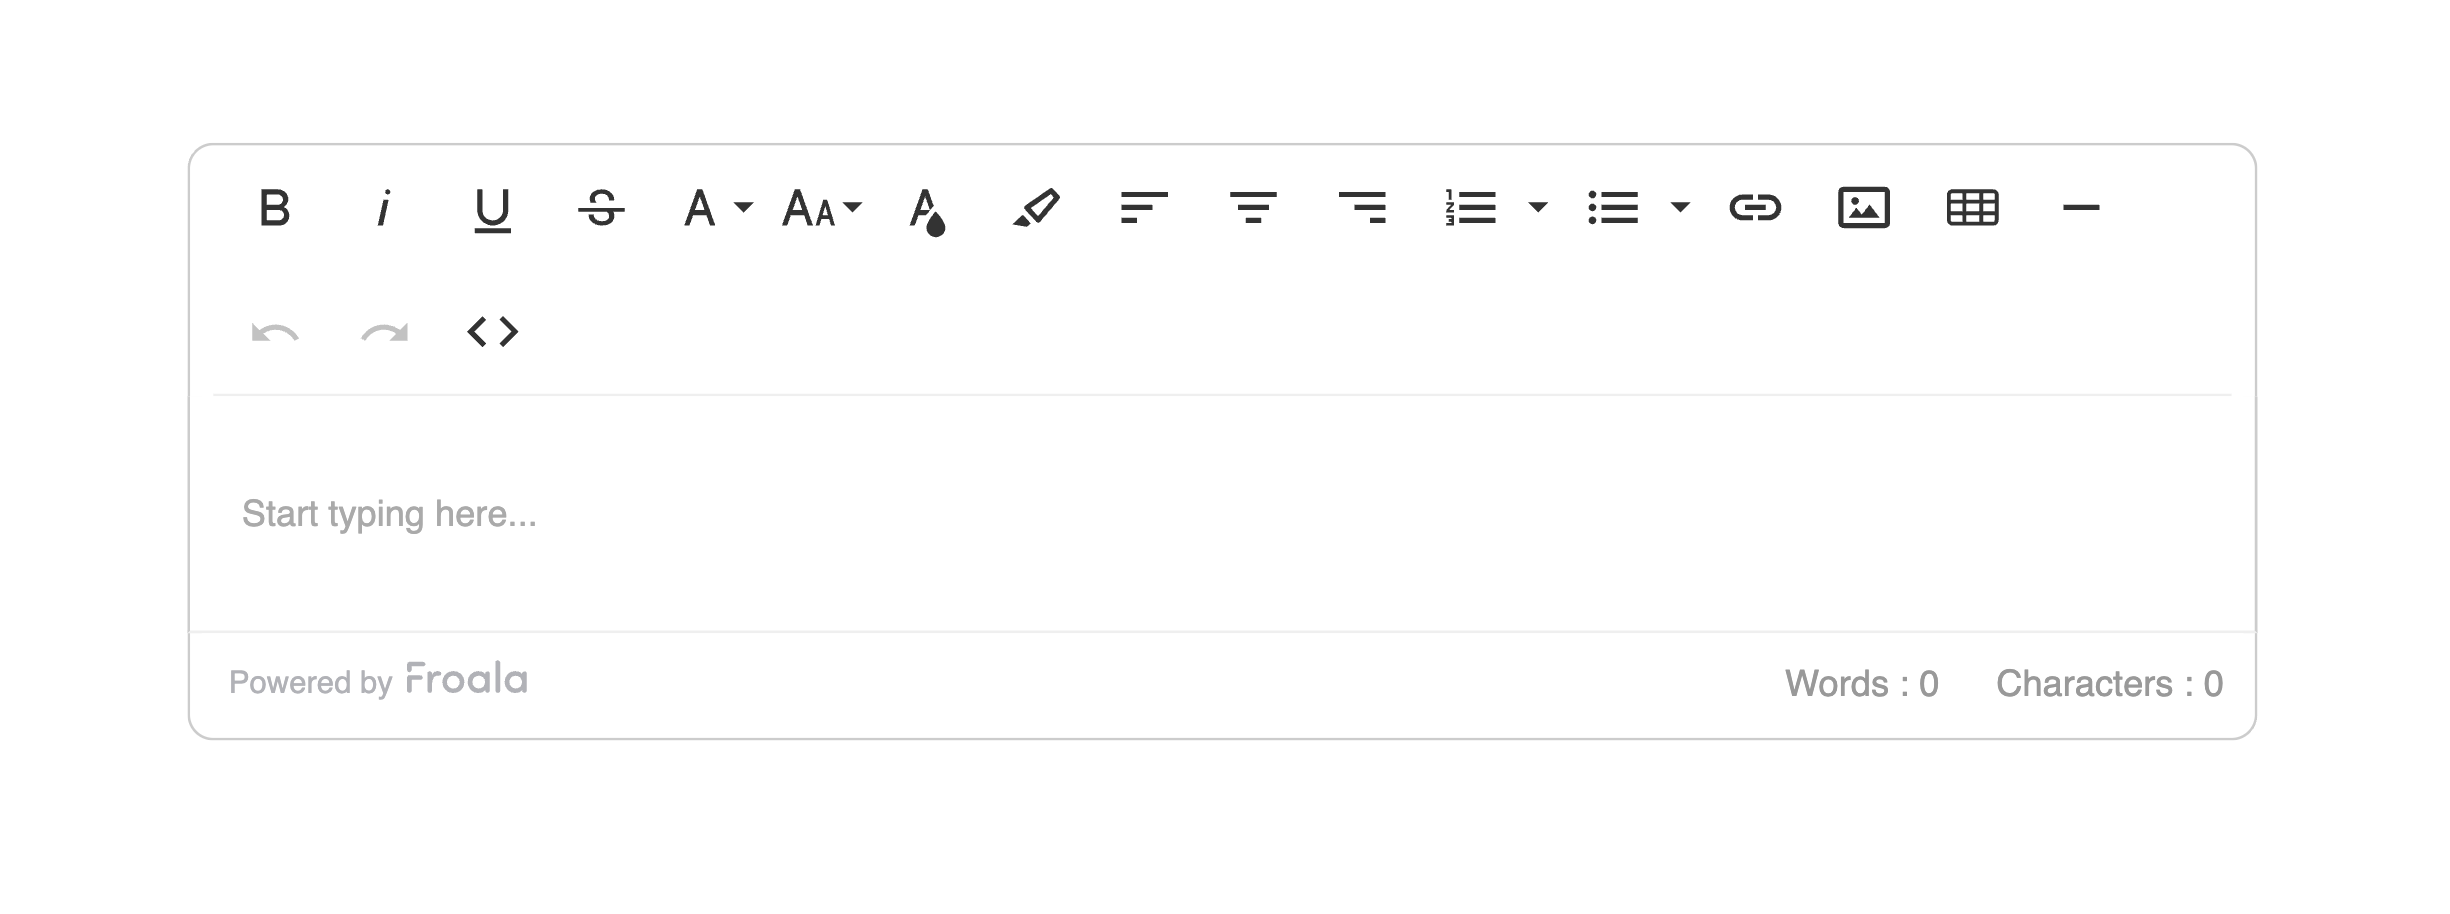
ย ย ย ย ย ย ย ย toolbarButtons: [

ย ย ย ย ย ย ย ย ย ย "bold",

ย ย ย ย ย ย ย ย ย ย "italic",

ย ย ย ย ย ย ย ย ย ย "underline",

ย ย ย ย ย ย ย ย ย ย "strikeThrough",

ย ย ย ย ย ย ย ย ย ย "fontFamily",

ย ย ย ย ย ย ย ย ย ย "fontSize",

ย ย ย ย ย ย ย ย ย ย "textColor",

ย ย ย ย ย ย ย ย ย ย "backgroundColor",

ย ย ย ย ย ย ย ย ย ย "alignLeft",

ย ย ย ย ย ย ย ย ย ย "alignCenter",

ย ย ย ย ย ย ย ย ย ย "alignRight",

ย ย ย ย ย ย ย ย ย ย "formatOL",

ย ย ย ย ย ย ย ย ย ย "formatUL",

ย ย ย ย ย ย ย ย ย ย "insertLink",

ย ย ย ย ย ย ย ย ย ย "insertImage",

ย ย ย ย ย ย ย ย ย ย "insertTable",

ย ย ย ย ย ย ย ย ย ย "insertHR",

ย ย ย ย ย ย ย ย ย ย "undo",

ย ย ย ย ย ย ย ย ย ย "redo",

ย ย ย ย ย ย ย ย ย ย "html",

ย ย ย ย ย ย ย ย ],

ย ย ย ย ย ย });

ย ย ย ย </script>

ย ย </body>

</html>

A visual diagram showing froala WYSIWYG editor interface

Adding AI Assist

Froala’s AI Assist plugin adds AI tools directly to the editor. To enable it, load the AI Assist plugin, accept the AI supplemental terms, and add the AI buttons to the toolbar:

<!doctype html>

<html>

ย ย <head>

ย ย ย ย <link

ย ย ย ย ย ย href="<https://cdn.jsdelivr.net/npm/froala-editor@latest/css/froala_editor.pkgd.min.css>"

ย ย ย ย ย ย rel="stylesheet"

ย ย ย ย ย ย type="text/css"

ย ย ย ย />

ย ย </head>

ย ย <body>

ย ย ย ย <div

ย ย ย ย ย ย id="editor-container"

ย ย ย ย ></div>

ย ย ย ย <script src="<https://cdn.jsdelivr.net/npm/froala-editor@latest/js/froala_editor.pkgd.min.js>"></script>

ย ย ย ย <script src="<https://cdn.jsdelivr.net/npm/froala-editor@latest/js/plugins/ai_assist.min.js>"></script>

ย ย ย ย <script>

ย ย ย ย ย ย new FroalaEditor("#editor-container", {

ย ย ย ย ย ย ย ย placeholderText: "Start typing here...",

ย ย ย ย ย ย ย ย aiSupplementalTermsAccepted: true,

ย ย ย ย ย ย ย ย toolbarButtons: [

ย ย ย ย ย ย ย ย ย ย "bold",

ย ย ย ย ย ย ย ย ย ย "italic",

ย ย ย ย ย ย ย ย ย ย "underline",

ย ย ย ย ย ย ย ย ย ย "strikeThrough",

ย ย ย ย ย ย ย ย ย ย "fontFamily",

ย ย ย ย ย ย ย ย ย ย "fontSize",

ย ย ย ย ย ย ย ย ย ย "textColor",

ย ย ย ย ย ย ย ย ย ย "backgroundColor",

ย ย ย ย ย ย ย ย ย ย "alignLeft",

ย ย ย ย ย ย ย ย ย ย "alignCenter",

ย ย ย ย ย ย ย ย ย ย "alignRight",

ย ย ย ย ย ย ย ย ย ย "formatOL",

ย ย ย ย ย ย ย ย ย ย "formatUL",

ย ย ย ย ย ย ย ย ย ย "insertLink",

ย ย ย ย ย ย ย ย ย ย "insertImage",

ย ย ย ย ย ย ย ย ย ย "insertTable",

ย ย ย ย ย ย ย ย ย ย "aiAssist",

ย ย ย ย ย ย ย ย ย ย "aiShortCuts",

ย ย ย ย ย ย ย ย ย ย "undo",

ย ย ย ย ย ย ย ย ย ย "redo",

ย ย ย ย ย ย ย ย ย ย "html",

ย ย ย ย ย ย ย ย ],

ย ย ย ย ย ย });

ย ย ย ย </script>

ย ย </body>

</html>

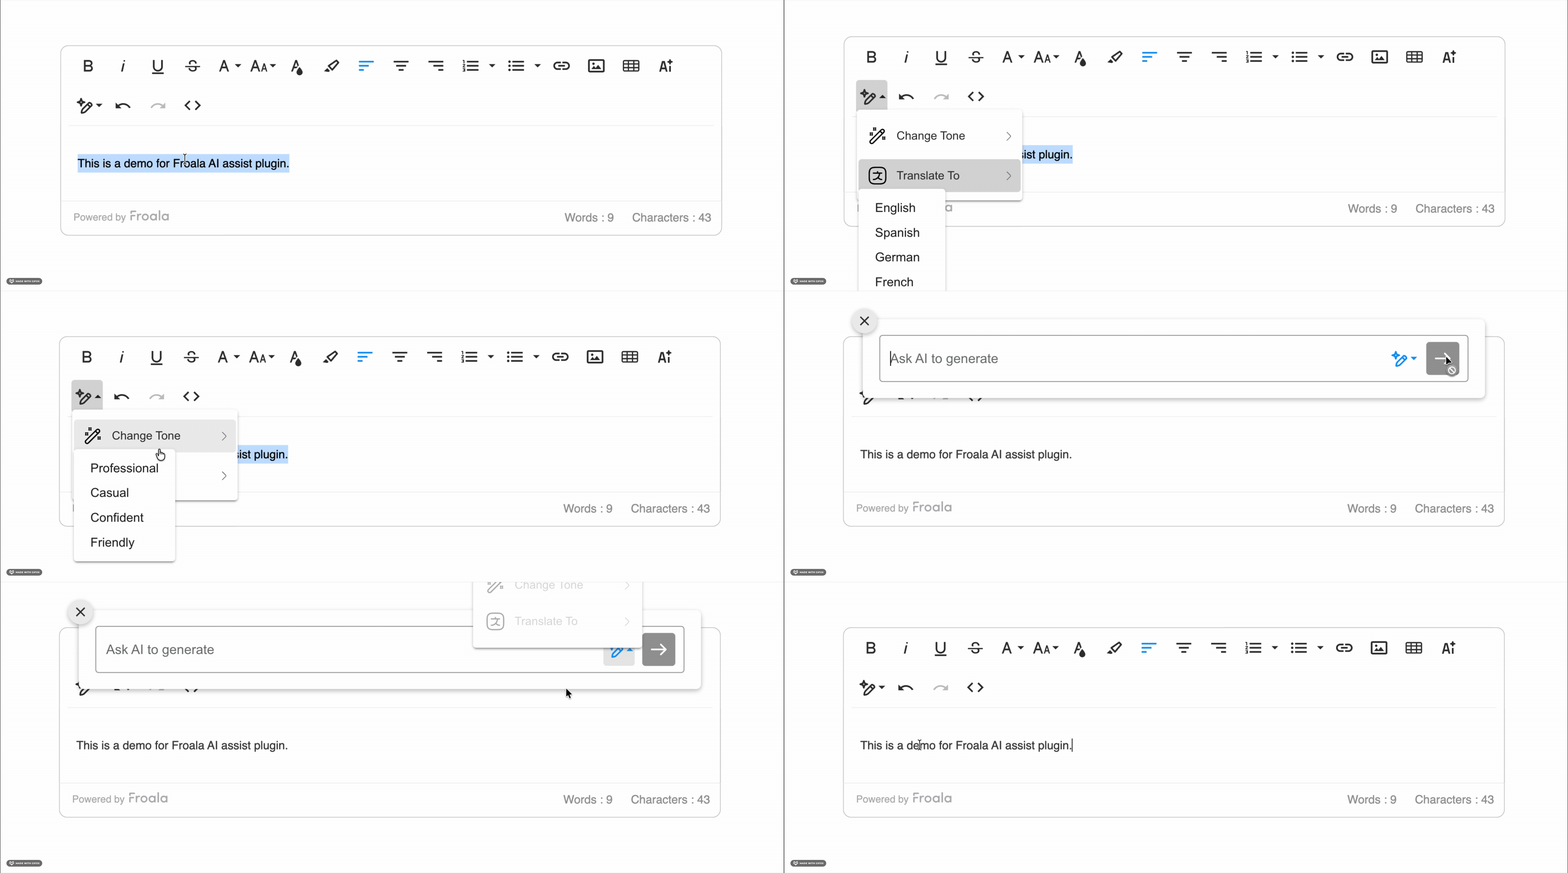
That’s it. The AI Assist options now appear in the editor toolbar, so users can access AI tools directly inside the editor without needing a separate AI interface.

A visual diagram showing AI assist plugin interface in Froala WYSIWYG editor

But Froala doesn’t limit you to a specific AI provider. You can use the aiAssistRequest option to control how AI requests are sent and connect the editor to the AI provider of your choice.

Here’s a simple example:

new FroalaEditor('#editor-container', {

ย ย aiAssistRequest: async function(data, signal) {

ย ย ย ย const response = await fetch('<https://my-ai-api.com/generate>', {

ย ย ย ย ย ย method: 'POST',

ย ย ย ย ย ย headers: { 'Authorization': 'Bearer TOKEN' },

ย ย ย ย ย ย body: JSON.stringify({

ย ย ย ย ย ย ย ย prompt: data.prompt,

ย ย ย ย ย ย ย ย max_tokens: 500

ย ย ย ย ย ย }),

ย ย ย ย ย ย signal: signal

ย ย ย ย });

ย ย ย ย const result = await response.json();

ย ย ย ย return result.generated_text;

ย ย }

});

In this example, aiAssistRequest sends the prompt to the OpenAI API and returns the generated content to Froala. The editor then adds the AI response to the editing workflow.

This direct setup is useful for testing and prototypes. For production apps, keep your AI API key on the server and send requests through your own backend instead.

The setup is simple, but there are a few things you should keep in mind when adding a rich text editor to a real application.

Best Practices

Here are a few best practices to follow when working with AIEditor or Froala:

  • Keep your AI API keys on the server. Never expose your OpenAI, Claude, or Gemini API key in frontend code. Use a backend endpoint or serverless function to handle AI requests.
  • Add only the toolbar buttons you need. Both editors let you choose which buttons appear in the toolbar. Keeping the toolbar simple makes the editor easier to use.
  • Test content pasted from Word or Google Docs. Pasted content can include extra HTML and inline styles, so test how the editor handles it before launching your app.
  • Set content limits. Use word or character limits to prevent users from adding more content than your application or database expects.
  • Check the license before going to production. Make sure you understand what the editor’s license allows before using it in a production application.

Following those practices will save you from most headaches, but a few mistakes are common enough and costly enough that they deserve a closer look on their own.

Common Pitfalls

Even with a simple setup, there are a few common mistakes you should avoid:

  • Assuming open source means every feature is free. AIEditor’s core editor is open source, but some advanced features are only available in the Pro version. Check which features you need before choosing a license.
  • Ignoring long-term support. Adding a rich text editor is easy, but you may run into paste issues, mobile bugs, or other edge cases later. Consider what kind of technical support you’ll need as your app grows.
  • Exposing AI API keys in frontend code. If you connect an AI provider to your editor, never add the API key directly to your frontend code. Keep it on your server and handle AI requests through your backend.
  • Not checking framework support early. If your app may move to a different framework later, check how well the editor supports and maintains its framework integrations.

Those common mistakes also show why choosing a rich text editor isnโ€™t just about how quickly you can set it up. You also need to think about pricing, support, integrations, and how well the editor will work as your application grows. This complexity is particularly evident when analyzing how Froala compares to Eddyter regarding the balance between feature-rich toolsets and long-term budget management for growing applications.

Why Teams Lean Toward Froala for Production Apps

Both AIEditor and Froala are capable editors. AIEditor offers a lot in its free, open-source version. But for production applications, Froala has a few practical advantages: When considering how these veteran platforms stack up against other enterprise-ready options, our analysis of <a Froala vs CKEditor in 2026 provides essential context for your technical roadmap.

  • More predictable pricing. Froala’s paid plans start at $799/year, while AIEditor Pro costs $5,000โ€“$8,000 as a one-time license. For teams that don’t want a large upfront cost, Froala can be easier to budget for.
  • A built-in plugin library. Froala includes plugins for tables, images, file uploads, and other common editing features. It also integrates with Filestack for advanced file and image management.
  • Flexible AI integration. With aiAssistRequest, you control how AI requests are handled. This makes it possible to connect different AI providers or your own AI service.
  • Maintained framework SDKs. Froala provides SDKs for React, Angular, and Vue, making it easier to use the editor in modern web applications.
  • Technical support. Froala provides technical support for paid users, which can be helpful when you run into integration or editor issues in production. Independent reviews on G2 echo this, with users regularly citing responsive support as a standout.

So, which editor should you choose?

Conclusion

If you’re building a small project or want a free, open-source editor, AIEditor is a good option. It’s easy to set up and offers useful AI-focused features.

But if you’re building a production application that you plan to maintain and scale, Froala may be a better fit. Its plugin library, flexible AI integration, maintained framework SDKs, and technical support can make long-term development easier.

Both editors are capable, so the best choice depends on your project and budget. Try them in your own application and see which one works better with your stack and requirements.

Ready to build with a production-ready rich text editor? Explore Froalaโ€™s AI Assist, plugin library, framework SDKs, and file management features to see how quickly you can integrate a flexible editor into your app.

Froala vs Eddyter: Which Rich Text Editor Is Right for Your App in 2026?

Froala vs Eddyter: Which Rich Text Editor Is Right for Your App in 2026?

If you’re adding a rich text editor to your app, you may have come across Eddyter and Froala.

Eddyter is a newer, AI-focused editor built for React and Next.js applications. It handles features like AI and storage as part of its managed setup. Froala, on the other hand, is an established WYSIWYG editor used in CMS platforms, CRMs, email builders, and other applications.

Both editors help you add rich text editing to your app, but they take different approaches. In this article, we’ll compare their features, pricing, AI support, and setup to help you choose the right one for your project.

Key Takeaways

  • Eddyter is a managed editor built on top of Lexical (Meta’s open-source editor framework) for React and Next.js apps. It requires an account and API key to use, even on the free tier.
  • Froala works with React, Angular, Vue, and plain JavaScript, giving you more flexibility across different projects.
  • Eddyter uses tiered subscription pricing, while Froala offers annual and perpetual licensing.
  • Both offer real AI features, but Eddyter bundles AI, storage, and hosting into one subscription, while Froala’s AI Assist plugs into whichever AI provider you choose, and you host everything yourself.
  • Eddyter is a good fit for React and Next.js apps that need a managed setup. Froala is better suited for teams that need more framework flexibility and control.

Quick Comparison Table

Here’s a side-by-side look at how the two editors differ before we get into setup and code.

Feature Eddyter Froala
License model Managed SaaS subscription Commercial subscription/perpetual license
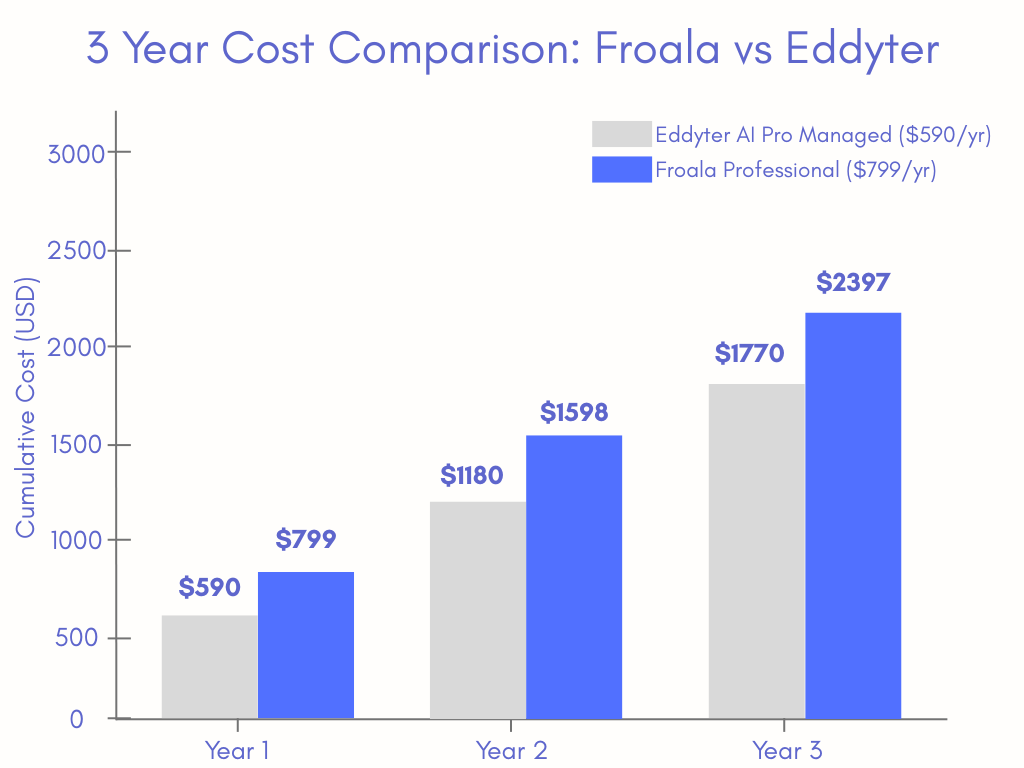
Starting price ~$590/year (AI pro managed plan) ~$799/year (Professional plan)
Framework support React and Next.js only React, Angular, Vue, or plain HTML/JS
Hosting model Managed platform with storage and AI infrastructure Self-hosted (you control your own backend)
Account/API key required Yes, on every plan No account needed for the core editor
Usage limits Limits vary by plan Unlimited editor loads and users
AI features AI chat, autocomplete, and tone tools AI Assist plugin, works with any LLM provider
Editor architecture Built on Lexical Built and maintained by Froala
Support Email support Dedicated technical support
Best for Teams that want a managed editor setup Teams that need framework flexibility and predictable costs at scale

The biggest difference between Eddyter and Froala is how they are set up.

Eddyter is a managed platform that includes storage and AI infrastructure. This can make setup easier, but limits such as editor loads, storage, and AI credits depend on your plan.

Froala runs directly in your application and gives you more control over your editor setup. It also includes unlimited editor loads and users, so your editor usage doesnโ€™t increase the license cost as your application grows. Not every vendor prices that way, and the top WYSIWYG editors to consider in 2026 splits them by exactly this: what happens to the bill as you grow.

The pricing difference becomes easier to understand when you compare both editors over a few years:

A visual diagram showing 3 year cost comparison of Froala and Eddyter

With that difference in mind, let’s look at what setup actually looks like for each.

Setting Up Eddyter

Eddyter is built specifically for React and Next.js, so setup goes through npm rather than a CDN. You’ll also need an API key from an Eddyter account before the editor will render, even on the free tier.

npm install eddyter

Then, add the editor to your application:

"use client";

import { ConfigurableEditorWithAuth, EditorProvider } from "eddyter";

import "eddyter/style.css";

export default function MyEditor() {

ย ย const apiKey = process.env.NEXT_PUBLIC_EDDYTER_API_KEY;

ย ย return (

ย ย ย ย <EditorProvider>

ย ย ย ย ย ย <ConfigurableEditorWithAuth

ย ย ย ย ย ย ย ย apiKey={apiKey}

ย ย ย ย ย ย ย ย onChange={(html) => console.log("Editor content:", html)}

ย ย ย ย ย ย />

ย ย ย ย </EditorProvider>

ย ย );

}

Add your Eddyter API key to the environment file:

# .env.local

NEXT_PUBLIC_EDDYTER_API_KEY=your_api_key_here

That’s it. Once the editor is set up, you can use features like AI chat, tables, embeds, and slash commands directly in your app.

The setup is quick for React and Next.js projects. Since the editor uses Eddyter’s API key and EditorProvider, you’ll also need an Eddyter account to get started.

You can find the full setup walkthrough in Eddyter’s own quick-install guide.

Setting Up Froala

Froala takes a different approach. You don’t need an API key or a specific framework to set up the editor. It can be loaded directly from a CDN, so a simple HTML page is enough to get started:

<!DOCTYPE html>

<html>

ย ย <head>

ย ย ย ย <link

ย ย ย ย ย ย href="<https://cdn.jsdelivr.net/npm/froala-editor@latest/css/froala_editor.pkgd.min.css>"

ย ย ย ย ย ย rel="stylesheet"

ย ย ย ย ย ย type="text/css"

ย ย ย ย />

ย ย </head>

ย ย <body>

ย ย ย ย <div id="editor-container"></div>

ย ย ย ย <script

ย ย ย ย ย ย type="text/javascript"

ย ย ย ย ย ย src="<https://cdn.jsdelivr.net/npm/froala-editor@latest/js/froala_editor.pkgd.min.js>"

ย ย ย ย ></script>

ย ย ย ย <script>

ย ย ย ย ย ย new FroalaEditor("#editor-container", {

ย ย ย ย ย ย ย ย placeholderText: "Start typing here...",

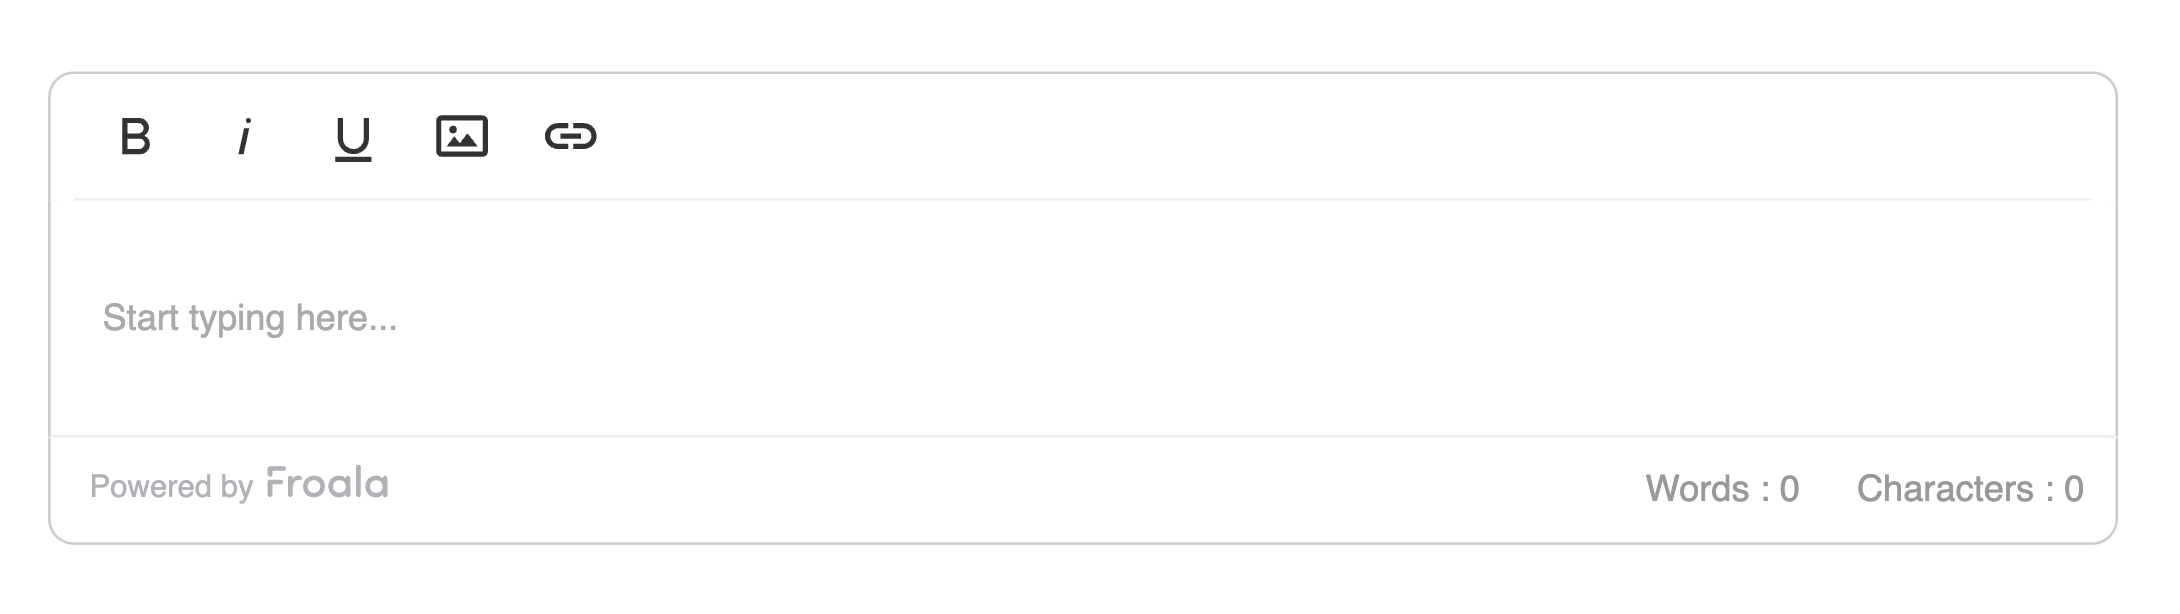
ย ย ย ย ย ย ย ย toolbarButtons: ["bold", "italic", "underline", "insertImage", "insertLink"],

ย ย ย ย ย ย });

ย ย ย ย </script>

ย ย </body>

</html>

That’s it. The editor is now ready to use in your application. You can also add more toolbar buttons and plugins based on the features your app needs.

A visual diagram showing the interface of froala WYSIWYG editor

Adding AI Assist

Froala also lets you add AI features using its AI Assist plugin. With aiAssistRequest, you can control how AI requests are handled and connect the editor to your own backend:

<script>

ย ย new FroalaEditor("#editor-container", {

ย ย ย ย toolbarButtons: ["bold", "italic", "aiAssist"],

ย ย ย ย aiSupplementalTermsAccepted: true,

ย ย ย ย aiAssistRequest: async function (data, signal) {

ย ย ย ย ย ย const response = await fetch("/api/ai-assist", {

ย ย ย ย ย ย ย ย method: "POST",

ย ย ย ย ย ย ย ย headers: { "Content-Type": "application/json" },

ย ย ย ย ย ย ย ย body: JSON.stringify({ prompt: data.prompt }),

ย ย ย ย ย ย ย ย signal: signal,

ย ย ย ย ย ย });

ย ย ย ย ย ย const result = await response.json();

ย ย ย ย ย ย return result.html;

ย ย ย ย },

ย ย });

</script>

In this example, aiAssistRequest sends the AI prompt to your own backend endpoint. Your backend can then connect to OpenAI, Claude, Gemini, or another AI model.

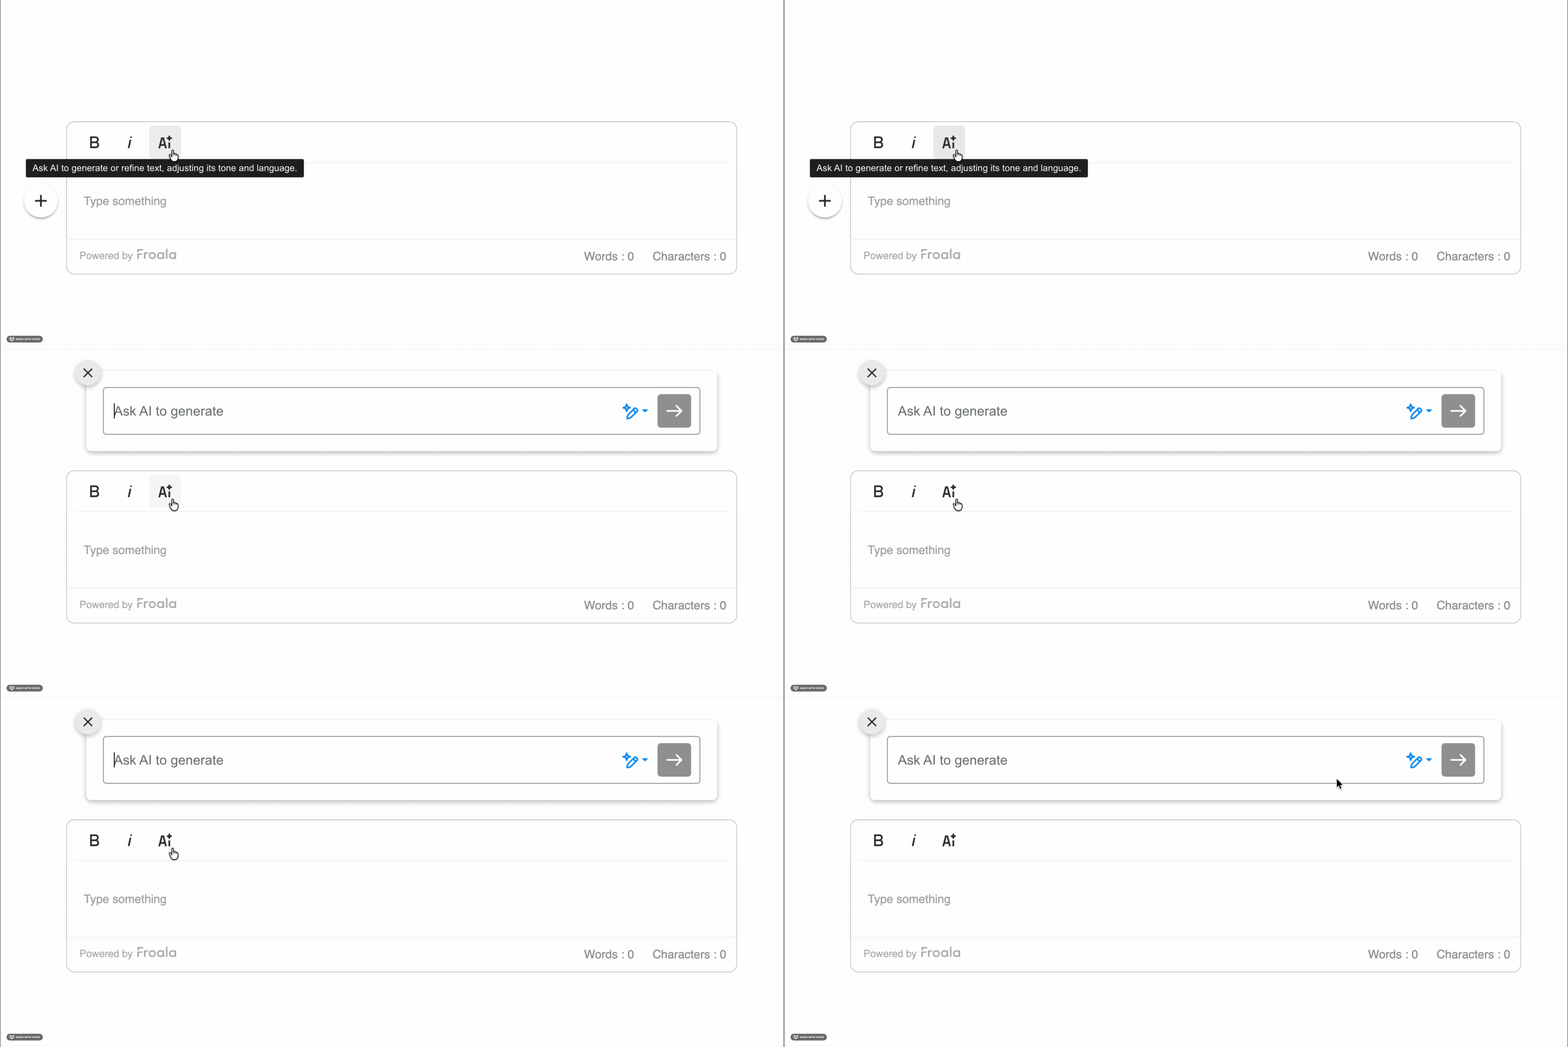
A visual showing the ai assist plugin interface of froala WYSIWYG editor

This is different from Eddyter’s managed setup. Eddyter connects the editor to its platform using an API key, while Froala gives you control over how and where AI requests are handled.

Best Practices

Before using either editor in a production application, here are a few things to keep in mind:

  • Keep AI API keys on the server. If you’re connecting an AI provider to Froala using aiAssistRequest, never expose the API key in your frontend code. Handle AI requests through your backend instead.
  • Check framework support early. Make sure the editor works with your current framework and any frameworks your team may use in the future.
  • Think about long-term costs. Don’t compare pricing based only on your current usage. Consider how storage, AI usage, and other limits may change as your application grows.
  • Test content pasted from Word or Google Docs. Pasted content can include unnecessary HTML and styles, so test how the editor handles it before launch.
  • Check how your data is handled. If you’re using a managed editor platform, understand where your content is stored and how it moves through the service before using it in production.

Common Pitfalls

Even with a simple setup, there are a few common mistakes to avoid:

  • Ignoring usage limits. Eddyter plans have different storage and AI usage limits. As your application grows, you may need to move to a higher plan.
  • Not thinking about platform dependency. Eddyter uses a managed platform for features such as storage and AI. This means parts of your editor setup depend on Eddyter’s services. Froala gives you more control over how these services are handled.
  • Skipping a framework check. Always check whether the editor supports the frameworks your application uses before choosing it.
  • Exposing AI API keys. If you use Froala’s aiAssistRequest or another custom AI integration, keep your AI credentials on the server and send requests through your backend.

The differences above become more important when you’re building an editor for a production application. Setup is only one part of the decision. You also need to think about framework support, costs, and long-term maintenance.

Why Teams Lean Toward Froala for Production Apps

Eddyter makes it easy to add an AI-powered editor to your app, especially if you want storage and AI infrastructure handled for you. But for teams building and scaling production applications, Froala has a few advantages: While Eddyter addresses modern AI needs, developers also need to weigh these enterprise features against how Froala compares to CKEditor regarding long-term support and functional parity.

  • More framework flexibility. Froala works with React, Angular, Vue, and plain JavaScript, making it easier to use across different applications and tech stacks.
  • Predictable costs as usage grows. Froala includes unlimited editor loads and users, while Eddyter plans have different storage and AI usage limits.
  • More control over your editor setup. Froala’s core editor runs directly in your application and doesn’t require an external API key to initialise.
  • A mature editor. Froala has been used in production applications for years and is built for use cases such as CMS platforms, CRMs, and email builders.
  • Technical support. Froala’s paid plans include technical support, which can be useful when you run into integration or production issues.

So, which editor should you choose?

Conclusion

If you want a managed editor with AI and storage included, Eddyter is worth trying. It’s quick to set up and can reduce the amount of infrastructure you need to manage.

If you need more framework flexibility and control over your editor setup, Froala may be a better fit. It works across different frameworks and lets you choose how features like AI and file management are handled. Developers who prioritize advanced automation might find additional clarity on feature parity through our comparison of Froala vs AIEditor in 2026.

Both editors take different approaches, so the right choice depends on your application’s requirements, budget, and tech stack. Try both in a small project before choosing one for your production application.

Ready to build with a flexible rich text editor? Explore Froalaโ€™s framework SDKs, AI Assist, plugins, and developer documentation to see how quickly you can add a production-ready editor to your app.

How to Build a Slash Command Quick Action Menu in Froala Editor

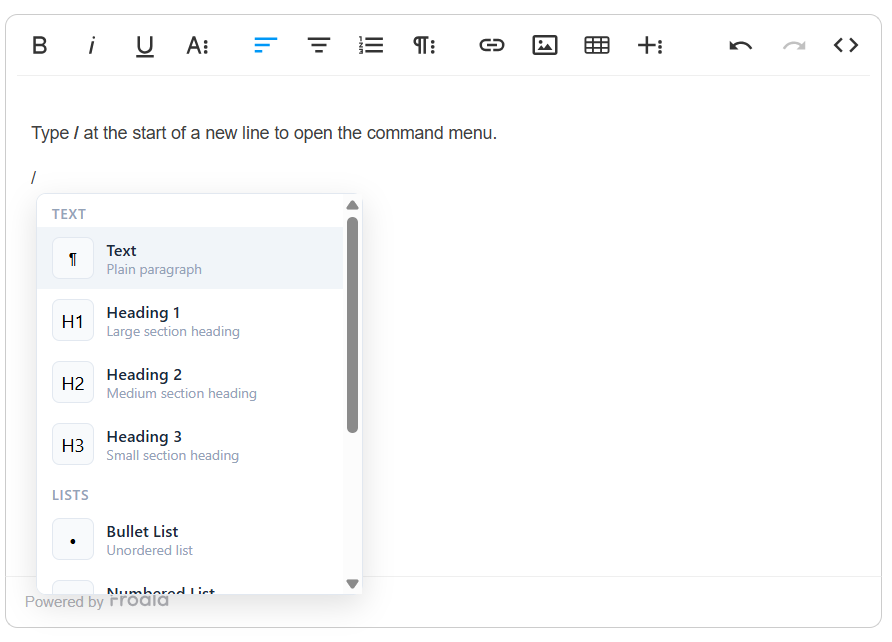
Slash Command Quick Action Menu

Notion does it. Linear does it. GitHub does it. Users now expect to type / and get an instant menu of content options. If you are integrating Froala V5 into your app, you can build the same experience from scratch using Froala’s keyup event, its html.insert() method, and a custom-rendered dropdown. No third-party library required.

In this tutorial, youโ€™ll learn how to add a fully functional slash command menu to Froala Editor. Weโ€™ll build it from scratch, explaining every decision so you understand not just what the code does, but why.

By the end, youโ€™ll have a clean, keyboard-friendly command menu that works reliably with Froalaโ€™s contenteditable surface.

Slash Command Quick Action Menu

Key Takeaways

  • Froala V5 does not ship a native slash command menu, but its event and methods API gives you everything you need to build one.
  • You intercept the / keystroke using the keyup event, then render and position a custom dropdown relative to the cursor.
  • Each menu item calls editor.html.insert() or a native Froala command to inject content at the correct position.
  • Proper cleanup (removing the / trigger character, dismissing the menu on Escape or blur) is critical for a polished UX.

Prerequisites

To follow along, you need:

  • Basic knowledge of HTML, CSS, and JavaScript
  • Familiarity with Froala Editor (initialization and events)
  • A Froala license key (or use the trial)

Weโ€™ll use the official CDN for simplicity.

The Complete Approach

The implementation has three main responsibilities:

  1. Detect when the user types / at the start of a line
  2. Render a filtered, keyboard-navigable menu
  3. Execute the chosen action and clean up the trigger character

See the full, working implementation on JSFiddle. You can read the complete code with inline comments explaining every non-obvious decision, and test it live in your browser by typing / in the editor.

Letโ€™s break down the code section by section.

1. HTML Structure

<div id="editor-container">
<div id="froala-editor">    <p>Type <strong>/</strong> at the start of a new line to open the command menu.</p>  </div>
</div>
<div id="slash-menu"></div>

The editor lives in its own container for easy styling. The #slash-menu element is placed outside the editor so it can be positioned absolutely relative to the viewport.

2. Styling the Menu

The CSS creates a clean, Notion-style dropdown:

  • Fixed width (260px) with max-height and scrolling
  • Category headers in uppercase
  • Icon + title + description layout
  • Hover and .is-active states for keyboard navigation
  • Subtle shadows and borders for depth

These styles are intentionally decoupled from Froalaโ€™s theme so you can easily adapt them.

/* โ”€โ”€โ”€ Slash Command Menu Styles โ”€โ”€โ”€โ”€โ”€โ”€โ”€โ”€โ”€โ”€โ”€โ”€โ”€โ”€โ”€โ”€โ”€โ”€โ”€โ”€โ”€โ”€โ”€โ”€โ”€โ”€โ”€โ”€โ”€โ”€โ”€ */
    #slash-menu {
      position: absolute;
      z-index: 9999;
      background: #ffffff;
      border: 1px solid #e2e8f0;
      border-radius: 8px;
      box-shadow: 0 8px 24px rgba(0, 0, 0, 0.12);
      width: 260px;
      max-height: 320px;
      overflow-y: auto;
      display: none; /* Hidden by default */
      font-family: -apple-system, BlinkMacSystemFont, 'Segoe UI', sans-serif;
    }

    #slash-menu .slash-menu-header {
      padding: 8px 12px 4px;
      font-size: 11px;
      font-weight: 600;
      color: #94a3b8;
      text-transform: uppercase;
      letter-spacing: 0.06em;
    }

    #slash-menu .slash-menu-item {
      display: flex;
      align-items: center;
      gap: 10px;
      padding: 8px 12px;
      cursor: pointer;
      transition: background 0.1s ease;
    }

    #slash-menu .slash-menu-item:hover,
    #slash-menu .slash-menu-item.is-active {
      background: #f1f5f9;
    }

    #slash-menu .slash-menu-item .item-icon {
      width: 32px;
      height: 32px;
      border-radius: 6px;
      background: #f8fafc;
      border: 1px solid #e2e8f0;
      display: flex;
      align-items: center;
      justify-content: center;
      font-size: 15px;
      flex-shrink: 0;
    }

    #slash-menu .slash-menu-item .item-text .item-title {
      font-size: 13px;
      font-weight: 500;
      color: #1e293b;
      line-height: 1.3;
    }

    #slash-menu .slash-menu-item .item-text .item-description {
      font-size: 11px;
      color: #94a3b8;
      line-height: 1.3;
    }

    /* Editor wrapper */
    #editor-container {
      max-width: 800px;
      margin: 40px auto;
      padding: 0 20px;
    }

3. Defining the Command Data

const SLASH_COMMANDS = [
  {
    category: 'Text',
    items: [
      { id: 'paragraph', title: 'Text', description: 'Plain paragraph', icon: 'ยถ', action: ... },
      ...
    ]
  },
  ...
];

This data structure is the heart of the feature. Each item contains:

  • id: Used for potential future features (like analytics)
  • title and description: Displayed in the UI
  • icon: Simple visual indicator
  • action: A function that receives the editor instance

Why separate actions from the UI? It keeps the data declarative. You can later load commands from an API or allow users to customize them without touching the rendering logic.

4. State Management

let menuVisible = false;
let activeIndex = 0;
let flatItems = [];
let editorInstance = null;

We maintain minimal state:

  • menuVisible controls visibility logic
  • activeIndex tracks which item is highlighted for keyboard navigation
  • flatItems holds the currently visible (filtered) items with their DOM references
  • editorInstance gives us access to Froala methods inside event handlers

5. Building the Menu DOM (buildMenu)

This function is called every time the user types after a /.

function buildMenu(filter) {
  menuEl.innerHTML = '';
  flatItems = [];

  const term = (filter || '').toLowerCase();

  SLASH_COMMANDS.forEach(function(group) {
    const filtered = group.items.filter(item =>
      item.title.toLowerCase().includes(term) ||
      item.description.toLowerCase().includes(term)
    );

    if (filtered.length === 0) return;

    // Create category header
    // Create item rows with click handlers
    // Push to flatItems
  });
}

Key details explained:

  • We flatten the data while respecting categories
  • Filtering happens on both title and description
  • We use mousedown instead of click on menu items. This is critical because click fires after blur, which would close the menu before the selection logic runs.

6. Positioning the Menu

function positionMenu() {
  const range = window.getSelection().getRangeAt(0).cloneRange();
  range.collapse(true);
  const rect = range.getBoundingClientRect();
  // Calculate top and left using scroll offsets
}

We use getBoundingClientRect() on a collapsed range to get the cursorโ€™s exact position. This is more reliable than trying to measure the editorโ€™s internal elements.

We also add a small horizontal boundary check so the menu doesnโ€™t overflow the viewport.

7. Detecting the Slash Trigger (getSlashTriggerText)

This is the most important logic function:

function getSlashTriggerText() {
  const text = node.textContent.slice(0, range.startOffset);
  const slashIndex = text.lastIndexOf('/');
  
  if (slashIndex === -1) return null;
  
  const beforeSlash = text.slice(0, slashIndex).trim();
  if (beforeSlash.length > 0) return null;
  
  return text.slice(slashIndex + 1);
}

Why this logic matters:

  • We only trigger when / is the first non-whitespace character on the current line
  • We extract everything after / as the filter term
  • This prevents the menu from appearing when someone types โ€œhello/worldโ€

8. Cleaning Up the Trigger Character (selectItem)

When the user selects a command, we must remove the / (and any filter text) before inserting the new content:

const text = node.textContent;
const slashIndex = text.lastIndexOf('/');
node.textContent = text.slice(0, slashIndex) + text.slice(range.startOffset);

We then recreate the range and place the cursor back where the / was. This is delicate work because weโ€™re manually editing a text node inside a contenteditable area.

After cleanup, we call the itemโ€™s action function and restore focus to the editor.

9. Froala Event Integration

The real power comes from hooking into Froalaโ€™s events:

events: {
  'keyup': function(e) { ... },
  'keydown': function(e) { ... },
  'blur': function() { ... }
}

keyup handler responsibilities:

  • Ignore modifier keys
  • Handle Escape to close the menu
  • Manage arrow keys and Enter when the menu is visible
  • Check for the slash trigger on every keystroke

keydown handler:

  • Prevents default behavior for Enter and arrow keys when the menu is open
  • This stops Froala from inserting a new paragraph when the user is just navigating the menu

blur handler:

  • Uses a small setTimeout (150ms) so that mousedown events on menu items have time to fire first

10. Keyboard Navigation

We maintain a flat list of visible items. Arrow keys simply increment/decrement activeIndex and call highlightItem().

highlightItem does two things:

  1. Toggles the is-active class
  2. Calls scrollIntoView({ block: 'nearest' }) so long menus scroll automatically

This creates a smooth experience similar to native dropdowns.

Full Flow Summary

  1. User types / at the start of a line
  2. keyup detects the trigger via getSlashTriggerText()
  3. showMenu() builds filtered DOM and positions it
  4. User can type to filter, use arrows to navigate, or click
  5. On selection, we remove the / text, execute the action, hide the menu, and refocus

Extending the Menu

Adding new content types requires only adding a new object to SLASH_COMMANDS. Here is a file upload entry as an example:

{
  id: 'file',
  title: 'File',
  description: 'Attach a file',
  icon: '๐Ÿ“Ž',
  action: function (editor) {
    // Trigger Froala's native file upload dialog
  }
}

You can also add dynamic items, such as loading a list of page templates from your API and appending them into the menu on the fly inside buildMenu.

Important Gotchas and Solutions

Problem Solution in this code
Menu closes before click registers Use mousedown + e.preventDefault()
Cursor jumps when using arrows Prevent default in keydown
Filter text remains after selection Manually edit the text node before inserting
Menu appears mid-sentence Check that nothing precedes / on the line
Editor loses focus Restore focus after action execution

Making It Production-Ready

Here are several improvements you can add:

  1. Better table insertion: Use Froalaโ€™s insertTable command instead of raw HTML when possible
  2. Command shortcuts: Add keyboard shortcuts (e.g., /h1)
  3. Icons: Replace text icons with SVG or Font Awesome for polish
  4. Async commands: Support commands that open modals (image upload, etc.)
  5. Accessibility: Add role="listbox" and aria-activedescendant
  6. Debouncing : The current implementation rebuilds on every key. For very large command sets, add light debouncing

Alternative Approaches

You could also implement this using:

  • A separate library like Tippy.js for positioning
  • MutationObserver instead of key events (more complex)

The manual approach shown here gives you maximum control and works without additional dependencies.

Conclusion

Building a slash command menu teaches you several valuable skills:

  • Working with Selection and Range APIs
  • Managing state between a rich text editor and custom UI
  • Handling the timing quirks of contenteditable elements
  • Creating accessible, keyboard-first interfaces

The code is deliberately kept simple and self-contained so you can understand every line. Once youโ€™re comfortable with the core mechanics, you can extend it with custom commands, better styling, or integration with your own design system.

Try it now: Paste the vanilla JS example into a local HTML file, add your license key, and open it in a browser. Type / at the start of a blank line to see the menu in action.

FAQ

Does Froala V5 have a built-in slash command menu?

No. Froala’s Quick Insert plugin shows a + button on empty lines and is triggered by the cursor position, not by typing /. The slash command UX in this guide is a custom layer built on top of Froala’s public API.

Will this break Froala’s built-in Quick Insert plugin?

No. The two features are independent. You can run both simultaneously if you want. The quickInsertEnabled option controls the + button behavior and is unrelated to the keyup event handler you are adding.

Can I add custom icons using SVG instead of emoji?

Yes. Replace the icon string in any SLASH_COMMANDS item with an SVG string, and update the .item-icon container’s innerHTML assignment in buildMenu accordingly.

How do I filter commands server-side or asynchronously? Modify buildMenu to be async and replace the SLASH_COMMANDS.forEach block with an await fetch(...) call. Pass the filter string as a query parameter. Show a loading spinner in the menu while the request is in flight.

How do I handle the slash command in Angular?

The pattern is identical. Inject the Froala config object with the same events block into your @Input() editorConfig. Access the editor instance from the initialized callback and store it in a component property. All other logic (DOM manipulation for the dropdown, text node traversal) lives in separate service methods.

What happens if the user types “/” and then presses Backspace?

The keyup handler fires after the Backspace. getSlashTriggerText re-evaluates the current text node. If the “/” has been deleted, slashIndex will be -1 and the function returns null, which triggers hideMenu(). The menu disappears automatically.