- Getting Started
- Browser Support
- Languages Support
- Shortcuts
- Activation
- Examples
- Customize the Editor
- Use-cases
- Plugins
- APIs
- Development Frameworks
- Server Integrations
- Server SDKs
- Migration Guides
- Changelog
Build an Amazing Page Builder Using Froala WYSIWYG Editor
How does a page builder work?
Basically, The page builder consists of two sections:
1- Toolbar
The toolbar contains different block types, such as title blocks and text blocks. Once you click on a block type it will add a new block of that type into the second section, the editing area, allowing you to edit the block content.
2- Editing Area
The editing area is divided into rows, columns, and blocks. Once the user clicks on a block type from the toolbar, it will be added to one of the columns that appear in the editing area. In this tutorial, for simplicity, the editing area will contain only blocks under each other.
Implementing This In The Code:
General Structure
Open your HTML file and add the following code which will create two sections: the toolbar section has a col-1 class and the editing area will have a col-2 class.
<div class="row">
    <div class="col col-1">
        <!-- Toolbar contains different block-types will go here -->
    </div>
    <div class="col col-2">
      <!-- Editing Area -->
       <div id="editing-area"></div>
    </div>
</div>
Toolbar
Toolbar conatins different block types. We represent each block type with an image and a title underneath it. For example, the 'Title' block type, the code will be:
<li data-type="title" class="block-source float-left">
  <div class="text-center">
      <div>
          <svg version="1.1" id="Layer_1" xmlns="http://www.w3.org/2000/svg" xmlns:xlink="http://www.w3.org/1999/xlink" x="0px" y="0px" viewBox="0 0 122.88 120.26" style="enable-background:new 0 0 122.88 120.26" xml:space="preserve"><g><polygon points="0,14.54 0,0 49.81,0 49.81,14.54 36.93,17.03 36.93,51.7 85.98,51.7 85.98,17.03 73.1,14.54 73.1,0 85.98,0 110,0 122.88,0 122.88,14.54 110,17.03 110,103.31 122.88,105.79 122.88,120.26 73.1,120.26 73.1,105.79 85.98,103.31 85.98,70.3 36.93,70.3 36.93,103.31 49.81,105.79 49.81,120.26 0,120.26 0,105.79 12.8,103.31 12.8,17.03 0,14.54"/></g></svg>
       </div>
        <span class="text-center">Title</span>
   </div>
</li>

In this tutorial, we will use the Froala WYSIWYG Editor to create and edit the following block types:
- Title Block
- Text Block
- Image Block
- Button
- Link
- CTA Block
- Code Block
- Markdown Block
<div class="row">
        <div class="col col-1">
            <!-- Add Different Block Types Here -->
                <ul class="list-unstyled" style="padding-left: 0px;">
                    <li data-type="title" class="block-source float-left">
                    <div class="text-center">
                        <div>
                        <svg version="1.1" id="Layer_1" xmlns="http://www.w3.org/2000/svg" xmlns:xlink="http://www.w3.org/1999/xlink" x="0px" y="0px" viewBox="0 0 122.88 120.26" style="enable-background:new 0 0 122.88 120.26" xml:space="preserve"><g><polygon points="0,14.54 0,0 49.81,0 49.81,14.54 36.93,17.03 36.93,51.7 85.98,51.7 85.98,17.03 73.1,14.54 73.1,0 85.98,0 110,0 122.88,0 122.88,14.54 110,17.03 110,103.31 122.88,105.79 122.88,120.26 73.1,120.26 73.1,105.79 85.98,103.31 85.98,70.3 36.93,70.3 36.93,103.31 49.81,105.79 49.81,120.26 0,120.26 0,105.79 12.8,103.31 12.8,17.03 0,14.54"/></g></svg>
                        </div>
                        <span class="text-center">Title</span>
                    </div>
                    </li>
                    <li data-type="text" class="block-source float-left">
                    <div class="text-center">
                        <div>
                        <svg xmlns="http://www.w3.org/2000/svg" viewBox="0 0 4445 5218" shape-rendering="geometricPrecision" text-rendering="geometricPrecision" image-rendering="optimizeQuality" fill-rule="evenodd" clip-rule="evenodd"><path d="M1339 3691c-74 0-134-60-134-134s60-134 134-134h996c74 0 134 60 134 134s-60 134-134 134h-996zm0-1896c-74 0-134-60-134-134s60-134 134-134h1767c74 0 134 60 134 134s-60 134-134 134H1339zM311 0h3823c86 0 164 35 220 91s91 134 91 220v4595c0 86-35 164-91 220s-134 91-220 91H311c-86 0-164-35-220-91S0 4992 0 4906V311c0-86 35-164 91-220S225 0 311 0zm3823 268H311c-12 0-23 5-31 13s-13 19-13 31v4595c0 12 5 23 13 31s19 13 31 13h3823c12 0 23-5 31-13s13-19 13-31V312c0-12-5-23-13-31s-19-13-31-13zM1339 2743c-74 0-134-60-134-134s60-134 134-134h1767c74 0 134 60 134 134s-60 134-134 134H1339z" fill-rule="nonzero"/></svg>
                        </div>
                        <span class="text-center">Text</span>
                    </div>
                    </li>
                    <li data-type="image" class="block-source float-left">
                    <div class="text-center">
                        <div>
                        <svg version="1.1" id="Layer_1" xmlns="http://www.w3.org/2000/svg" xmlns:xlink="http://www.w3.org/1999/xlink" x="0px" y="0px" width="122.88px" height="122.151px" viewBox="0 0 122.88 122.151" enable-background="new 0 0 122.88 122.151" xml:space="preserve"><g><path d="M8.676,0h105.529c2.405,0,4.557,0.984,6.124,2.552c1.567,1.567,2.551,3.754,2.551,6.124v104.8 c0,2.405-0.983,4.557-2.551,6.124c-1.568,1.567-3.755,2.552-6.124,2.552H8.676c-2.406,0-4.557-0.984-6.124-2.553 C0.984,118.032,0,115.845,0,113.476V8.675C0,6.27,0.984,4.119,2.552,2.552C4.12,0.984,6.307,0,8.676,0L8.676,0z M9.097,88.323 l35.411-33.9c1.421-1.313,3.645-1.167,4.921,0.255c0.037,0.036,0.037,0.073,0.073,0.073l31.459,37.218l4.812-29.6 c0.328-1.896,2.114-3.208,4.01-2.879c0.729,0.109,1.385,0.474,1.895,0.948l22.07,23.184V10.773c0-0.474-0.183-0.875-0.511-1.166 c-0.291-0.292-0.729-0.511-1.166-0.511H10.737c-0.474,0-0.875,0.182-1.166,0.511c-0.292,0.291-0.511,0.729-0.511,1.166v77.55H9.097 L9.097,88.323z M90.526,19.866c3.464,0,6.635,1.422,8.895,3.682c2.297,2.296,3.682,5.431,3.682,8.895 c0,3.463-1.421,6.634-3.682,8.894c-2.296,2.297-5.431,3.682-8.895,3.682c-3.462,0-6.634-1.421-8.894-3.682 c-2.297-2.296-3.682-5.431-3.682-8.894c0-3.463,1.421-6.634,3.682-8.895C83.929,21.251,87.064,19.866,90.526,19.866L90.526,19.866z"/></g></svg>
                        </div>
                        <span class="text-center">Image</span>
                    </div>
                    </li>

                    <li data-type="button" class="block-source float-left">
                    <div class="text-center">
                        <div>
                        <svg id="Layer_1" data-name="Layer 1" xmlns="http://www.w3.org/2000/svg" viewBox="0 0 122.88 83.68"><defs><style>.cls-1{fill-rule:evenodd;}</style></defs><title>rectangle-line</title><path class="cls-1" d="M14.48,0H108.4a14.63,14.63,0,0,1,14.48,14.69V69A14.63,14.63,0,0,1,108.4,83.68H14.48A14.62,14.62,0,0,1,0,69V14.69A14.62,14.62,0,0,1,14.48,0Zm.28,7.59h93.36a7.27,7.27,0,0,1,7.25,7.24v54a7.27,7.27,0,0,1-7.25,7.25H14.76a7.27,7.27,0,0,1-7.25-7.25v-54a7.27,7.27,0,0,1,7.25-7.24Z"/></svg>
                        </div>
                        <span class="text-center">Button</span>
                    </div>
                    </li>

                    <li data-type="link" class="block-source float-left">
                    <div class="text-center">
                        <div>
                        <svg xmlns="http://www.w3.org/2000/svg" viewBox="0 0 24 24">
                            <path d="M15.0004875,8 L18,8 C20.209139,8 22,9.790861 22,12 C22,14.209139 20.209139,16 18,16 L12,16 C9.790861,16 8,14.209139 8,12 C8,11.4477153 8.44771525,11 9,11 C9.55228475,11 10,11.4477153 10,12 C10,13.1045695 10.8954305,14 12,14 L18,14 C19.1045695,14 20,13.1045695 20,12 C20,10.8954305 19.1045695,10 18,10 L16.5839563,10 C16.2360594,9.20374889 15.6867759,8.51562167 15.0004875,8 Z M8.99951255,16 L6,16 C3.790861,16 2,14.209139 2,12 C2,9.790861 3.790861,8 6,8 L12,8 C14.209139,8 16,9.790861 16,12 C16,12.5522847 15.5522847,13 15,13 C14.4477153,13 14,12.5522847 14,12 C14,10.8954305 13.1045695,10 12,10 L6,10 C4.8954305,10 4,10.8954305 4,12 C4,13.1045695 4.8954305,14 6,14 L7.41604369,14 C7.7639406,14.7962511 8.3132241,15.4843783 8.99951255,16 Z" transform="rotate(-45 12 12)"/>
                            </svg>                             </div>
                        <span class="text-center">Link</span>
                    </div>
                    </li>

                    <li data-type="cta" class="block-source float-left">
                    <div class="text-center">
                        <div>
                        <svg id="Layer_1" data-name="Layer 1" xmlns="http://www.w3.org/2000/svg" viewBox="0 0 109.21 122.88"><title>mouse-click</title><path d="M86,122.31a5.57,5.57,0,0,1-.9.35,5.09,5.09,0,0,1-1,.18,5.46,5.46,0,0,1-1,0,6.77,6.77,0,0,1-1-.15,6,6,0,0,1-1-.36l0,0a5.51,5.51,0,0,1-.92-.53l0,0a6.41,6.41,0,0,1-.78-.69,5.19,5.19,0,0,1-.65-.87l-9.08-14.88-7.69,9a15.49,15.49,0,0,1-1.1,1.18c-.39.37-.78.71-1.18,1l-.08.06a12.19,12.19,0,0,1-1.2.82,9.66,9.66,0,0,1-1.24.63,6.91,6.91,0,0,1-1,.37,6.21,6.21,0,0,1-1,.22,7.55,7.55,0,0,1-1.06.07,7.19,7.19,0,0,1-1-.11,6.14,6.14,0,0,1-1.18-.35,5.42,5.42,0,0,1-1.06-.57,6.22,6.22,0,0,1-.92-.78l0,0a7.31,7.31,0,0,1-.75-1l-.11-.2-.09-.21L47.72,112l0-.17L40.91,43.26a4.52,4.52,0,0,1,0-1.33,4.3,4.3,0,0,1,.43-1.25,4.31,4.31,0,0,1,1.39-1.55l0,0a3.82,3.82,0,0,1,.9-.46,4.25,4.25,0,0,1,1-.24h0a4.31,4.31,0,0,1,1.29.05,4.67,4.67,0,0,1,1.25.44l.3.16c13.51,8.84,26.1,17.06,38.64,25.25l19,12.39a11.72,11.72,0,0,1,1,.72l0,0a8.78,8.78,0,0,1,.82.73l.06.07a7.41,7.41,0,0,1,.71.82,5.91,5.91,0,0,1,.57.87,6.42,6.42,0,0,1,.51,1.14,5.6,5.6,0,0,1,.26,1.17,5.44,5.44,0,0,1,0,1.21h0a6.59,6.59,0,0,1-.23,1.19,6.54,6.54,0,0,1-.94,1.88,6.41,6.41,0,0,1-.67.83,7.45,7.45,0,0,1-.82.76,10.42,10.42,0,0,1-1.16.83,12.92,12.92,0,0,1-1.34.7c-.47.21-1,.41-1.46.58a14.27,14.27,0,0,1-1.55.43h0c-2.77.54-5.53,1.21-8.27,1.87l-3.25.77,9,14.94a5.84,5.84,0,0,1,.46,1,5.59,5.59,0,0,1,.15,3.21l0,.1a5.53,5.53,0,0,1-.33.94,6.43,6.43,0,0,1-.51.89,5.62,5.62,0,0,1-.68.81,6,6,0,0,1-.82.67l-2,1.29A83,83,0,0,1,86,122.31ZM37.63,19.46a4,4,0,0,1-6.92,4l-8-14a4,4,0,0,1,6.91-4l8.06,14Zm-15,46.77a4,4,0,0,1,4,6.91l-14,8.06a4,4,0,0,1-4-6.91l14-8.06ZM20.56,39.84a4,4,0,0,1-2.07,7.72L3,43.36A4,4,0,0,1,5,35.64l15.53,4.2ZM82,41.17a4,4,0,0,1-4-6.91L92,26.2a4,4,0,0,1,4,6.91L82,41.17ZM63.46,20.57a4,4,0,1,1-7.71-2.06L59.87,3A4,4,0,0,1,67.59,5L63.46,20.57Zm20.17,96.36,9.67-5.86c-3.38-5.62-8.85-13.55-11.51-19.17a2.17,2.17,0,0,1-.12-.36,2.4,2.4,0,0,1,1.81-2.87c5.38-1.23,10.88-2.39,16.22-3.73a10.28,10.28,0,0,0,1.8-.58,6.11,6.11,0,0,0,1.3-.77,3.38,3.38,0,0,0,.38-.38.9.9,0,0,0,.14-.24l-.06-.18a2.15,2.15,0,0,0-.44-.53,5.75,5.75,0,0,0-.83-.63L47.06,45.75c2.11,21.36,5.2,44.1,6.45,65.31a6.28,6.28,0,0,0,.18,1,2.89,2.89,0,0,0,.26.62l.13.14a1,1,0,0,0,.29,0,2.76,2.76,0,0,0,.51-.17,5.71,5.71,0,0,0,1.28-.79,11.22,11.22,0,0,0,1.35-1.33c1.93-2.27,9.6-12.14,11.4-13.18a2.4,2.4,0,0,1,3.28.82l11.44,18.75Z"/></svg>                                                           </div>
                        <span class="text-center">CTA</span>
                    </div>
                    </li>

                    <li data-type="code" class="block-source float-left">
                    <div class="text-center">
                        <div>
                        <svg version="1.1" id="Layer_1" xmlns="http://www.w3.org/2000/svg" xmlns:xlink="http://www.w3.org/1999/xlink" x="0px" y="0px" viewBox="0 0 122.88 101.57" style="enable-background:new 0 0 122.88 101.57" xml:space="preserve"><g><path d="M44.97,12.84h-17.2L0,49.37L27.77,85.9h17.2L17.2,49.37L44.97,12.84L44.97,12.84z M77.91,12.84h17.2l27.77,36.53 L95.11,85.9h-17.2l27.77-36.53L77.91,12.84L77.91,12.84z M70.17,0.04l5.96,1.39c0.94,0.22,1.52,1.16,1.31,2.1l-22.5,96.69 c-0.22,0.93-1.16,1.52-2.1,1.31l-5.95-1.39c-0.94-0.22-1.52-1.16-1.31-2.1l22.5-96.69C68.3,0.42,69.24-0.17,70.17,0.04L70.17,0.04 L70.17,0.04z"/></g></svg>
                        </div>
                        <span class="text-center">Code</span>
                    </div>
                    </li>


                    <li data-type="markdown" class="block-source float-left">
                    <div class="text-center">
                        <div>
                        <svg viewBox="0 0 16 16" class="bi bi-markdown" fill="currentColor" xmlns="http://www.w3.org/2000/svg">
                            <path fill-rule="evenodd" d="M14 3H2a1 1 0 0 0-1 1v8a1 1 0 0 0 1 1h12a1 1 0 0 0 1-1V4a1 1 0 0 0-1-1zM2 2a2 2 0 0 0-2 2v8a2 2 0 0 0 2 2h12a2 2 0 0 0 2-2V4a2 2 0 0 0-2-2H2z"/>
                            <path fill-rule="evenodd" d="M9.146 8.146a.5.5 0 0 1 .708 0L11.5 9.793l1.646-1.647a.5.5 0 0 1 .708.708l-2 2a.5.5 0 0 1-.708 0l-2-2a.5.5 0 0 1 0-.708z"/>
                            <path fill-rule="evenodd" d="M11.5 5a.5.5 0 0 1 .5.5v4a.5.5 0 0 1-1 0v-4a.5.5 0 0 1 .5-.5z"/>
                            <path d="M3.56 11V7.01h.056l1.428 3.239h.774l1.42-3.24h.056V11h1.073V5.001h-1.2l-1.71 3.894h-.039l-1.71-3.894H2.5V11h1.06z"/>
                            </svg>
                                                        </div>
                        <span class="text-center">Markdown</span>
                    </div>
                    </li>
                </ul>
        </div>
        <div class="col col-2">
            <div id="editing-area"></div>
        </div>
</div>
Toolbar Style
Add the following CSS code to adjust the block style and format:
<style>
    html,body, .row{
         margin: 0;
         padding: 0;
         height: 100%;
    }

    .col{
        float: left;
    }
    .col-1{
        width: 22%;
        height: 100%;
        margin-right: 5%;
        background-color: #eee;
        border-right: 1px solid #c4c1c1;
    }
    .col-2{
        width: 72%;
        padding: 10px auto;
    }

    @media screen and (max-width: 676px) {
        .col{
            float: none
        }
        .col-1, .col-2{
            width: 100%;
            height: auto;
            border: none;
            margin: 0;
        }

        .col-1{
            height:250px;
        }

    }

    .text-center {
     text-align:center
    }

    .block-source {
     margin:0 0 18px 18px;
     width:7rem;
     height:7rem;
     white-space:nowrap;
     text-overflow:ellipsis;
     background-color:#fff;
     border:1px solid #bfc7d6;
     -webkit-box-sizing:border-box;
     box-sizing:border-box;
     border-radius:6px;
     display:-webkit-inline-box;
     display:-ms-inline-flexbox;
     display:inline-flex;
     -webkit-box-pack:center;
     -ms-flex-pack:center;
     justify-content:center;
     -webkit-box-align:center;
     -ms-flex-align:center;
     align-items:center;
     color:#6c757d
    }
    .block-source:hover {
     cursor:pointer;
     border:1px solid #c6bbef;
     -webkit-transform:translate(0);
     transform:translate(0)
    }
    .block-source svg {
     height:3.65rem;
     width:3.65rem;
     color:#bfc7d6;
     fill:#bfc7d6
    }
    .block{
     margin: 20px 0;
    }

</style>
What We Get:
After adding the code from the above steps altogether, open your HTML file on the browser, and you should see the following layout:
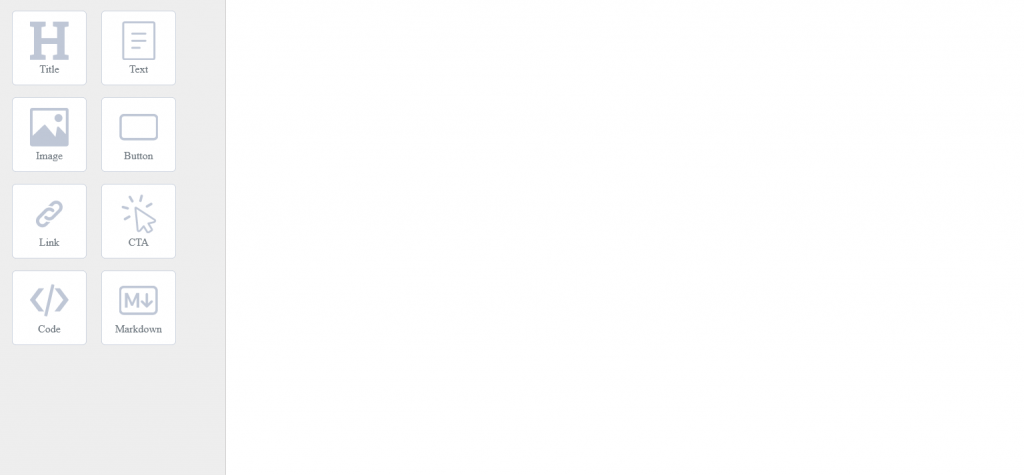
Congratulations, you have finished the toolbar! Now you have seen all of the different types of blocks that will be possible to add to the editing area. Let’s move on to creating the editing area.
Adding Different Blocks To The Editing Area Using Froala Editor :
The editing area will house the blocks that the user decides to add to the page. Therefore, when a user clicks on a block-type from the toolbar, we need to
- Add a HTML element corresponding to the block-type on the editing area.
- Initialize the Froala Editor on that element with the desired options.
Note: In this tutorial, for simplification, we will not consider using rows or columns. Instead, clicking on a block-type element will add a block that will take the editing area full-width.
Get Ready to Initialize Froala Editor
As explained in the get started guide, to initialize Froala Editor we first need to include the Froala stylesheet and JavaScript files inside the Page Builder HTML file.
- Add the Froala latest version stylesheet inside the head
- Add the Froala latest version script before closing the body tag
<link rel="stylesheet" href="https://cdn.jsdelivr.net/npm/froala-editor@latest/css/froala_editor.pkgd.min.css">
<script src="https://cdn.jsdelivr.net/npm/froala-editor@latest/js/froala_editor.pkgd.min.js" ></script>
Add a click event listener to the Block Types
In this tutorial, we will use jQuery. Add the jQuery script before closing the body tag:
<script src="https://code.jquery.com/jquery-3.6.0.min.js" integrity="sha256-/xUj+3OJU5yExlq6GSYGSHk7tPXikynS7ogEvDej/m4=" crossorigin="anonymous"></script>
Since each block type is a div with block-source class, we can attach the click event as:
  <script>
        $(document).ready(function() {
            $(document).on('click', '.block-source', function(e) {

            });
        });
   </script>
When a block-type is clicked, it should append a new block to the editing area. The new block HTML should be wrapped into a div element that has a block class.
<div class='block'>
<!-- The Block HTML Content -->
</div>
Inside that div, we will add the content of the new block which is an HTML element related to the clicked block-type. Then we will initialize Froala Editor on that element with the desired Froala API options.
<script>
    $(document).ready(function() {
         $(document).on('click', '.block-source', function(e) {
            //append the content
            $('#editing-area').append("<div class='block'>"+ content +"</div>");
            //init Froala Editor
            // eleId is the id of the content element
            new FroalaEditor('#'+eleId, editorOptions);

         });
     });
 </script>
How to determine the content, eleId, and editorOptions variables:
content:
The content variable value is the HTML element that will be added to the editing area when a user clicks on a block type. This element will be different based on the clicked block type but as a default value we will use the textarea HTML element.
eleId:
Each block should have a unique ID to be used to initialize the editor. Let’s use the Date.now() method to create the ID as it returns a unique number each time a new block is added.
editorOptions:
The editorOptions depend on the block type. We will take the following considerations while setting the default value:
- When there are multiple editors on the same page, it is recommended to set
initOnClickto true. This reduces the page load time since it initializes only the minimum required events on page load and the rest of Froala events will be initialized when the user clicks to edit the content. - For modern page builders, it is recommended to put the editor on inline mode by setting
toolbarInlineoption to true, so users can watch how the page will look while they are editing it. We will also need to settoolbarVisibleWithoutSelectionto true to display the toolbar as soon as you click on the text and not only when you select the text. -
In the inline editor mode, it is better to hide characters counter by setting
charCounterCountoption to false to preserve the page look without any distraction.
<script>
        $(document).ready(function() {
            $(document).on('click', '.block-source', function(e) {
                const eleId = 'id'+Date.now();
                let content = '<textarea id="'+ eleId + '">This is a text block, edit the text here.</textarea>';
                let editorOptions = {

                            initOnClick: true, //reduce the page load time.
                            toolbarInline: true,
                            charCounterCount: false,
                            toolbarVisibleWithoutSelection: true,
                                    };


                $('#editing-area').append("<div class='block'>"+ content +"</div>");

                new FroalaEditor('#'+eleId, editorOptions);

            });
        });
    </script>
If you try to click on any block type Now, it will add a new Froala Editor on the editing area.
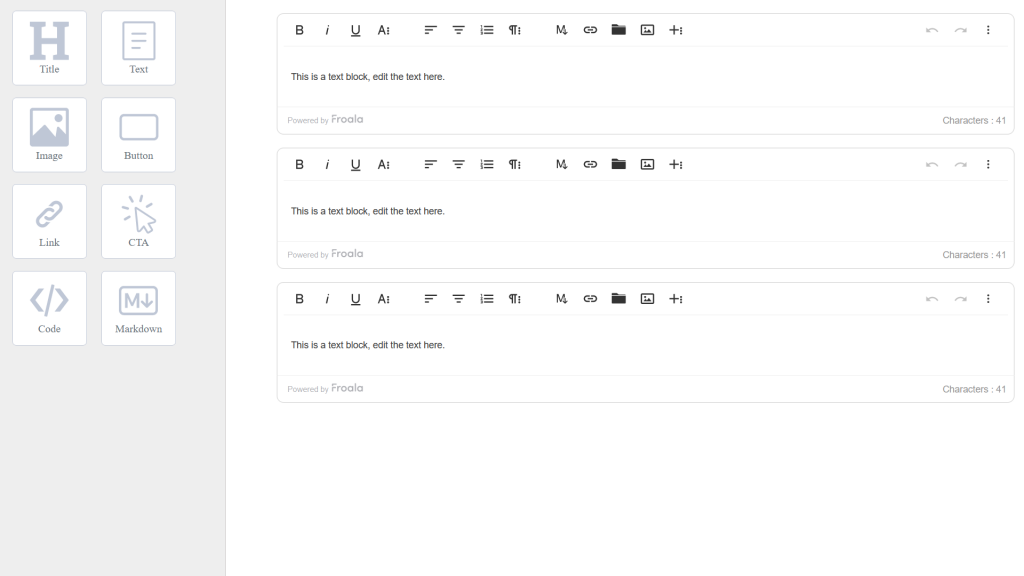
Let’s customize each block-type output by changing the default value of the content and editorOptions variables.
Change block elements based on the clicked block type
Each block-type on the page builder toolbar has a data-type attribute that contains the type of the block that should be added. This allows us to easily detect the clicked block-type and set the right content and editor options.
//Get The block type
let blockType = $(this).data('type');
Let’s dive into each block data:
1- Title Block
Titles are essential on any web page, email, or any content.
HTML element that will be added:
<h1> element.
Froala Options:
For editing titles, we don’t need to display all the editor buttons. Let’s customize the editor toolbar buttons to hide the unused buttons to give users a better user experience.. For example, you don't need to insert images or tables on the Title.
There are many options that we can use with the heading element, let’s take some examples:
you can set paragraphFormatSelection to true which will display a dropdown showing the actual paragraph format name for the current text selection instead of the Paragraph Format button.
You can predefine your preferred paragraph styles to be easily applied for the selected paragraph using paragraphStyles option.
Look at the Paragraph Format options section for more options and details.
<script>
        $(document).ready(function() {
            $(document).on('click', '.block-source', function(e) {
                const eleId = 'id'+Date.now();
                let content = '<textarea id="'+ eleId + '">This is a text block, edit the text here.</textarea>';
                let editorOptions = {
                                        //reduce the page load time.
                            initOnClick: true,
                            toolbarInline: true,
                            charCounterCount: false,
                            toolbarVisibleWithoutSelection: true,
                                    };
                let blockType = $(this).data('type');

                if (blockType == "title") {

                        content = '<h1 id="'+ eleId + '">Section Title</h1>';

                        editorOptions =  {
                            initOnClick: true,
                            toolbarInline: true,
                            charCounterCount: false,
                            toolbarVisibleWithoutSelection: true,
                            toolbarButtons: [
                                'paragraphFormat',
                                'fontSize',
                                'fontFamily',
                                '|',
                                'textColor',
                                'backgroundColor',
                                'lineHeight',
                                'align',
                                '|',
                                'bold',
                                'italic',
                                'underline',
                                '|',
                                'insertLink',
                                'emoticons',

                            ],
                        };

                }

                $('#editing-area').append("<div class='block'>"+ content +"</div>");

                new FroalaEditor('#'+eleId, editorOptions);

            });
        });
</script>
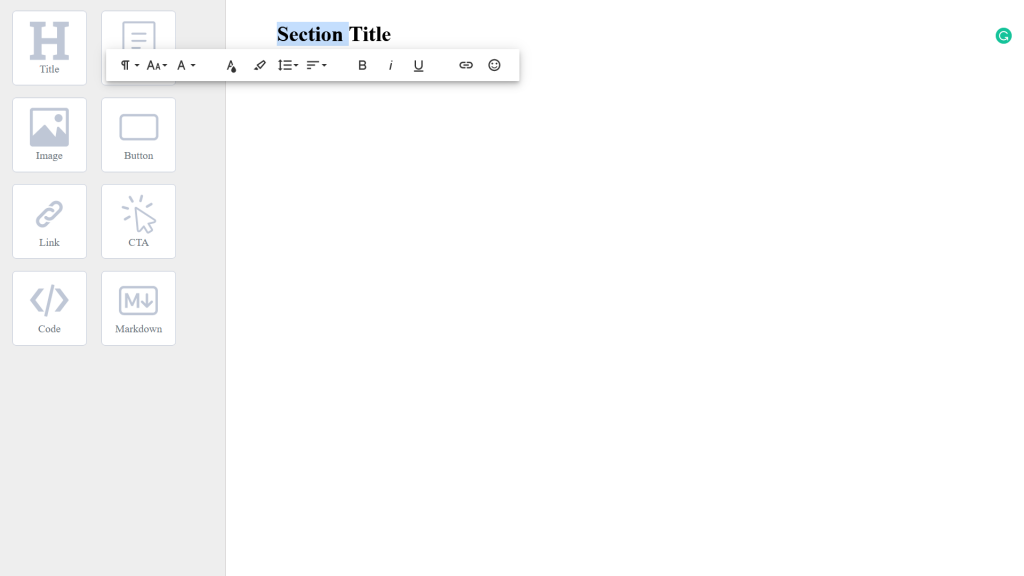
2- Text Block
HTML element that will be added:
<Textarea> element.
Froala Options:
Go over the +240 Froala options to find the best settings for your text block. It depends on your application. In this tutorial, we will use the full featured toolbar mode which shows all available Forala buttons.
let content = '<textarea id="'+ eleId + '">This is a text block, edit the text here.</textarea>';
let editorOptions = {
                       initOnClick: true, //reduce the page load time.
                       toolbarInline: true,
                       charCounterCount: false,
                       toolbarVisibleWithoutSelection: true,
                    };
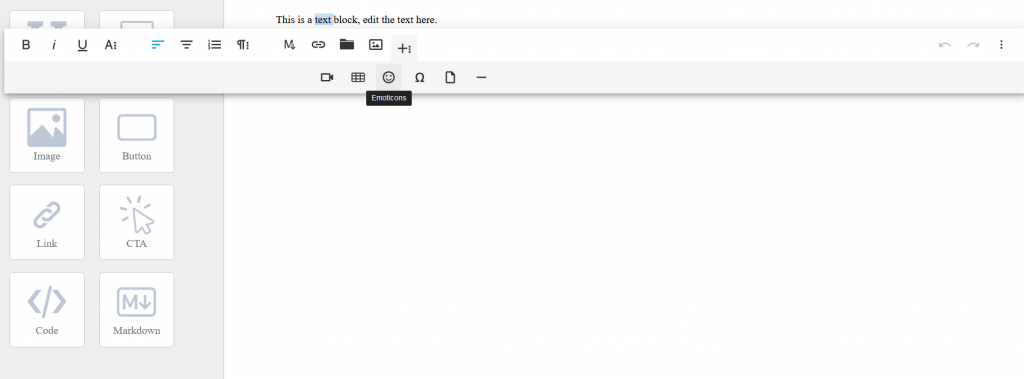
In some earlier Froala Editor releases, the inline toolbar was taking the full-width of the page. Let’s use the Froala initialized event to make the toolbar smaller by setting its max-width to a fixed value
let editorOptions = {
                      initOnClick: true, //reduce the page load time.
                       toolbarInline: true,
                       charCounterCount: false,
                       toolbarVisibleWithoutSelection: true,
                       events: {
                                 'initialized': function () {
                                                /*
                                                 * Set editor toolbar max-width to 400px
                                                 * this is the editor instance.
                                                 */
                                                this.$tb[0].style.maxWidth = "400px";
                                            }
                                 }
                     };
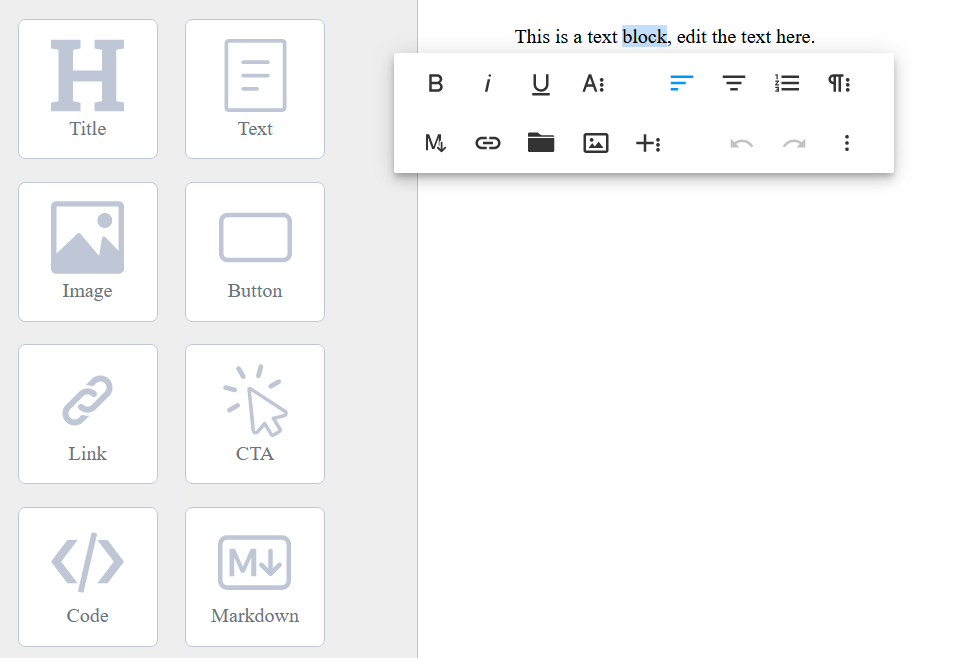
If you are looking to use this builder for creating email templates, read our setting Froala for email marketing software guide to learn how to use Froala for this purpose.
3- Image Block
HTML element that will be added:
We will use an <img> element for the image block. To prevent the browser from hiding or displaying the image element as a broken one, we have to set a placeholder on the src attribute. In this tutorial we will use this image https://fakeimg.pl/350x200/?text=Click%20on%20me
Froala Options:
Let’s keep the default Froala options which will display all different image editing buttons. They will allow you to:
- Replace the image.
- Change the image width and height.
- Set and edit the ALT attribute.
- Set and edit image caption.
- Set image alignment.
- Set image display property.
- Insert and edit an image link.
- Apply a predefined style to the image.
 }else if (blockType == "image") {

    content = '<img id="'+ eleId + '" src="https://fakeimg.pl/350x200/?text=Click%20on%20me" />';
    editorOptions =  {};
 }
How to upload images on your server?
Froala WYSIWYG Editor provide an image concepts guide that will help you to know how image uploading, deletion, and management works, moreover, Froala has ready-to-go SDK libraries that will help you implement the server-side image processing operations in a few minutes instead of building it from scratch.
We also recommended that you look at the Froala image tool to learn more about the variety of features it offers. If you still need help getting started you can check out this step by step tutorial for setting up Froala to upload images.
Do you need to add a different editing image functionality?
Follow this guide to create a custom button that does the functionality you need then add it to theimageEditButtons list.
4- Button
HTML element that will be added:
<button> element.
Froala Options:
If you are interested in editing the button text, you can simply use the default options.
}else if (blockType == "button") {
    content = '<button id="'+ eleId + '">Submit</button>';
}
5- Link Block
HTML element that will be added:
<a> element.
Froala Options:
Froala default options allows you to edit the link text, URL, and the target attribute. Moreover, Froala Editor has different options to give you advanced control on the inserted links. For instance, you can set Froala to disable adding the noopener value to the link rel attribute when a link is set to open in a new tab, or convert email addresses inserted as link to mailto: links. Review all link options and customize links per your needs.
Do you need to add a different editing links functionality?
Follow this guide to create a custom button that does the functionality you need then add it to the linkEditButtons list.
}else if (blockType == "link") {
    content = '<a id="'+ eleId + '">link</a>';
}
6- CTA Buttons
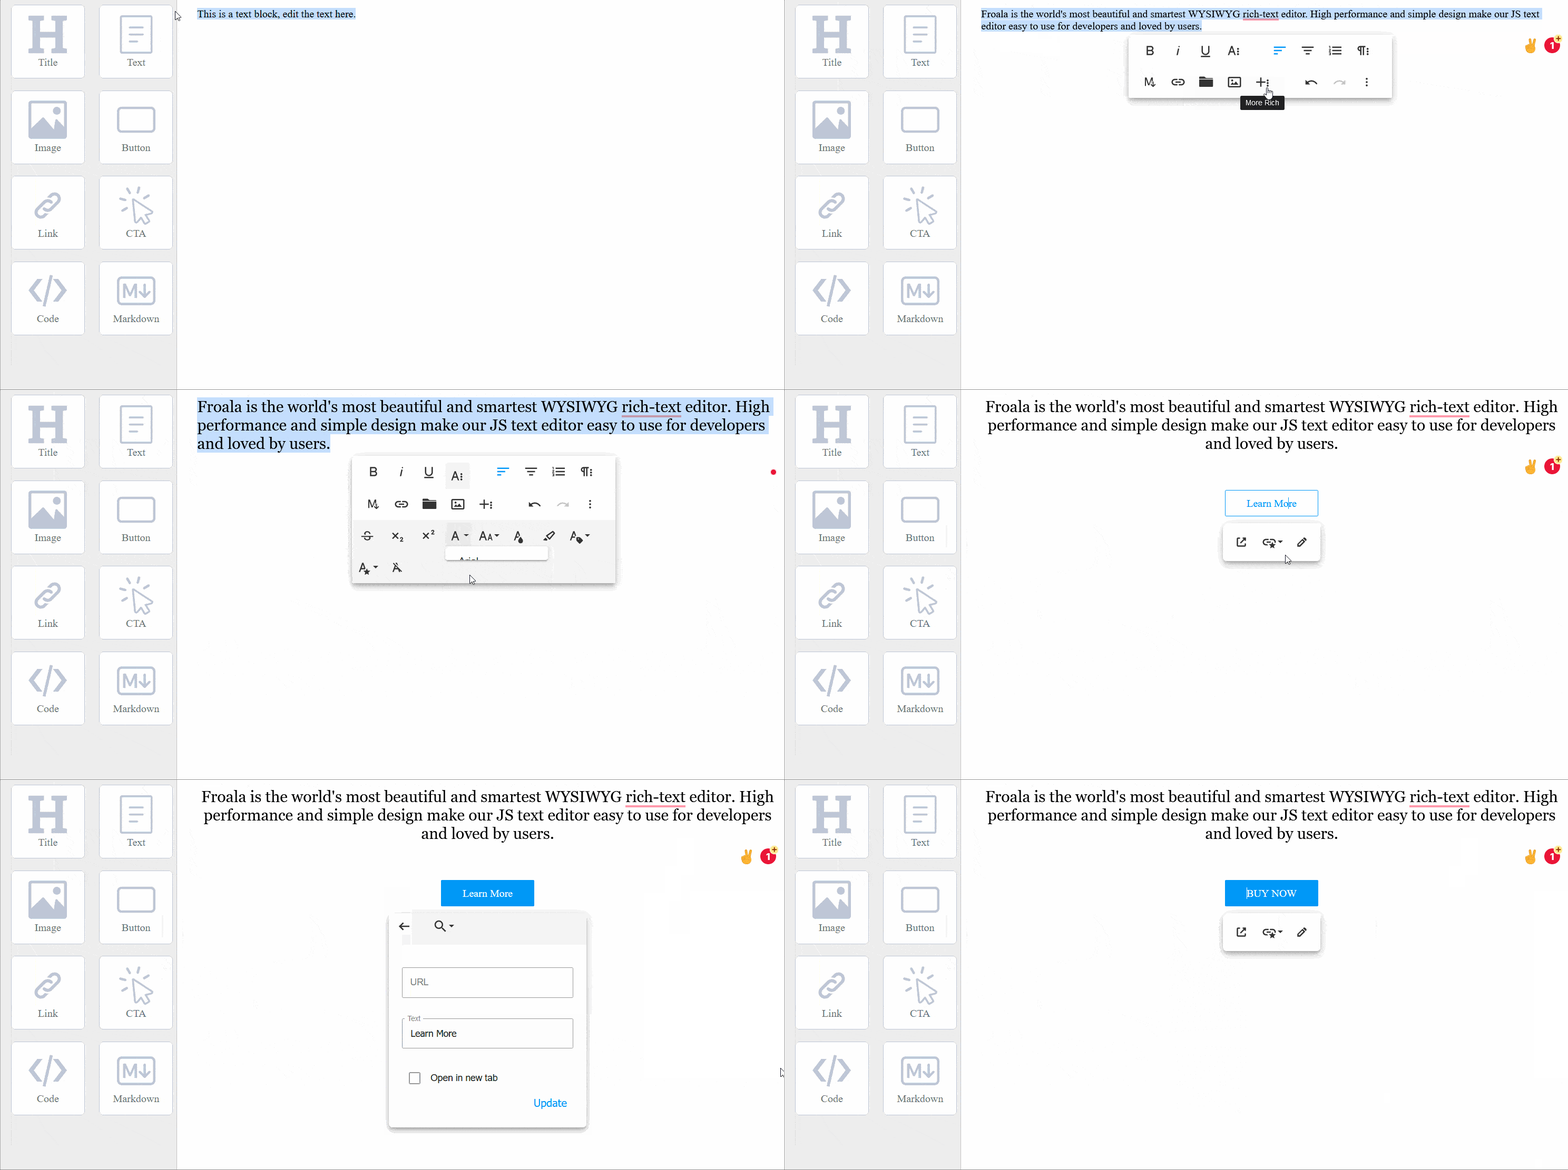
A call to action (CTA) button is a button that has a text that encourages your visitors, leads, and customers to take action. The CTA buttons should be beautifully designed to get your web visitor clicking on them and completing a conversion.
HTML element that will be added:
Since we basically want the CTA button to redirect users to a specific page, we will use <a> HTML element and style it to look like a button with the help of the linkStyles option.
Froala Options:
linkStyles option is an Object where the key represents the class name and its value is the style name that appears in the dropdown list.
- Define your CTA styles as CSS classes and add them to the page stylesheet.
<style> .cta1{ background-color: #fff; color: #0098f7; border: 1px solid #0098f7; text-decoration: none; vertical-align: middle; word-wrap: break-word; text-align: center; padding: 10px 20px 10px 20px; border-radius: 2px; display: inline-block; max-width: 100%; width: auto; } .cta2{ background-color: #0098f7; color: #fff; border: 1px solid #0098f7; text-decoration: none; vertical-align: middle; word-wrap: break-word; text-align: center; padding: 10px 20px 10px 20px; border-radius: 2px; display: inline-block; max-width: 100%; width: auto; } .centerCta{ margin: 0 auto; display: block !important; max-width: 100px; } </style> - Set
linkStylesoptionlinkStyles: { cta1: 'Primary CTA', cta2: 'Secondary CTA', centerCta: 'Center' },
By default, Froala Editor allows users to select multiple link styles at a time. To disable this, set the linkMultipleStyles option to false.
The JavaScript code for the CTA block:
}else if (blockType == "cta") {

         content = '<a class="cta1" id="'+ eleId + '">Learn More</a>';

          editorOptions = {
                        initOnClick: true, //reduce the page load time.
                        linkStyles: {
                                 cta1: 'Primary CTA',
                                 cta2: 'Secondary CTA'
                                 centerCta: 'Center'
                          },
            };
}
7- Code Block
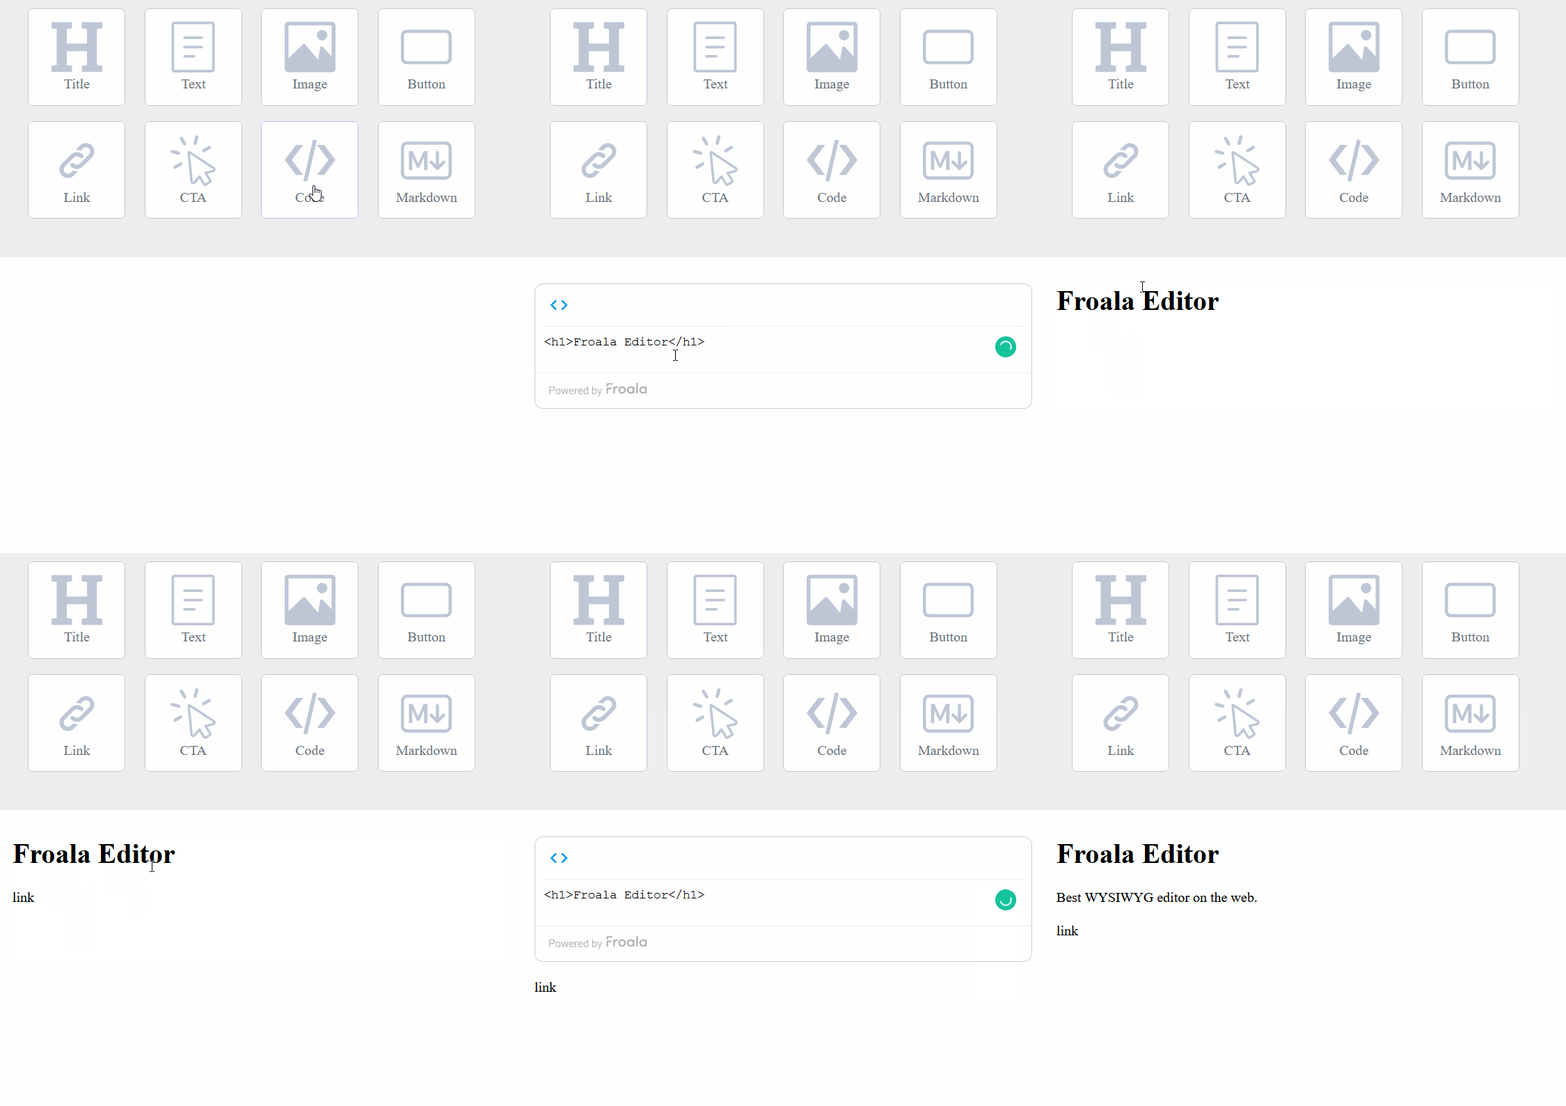
The Froala WYSIWYG Editor toolbar has a button that when clicked allows the content's HTML code to be edited, and when it is clicked again it converts the HTML code back to rich content. The Froala Code View plugin is responsible for that. We will use it and its API events to create the page builder HTML block. You can also use the Froala Code Beautifier plugin if you want to display the code in a specific format.
HTML element that will be added:
<div> element
Froala Options:
There are several different considerations when adding a code block to the editing area, Let's examine a few below:
- Since we will use this block to write and edit HTML code, we will set the
pluginsEnabledoption to enable the Code View and the Code Beautifier plugins only. This will prevent unwanted plugins from loading. - We will use the
toolbarButtonsoption to display the HTML code button only. - To automatically open the HTML editing window, we will call the
codeView.toggle()method once the editor is initialized. - After the user finishes writing the HTML code, he should click on the Froala Editor Code toolbar button to see how his code looks in the rich content mode. At that moment, we should also remove the editor toolbar, so the user can see how the page exactly looks. This could be done by destroying the editor instance inside the
codeView.updateevent which is triggered when the Froala Editor Code toolbar button is clicked.
The code to enable these options would look like the following:
}else if (blockType == "code") {
         content = '<div class="codeblock" id="'+ eleId +'"></div>';
         editorOptions = {
                            pluginsEnabled: ['codeView', 'codeBeautifier'],
                            toolbarButtons: ['html'],
                            events: {
                                      'initialized': function () {
                                                //this is the editor instance.
                                                this.codeView.toggle();
                                       },
                                       'codeView.update': function () {
                                                //Replace the editor with the rich text content
                                                this.destroy();
                                        }
                               }

                    };
}
Since we destroy the Froala Editor instance, the user will not be able to edit the block again unless we initialize the editor again. Let’s give users the ability to edit the block again by double clicking on the block.
Add a double click event listener to the code block and once it’s triggered, initialize the editor on that block with the same defined options:
// reopen the editor to edit the code block when user double click on it
$(document).on('dblclick', '.codeblock', function(e) {

      //get the div id
      let eleId = $(this).attr('id');

       //set options
        let editorOptions = {
               pluginsEnabled: ['codeView', 'codeBeautifier'],
               toolbarButtons: ['html'],
               events: {
                       'initialized': function () {
                            //this is the editor instance.
                            this.codeView.toggle();
                        },
                        'codeView.update': function () {
                              //remove the editor and replace it with the HTML output
                              this.destroy();
                          }
                 }
         };

         //initialize Froala
         new FroalaEditor('#'+eleId, editorOptions);
 });
Now users will be able to edit the code again.
8- Markdown Block
Markdown is a lightweight markup language. It allows users to write using an easy-to-read, easy-to-write plain text format, then convert it to structurally valid HTML.
TheFroala WYSIWYG Editor provides markdown support to those who prefer writing markdown syntax instead of the HTML tags. Check the full list of the supported markdown syntax on the
Markdown plugin page.
HTML element that will be added:
<div> element
Froala Options:
There are several different considerations when adding a code block to the editing area, Let's examine a few below:
- Since we will use this block to write and edit markdown syntax only, we will set the
pluginsEnabledoption to just enable the Markdown plugin. - We will set the
toolbarInlineoption totrueand settoolbarButtonsoption to empty array to not display any toolbar. - To automatically open the Markdown editing window, we will call the
markdown.toggle()method once the editor is initialized.
The code to enable these options would look like the following:
 }else if (blockType == "markdown") {

       content = '<div id="'+ eleId +'"></div>';
       editorOptions = {
                         toolbarInline: true,
                         charCounterCount: false,
                         toolbarVisibleWithoutSelection: true,
                         pluginsEnabled: ['markdown'],
                         toolbarButtons: [],
                         events: {
                               'initialized': function () {
                                      //this is the editor instance.
                                      this.markdown.toggle();
                                  }
                          }
                 };
 }
Still need another block Type?
The Froala Editor has a powerful API that allows, as you see above, easy customization of the editor to perform different functions. Discover more than 240 options, +100 events, and +220 methods and start customizing it to your functionality. Need more? Froala is easily extended by creating custom plugins, buttons, pop-ups, and dropdown menus. Want to style the Froala Editor to your brand style? You can customize the Froala user interface from editing icons to completely using another color theme.Deleting Blocks:
We've learned previously how to add and edit different block types. Let’s add the delete block functionality.
We need to add a delete button with each added block. To achieve this, we need to edit the line that adds a new block to the editing area:
$('#editing-area').append("<div class='block'>"+ content +"</div>");
To be:
$('#editing-area').append("<div class='block'><i class='close_btn'>✖</i>"+ content +"</div>");
The delete button should be visible only when a user hovers over the block so let’s add its style
<style>
 .block{
       margin: 20px 0;
       position: relative;
     }
  .close_btn{
            display: none;
            position: absolute;
            left: 100%;
            color: #fff;
            font-size: 18px;
            background: #505050;
            padding: 2px 10px 4px 5px;
            cursor: pointer;
        }

</style>
Now add a click event listener to remove the block when the delete button is clicked:
<script>
// delete block
$(document).on('click', '.close_btn', function(e) {
    $(this).parent().remove();
 });
</script>
Adding Drag-and-Drop Feature
Page builders usually allow rearrange blocks through drag and drop functionality. This can be added easily to Froala page builder through any 3rd party drag and drop library. For instance, we will use the Jquery UI Sortable plugin to achieve this in our tutorial.
Include Sortable JavaScript file
<script src="https://code.jquery.com/ui/1.13.1/jquery-ui.js"></script>
Similar to deleting blocks, We need to add a button that will be used to drag blocks. Replace:
$('#editing-area').append("<div class='block'><i class='close_btn'>✖</i>"+ content +"</div>");
With:
$('#editing-area').append("<div class='block'><i class='drag_btn'>&#duarr;</i><i class='close_btn'>✖</i>"+ content +"</div>");
And replace this style block:
<style>

  .close_btn{
            display: none;
            position: absolute;
            left: 100%;
            color: #fff;
            font-size: 18px;
            background: #505050;
            padding: 2px 10px 4px 5px;
            cursor: pointer;
        }

</style>
With:
<style>
	.close_btn, .drag_btn{
		display: none;
		position: absolute;
		color: #fff;
		font-size: 18px;
		background: #505050;
		padding: 2px 10px 4px 5px;
		z-index: 1000;
	}

	.close_btn{
		left: 100%;
		cursor: pointer;
	}

	.drag_btn{
		left: 95%;
		cursor: grab;
		font-weight: bold;

	}

	.block:hover > .close_btn, .block:hover > .drag_btn{
		display: inline-block;

	}

	.close_btn:hover, .drag_btn:hover{
		background-color: #eee;
	}
</style>
Then add the following code:
<script>
//Add drag and drop functionality
   $( "#editing-area" ).sortable({
      handle: ".drag_btn"
   });

</script>
Displaying The Page Content
After the designer finishes building the page and wants to display its content to the users, remember to follow the final step mentioned on the get started page.
- Include the froala style sheet
- Make sure that you put the edited content inside an element that has the class fr-view.
<!-- CSS rules for styling the element inside the editor such as p, h1, h2, etc. -->
<link href="../css/froala_style.min.css" rel="stylesheet" type="text/css" />
<div class="fr-view">
<!-- Here comes the HTML edited with the Froala rich text editor. -->
</div>
Result:
The Froala Editor is more than a WYSIWYG editor. Its powerful API allows you to use it as a WYSIWYG editor, image uploader, page builder, and many other applications. In this tutorial we showed you how to build eight different types of blocks just by customizing its API options.
Congratulations, you have built an amazing page builder that will help your users create their own content effortlessly!
✨ It's the fun time ✨ Try Froala Page Builder Now ✨
-
Title
-
Text
-
Image
-
Button
-
Link
-
CTA
-
Code
-
Markdown
What do customers say about Froala Editor?

It feels like we tried every editor on the market before discovering Froala! We haven’t looked back since. Our users have now used Froala Editor to send over 1 billion emails and the feedback has been hugely positive. Keep up the good work.
—
Jonathan Bull
EmailOctopus Co-founder

