
Building a Multi-Model AI Assistant in Froala Editor

Froala Editor’s AI Assist feature gives developers a clean way to bring generative AI directly into the editing experience. While some users work well with a single model, others need more flexibility. Different models excel at different tasks. Some are faster and cheaper, others produce higher-quality long-form content, and some handle specific languages or coding tasks better.
This article explains how to connect multiple AI models to Froala and let users switch between them directly from the toolbar. We will walk through a working prototype that demonstrates the approach using only Froala’s configuration system and its command registration API.
Key Takeaways
- Froala’s
aiAssistRequestoption can be swapped at runtime, enabling multi-model support without recreating the editor. - A custom dropdown command in the toolbar lets users switch models seamlessly.
- Request handler functions follow a consistent interface, so switching models requires only updating a single function reference.
- Production deployments should proxy AI requests through a backend to protect API keys and enforce security policies.
- Froala’s popup system lets you expose advanced settings like temperature and token limits alongside model selection.
How Froala AI Assist Works Under the Hood
Froala exposes the aiAssistRequest configuration option. This option accepts a function that receives an object containing the user’s instruction and the current selection (or full document content). The function is responsible for returning a string of HTML that Froala will insert into the editor.
Because aiAssistRequest lives in the editor’s options object, you can change it at runtime. This single fact makes multi-model support possible without touching Froala’s core code.
In the prototype we keep a map of model names to request functions:
const aiReqHandler = {
  chatgpt: openAIRequest,
  claude: claudeRequest,
  deepseek: deepSeekRequest,
  gemini: geminiRequest,
  groq: groqRequest,
  openrouter: openRouterRequest
};
At initialization we point aiAssistRequest at the default handler: new FroalaEditor("#editor", {
toolbarButtons: [
"bold",
"italic",
"underline",
"|",
"aiAssist",
"aiShortCuts",
"aiModelList"
],
aiAssistRequest: aiReqHandler[aiDefaultModel]
// ...
});
The key insight is that we never replace the entire editor instance. We simply swap the function reference stored in this.opts.aiAssistRequest.
Extending the Toolbar with a Custom Dropdown
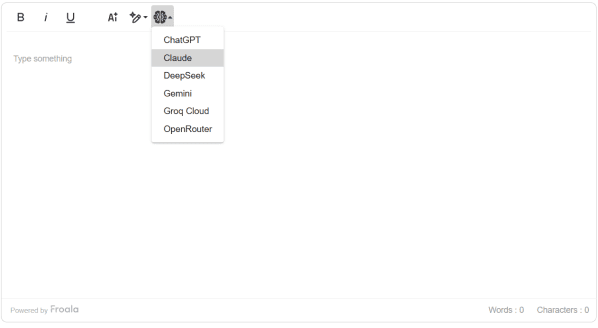
Froala’s toolbar is built from registered commands. To add a model selector, we register a new command of type dropdown.
Defining a Custom Icon
First we create a recognizable icon using DefineIcon. The command uses an SVG that visually suggests multiple models:
FroalaEditor.DefineIcon("aiModel", {
  template: "svgMultiplePath",
  VIEWBOX: "0 0 48 48",
  PATHS: "..." // (SVG paths)
});
Using a custom icon keeps the toolbar consistent with Froala’s design language and makes the new control immediately understandable to users.
Registering the Dropdown Command
The actual control is created with RegisterCommand:
FroalaEditor.RegisterCommand("aiModelList", {
  title: "Select AI Model",
  type: "dropdown",
  icon: "aiModel",
  options: AI_MODELS,
  undo: true,
  focus: true,
  refreshAfterCallback: true,
  callback: function (cmd, val) {
    this.opts.selectedAiModel = val;
    this.opts.aiAssistRequest = aiReqHandler[val];
  },
  refreshOnShow: function ($btn, $dropdown) {
    const current = this.opts.selectedAiModel || aiDefaultModel;
    $dropdown.find("a").removeClass("fr-active");
    $dropdown.find(`a[data-param1="${current}"]`).addClass("fr-active");
  }
});
Several details are worth highlighting for Froala developers:
optionsis a plain object. The keys become the values passed to the callback; the values become the visible labels.- The
callbackreceives the selected key (val). Inside the callback we update two properties onthis.opts. This works because Froala readsaiAssistRequestagain the next time the user triggers an AI action. refreshOnShowruns every time the dropdown opens. It is the correct hook for applying visual state (the active model) without affecting editor performance.- We store the current model in
this.opts.selectedAiModelso other parts of the integration (or future custom popups) can read the active choice.
Once the command is registered, we simply add its name to the toolbarButtons array. No additional plugin registration or CSS work is required.
Switching Models at Runtime
When the user selects a different model, the callback executes immediately:
this.opts.aiAssistRequest = aiReqHandler[val];
console.log(`AI Model switched to ${AI_MODELS[val]}`);
The next time the user clicks the built-in “AI Assist” or “AI Shortcuts” buttons, Froala calls whatever function currently lives at this.opts.aiAssistRequest. Because the request functions all follow the same contract (they accept the same data object and an optional AbortSignal), the rest of the AI Assist pipeline remains unchanged.
This pattern gives you several advantages:
- Zero downtime switching — The editor does not need to be destroyed and recreated.
- Per-instance state — Each Froala instance can track its own selected model.
- Easy debugging — You can log or expose the current handler for development tools.
You can see the complete working demo on JSFiddle. This fiddle includes all the code from this article—model registration, dropdown setup, and request handlers—running in a live editor. You can fork it, modify the models, adjust settings, or test with your own API keys.
Adding Configuration Options with Froala’s Custom Popups
A dropdown is sufficient for model selection, but many teams also want to expose parameters such as temperature, max tokens, or system prompts. Froala’s popup system lets you create rich configuration interfaces that feel native.
You can register a second command that opens a custom popup. Inside the popup you can render form controls (temperature slider, token limit input, etc.). When the user saves the popup, you store the values on this.opts (for example this.opts.aiSettings = { temperature: 0.7, maxTokens: 2048 }).
Your request functions can then read these values before making the API call:
// Inside any request handler
const settings = this.opts.aiSettings || {};
const temperature = settings.temperature ?? 0.7;
Because the popup is built with Froala’s own popup API (this.popups.create, this.popups.show, etc.), it automatically respects the editor’s theme, positioning, and keyboard navigation. This keeps the user experience consistent even when you add advanced AI controls.
A practical tip: keep the popup data minimal. Store only what the request function actually needs. Heavy configuration objects can be moved to a separate module that the request handlers import.
Why the Prototype Keeps Logic in the Frontend
The provided code performs all AI calls directly from the browser using fetch. This approach is intentional for a demonstration:
- It shows the complete flow without requiring a backend server.
- It lets developers quickly test different providers and models.
- It makes the integration easy to copy into a CodePen or local HTML file.
However, this pattern must not be used in production. There are several non-negotiable reasons:
API key exposure
Embedding real API keys in client-side JavaScript makes them available to anyone who opens the browser’s developer tools. Once leaked, keys can be abused, leading to unexpected costs or account suspension.
CORS restrictions
Some providers (notably Anthropic) block direct browser requests. Even when CORS is allowed, many organizations prefer not to open their AI endpoints to arbitrary origins.
Centralized control and observability
A backend proxy gives you a single place to implement rate limiting, user authentication, cost tracking, content moderation, and prompt sanitization. You can also rotate keys or switch providers without touching the frontend.
Compliance and data residency
Many teams must ensure that sensitive document content never leaves their infrastructure in raw form. A backend layer lets you apply logging policies, PII redaction, or regional routing before any data reaches an external model.
Future flexibility
When you later add features such as streaming responses, retry logic with exponential backoff, or model fallbacks, these concerns are much easier to manage on the server.
The recommended production pattern is therefore simple: keep the model selection UI and the call to aiAssistRequest in the frontend, but have the actual request function call an internal endpoint (for example /api/ai/generate). That endpoint receives the model identifier, the prompt data, and any settings, then proxies the request to the chosen provider using server-side secrets.
Learn more on this “setup AI React WYSIWYG editor powered by Claude” guide.
Recommended Architecture for Production
- Store the mapping of friendly model names to provider details on the backend.
- Expose a single
/ai-assistendpoint that accepts{ model, prompt, text, settings }. - Validate the incoming model against an allow-list.
- Apply any business rules (user quotas, content filters).
- Forward the request to the appropriate provider using the correct SDK or HTTP client.
- Return only the generated HTML (or an error object) to the editor.
On the Froala side, your aiAssistRequest function becomes very small:
async function aiAssistRequest(data, signal) {
  const response = await fetch("/api/ai-assist", {
    method: "POST",
    headers: { "Content-Type": "application/json" },
    body: JSON.stringify({
      model: this.opts.selectedAiModel,
      prompt: data.prompt,
      text: data.text,
      settings: this.opts.aiSettings
    }),
    signal
  });
  // handle response...
}
This keeps the editor configuration clean while moving all sensitive logic behind your own authentication boundary.
Best Practices When Working with Froala’s Command System
- Always use
refreshOnShow(notrefresh) when you need to update dropdown appearance. The former runs only when the menu is about to open. - Store runtime state on
this.optsrather than on the command object itself. This keeps state scoped to the editor instance. - If you need to disable the model selector in certain contexts (read-only mode, specific user roles), use the
refreshcallback on the command to toggle thedisabledclass on the button. - Consider persisting the user’s last chosen model in localStorage and restoring it when the editor initializes. This small UX improvement makes repeated sessions feel more personal.
Testing the Multi-Model AI Integration
When testing multi-model support, verify the following flows:
- Switching models while text is selected should use the newly chosen model on the next AI action.
- The active model should remain highlighted when the dropdown reopens.
- Changing models should not clear the current selection or undo stack.
- Error states returned by one provider should not affect subsequent calls when the user switches models.
Because each request function is independent, you can also temporarily replace any handler with a mock during automated tests:
editor.opts.aiAssistRequest = async () => '<p>Mock response</p>';Conclusion
Froala’s AI Assist configuration combined with the command registration system gives developers a surprisingly powerful extension surface. By treating aiAssistRequest as a swappable strategy and using a custom dropdown command for model selection, you can deliver a first-class multi-model experience with very little code.
The pattern scales well: whether you’re connecting two models or ten, the core architecture remains unchanged. The separation between frontend UI (model selection, settings) and backend logic (API calls, security) keeps your codebase maintainable as you add new providers or features.
Ready to get started? Fork the JSFiddle demo, connect your own API keys, and experiment with different models in your editor. Then move to a backend architecture following the recommended production pattern, and you’ll have a robust, secure multi-model AI assistant built right into your editing experience.


No comment yet, add your voice below!