Days
Hours
Minutes
Seconds
x
Skip to content

Reading and Writing Markdown in Froala Editor

Reading and Writing Markdown in Froala Editor

Froala v5.4.0 adds getMarkdown() and setMarkdown(), so Markdown can be the format your application stores rather than something you convert once on the way out. Before you wire them up, it helps to understand how Froala keeps Markdown content separate from rich text content. That design protects your users’ work, and it explains exactly what each of these two methods reads, writes, and returns.

Key Takeaways

  • Markdown mode and Rich Text mode each hold their own content, so switching between them is never destructive.
  • getMarkdown() and setMarkdown() work only with the Markdown side of the editor.
  • A null return from setMarkdown() means the value was cached, not that the call failed.
  • getMarkdown() fully replaces the older custom export button built on selection.text().

How Froala Separates Markdown Content From Rich Text Content

Froala gives you two modes, and each one holds its own content:

  • Rich Text mode, the familiar WYSIWYG experience where users type and format with the toolbar.
  • Markdown mode, where users write Markdown syntax directly.

The markdown toolbar button switches between them. Switching does not move or convert content. Whatever you left in Rich Text mode is still there when you come back, and the same is true of Markdown mode. Each mode owns its content for the whole life of the editor session.

Why the two are kept separate

This is a deliberate design decision, and it exists to protect content.

HTML expresses far more than Markdown can. Rich text content routinely holds tables with merged cells, styled spans, custom classes, embedded media, and inline attributes that have no Markdown equivalent. If the toolbar button converted automatically on every switch, each toggle would quietly discard whatever could not be represented in the target format. Flip to Markdown and back, and you would not return to where you started. A user checking the Markdown view out of curiosity would pay for it with degraded formatting.

Keeping the two separate means toggling is always safe. A user can move between modes as often as they like, and nothing is lost in either direction. The tradeoff is that content does not travel between modes on its own, which is why getMarkdown() and setMarkdown() exist as explicit, deliberate operations on the Markdown side.

Inside each mode, the layout differs.

Rich Text mode has two views you can flip between with the Code View toolbar button. The Rich Text view shows formatted content. The Code View shows the underlying HTML. These two views do convert content between them: edit formatted text, switch to Code View, and you see the HTML for it. Edit that HTML, switch back, and you see it rendered.

Markdown mode has a single view split into two panes. The Markdown pane is where you write. The result pane beside it shows a live preview of what your Markdown renders to. The preview pane is view-only, so users edit Markdown in one pane and watch the result in the other.

Here is the whole picture:

Where you are What it shows Editable
Rich Text view Formatted content Yes
Code View HTML for that content Yes
Markdown pane Markdown syntax Yes
Preview pane Rendered result No

In practice this means a document belongs to one mode. Since nothing carries content across, you decide up front whether a given piece of content is a Markdown document or a rich text document, and your users work in that mode.

Set Up the Editor

Everything below builds on this initialization.

<!DOCTYPE html>
<html lang="en">
<head>
  <meta charset="UTF-8" />
  <title>Froala Markdown Demo</title>

  <!-- Core Froala Editor styles -->
  <link
    href="https://cdn.jsdelivr.net/npm/froala-editor@5.4.0/css/froala_editor.pkgd.min.css"
    rel="stylesheet"
  />
  <!-- Markdown plugin styles -->
  <link
    href="https://cdn.jsdelivr.net/npm/froala-editor@5.4.0/css/plugins/markdown.min.css"
    rel="stylesheet"
  />
</head>
<body>
  <div id="editor"></div>
  <button id="download-md">Download .md</button>

  <!-- Core Froala Editor script -->
  <script src="https://cdn.jsdelivr.net/npm/froala-editor@5.4.0/js/froala_editor.pkgd.min.js"></script>
  <!-- Markdown plugin script -->
  <script src="https://cdn.jsdelivr.net/npm/froala-editor@5.4.0/js/plugins/markdown.min.js"></script>

  <script>
    const editor = new FroalaEditor('#editor', {
      // Required. Without this, editor.markdown is undefined.
      pluginsEnabled: ['markdown'],
      // The 'markdown' button switches the user between the two modes.
      toolbarButtons: ['bold', 'italic', 'underline', '|', 'markdown'],
      events: {
        'markdown.beforeSet': function (markdown) {
          // Return false here to reject the write entirely.
          if (!markdown || !markdown.trim()) {
            console.warn('Refusing to load empty Markdown.');
            return false;
          }
        },
        'markdown.set': function () {
          console.log('Markdown content applied.');
        },
        'markdown.afterGet': function (markdown) {
          console.log('Markdown read, length:', markdown.length);
        }
      }
    });
  </script>
</body>
</html>

Load Markdown Content Into the Editor

This is the inbound half of the workflow. Content arrives as a Markdown string from a CMS field, a GitHub README, or a generated draft, and you need it inside the editor.

setMarkdown() takes that string and writes it to the Markdown side of the editor, replacing whatever was there.

async function loadDraft(editor, draftId) {
  const response = await fetch(`/api/drafts/${draftId}`);
  const draft = await response.json();

  const result = editor.markdown.setMarkdown(draft.markdownBody);

  if (result === false) {
    // Either the value wasn't a string, or markdown.beforeSet cancelled it.
    console.error('Draft content was rejected.');
    return;
  }

  // result is true if Markdown mode was on and the content is now visible.
  // result is null if Markdown mode was off and the content was cached.
  console.log('Draft loaded. Applied immediately:', result === true);
}

Understanding the three return values

setMarkdown() gives you one of three answers, and each one tells you something specific:

  • true means Markdown mode was enabled. The content was applied immediately and an undo step was saved, so the user can reverse it.
  • null means Markdown mode was disabled. The value was cached and will be applied the next time Markdown mode is turned on. It can also be read back through getMarkdown() in the meantime. Nothing visible happens at call time.
  • false means the value you passed was not a string, or a markdown.beforeSet listener returned false and cancelled the write.

The null case is worth dwelling on, because it is doing more work than it first appears.

When you call setMarkdown() from Rich Text mode, the editor has a choice to make. It could refuse the write. It could force the user into Markdown mode so the content has somewhere visible to land. Froala does neither. It accepts the content, holds it, applies it the moment Markdown mode next opens, and hands you a distinct return value saying so. The user is not yanked out of the view they were working in, and your content is not dropped.

That is why the return type is true, null, or false rather than a plain boolean. Three states tell you three different things: applied and visible, accepted and waiting, or rejected. You can branch on all three.

Treat null as success. The only failure signal is false.

Repopulate on every initialization

Markdown content does not survive across page loads or editor re-initialization. Every fresh editor starts with the Markdown side empty until something calls setMarkdown().

That makes this call part of your setup path, not just something behind a “Load draft” button:

const editor = new FroalaEditor('#editor', {
  pluginsEnabled: ['markdown'],
  toolbarButtons: ['bold', 'italic', 'underline', '|', 'markdown'],
  events: {
    initialized: function () {
      // Restore stored Markdown as soon as the editor is ready.
      const stored = window.localStorage.getItem('draft-markdown');
      if (stored) {
        this.markdown.setMarkdown(stored);
      }
    }
  }
});

If you skip this, users who refresh the page find their Markdown gone, which reads as data loss even though nothing was ever persisted in the first place.

Save Markdown Content as a .md File

Now the outbound half. getMarkdown() returns the Markdown content as a string.

Be clear about what it reads. It returns the Markdown side of the editor, which means it gives you real content when the document was authored in Markdown mode or populated through setMarkdown(). It does not convert a user’s rich text into Markdown. If someone typed formatted content in Rich Text mode and you call getMarkdown(), you get whatever is on the Markdown side, which may well be empty.

The method also behaves differently depending on the current mode. With Markdown mode enabled you get the live content. With Markdown mode disabled you get the last cached value, and the editor’s HTML is never consulted.

function downloadMarkdown(editor, filename = 'content.md') {
  const markdown = editor.markdown.getMarkdown();

  // A markdown.beforeGet listener can cancel the read.
  if (markdown === false) {
    console.warn('Markdown read was cancelled.');
    return;
  }

  const blob = new Blob([markdown], { type: 'text/markdown;charset=utf-8' });
  const url = URL.createObjectURL(blob);

  const link = document.createElement('a');
  link.href = url;
  link.download = filename;
  link.click();

  URL.revokeObjectURL(url);
}

document.getElementById('download-md').addEventListener('click', function () {
  downloadMarkdown(editor, 'article.md');
});

Always check for false before writing to a file. A cancelled read returns the boolean, and passing that straight into a Blob produces a file containing the text “false”.

This is what makes docs-as-code workflows practical. The .md file that comes out is diffable in Git, reviewable in a pull request, and consumable by any static site generator, without the HTML noise that makes content diffs unreadable.

The markdown.afterGet event fires on every successful read and receives the string, which makes it a convenient hook for logging exports or triggering analytics.

Replace the Custom Export to Markdown Button

If you followed our earlier guide to adding a custom Export from Markdown button, you built a toolbar button that worked around the absence of a getter. Retrieving the content took four calls:

// The older pattern, before getMarkdown() existed.
this.selection.save();
this.commands.selectAll();
const markdownContent = this.selection.text();
this.selection.restore();

That button also needed a refresh handler checking markdown.isEnabled(), so it could disable itself outside Markdown mode, plus an SVG entry, a DefineIcon call, and a RegisterCommand block.

All of it collapses into one line:

const markdown = editor.markdown.getMarkdown();

Both approaches require Markdown mode, so this is a like-for-like swap rather than a new capability. What you gain is less code to own, a cursor that is never touched, and the markdown.beforeGet and markdown.afterGet events, which the selection-based approach had no way to offer. The download half of the old callback still applies unchanged, and it is the same Blob code shown earlier.

Common Pitfalls

Know which mode you are in before you save. The getters follow the active mode, so html.get() returns Markdown text while Markdown mode is on. That consistency is useful once you expect it, since a single save handler can serve both modes as long as it records which format it received. Branch on the current mode and store the format alongside the content:

function getContentForStorage(editor) {
  return editor.markdown.isEnabled()
    ? { format: 'markdown', body: editor.markdown.getMarkdown() }
    : { format: 'html', body: editor.html.get() };
}

setMarkdown() replaces the Markdown content rather than appending to it. That is the documented behavior and it matches html.set(), but it applies to cached writes too. If you call it while Markdown mode is off, the queued value will replace whatever the user had written there once they switch back. Prompt for confirmation when you are loading over content a user may have authored.

Conclusion

The single thing to remember is that Markdown content and rich text content live separately in Froala, so a user can move between modes without losing anything in either one. Every part of the API follows from that: getMarkdown() and setMarkdown() operate on the Markdown side deliberately, null tells you a write is waiting for a mode that is not open yet, and the getters report the mode you are actually in. Build around it and Markdown becomes a first-class storage format rather than a one-way export. For the complete method and event reference, see the Froala Markdown plugin documentation.

FAQ

Why does setMarkdown() return null?

Markdown mode was off when you called it, so rather than dropping your content or forcing the user into a different view, the editor cached the value. It applies the next time Markdown mode turns on, and you can read it back with getMarkdown() in the meantime. The write succeeded. Only false indicates a rejected call.

Does switching between Markdown mode and Rich Text mode convert my content?

No, and that is intentional. HTML can express formatting that Markdown cannot, so converting on every toggle would discard a little more of your content each time. Keeping the two separate means switching is always safe. You may be thinking of Code View, which is a different feature and does convert between formatted content and HTML within Rich Text mode.

Can I load a Markdown string and let users edit it as formatted rich text?

Convert it to HTML in your application first, with a library such as marked.js, then call html.set(). setMarkdown() writes to the Markdown side of the editor, which is where users edit Markdown syntax directly.

Does Markdown content persist after a page refresh?

No. Every editor initialization starts with the Markdown side empty. Store the string yourself and call setMarkdown() when the editor initializes.

graphical user interface, text

Froala v5.4.0: AI Chat Assistant, Reviewable AI Edits, and Markdown

Froala v5.4.0

Froala v5.4.0 is our biggest AI release yet. You get a full AI Chat Assistant that lives in a side panel next to your content, AI Improve Writing that shows every suggested edit as an accept or reject change instead of overwriting your text, and Markdown getter and setter methods so Markdown can finally be the format you store, not just something you convert once. Collaboration also gets a solid upgrade, with track changes now covering drag and drop moves and code snippet edits.

AI Chat Assistant


Top Highlights

1. AI Chat Assistant: a conversation next to your document

What it is

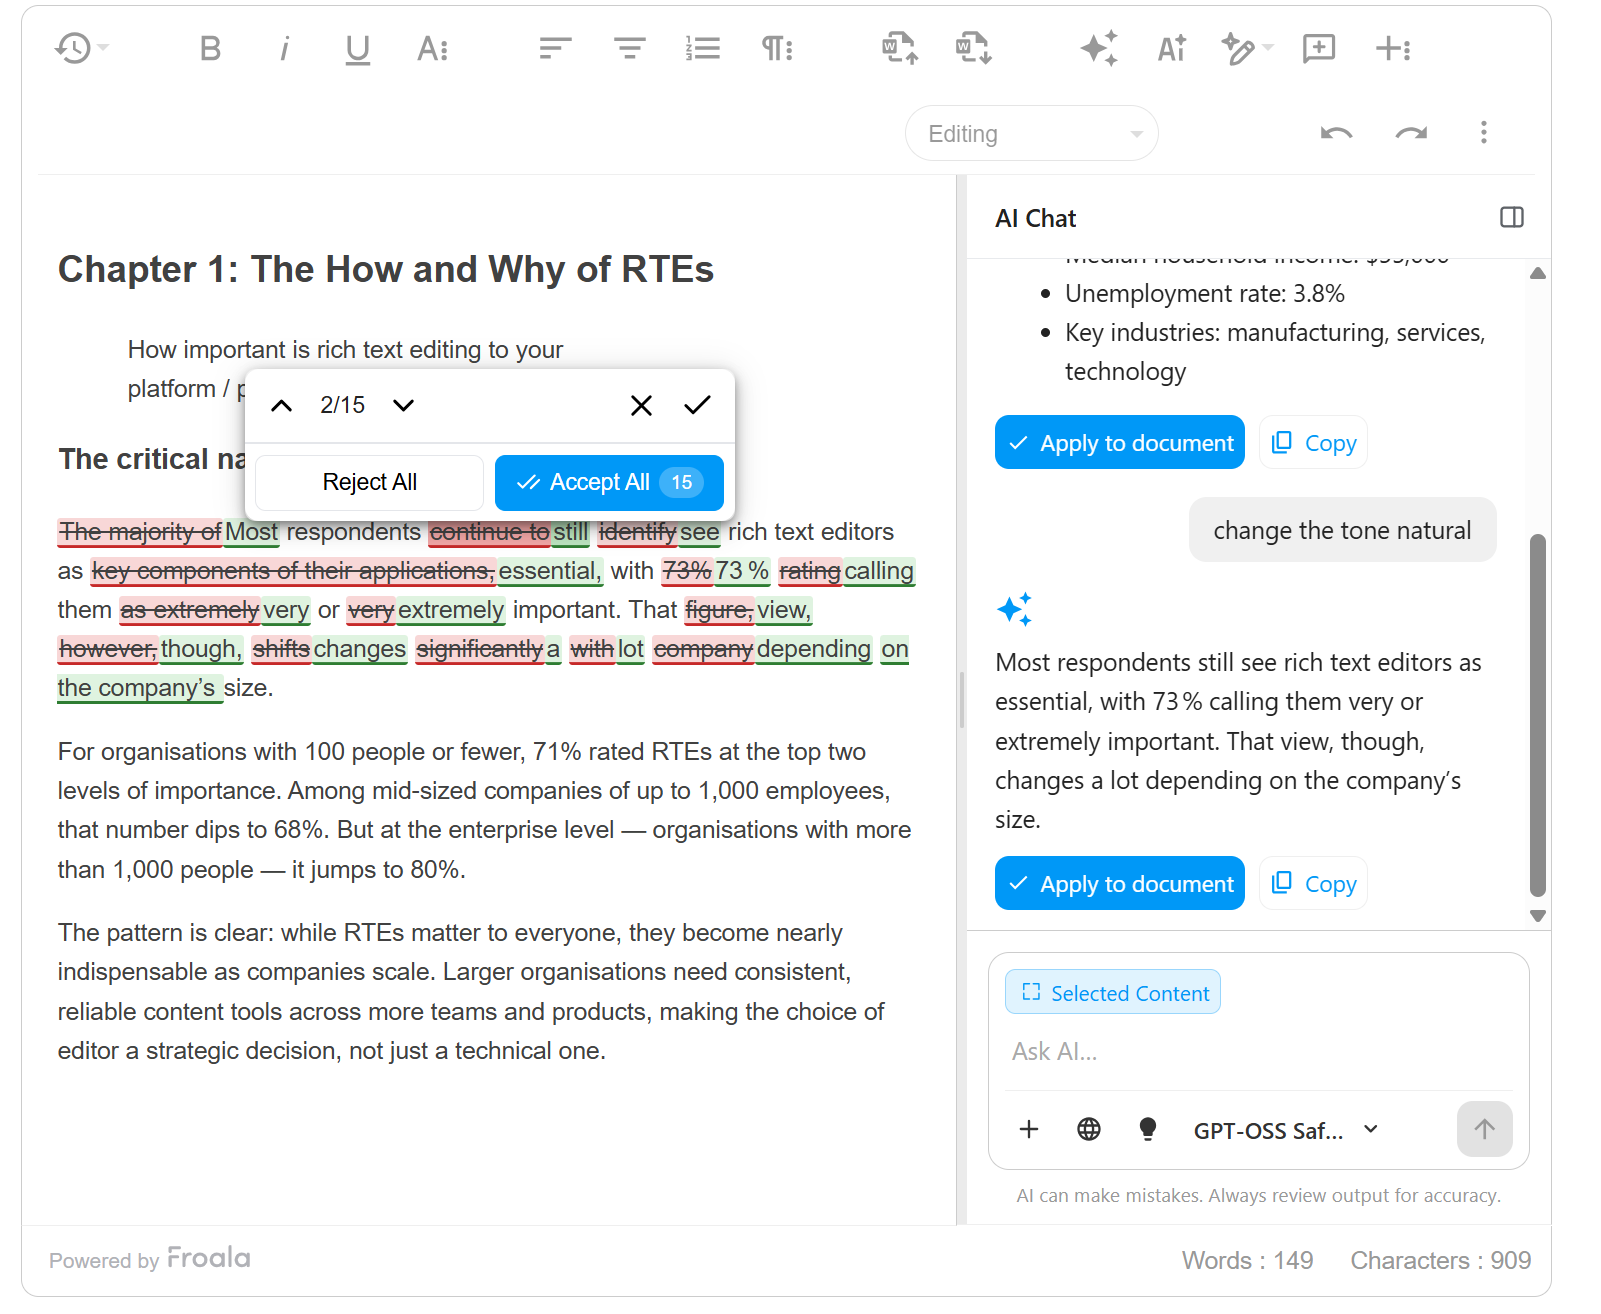
A new AI Chat icon in the toolbar opens a collapsible panel docked to the right of the editor. Instead of firing a single prompt and dropping the answer into your content, you can now have a back and forth conversation: ask a question, get an answer, ask a follow-up and only then decide whether anything goes into the document.

You choose what the AI can see, using one or more context sources at the same time:

  • Current Document: sends the whole editor content.
  • Selected Content: sends only the text you highlighted.
  • Uploaded files: PDF, DOCX, TXT, Markdown, and images (JPG, PNG, GIF, WebP).
  • Reference URL: a link the AI can pull context from.

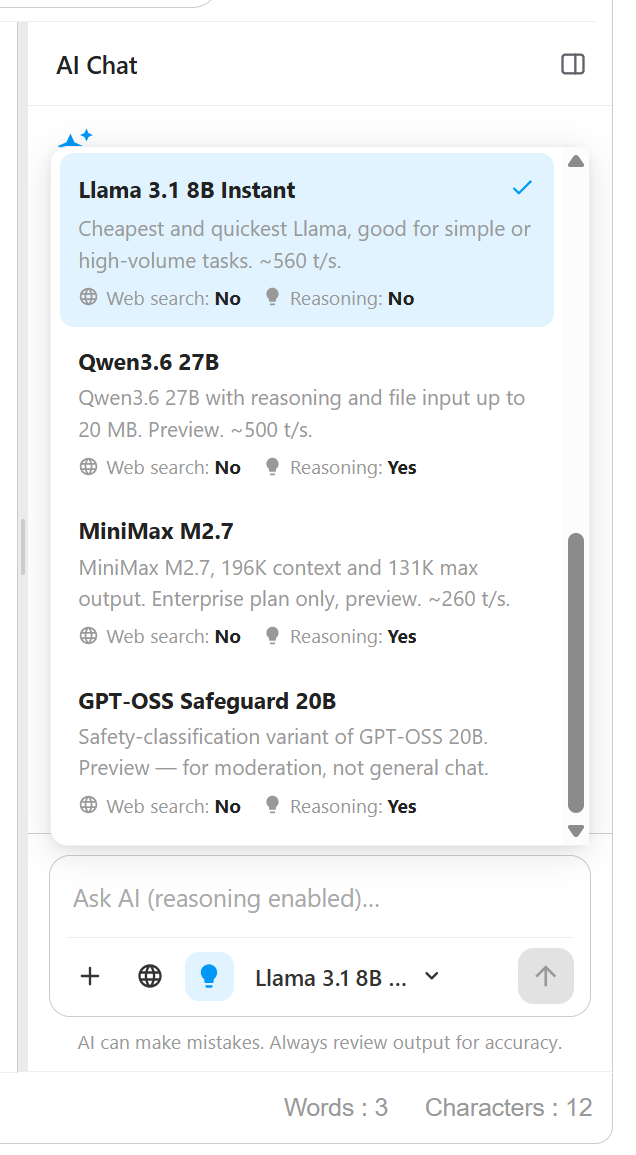
The panel also includes a web search toggle, a model dropdown, and a reasoning toggle so users can pick a fast model for quick questions or a stronger one for heavier work. The chat is provider agnostic, so it works with whichever AI service you already have configured.

When the AI proposes a rewrite, you review it before it lands. In normal mode, clicking Apply to document opens the same review popup used elsewhere in the editor, with additions and removals highlighted, and the affected part of the document is visibly highlighted the moment you click Apply. In collaboration mode, the suggestion appears as a Suggested rewrite card right inside the chat panel with a preview toggle and an Insert button.

Why it matters

Writers stop tab-switching to a separate AI tool and pasting content back and forth. Reviewers get a safety net, because nothing changes in the document until a human approves it. And because the model list is supplied by you rather than hard-coded by us, you stay in control of cost, provider, and data handling.

How to use it

Add the AI Chat button to your toolbar and supply the models you want users to choose from:

new FroalaEditor('#editor', {
  aiSupplementalTermsAccepted: true,
  toolbarButtons: ['bold', 'italic', 'aiChatAssistant'],
  aiChatModels: [
    { id: 'fast-model', name: 'Fast', webSearch: false, reasoning: false },
    { id: 'smart-model', name: 'Smart', webSearch: true, reasoning: true }
  ],
  aiChatDefaultModel: 'fast-model',
  aiChatWelcomeMessage: 'Hi! Ask me anything about this document.',
  aiAssistRequest: function (data, signal) {
    return fetch('https://your-ai-backend/chat', {
      method: 'POST',
      headers: { 'Content-Type': 'application/json' },
      body: JSON.stringify(data),
      signal: signal
    })
      .then(response => response.json())
      .then(result => result.answer);
  }
});

If you do not configure any models, the model dropdown simply does not appear.

Agnostic AI rich text editor

Good to know

  • Only one right-docked panel is open at a time. Opening AI Chat closes the Collaboration comments panel, and the other way around.
  • The panel can be resized, but the width is not stored by the editor. Listen for the resize and pass the width back in yourself if you want it remembered.
  • When the editor is disabled or read only, the chat panel dims and stops responding too.
  • The Copy button on a chat message now copies formatted content, so bold text, lists, and headings survive when you paste into an email or another document.

2. AI Improve Writing with accept and reject changes

What it is

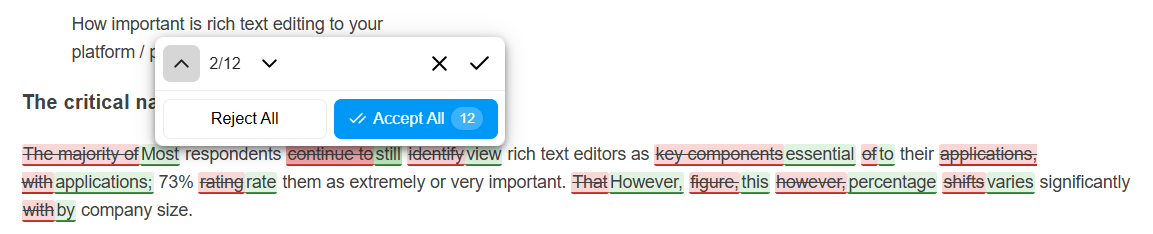
Select text in the editor and a floating action button appears. Click Improve Writing and only that selection is sent to your AI provider. The result comes back as tracked changes: removed text is struck through, added text is highlighted, and you can step through the changes one at a time and accept or reject each one, or use Accept All and Reject All. The original content stays untouched until you accept.

The behaviour adapts to how your editor is set up:

Setup Where the diff appears What happens on accept
Collaboration off Inline in the editor The change is applied in place
Collaboration on, Editing mode In a review popup The change is inserted as a normal edit and syncs to everyone
Collaboration on, Suggesting mode In a review popup The change becomes a tracked suggestion for others to review

Why it matters

AI output is a proposal, not a decision. Staging the diff means an author never has to undo a bad rewrite, and in a shared document it means half-finished AI suggestions never appear in a teammate’s screen before anyone approved them.

How to use it

new FroalaEditor('#editor', {
  aiSupplementalTermsAccepted: true,
  aiImproveWritingPrompt: 'Improve the clarity and grammar of this text.',
  aiAssistRequest: function (data, signal) {
    return fetch('https://your-ai-backend/improve', {
      method: 'POST',
      headers: { 'Content-Type': 'application/json' },
      body: JSON.stringify({ prompt: data.prompt }),
      signal: signal
    })
      .then(response => response.json())
      .then(result => result.answer);
  }
});

Under the hood, the comparison logic behind this feature is now a single shared module used by Improve Writing, the AI Chat previews, and the collaborative version control Compare With view.

AI improve writing

3. Markdown in, Markdown out

What it is

Two new methods, getMarkdown() and setMarkdown(), work exactly like html.get() and html.set() do for HTML. Authors edit in the familiar rich text interface, but your application reads and writes Markdown. Four lifecycle events let you hook into the flow: markdown.beforeGet, markdown.afterGet, markdown.beforeSet, and markdown.set.

Why it matters

If your product stores content in Markdown, the way GitHub comments or Asana descriptions do, you no longer have to choose between a good editing experience and keeping Markdown as your source of truth. Content round-trips cleanly: load Markdown, edit visually, save Markdown, load it again later and keep editing.

How to use it

const editor = new FroalaEditor('#editor', {
  pluginsEnabled: ['markdown'],
  events: {
    'markdown.afterGet': function (markdown) {
      console.log('Markdown fetched:', markdown);
    },
    'markdown.beforeSet': function (markdown) {
      // Return false to cancel setMarkdown()
      if (!markdown.trim()) {
        return false;
      }
    }
  }
});

// Load stored Markdown into the editor
editor.setMarkdown('# Release notes\n\nWritten in Markdown.');

// Read it back out to save
const content = editor.getMarkdown();

getMarkdown() reads live editor content and converts it when Markdown mode is on, or returns the cached value when it is off. setMarkdown() does the reverse. We also fixed a long standing annoyance where a Shift+Enter line break came back as a literal <br> in your Markdown text. It now returns as a proper line break, and it stays clean no matter how many times you edit the content.

4. Track changes now covers moves and code snippets

What it is

Two gaps in collaborative Suggesting mode are closed.

Drag and drop is now tracked. Dragging an image, table, video, or a block of selected text creates one linked pair of suggestions: a red struck-through marker where the content used to be, and a green highlighted copy where it now sits. The suggestions panel shows this as a single Moved card rather than two unrelated Added and Removed cards, and accepting or rejecting either half automatically resolves the other. Dragging an already-pending move a second time is recognized as the same proposal, so you never build up a pile of stray cards.

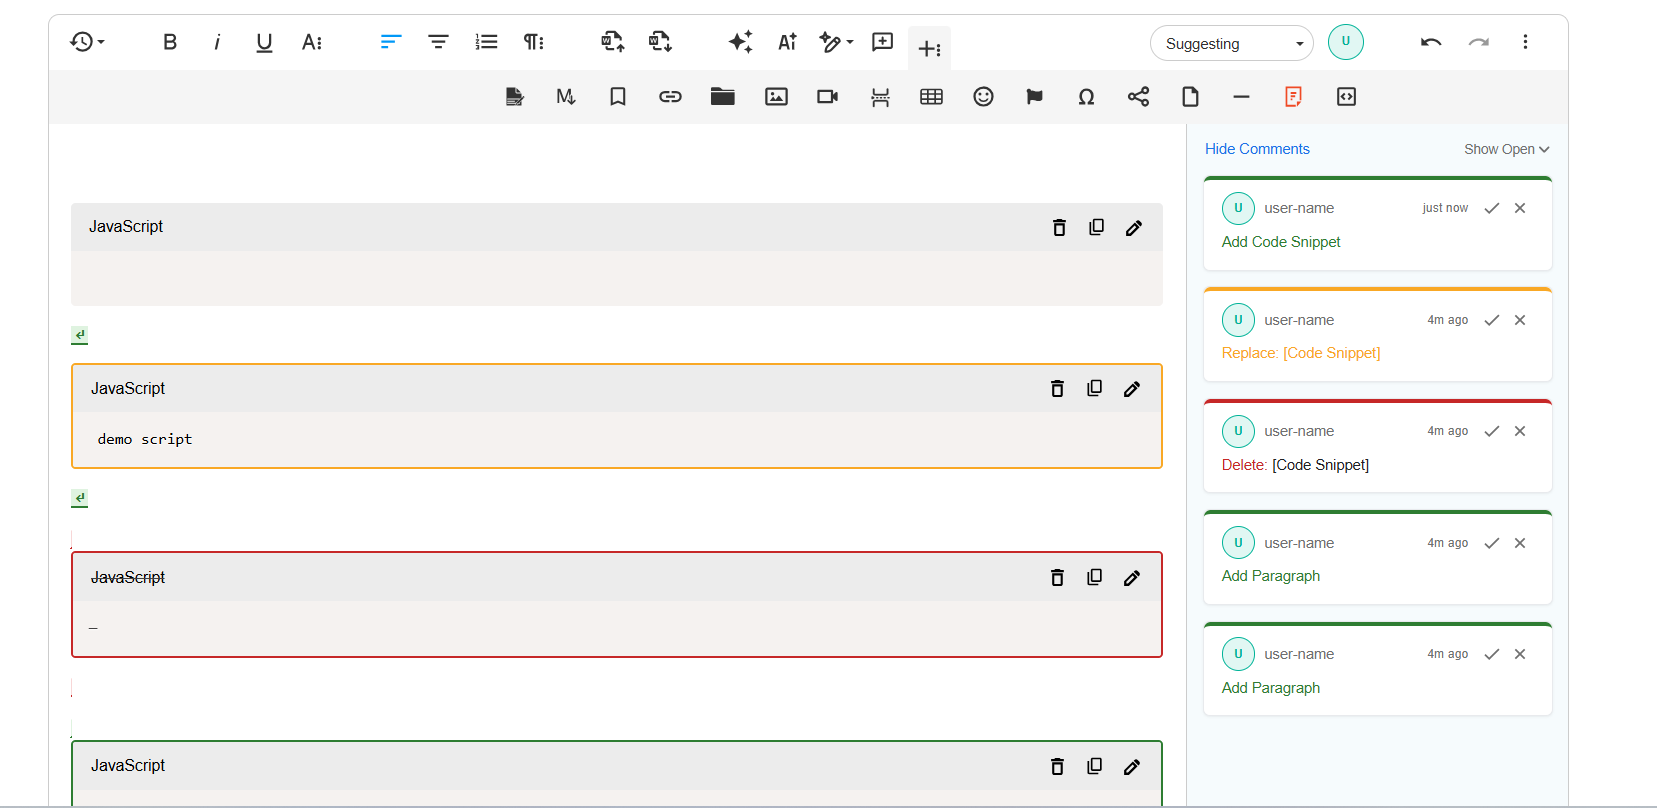
Code snippet edits and deletes are now tracked. Previously, inserting a code snippet created a suggestion but editing or deleting one applied silently. Editing is now recorded as a single in-place Replace suggestion, and deleting wraps the snippet as a normal delete suggestion.

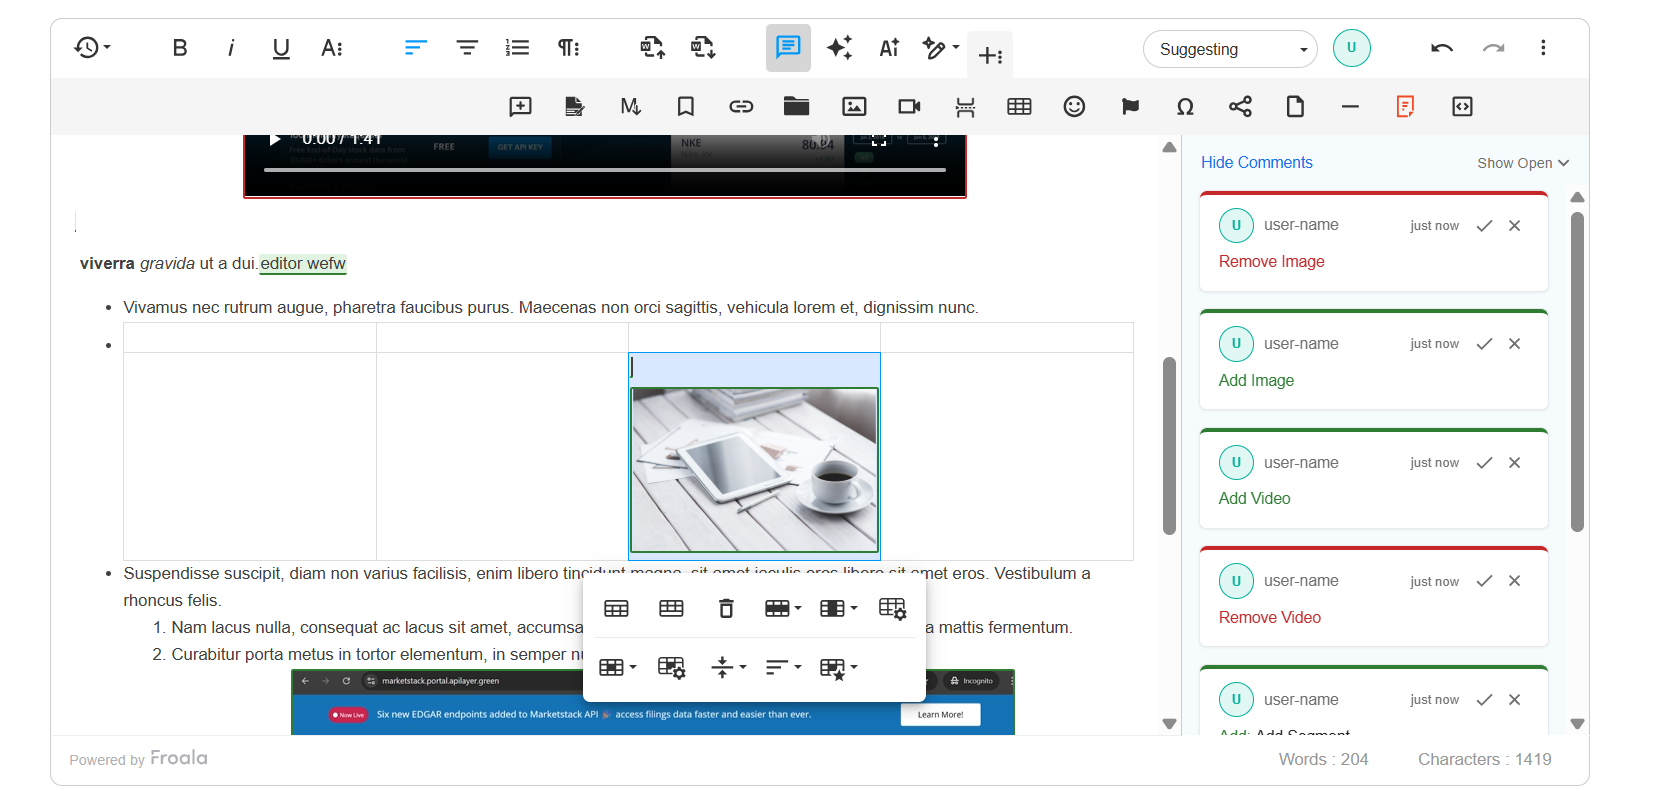
code snippets track changes

Why it matters

Reviewers can trust the suggestions panel again. If a change happened in the document, it shows up as something a reviewer can accept or reject, with no silent edits slipping through and no confusing duplicate cards.

Rich text editor with track changes

Also in v5.4.0

A few smaller AI and collaboration additions worth knowing about:

  • Speech to text in AI Assist. A microphone button lets users dictate a prompt instead of typing it. Audio is captured in the browser and transcribed through your existing aiAssistRequest handler, so it works in Chrome, Firefox, and Safari with no extra service. Controlled by aiSpeechToText (default true), plus aiSpeechToTextWaveform, aiSpeechToTextListeningText, and aiSpeechToTextMaxDuration (default 120 seconds).
    Speech to text in AI Assist
  • Inline ghost text autocomplete. An opt-in, Smart Compose style suggestion that appears in grey at your cursor when you pause at the end of a block. Press Tab to accept, Esc to dismiss, or just keep typing. Configured with aiAssistAutoComplete, aiAssistAutoCompleteDelay, and aiAssistAutoCompletePromptTemplate. Ghost text is stripped before html.get(), so it can never leak into saved content.
    Inline ghost text autocomplete
  • AI Shortcuts menu cleanup. The Tone and Translate menus are now hidden when no options are configured, and inserting AI content causes far less layout shift.
  • Collaboration fixes. The user name label now appears on the very first character typed, suggestion cards get a proper reply field with Cancel and Reply buttons, and word replacements made through the browser spell check menu are tracked correctly.

A full list of the remaining enhancements and bug fixes is on the v5.4.0 changelog page.

Upgrading to v5.4.0

1. Update the package

# npm
npm install froala-editor@5.4.0

# yarn
yarn upgrade froala-editor@5.4.0

# pnpm
pnpm update froala-editor@5.4.0

If you use a framework wrapper, update it alongside the core package, for example npm install react-froala-wysiwyg@5.4.0.

2. Or update your CDN links

<link href="https://cdn.jsdelivr.net/npm/froala-editor@5.4.0/css/froala_editor.pkgd.min.css" rel="stylesheet">
<script src="https://cdn.jsdelivr.net/npm/froala-editor@5.4.0/js/froala_editor.pkgd.min.js"></script>

3. Enable what you want to use. The AI Chat panel needs the aiChatAssistant toolbar button and an aiAssistRequest handler. Inline autocomplete is off by default and needs aiAssistAutoComplete: true. Markdown getter and setter methods need the markdown plugin enabled.

5. Clear your build cache and rebuild, then test any custom AI or collaboration integration against the new shared review flow.

Coming from Froala 3 or 4? Start with the migration guide, then apply the steps above.

Try it out

The fastest way to get a feel for v5.4.0 is to use it.

We would love to hear what you build with it. If something does not behave the way you expect, open an issue and tell us.

How to Autosave Froala Content and Recover Drafts in React

Froala React autosave

Losing an hour of writing because a tab crashed is one of the fastest ways to lose a user’s trust in your app. If your React app uses Froala Editor for rich text, you can fix this with a lightweight autosave system that writes drafts to localStorage instantly and syncs to your server every few seconds.

This guide walks you through building that system from scratch, including a “Saving / Saved” status indicator, a “Restore draft” banner on reload, and a warning that stops users from accidentally closing the tab with unsaved work.

Key Takeaways

  • Use the contentChanged event, not keyup, to trigger saves. It fires once per meaningful edit instead of on every keystroke.
  • Debounce your save logic with a useRef timer so you don’t flood localStorage or your API during fast typing.
  • Save to localStorage on every debounced change (cheap and instant), but only hit your API every few seconds (expensive and rate-limited).
  • Leave immediateReactModelUpdate off unless another part of your UI needs to read the editor’s content on every keystroke.
  • Add a beforeunload listener to warn users before they lose unsaved changes.
  • This custom setup is different from Froala’s built-in autosave plugin (saveInterval, saveURL). Use the built-in plugin for simple, timer-based server saves. Use this guide’s approach when you also want local draft recovery and change-based saving.

Prerequisites

Before you start, make sure you have:

  • Froala Editor installed (froala-editor and react-froala-wysiwyg)
  • React 18 or later
  • A basic backend endpoint (or a mock one) that can accept a POST request with draft content
  • Familiarity with React hooks (useState, useEffect, useRef)

Install the packages if you haven’t already:

npm install froala-editor react-froala-wysiwyg

Why Autosave Matters for Rich Text Editors

Rich text content is expensive to lose. Unlike a single form field, a Froala document might represent 20 minutes of formatting, image placement, and careful wording. Users don’t expect to lose that to a refresh, a closed laptop lid, or a flaky network connection.

An autosave system solves three problems at once:

  1. Local safety net. localStorage writes are synchronous and don’t depend on the network, so you get instant protection against tab crashes and accidental refreshes.
  2. Server durability. localStorage is scoped to one browser. If the user switches devices, they need their draft saved to your backend too.
  3. User confidence. A visible “Saving…” or “Saved” indicator tells users their work is safe, so they stop hitting Ctrl+S out of habit.

This Guide Goes Beyond Froala’s Built-in Autosave Plugin

Froala ships its own autosave plugin with options like saveInterval, saveURL, and saveMethod. It’s worth knowing what that plugin covers before you write any custom code, so you can decide which approach fits your app.

The built-in plugin fires an HTTP request to your server on a fixed timer. This guide builds something different, for three reasons:

  • A local safety net. The built-in plugin only talks to your server. If the request fails or the tab closes mid-cycle, there’s no local backup. This guide adds a localStorage layer that saves instantly and works offline.
  • A restore experience. The built-in plugin has no concept of “here’s a draft you can recover.” This guide adds a banner that lets users choose between a local draft and their last saved server version.
  • Change-based saving instead of a fixed clock. The built-in plugin saves on a timer regardless of whether anything changed. This guide debounces saves based on actual edits, so you get faster local protection and fewer wasted server requests.

If you only need periodic server saves with no local fallback or recovery UI, the built-in plugin is fewer lines of code and worth using instead. The rest of this guide is for cases where you want the fuller setup: instant local saves, controlled server syncs, and a way for users to recover unsaved work.

Step 1. Set Up the Froala Editor Component

Start with a standard Froala setup in a React functional component. Keep the editor’s config minimal at first, you’ll add autosave logic on top of it.

import React, { useState, useRef, useEffect, useCallback } from 'react';
import FroalaEditor from 'react-froala-wysiwyg';
import 'froala-editor/css/froala_style.min.css';
import 'froala-editor/css/froala_editor.pkgd.min.css';

const DRAFT_KEY = 'froala-draft-content';
const SAVE_INTERVAL_MS = 5000; // sync to API every 5 seconds
const DEBOUNCE_MS = 800; // wait this long after typing stops

function AutosaveEditor() {
  const [content, setContent] = useState('');
  const [saveStatus, setSaveStatus] = useState('idle'); // idle | saving | saved | error
  const [showRestoreBanner, setShowRestoreBanner] = useState(false);

  return (
    <div className="editor-wrapper">
      <FroalaEditor
        model={content}
        onModelChange={setContent}
        config={{ placeholderText: 'Start writing your draft...' }}
      />
    </div>
  );
}

export default AutosaveEditor;

This gives you a working editor with two-way binding. Now you’ll layer autosave on top without touching this core setup.

Step 2. Use contentChanged, Not keyup

It’s tempting to hook into keyup because it feels like the most direct signal that “something happened.” Don’t. keyup fires on every single keystroke, including arrow keys, backspace, and shortcut combinations that don’t even change the content. That’s a lot of noise for something that’s supposed to trigger a save.

contentChanged is Froala’s dedicated event for actual content mutations. It fires after the internal editor model updates, so you know the HTML genuinely changed. This is also the event Froala’s own React integration uses internally to keep the React model in sync, so you’re working with the grain of the library rather than against it.

Here’s how you register it through the events config:

const editorConfig = {
  placeholderText: 'Start writing your draft...',
  events: {
    contentChanged: function () {
      // 'this' refers to the Froala editor instance here
      handleContentChanged(this.html.get());
    },
  },
};

Why this matters: if you based autosave on keyup, a user who pastes an image or uses the toolbar to bold a selection (no keyboard involved) wouldn’t trigger a save at all. contentChanged catches all of these cases because it listens for actual document mutations, not input device events.

Step 3. Debounce Saves With a useRef Timer

If you save on every contentChanged event without debouncing, you’ll write to localStorage and call your API dozens of times a minute during active typing. That’s wasteful and, for the API call, can trip rate limits or create a backlog of requests.

The fix is a debounce pattern using useRef to hold the timer ID. A ref is the right tool here because you need a mutable value that persists across renders without triggering a re-render itself, which is exactly what a timer ID needs.

function AutosaveEditor() {
  const [content, setContent] = useState('');
  const [saveStatus, setSaveStatus] = useState('idle');
  const [showRestoreBanner, setShowRestoreBanner] = useState(false);

  // Holds the debounce timer so it survives across re-renders
  const debounceTimerRef = useRef(null);
  // Holds the interval timer for periodic API syncs
  const apiSyncIntervalRef = useRef(null);
  // Tracks whether there's unsaved content since the last API sync
  const hasUnsavedChangesRef = useRef(false);

  const saveToLocalStorage = useCallback((html) => {
    try {
      localStorage.setItem(DRAFT_KEY, html);
    } catch (err) {
      // localStorage can throw if storage is full or disabled
      console.error('Failed to save draft locally:', err);
    }
  }, []);

  const saveToApi = useCallback(async (html) => {
    setSaveStatus('saving');
    try {
      await fetch('/api/drafts', {
        method: 'POST',
        headers: { 'Content-Type': 'application/json' },
        body: JSON.stringify({ content: html }),
      });
      setSaveStatus('saved');
      hasUnsavedChangesRef.current = false;
    } catch (err) {
      console.error('Failed to save draft to API:', err);
      setSaveStatus('error');
    }
  }, []);

  const handleContentChanged = useCallback((html) => {
    // Clear any pending debounce so rapid typing doesn't stack up saves
    if (debounceTimerRef.current) {
      clearTimeout(debounceTimerRef.current);
    }

    debounceTimerRef.current = setTimeout(() => {
      // localStorage writes are cheap, so this happens on every debounced change
      saveToLocalStorage(html);
      hasUnsavedChangesRef.current = true;
    }, DEBOUNCE_MS);
  }, [saveToLocalStorage]);

  // ...editor config and JSX go below
}

Notice the two different debounce strategies happening here. The localStorage write happens on a short debounce (800ms) because it’s fast and local. The API sync happens on a separate, longer interval, which you’ll wire up next.

Step 4. Sync to Your API on an Interval, Not on Every Change

Debouncing alone isn’t quite enough for the API call. Even with an 800ms debounce, a user who types continuously for two minutes would still fire a save every time they pause, which can still add up to more requests than your backend needs to handle.

Instead, use a separate setInterval that checks a flag and only sends a request if there’s actually unsaved content:

useEffect(() => {
  apiSyncIntervalRef.current = setInterval(() => {
    if (hasUnsavedChangesRef.current) {
      saveToApi(content);
    }
  }, SAVE_INTERVAL_MS);

  return () => {
    clearInterval(apiSyncIntervalRef.current);
  };
}, [content, saveToApi]);

This gives you a clean separation of responsibilities. localStorage acts as your instant, per-change safety net. The API call acts as your durable, every-few-seconds sync. Neither one blocks the other, and the user’s typing never stalls waiting on a network request.

Step 5. Add a Saving and Saved Status Indicator

A status indicator closes the loop for the user. Without it, autosave is invisible, and invisible safety nets don’t build trust. Keep this simple with a small conditional render based on the saveStatus state you’re already tracking.

function SaveIndicator({ status }) {
  const statusConfig = {
    idle: { text: '', color: '#999' },
    saving: { text: 'Saving...', color: '#f0ad4e' },
    saved: { text: 'Saved', color: '#5cb85c' },
    error: { text: 'Save failed, retrying...', color: '#d9534f' },
  };

  const current = statusConfig[status] || statusConfig.idle;

  if (!current.text) return null;

  return (
    <span style={{ color: current.color, fontSize: '13px', marginLeft: '8px' }}>
      {current.text}
    </span>
  );
}

Drop it right next to your editor’s toolbar area:

<div className="editor-header">
  <h3>Draft</h3>
  <SaveIndicator status={saveStatus} />
</div>

This small piece of UI does a lot of work. Users glance at it, see “Saved,” and move on with confidence.

Step 6. Offer a Restore Draft Banner on Reload

Now handle the recovery side. When the component mounts, check localStorage for an existing draft and, if one exists and differs from what the server has, show a banner offering to restore it.

useEffect(() => {
  const savedDraft = localStorage.getItem(DRAFT_KEY);
  if (savedDraft && savedDraft.trim().length > 0) {
    setShowRestoreBanner(true);
  }
}, []);

const handleRestoreDraft = () => {
  const savedDraft = localStorage.getItem(DRAFT_KEY);
  if (savedDraft) {
    setContent(savedDraft);
  }
  setShowRestoreBanner(false);
};

const handleDiscardDraft = () => {
  localStorage.removeItem(DRAFT_KEY);
  setShowRestoreBanner(false);
};

And the banner itself:

{showRestoreBanner && (
  <div className="restore-banner">
    <span>We found an unsaved draft from your last session.</span>
    <button onClick={handleRestoreDraft}>Restore draft</button>
    <button onClick={handleDiscardDraft}>Discard</button>
  </div>
)}

This pattern gives users control instead of silently overwriting whatever they last saved to the server. Some users will want their last-known-good server copy, others will want the more recent local draft. Let them choose.

Step 7. Warn Before Unload With beforeunload

Even with autosave running, there’s a small window between the last successful save and the current unsaved keystrokes. Cover that gap by warning the user if they try to close the tab while hasUnsavedChangesRef.current is true.

useEffect(() => {
  const handleBeforeUnload = (event) => {
    if (hasUnsavedChangesRef.current) {
      event.preventDefault();
      // Most modern browsers show a generic message regardless of this string
      event.returnValue = '';
    }
  };

  window.addEventListener('beforeunload', handleBeforeUnload);
  return () => {
    window.removeEventListener('beforeunload', handleBeforeUnload);
  };
}, []);

Modern browsers ignore custom text in this dialog for security reasons, but calling event.preventDefault() and setting event.returnValue is still what triggers the browser’s built-in warning dialog. This is a small addition that catches the rare case where a user closes the tab in the few seconds before your next scheduled API sync.

When to Use immediateReactModelUpdate

Froala’s React wrapper ships an option called immediateReactModelUpdate. When set to true, it updates your React model on every keyup event instead of waiting for contentChanged.

When it helps: if another part of your UI needs to reflect the editor’s content in real time, like a live word counter that updates mid-keystroke, or a preview pane that mirrors the editor exactly as the user types, this option keeps your React state perfectly in sync with the DOM.

When it costs you: for autosave specifically, you don’t need this. Autosave only cares about the settled state of the content after a pause, not every intermediate keystroke. Turning this on means React re-renders on every key release, which adds unnecessary overhead, especially in documents with a lot of content or complex formatting. Leave it at its default of false and let contentChanged plus your debounce handle everything.

const editorConfig = {
  immediateReactModelUpdate: false, // Keep this off for autosave-only use cases
  events: {
    contentChanged: function () {
      handleContentChanged(this.html.get());
    },
  },
};

Full Code For The React Component

import React, { useState, useRef, useEffect, useCallback } from 'react';
import FroalaEditor from 'react-froala-wysiwyg';
import 'froala-editor/css/froala_style.min.css';
import 'froala-editor/css/froala_editor.pkgd.min.css';

const DRAFT_KEY = 'froala-draft-content';
const SAVE_INTERVAL_MS = 30000; // sync to API every 30 seconds
const DEBOUNCE_MS = 800; // wait this long after typing stops before saving locally

function SaveIndicator({ status }) {
  const statusConfig = {
    idle: { text: '', color: '#999' },
    saving: { text: 'Saving...', color: '#f0ad4e' },
    saved: { text: 'Saved', color: '#5cb85c' },
    error: { text: 'Save failed, retrying...', color: '#d9534f' },
  };

  const current = statusConfig[status] || statusConfig.idle;

  if (!current.text) return null;

  return (
    <span style={{ color: current.color, fontSize: '13px', marginLeft: '8px' }}>
      {current.text}
    </span>
  );
}

function AutosaveEditor() {
  const [content, setContent] = useState('');
  const [saveStatus, setSaveStatus] = useState('idle'); // idle | saving | saved | error
  const [showRestoreBanner, setShowRestoreBanner] = useState(false);

  // Holds the debounce timer so it survives across re-renders without causing them
  const debounceTimerRef = useRef(null);
  // Holds the interval timer for periodic API syncs
  const apiSyncIntervalRef = useRef(null);
  // Tracks whether there's unsaved content since the last successful API sync
  const hasUnsavedChangesRef = useRef(false);
  // Mirrors the latest content so the interval callback always sees the current value
  const latestContentRef = useRef('');

  // --- Save to localStorage (fast, local, synchronous) ---
  const saveToLocalStorage = useCallback((html) => {
    try {
      localStorage.setItem(DRAFT_KEY, html);
    } catch (err) {
      // localStorage can throw if storage is full or disabled (e.g. private browsing)
      console.error('Failed to save draft locally:', err);
    }
  }, []);

  // --- Save to your backend API ---
  const saveToApi = useCallback(async (html) => {
    setSaveStatus('saving');
    try {
      await fetch('/api/drafts', {
        method: 'POST',
        headers: { 'Content-Type': 'application/json' },
        body: JSON.stringify({ content: html }),
      });
      setSaveStatus('saved');
      hasUnsavedChangesRef.current = false;
    } catch (err) {
      console.error('Failed to save draft to API:', err);
      setSaveStatus('error');
    }
  }, []);

  // --- Debounced handler wired to the editor's contentChanged event ---
  const handleContentChanged = useCallback(
    (html) => {
      latestContentRef.current = html;

      // Clear any pending debounce so rapid typing doesn't stack up saves
      if (debounceTimerRef.current) {
        clearTimeout(debounceTimerRef.current);
      }

      debounceTimerRef.current = setTimeout(() => {
        saveToLocalStorage(html);
        hasUnsavedChangesRef.current = true;
      }, DEBOUNCE_MS);
    },
    [saveToLocalStorage]
  );

  // --- Periodic API sync, only fires a request if something actually changed ---
  useEffect(() => {
    apiSyncIntervalRef.current = setInterval(() => {
      if (hasUnsavedChangesRef.current) {
        saveToApi(latestContentRef.current);
      }
    }, SAVE_INTERVAL_MS);

    return () => {
      clearInterval(apiSyncIntervalRef.current);
    };
  }, [saveToApi]);

  // --- Clean up the debounce timer on unmount to avoid a stray setTimeout ---
  useEffect(() => {
    return () => {
      if (debounceTimerRef.current) {
        clearTimeout(debounceTimerRef.current);
      }
    };
  }, []);

  // --- Check for a recoverable draft on mount ---
  useEffect(() => {
    const savedDraft = localStorage.getItem(DRAFT_KEY);
    if (savedDraft && savedDraft.trim().length > 0) {
      setShowRestoreBanner(true);
    }
  }, []);

  const handleRestoreDraft = () => {
    const savedDraft = localStorage.getItem(DRAFT_KEY);
    if (savedDraft) {
      setContent(savedDraft);
      latestContentRef.current = savedDraft;
    }
    setShowRestoreBanner(false);
  };

  const handleDiscardDraft = () => {
    localStorage.removeItem(DRAFT_KEY);
    setShowRestoreBanner(false);
  };

  // --- Warn before the tab closes if there's unsaved work ---
  useEffect(() => {
    const handleBeforeUnload = (event) => {
      if (hasUnsavedChangesRef.current) {
        event.preventDefault();
        // Most modern browsers show a generic message regardless of this string
        event.returnValue = '';
      }
    };

    window.addEventListener('beforeunload', handleBeforeUnload);
    return () => {
      window.removeEventListener('beforeunload', handleBeforeUnload);
    };
  }, []);

  const editorConfig = {
    placeholderText: 'Start writing your draft...',
    // Keep this off for autosave-only use cases. Turning it on updates the React
    // model on every keyup, which costs a re-render per keystroke you don't need
    // here since contentChanged plus the debounce already covers autosave timing.
    immediateReactModelUpdate: false,
    events: {
      contentChanged: function () {
        // 'this' refers to the Froala editor instance here
        handleContentChanged(this.html.get());
      },
    },
  };

  return (
    <div className="editor-wrapper">
      {showRestoreBanner && (
        <div className="restore-banner">
          <span>We found an unsaved draft from your last session.</span>
          <button onClick={handleRestoreDraft}>Restore draft</button>
          <button onClick={handleDiscardDraft}>Discard</button>
        </div>
      )}

      <div className="editor-header">
        <h3>Draft</h3>
        <SaveIndicator status={saveStatus} />
      </div>

      <FroalaEditor
        model={content}
        onModelChange={setContent}
        config={editorConfig}
      />
    </div>
  );
}

export default AutosaveEditor;

How to Test React Autosave and Draft Recovery

Autosave logic is easy to get subtly wrong, since most of it happens in the background with no visible feedback beyond the status indicator. Work through these checks manually before you ship it.

1. Confirm contentChanged is firing, and keyup isn’t needed. Open your browser’s DevTools console and add a temporary log inside handleContentChanged. Type a few words, then use the toolbar to bold a selection or paste an image with no keyboard involved. Both should log. If the toolbar or paste actions don’t trigger a save, you’ve likely wired the listener to keyup instead of contentChanged.

const handleContentChanged = useCallback((html) => {
  console.log('contentChanged fired', html.length, 'chars'); // remove before shipping
  // ...debounce logic
}, []);

2. Verify the debounce is actually debouncing. Type continuously for five seconds without pausing. Check localStorage in DevTools (Application tab -> Local Storage) while typing. The froala-draft-content key should not update on every keystroke, it should only update roughly 800ms after you stop typing. If you see it updating constantly, the clearTimeout call is likely missing or not clearing the right ref.

3. Confirm the API syncs on interval, not on every change. Open the Network tab, filter for your /api/drafts endpoint, and type continuously for 20-30 seconds. You should see requests roughly every 5 seconds, not one per keystroke and not one per debounced local save. If requests fire more often than SAVE_INTERVAL_MS, check that hasUnsavedChangesRef is being read inside the interval callback rather than recreating the interval on every render.

4. Test the “no unnecessary requests” behavior. Let the editor sit idle for 10+ seconds after your last edit and watch the Network tab. No new requests should appear, since hasUnsavedChangesRef.current should be false after a successful save. If requests keep firing on an empty editor, the flag isn’t being reset in saveToApi.

5. Test draft recovery end to end. Type some content, wait for the local save to fire (check localStorage for the updated value), then refresh the page without submitting or navigating away cleanly. The restore banner should appear. Click “Restore draft” and confirm the editor repopulates with your content. Then repeat the test and click “Discard” instead, confirming the banner disappears and the localStorage key is cleared.

6. Test the offline / failed-save path. Open DevTools, go to the Network tab, and set throttling to “Offline.” Type some content and wait past your SAVE_INTERVAL_MS. The indicator should show your error state. Go back online and wait for the next interval tick, the indicator should flip to “Saved” without you needing to type anything else, since hasUnsavedChangesRef stays true until a save actually succeeds.

7. Test the beforeunload warning. Type content, don’t wait for it to save, and try closing the tab or navigating away immediately. Your browser should show its built-in “leave site” confirmation dialog. Then let content fully save (indicator shows “Saved”), and try closing again, this time there should be no warning.

8. Sanity-check immediateReactModelUpdate performance if you ever turn it on. If you’re experimenting with immediateReactModelUpdate: true for another feature, open the React DevTools Profiler, start recording, and type a long sentence. Compare the render count against the same test with it set to false. You should see noticeably more renders when it’s on, which confirms the performance tradeoff described earlier in this guide is real and not just theoretical.

Common React Autosave Pitfalls

  • Relying on keyup for save triggers. It fires on non-content-changing keys and misses toolbar-driven changes like pasted images or applied formatting.
  • Skipping the debounce. Without it, you’ll flood localStorage and your API with redundant writes during normal typing.
  • Forgetting to clear the debounce timer on unmount. Leaving a setTimeout running after the component unmounts can throw errors or leak memory. Always clean up in your useEffect return function.
  • Not handling localStorage write failures. Storage can be full or disabled in private browsing. Wrap writes in a try/catch so a storage failure doesn’t crash your save flow.
  • Overwriting the server draft without asking. Always let the user choose between the local draft and the server version instead of picking one automatically.
  • Turning on immediateReactModelUpdate “just in case.” It’s rarely needed for autosave and adds performance cost you don’t need to pay.

Froala React Autosave FAQ

Does contentChanged fire for programmatic changes, like setContent() calls?

It can, depending on how the content is set. If you’re setting content through editor.html.set(), test this in your specific version, since behavior can vary. Setting the React model directly through model typically won’t re-trigger contentChanged on the editor instance itself.

How often should I sync to my API?

Every 5 to 10 seconds is a reasonable starting point for most text-heavy apps. Adjust based on your backend’s tolerance for request volume and how critical near-real-time durability is for your use case.

What if the user is offline when autosave tries to hit the API?

The fetch call will fail, and your catch block sets saveStatus to 'error'. Because hasUnsavedChangesRef.current stays true, the next interval tick will retry automatically once the connection returns.

Should I debounce the localStorage write too, or save on every keystroke?

Debouncing it, even with a short delay like 800ms, is still worth it. localStorage writes are synchronous and can block the main thread briefly on large documents, so avoiding a write on every single keystroke keeps typing feeling smooth.

Conclusion

You now have a complete autosave and draft recovery system for Froala Editor in React. It saves locally in near real time, syncs to your server on a controlled interval, shows users a clear save status, and gives them the choice to restore or discard a recovered draft. None of this required any exotic dependencies, just Froala’s contentChanged event, a couple of useRef timers, and standard browser APIs.

For more on Froala’s event system and React-specific configuration options, check the official Froala React documentation.

Try wiring this into your own project and see how it feels. If you want to go further, the same debounce pattern works well for syncing to collaborative editing backends or version history systems built on top of Froala.

graphical user interface, text

Vue WYSIWYG Editor v-model, Events, and Two-Way Binding Explained

Vue WYSIWYG Editor v-model Two-Way Binding Illustration

Integrating a standard form field into Vue is simple: add v-model, connect it to reactive state, and Vue keeps the interface and data synchronized. A WYSIWYG editor is more complex because it manages formatted HTML, toolbar actions, pasted content, selection state, and other editing behavior within its own interface.

This guide explains how to keep a Vue WYSIWYG editor synchronized with application state using v-model, component events, and Vue 3’s Composition API. Using the Froala Vue Rich Text Editor as the implementation example, you will learn how two-way binding works, how to respond to editor events, and how to update content without relying on manual DOM manipulation.

Key Takeaways

  • Use v-model to establish a single source of truth between your Vue application and the editor, ensuring changes stay synchronized in both directions.
  • Combine v-model with editor events such as contentChanged, focus, and blur to implement features like autosave, validation, live previews, and draft management.
  • Leverage Vue’s Composition API with ref() and reactive() to manage editor content alongside the rest of your application’s reactive state.
  • Update the bound reactive variable instead of manipulating the DOM, allowing Vue and the editor to handle synchronization automatically.
  • Follow performance best practices by debouncing expensive operations, keeping reactive state lightweight, and avoiding unnecessary re-renders.
  • Choose a Vue-native editor that integrates seamlessly with Vue’s reactivity system, provides a comprehensive event API, and supports the customization needed for production-ready applications.

Understanding Two-Way Binding in Vue

Two-way binding keeps your application’s state and UI synchronized. When the user updates an input, the underlying data changes automatically. Likewise, when the data changes programmatically, the UI reflects the new value.

With standard form elements, Vue makes this easy using the v-model directive.

<script setup>
import { ref } from 'vue'

const title = ref('')
</script>

<template>
  <input v-model="title" placeholder="Enter a title" />

  <p>Current value: {{ title }}</p>
</template>

When the user types into the input:

Input
   ↓
v-model
   ↓
title (ref)
   ↓
Vue re-renders the UI

This works because v-model combines two operations:

  • It passes the current value to the component.
  • It listens for updates and writes them back to the reactive variable.

Without v-model, you would need to handle both steps yourself.

<input
  :value="title"
  @input="title = $event.target.value"
/>

Although both examples produce the same result, v-model is cleaner and easier to maintain.

Rich text editors are different from native inputs. Instead of editing plain text, they manage formatted HTML, toolbar interactions, and editing state internally. As a result, they require an integration that synchronizes the editor with Vue’s reactive data instead of relying on a standard <input> element.

Why WYSIWYG Editors Need Special Binding

Unlike a textarea, a WYSIWYG editor is a complete application running inside your Vue component. It maintains its own editing environment while Vue manages your application’s state.

For example, when a user clicks Bold, the editor doesn’t simply append text. It updates the HTML, preserves the cursor position, records an undo history entry, refreshes the toolbar, and re-renders the content.

User Action
      ↓
Editor Internal State
      ↓
Generated HTML
      ↓
Vue Reactive State

A rich text editor typically manages:

  • The editable DOM
  • HTML content
  • Text formatting
  • Toolbar state
  • Cursor and selection
  • Clipboard operations
  • Undo/redo history

If the editor and Vue state become unsynchronized, problems quickly appear. For example, loading an existing article by updating a Vue variable won’t update the editor unless the integration propagates the new value. Likewise, changes made inside the editor won’t be available when the form is submitted unless they are synchronized back to Vue.

A Vue-compatible editor solves this by keeping both sides in sync automatically, allowing the editor to handle editing while Vue manages the application’s reactive state.

Setting Up Froala as a Vue WYSIWYG Editor

Froala provides an official Vue package that makes it straightforward to integrate a rich text editor into Vue 3 applications.

Install the required packages

Install the Froala editor and its Vue wrapper using your preferred package manager.

npm install froala-editor vue-froala-wysiwyg

Import the editor assets

Import the Froala JavaScript bundle to register the built-in editor plugins, then import the required styles.

import 'froala-editor/js/plugins.pkgd.min.js'
import 'froala-editor/css/froala_editor.pkgd.min.css'
import 'froala-editor/css/froala_style.min.css'

Register the Vue plugin

Register the Froala plugin in your application’s entry file.

import { createApp } from 'vue'
import App from './App.vue'

import VueFroala from 'vue-froala-wysiwyg'

createApp(App)
  .use(VueFroala)
  .mount('#app')

Once registered, the <froala> component is available throughout your application.

Create your first editor

Create a reactive variable to hold the editor content and bind it to the editor component.

<script setup>
import { ref } from 'vue'

const content = ref('<p>Hello, Vue!</p>')
</script>

<template>
  <froala v-model:value="content" />
</template>

Running the application displays a fully functional rich text editor with the initial HTML stored in content. At this point, the editor is installed and ready to use. In the next section, you’ll learn how the v-model directive keeps the editor and Vue’s reactive state synchronized automatically.

Binding the Editor with v-model

The v-model directive connects the Froala editor to a reactive variable, creating a single source of truth for your editor content.

<froala v-model:value="content" />

Whenever the user edits the document, Vue automatically updates the content variable. Likewise, if you update content in your application, the editor immediately reflects the new value.

content (ref)
      ⇅
   v-model
      ⇅
 Froala Editor

For example, after loading an existing article from an API, simply assign the returned HTML to the reactive variable.

content.value = response.data.body

The editor immediately displays the updated content without requiring any additional synchronization code.

Because content is reactive, other parts of your application always receive the latest editor content.

<p>Content length: {{ content.length }}</p>

<button :disabled="!content">
  Publish
</button>

As the user edits the document, the character count and button state update automatically because they depend on the same reactive variable.

This is the primary benefit of using v-model. Instead of manually reading HTML from the editor or writing content back into it, you work with a single reactive variable while Vue and Froala handle the synchronization for you. The next section explores how these updates propagate through the rest of your Vue application.

Understanding the Data Flow

When you bind Froala using v-model, the editor becomes part of Vue’s reactive data flow.

User Types
      ↓
Froala Editor
      ↓
v-model
      ↓
Vue State
      ↓
Other Components
      ↓
Editor Updates

Here’s what happens at each step:

  1. User Types
    The user edits content inside the Froala editor.
  2. Froala Editor
    Froala updates its internal document model, toolbar state, cursor position, and generated HTML.
  3. v-model
    The updated HTML is automatically assigned to your reactive variable.
  4. Vue State
    Your ref() or reactive() object now contains the latest editor content.
  5. Other Components
    Any component using that reactive data is updated automatically.
  6. Editor Updates
    If the reactive value changes elsewhere (for example, after loading a draft), Vue updates the editor to display the new content.

The following example demonstrates this flow.

<script setup>
import { ref } from 'vue'

const content = ref('<p>Hello World!</p>')
</script>

<template>
  <froala v-model:value="content" />

  <h3>Preview</h3>

  <div v-html="content"></div>
</template>

As the user types, the preview updates automatically because both the editor and preview share the same reactive variable.

Listening to Editor Events

While v-model synchronizes content, editor events let you react to user actions.

Some commonly used Froala events include:

EventCommon Use
initializedRun setup logic after the editor loads
contentChangedAutosave, validation, live preview
focusHighlight the active editor
blurValidate or save content
keyupCharacter or word counter
keydownKeyboard shortcuts
paste.afterSanitize pasted content
image.insertedTrack uploaded images
image.removedClean up deleted images

For example, you can listen for content changes to trigger an autosave.

<template>
  <froala
    v-model:value="content"
    :config="config"
  />
</template>

<script setup>
import { ref } from 'vue'

const content = ref('')

const config = {
  events: {
    contentChanged() {
      console.log('Saving draft...')
    }
  }
}
</script>

You can also monitor when the editor gains or loses focus.

const config = {
  events: {
    focus() {
      console.log('Editor focused')
    },

    blur() {
      console.log('Editor lost focus')
    }
  }
}

Character counting is another common use case.

const config = {
  events: {
    keyup() {
      console.log('Content updated')
    }
  }
}

Instead of polling for changes, your application responds immediately whenever an event occurs.

Combining v-model with Editor Events

v-model and editor events solve different problems.

  • v-model stores the current editor content.
  • Events notify your application when something happens.

In most real-world applications, you’ll use both together.

<script setup>
import { ref } from 'vue'

const content = ref('')
const hasUnsavedChanges = ref(false)

const config = {
  events: {
    contentChanged() {
      hasUnsavedChanges.value = true
    }
  }
}
</script>

<template>
  <froala
    v-model:value="content"
    :config="config"
  />

  <button :disabled="!hasUnsavedChanges">
    Save Draft
  </button>
</template>

Here:

  • v-model keeps content synchronized.
  • contentChanged enables the Save Draft button.
  • After saving successfully, you can simply reset the flag.
hasUnsavedChanges.value = false

The same approach works for many common features:

  • Enable or disable the Publish button.
  • Display a live preview.
  • Show an “Unsaved changes” warning.
  • Trigger autosave every few seconds.
  • Enforce character or word limits.

A typical workflow looks like this:

User edits content
        ↓
contentChanged event
        ↓
Application logic runs
        ↓
v-model updates content
        ↓
UI refreshes automatically

Working with Reactive Data

Vue 3’s Composition API uses ref() and reactive() to create reactive state.

For editor content, ref() is usually the simplest choice.

<script setup>
import { ref } from 'vue'

const content = ref('')
</script>

Bind it directly to the editor.

<froala v-model:value="content" />

Whenever the user edits the document:

User types
      ↓
content.value updates
      ↓
Vue reactivity runs
      ↓
Dependent components update

If your editor belongs to a larger form, reactive() can group related fields together.

<script setup>
import { reactive } from 'vue'

const article = reactive({
  title: '',
  content: '',
  category: ''
})
</script>

<template>
  <input v-model="article.title" />

  <froala v-model:value="article.content" />
</template>

Now the title, editor content, and category all belong to the same reactive object.

Resetting and Updating Editor Content

Since the editor is bound with v-model, updating the reactive variable automatically updates the editor.

Load an existing article

content.value = article.body

Switch to another document

content.value = selectedPost.content

Clear the editor

content.value = ''

Load a template

content.value = `
<h2>Meeting Notes</h2>

<ul>
  <li></li>
</ul>

There’s no need to call DOM APIs or manually replace the editor’s HTML. Simply update the reactive value, and Vue synchronizes the editor.

For best results:

  • Always update the bound reactive variable.
  • Avoid manually manipulating the editor’s DOM.
  • Keep a single source of truth for editor content.
  • Let v-model handle synchronization.

Using the Editor Inside Vue Forms

Rich text editors are often used alongside other form fields.

<script setup>
import { reactive } from 'vue'

const form = reactive({
  title: '',
  content: ''
})
</script>

<template>
  <form>

    <input
      v-model="form.title"
      placeholder="Article title"
    />

    <froala v-model:value="form.content" />

  </form>
</template>

Your form data now contains both the title and rich text content.

A typical submission looks like this:

async function submit() {

  if (!form.content.trim()) {
    alert('Content is required.')
    return
  }

  await api.post('/articles', form)
}

The workflow is straightforward:

Editor
    ↓
Form Model
    ↓
Validation
    ↓
Submit

Because the editor is part of the same reactive form model, validation, submission, and API requests work exactly like any other Vue form field. This keeps your forms simpler while ensuring the editor content always stays synchronized with the rest of your application.

Get the complete Vue 3 and Froala example from GitHub to explore `v-model`, editor events, live preview, autosave, programmatic content updates, and form validation in a runnable project.

Common Mistakes Developers Make

Integrating a Vue WYSIWYG editor is straightforward once you understand Vue’s reactivity model. The following mistakes are common and can lead to synchronization issues or unnecessary complexity.

Manipulating the DOM directly

Avoid updating the editor by manually changing its HTML.

❌ Avoid

document.querySelector('.fr-element').innerHTML = html

✅ Use

content.value = html

Always update the reactive variable and let v-model synchronize the editor.

Not using v-model

Some developers manually read the editor content before submitting a form.

❌ Avoid

const html = editor.html.get()

✅ Use

<froala v-model:value="content" />

The latest HTML is always available in content.value.

Mutating HTML incorrectly

Avoid modifying the generated HTML using string operations.

❌ Avoid

content.value += '<p>New text</p>'

Instead, update the editor naturally through user interaction or replace the content with a complete HTML string when appropriate.

Ignoring the editor lifecycle

Some logic should only run after the editor has finished initializing.

const config = {

  events: {

    initialized() {

      console.log('Editor is ready')

    }

  }

}

Waiting for the initialized event helps avoid timing issues.

Updating state incorrectly

Always modify the reactive variable instead of trying to synchronize multiple copies of the same data.

❌ Avoid

let editorContent = ''

let html = ''

✅ Use

const content = ref('')

Maintain a single source of truth.

Recreating the editor unnecessarily

Avoid destroying and recreating the editor whenever content changes.

❌ Avoid

editor.destroy()

editor.initialize()

Instead, simply update the bound value.

content.value = article.body

Binding large objects instead of HTML

The editor should be bound to the HTML content, not the entire article object.

❌ Avoid

const article = reactive({

  title: '',

  author: '',

  content: '',

  tags: []

})


<froala v-model:value="article" />

✅ Use

<froala v-model:value="article.content" />

This keeps updates focused and avoids unnecessary reactive work.

Performance Best Practices

Most applications won’t experience performance issues, but following a few best practices helps keep the editor responsive as projects grow.

Avoid unnecessary re-renders

Keep the editor mounted whenever possible. If only the content changes, update the reactive variable instead of recreating the component.

content.value = article.body

Lazy load the editor

If the editor appears only on certain pages, consider loading it only when needed.

const Editor = defineAsyncComponent(() =>

  import('./Editor.vue')

)

This reduces your application’s initial bundle size.

Debounce autosave

Saving on every keystroke can generate unnecessary API requests.

import { debounce } from 'lodash-es'


const saveDraft = debounce(() => {

  console.log('Saving...')

}, 1000)

Use the debounced function inside the contentChanged event.

Keep event handlers lightweight

Event handlers fire frequently, especially keyup and contentChanged.

Prefer:

contentChanged() {

  saveDraft()

}

Avoid expensive calculations or multiple API calls inside every event.

Keep reactive state lightweight

Store only the editor’s HTML in the reactive variable.

const content = ref('')

Avoid storing editor instances or unrelated application data inside the same reactive value.

Consider large documents

Very large articles naturally require more processing.

For better performance:

  • Update only the bound HTML.
  • Debounce expensive operations.
  • Avoid unnecessary watchers.
  • Use editor events only where needed.

These small optimizations help maintain a smooth editing experience.

Why Froala Works Well with Vue Reactivity

Vue’s reactive data model works best with components that follow the same principles. Froala’s official Vue integration is designed to fit naturally into that workflow.

Some of its key capabilities include:

  • Native Vue component integration
  • Simple v-model support for two-way binding
  • Comprehensive event system for responding to user actions
  • Automatic synchronization with Vue’s reactive state
  • Fast rendering for responsive editing
  • Extensive configuration and toolbar customization
  • A plugin ecosystem for adding features such as tables, images, markdown, file management, and more

Because the editor integrates directly with Vue’s reactivity system, developers can work with familiar Composition API patterns instead of manually synchronizing editor content. This results in cleaner code and makes it easier to build features such as autosave, live previews, form validation, and collaborative editing while keeping the application’s state consistent.

Conclusion

Vue’s v-model makes two-way binding simple by keeping application state and the user interface synchronized automatically. Rich text editors introduce additional complexity because they manage their own editing environment, making proper synchronization essential for a reliable editing experience.

By combining v-model with editor events, you can build responsive features such as autosave, live previews, validation, and draft management while keeping your code clean and maintainable. Using a Vue-native editor like Froala allows you to integrate rich text editing into modern Vue 3 applications without sacrificing the benefits of Vue’s reactive data model.

Ready to build a seamless editing experience? Try the Froala Vue Rich Text Editor and start integrating rich text editing into your Vue 3 applications today.

FAQ

How do I bind a Vue WYSIWYG editor using v-model?

Bind the editor component to a reactive variable using Vue’s v-model directive. As users edit the content, the editor automatically updates the reactive variable. Likewise, any programmatic changes to that variable are reflected in the editor, keeping both synchronized.

Why doesn’t a rich text editor behave like a normal input?

Unlike native inputs, a WYSIWYG editor manages its own editable DOM, formatting, toolbar interactions, cursor position, and undo/redo history. Because of this additional functionality, it requires an integration layer to synchronize its content with Vue’s reactive data model.

Can I use editor events together with v-model?

Yes. v-model keeps the editor’s content synchronized with your application state, while editor events let you respond to user actions such as content changes, focus, blur, keyboard input, image uploads, and paste operations. Using both together makes it easy to implement features like autosave, validation, and live previews.

How do I update editor content programmatically?

Simply update the reactive variable bound to the editor with v-model. Vue automatically propagates the new value to the editor, making it easy to load existing articles, switch between documents, clear the editor, or insert predefined templates.

Is Froala compatible with Vue 3?

Yes. Froala provides an official Vue integration that supports Vue 3, including seamless v-model binding, reactive state synchronization, and a comprehensive event API for building modern rich text editing experiences.