Days
Hours
Minutes
Seconds
x
Skip to content

Froala v5.5.0: AI Image Generation, Headless Mode, and More

Froala v5.5.0

We are excited to announce Froala v5.5.0, a release that brings:

  • AI image generation in AI Assist, so writers can create and insert visuals without leaving the editor.
  • Headless mode (initial release), which lets you run Froala with no built-in UI and build your own interface and styling on top of its editing engine.
  • Expanded Suggestion mode in the Collaboration plugin, making image, video, and link changes reviewable just like text edits.
  • More control and polish, including side panel state APIs, model-aware AI Chat toggles, new image and video resize events, and a round of bug fixes.

Here is what’s new and how to start using it.

Headless Mode (Initial Release)

What Is Froala Headless Mode?

A new headless option runs Froala as a pure editing engine. The editable area and all Action API methods (bold, align, lists, undo/redo, and more) keep working, but Froala draws none of its own UI:

  • Toolbar: never added to the page.
  • Popups, modals, and toasts: turned off. Methods that would open one simply do nothing.
  • Quick insert, line breaker, drag handles, image resize handles: not built.
  • Styling: the editor box gets an fr-headless class that removes Froala’s default font, color, padding, and border, so your own CSS decides how content looks.
  • Word paste: the keep/clean formatting modal is skipped and content is cleaned right away.
  • Character and word counters: off by default, but you can still turn them on.
  • Collaboration: disabled in headless mode, even if collabConfig is set.

Froala Headless mode

Benefits of Using Froala Headless Mode

Until now, there was no way to stop Froala from injecting its toolbar, popups, and styling. If your product has its own design system, you can now build a fully custom interface on top of Froala’s proven editing core, without fighting default UI or CSS.

A few methods were also updated so they work without a popup or toolbar click:

  • image.insertByURL(url) accepts the URL directly.
  • align.apply(), quote.apply(), and lists.format() focus the editor first if nothing is selected, so they always have a caret to work from.

How to Use Froala Headless Mode

const editor = new FroalaEditor('#editor', {
  headless: true
});

document.querySelector('#my-bold').addEventListener('click', function () {
  editor.commands.bold();
});

document.querySelector('#my-image').addEventListener('click', function () {
  editor.image.insertByURL('https://example.com/photo.jpg');
});

For plugin authors: five new helpers let your custom plugins behave correctly in headless mode, just like the built-in ones: 

  • helpers.isHeadless()

  • helpers.isUserOpt(key)

  • helpers.headlessDefault(key, value)

  • helpers.guardHeadlessUI(pluginApi, methodNames)

  • helpers.ensureHeadlessFocus().

FroalaEditor.PLUGINS.myHighlighter = function (editor) {
  function apply() {
    editor.helpers.ensureHeadlessFocus();
    editor.format.applyStyle('background-color', 'yellow');
  }
  return { apply: apply };
};

This is the first release of headless mode with an initial, limited feature scope. We plan to expand it in upcoming versions.

AI Image Generation in AI Assist

What it is

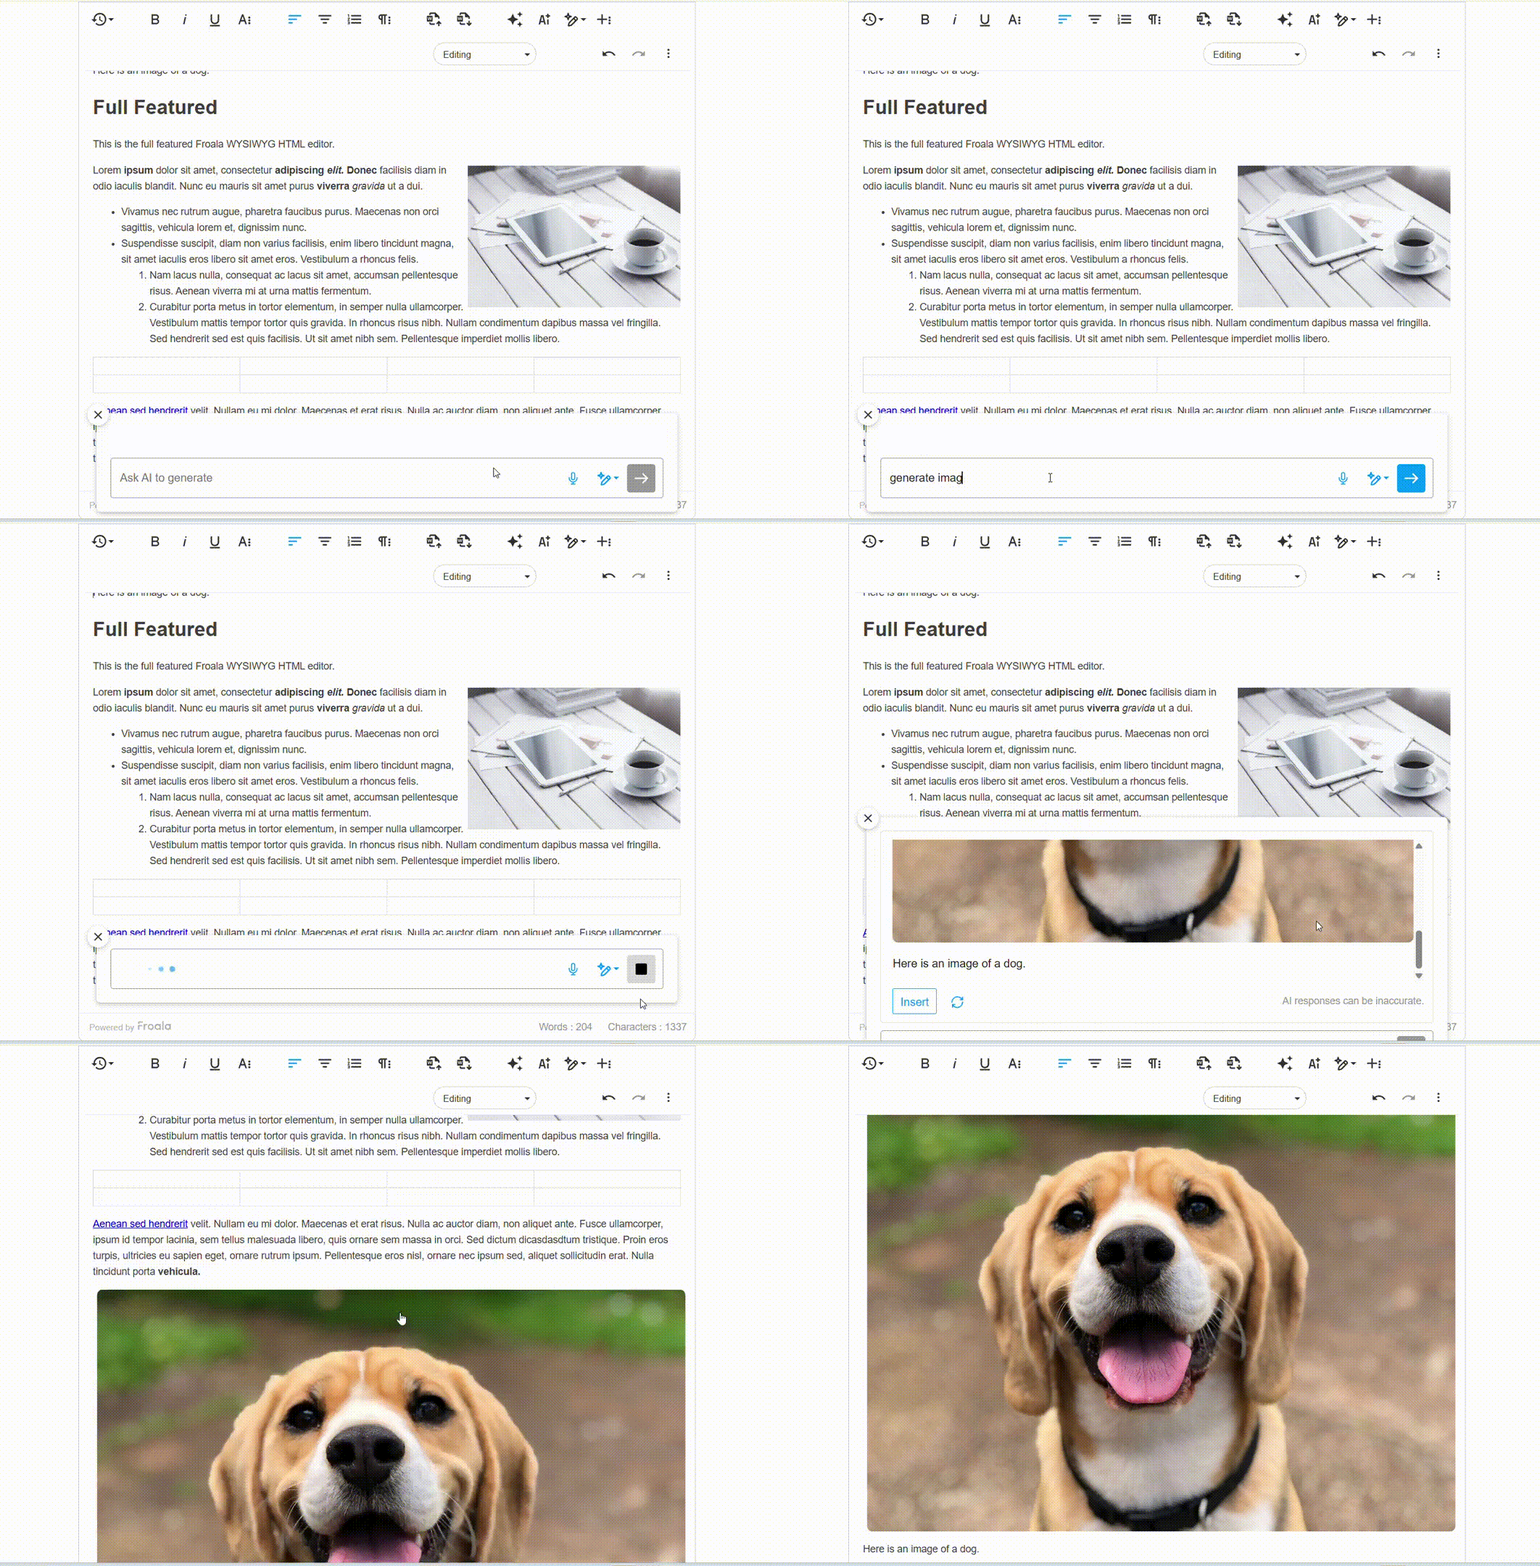
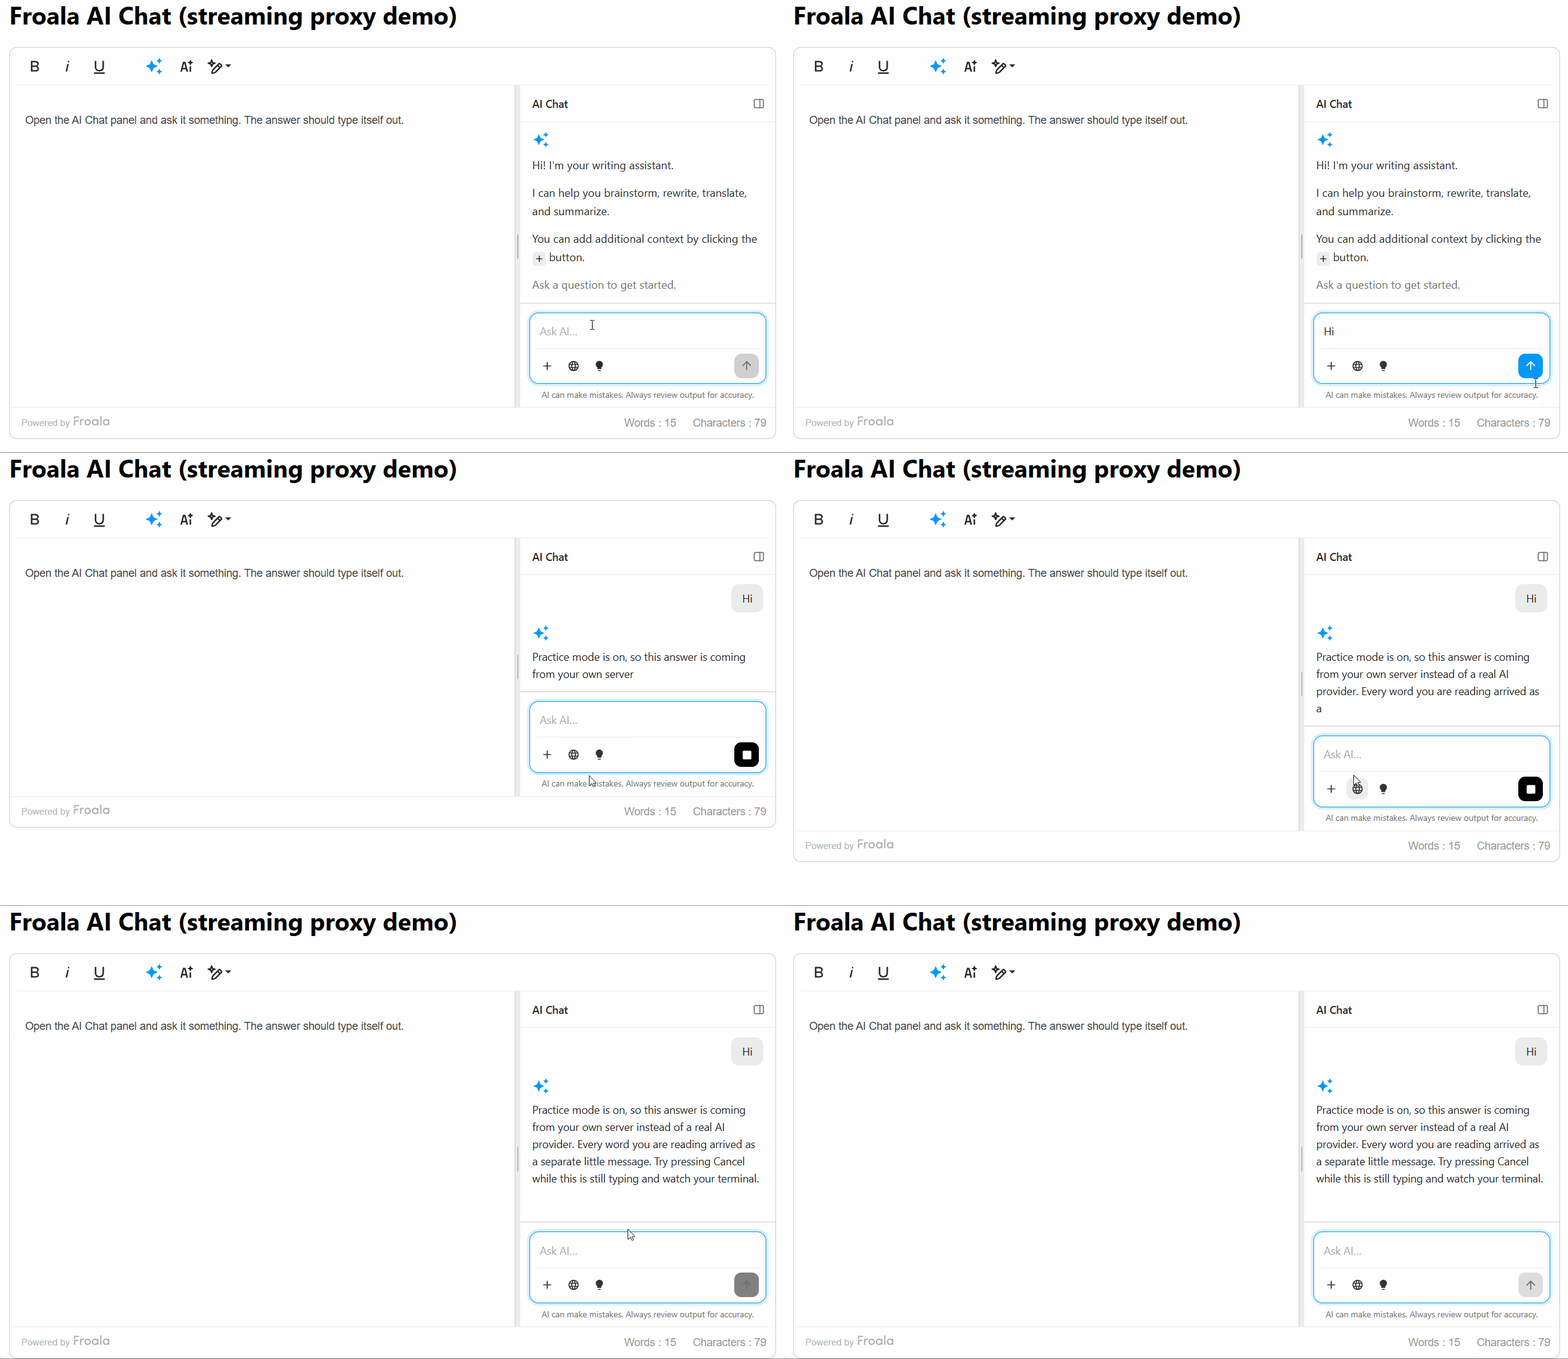
AI Assist is no longer limited to text. Users can describe the image they want in the AI Assist prompt, and Froala sends the request to the AI model you have configured. Then users can:

  • Preview the generated image inside the AI Assist popup.
  • Insert it at the cursor position with one click, using Froala’s standard image insertion, so the image behaves like any other image in the editor.
  • Regenerate it to get a new version from the same prompt.

The feature is provider-agnostic. It works with whichever AI service you connect, as long as that model supports image generation.

Froala AI image generation

Why it matters

Writers can illustrate blog posts, product pages, or docs in the same place they write, instead of switching to a separate image tool, downloading the file, and uploading it again. For you, there is no new UI to build: it reuses the AI Assist experience your users already know.

How to use it

Point AI Assist at your own backend, and have that backend call an image-capable model. When a user clicks Regenerate, Froala resends the original prompt and context with regenerate: true, so a caching backend knows to return a fresh image instead of the same one.

new FroalaEditor('.selector', {
  aiAssistRequest: async function (data, signal) {
    const response = await fetch('/api/ai', {
      method: 'POST',
      headers: { 'Content-Type': 'application/json' },
      body: JSON.stringify({
        prompt: data.prompt,
        context: data.context,
        noCache: data.regenerate === true
      }),
      signal: signal
    });
    return response.json();
  }
});

Collaboration Upgrades

Suggestion Mode Now Covers Image, Video, and Link Edits

In the Collaboration plugin’s Suggestion mode, more edits now create a reviewable suggestion instead of applying instantly:

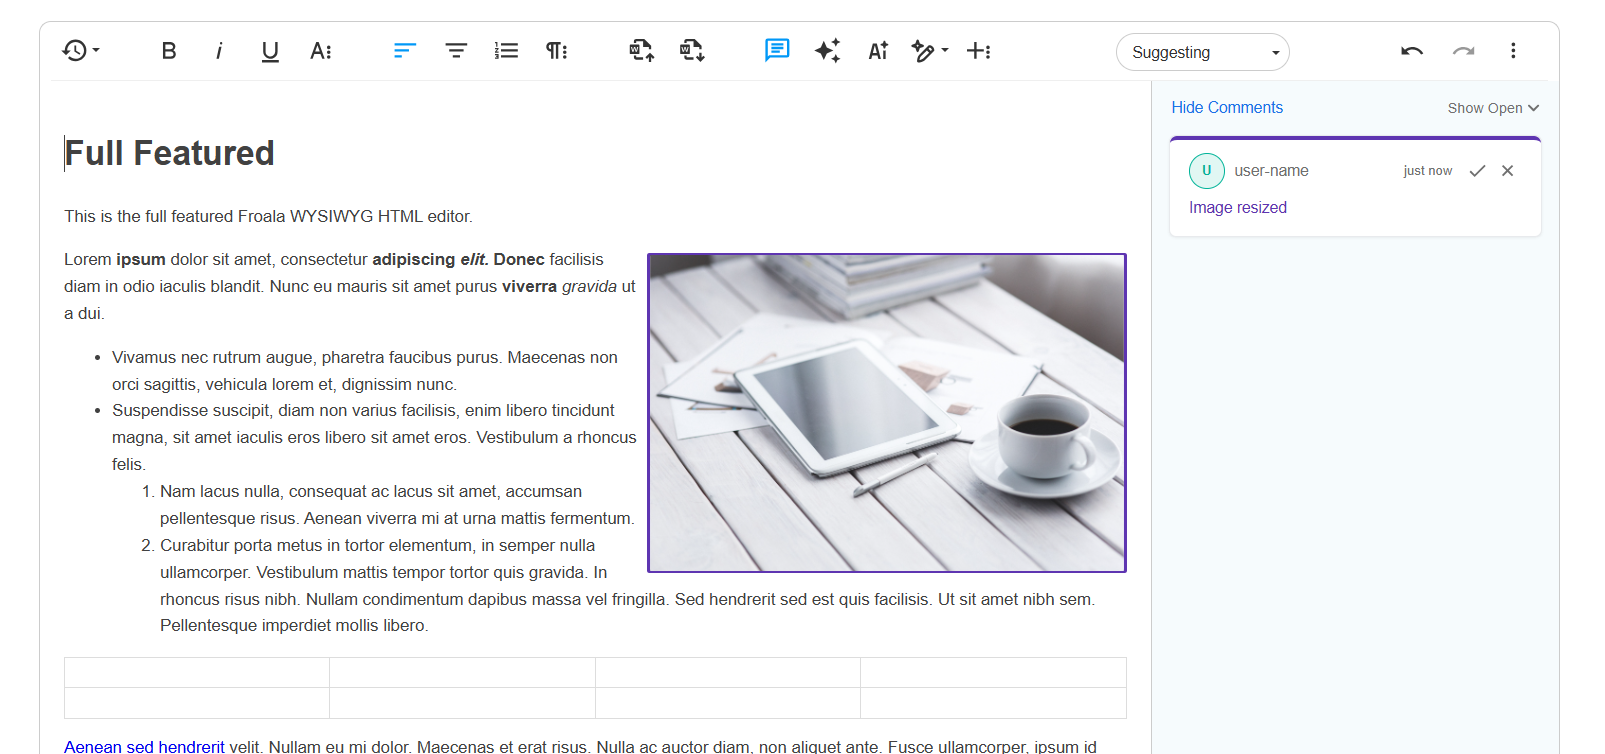
  • Resizing images and videos. Drag or keyboard resizes show up as an “Image resized” or “Video resized” card with a solid border around the element. Multiple resizes on the same element merge into one suggestion. Reject restores the size from before the first resize; Accept keeps the new size.
  • Image popup edits: replace (upload or URL), remove, alt text, size, display, alignment, styles, and captions.
  • Video popup edits: replace, remove, size, display, alignment, and autoplay.
  • Link popup edits: insert, edit (URL, text, target, rel, title), styles, and unlink.

Suggestion cards are also clearer. They now say what the edit did and replacements use their own distinct color.

Image resize

Why it matters: Reviewers no longer miss changes made through element popups. Every media and link change can be seen, discussed, and accepted or rejected like any text edit, which keeps team review workflows complete and trustworthy.

How to use it: No setup is needed. When Suggestion mode is on, these edits become suggestions automatically.

Full Control Over the Collaboration Side Panel

What it is: The comments and suggestions side panel now remembers the state the local user chose.

New API surface:

  • collabConfig.panel.defaultState: start the panel as 'expanded' (default), 'collapsed', or 'hidden'. It applies before the first paint, so there is no flash or layout shift on load.
  • collaborative.getPanelState(): read the current state.
  • collaborative.setPanelState(state): set the state from your own code.
  • collab.panelStateChanged event: fires with state, previousState, and origin whenever the state actually changes.

Why it matters: You can match the panel to your app’s layout from the very first render and build your own toggle buttons that always stay in sync.

How to use it:

const editor = new FroalaEditor('#editor', {
  collabConfig: {
    user: { id: 'user-1', name: 'Alex Walker', role: 'editor' },
    docId: 'my-document',
    panel: { defaultState: 'hidden' }
  },
  events: {
    'collab.panelStateChanged': function (state, previousState, origin) {
      document.querySelector('#show-comments')
        .classList.toggle('is-active', state !== 'hidden');
    }
  }
});

document.querySelector('#show-comments').addEventListener('click', function () {
  editor.collaborative.setPanelState('expanded');
});

AI Chat Respects Each Model’s Capabilities

What it is

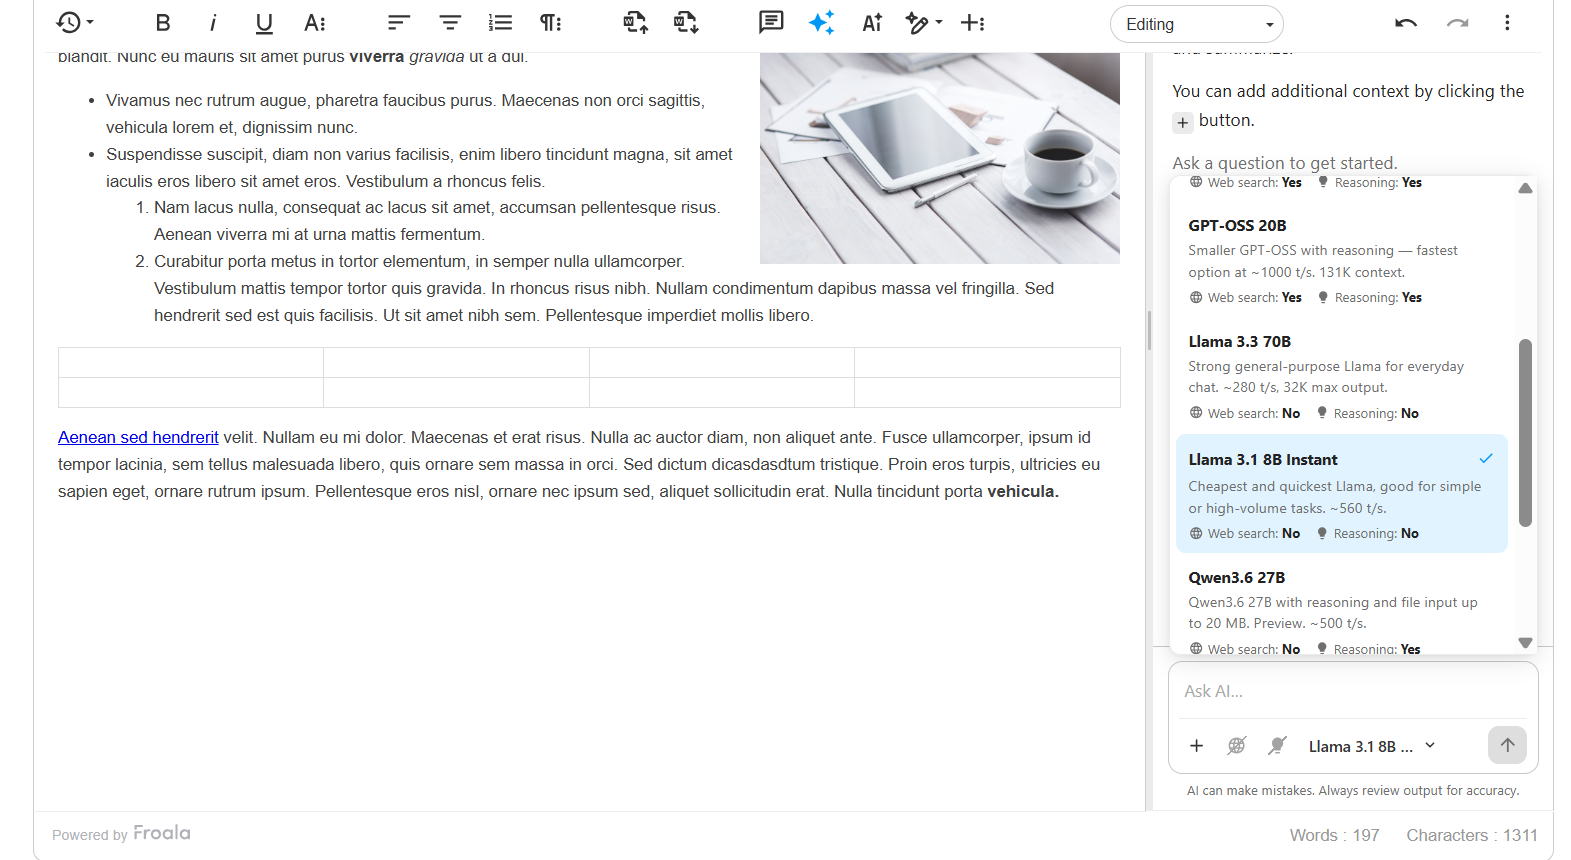
The webSearch and reasoning flags on each aiChatModels entry now control the composer toggles. When a model sets a capability to false:

  • The toggle is disabled and cannot be turned on.
  • It is turned off automatically when the user switches to that model, with a short inline notice.
  • The flag is removed from requests sent for that model, including direct aiAssist.requestAnswer() calls.

Only an explicit false disables a toggle. Disabled toggles stay reachable by keyboard and screen readers, which announce why they are unavailable.

Froala AI Assist

Why it matters

Users can no longer turn on web search for a model that can’t search.

How to use it

new FroalaEditor('.selector', {
  aiChatModels: [
    {
      modelName: 'openai/gpt-oss-120b',
      displayName: 'GPT-OSS 120B',
      webSearch: true,
      reasoning: true
    },
    {
      modelName: 'llama-3.1-8b-instant',
      displayName: 'Llama 3.1 8B Instant',
      webSearch: false, // toggle is disabled for this model
      reasoning: false
    }
  ],
  aiChatWebSearchEnabled: true
});

New Image and Video Resize Events

What it is

New events now fire around every image and video resize, whether the user drags a handle or resizes with the keyboard:

  • image.resizeStart (new): fires when the user grabs a resize handle, before the size changes. It completes the existing image.resize and image.resizeEnd events.
  • video.resizeStart (new): fires before a video’s size changes.
  • video.resizeEnd (new): fires after the new video size is applied.

The replaced events also carry more information now:

  • image.replaced receives a third argument, old_src, with the replaced image’s source.
  • video.replaced receives the upload response (or undefined for URL/embed) and old_src.

Existing handlers keep working, since the original arguments are unchanged.

Why it matters

You can record an element’s size before and after a resize, which is useful for undo tools, audit logs, or saving layout changes to your backend. With old_src, you can also delete a replaced file from your server so unused uploads don’t pile up.

How to use it

new FroalaEditor('.selector', {
  events: {
    'image.resizeStart': function ($img) {
      console.log('Resizing from', $img[0].width, 'x', $img[0].height);
    },
    'video.resizeEnd': function ($video) {
      const $el = $video.find('iframe, video, embed');
      console.log('New size:', $el.attr('width'), 'x', $el.attr('height'));
    },
    'image.replaced': function ($img, response, old_src) {
      fetch('/images/delete', {
        method: 'POST',
        headers: { 'Content-Type': 'application/json' },
        body: JSON.stringify({ src: old_src })
      });
    }
  }
});

Additional Froala v5.5.0 Improvements and Fixes

Lists

  • New preserveListMarkerStyle option. By default (true), bolding or italicizing a whole list item styles the <li> so the bullet or number matches. Set it to false to keep semantic <strong> and <em> tags instead. This is useful when your HTML goes through a sanitizer that removes <li> styles, or into emails or Markdown exports.

new FroalaEditor('.selector', {

  preserveListMarkerStyle: false

});

// Whole bold item → <li><strong>Item</strong></li>

Images and Video Events

  • image.replaced now receives a third argument, old_src, so you can clean up the replaced file on your server.
  • video.replaced now receives the upload response (or undefined for URL/embed) and old_src.
  • Existing handlers keep working since the original arguments are unchanged.

Collaboration and Selection

  • Selection highlight stay visible when typing in popup fields. When focus moves into a text field inside a popup (like a link URL input), the selected text stays highlighted. This now also works in collaborative mode without adding extra steps to undo history. The AI Chat “Selected Content” highlight uses the same improvement.

Bug Fixes

  • Fixed Clear Formatting in Suggestion mode: it now creates a suggestion for accepted formatted content, removes pending Enter-key markers cleanly, and no longer creates cards for unformatted or still-pending content.
  • Fixed a browser spell-check correction needing two Undo actions to revert in Suggestion mode. One Undo now reverts it completely.
  • Fixed the “Add comment” floating button not appearing on mobile after press-and-hold text selection.
  • Fixed Page Break not working when the editor is placed inside an HTML table.

A full list of the remaining enhancements and bug fixes is on the v5.5.0 changelog page.

Upgrading to Froala v5.5.0

No breaking changes in this release.

Step 1: Update the package

npm install froala-editor@5.5.0

CDN

<link href="https://cdn.jsdelivr.net/npm/froala-editor@5.5.0/css/froala_editor.pkgd.min.css" rel="stylesheet" type="text/css" />
<script type="text/javascript" src="https://cdn.jsdelivr.net/npm/froala-editor@5.5.0/js/froala_editor.pkgd.min.js"></script>

If you use a framework wrapper (React, Angular, Vue, Svelte), update it to the version that supports Froala 5.5.0.

Step 2: Clear caches

Clear your build and browser caches so the new files load.

Step 3: Test key workflows

Check your main editing flows, especially collaboration, AI features, and any custom plugins.

Upgrading from an older major version? Follow the Froala 3 to Froala 5 migration guide.

What’s Coming Next

With this release’s AI work delivered, our focus now widens to architecture and accessibility. Here is what the team is working on:

  • Headless Mode: Full Coverage (In progress). We’re extending headless mode beyond the initial scope in v5.5.0, so every part of the editor can be driven from your own design system without falling back to Froala’s built-in UI.
  • Accessibility Checker Plugin (Planned). A new plugin that scans content against WCAG levels A, AA, and AAA plus Section 508, with one-click fixes. We plan to include it in every license rather than as a paid add-on.

Have a use case for any of these? We’d love to hear from you.

Plans may change as development progresses.

Try Froala v5.5.0 Today

Froala v5.5.0 gives you more freedom to build the editing experience your users need, from AI-generated visuals and a fully custom UI to complete review workflows for media and links.

We would love to hear what you build with it. If something does not behave the way you expect, open an issue and tell us. Share your feedback with our team and help shape the next release.


Collaborative Review Workflows in Froala Without a WebSocket Server

Froala Async collaboration feature

You don’t need a WebSocket server to get practical collaboration in Froala. If your app runs on serverless platforms, shared hosting, or any infrastructure that kills idle sockets, Froala’s asynchronous mode gives you comments, track changes and version history without the pain of running a WebSocket relay.

It isn’t real-time typing: collaborators work in turns, and changes appear after a save and refresh. For most editorial workflows, where one person edits and others review, that trade-off is a net win: reviewers work at their own pace, and nothing depends on everyone being online at once.

Here’s exactly what you get:

Feature Async mode
Comments and replies ✅ Fully supported
Suggestions (track changes) ✅ Fully supported
Version history ✅ Fully supported
Live cursors ❌ Not available
Instant sync while typing ❌ Not available

For review workflows, which is what most teams actually want, this trade is often a better fit. Reviewers work at their own pace, and nobody needs to be online at the same time.

Key Takeaways

  • No WebSocket needed. Leaving out realTime.syncUrl switches Froala into async mode, and three REST modules from the Node SDK handle everything else.
  • Review features work fully. Comments, replies, suggestions and version history all persist to a single SQLite file.
  • Collaborators take turns. There are no live cursors, and updates appear after the other person saves and you refresh.
  • The document follows last save wins. Comments and suggestions never conflict, so the simplest pattern is one editor and any number of suggesters.
  • You can upgrade later. Adding real-time sync reuses the same persistence routes, so nothing you build here is thrown away.

What We’ll Build

We’ll build a small page where one person writes a draft and another person reviews it with comments and suggestions. Everything is saved, so each person sees the other’s work after refreshing. The backend is three REST modules and about 20 lines of code.

Prerequisites

  • Node.js 20 or newer (22 is recommended). Check by running node -v in your terminal.
  • A code editor such as VS Code.
  • A terminal, like the one built into VS Code (View → Terminal).

That’s it. No database to install; SQLite is just a file on disk.

Step 1: Create the Project

Open your terminal and run these commands one at a time:

mkdir froala-async-review 
cd froala-async-review 
npm init -y 
npm install express wysiwyg-editor-node-sdk

The first two commands create a project folder and move into it. npm init -y creates a package.json file, which is your project’s ID card. The last line installs Express, which is our web server, and Froala’s Node SDK, which includes the collaboration modules. SQLite support (better-sqlite3) comes with the SDK automatically.

Step 2: Create the Server

Create a file called server.js in your project folder. We’ll build it in three small pieces.

Piece 1: Load the tools. 

const path = require('path');       // Builds file paths that work on every OS
const fs = require('fs');           // Lets us create folders
const express = require('express'); // Our web server framework

// Grab the three collaboration modules we need from Froala's SDK
const { CollabPersistence, VersionControl, AsyncSave } = require('wysiwyg-editor-node-sdk');

The code loads the libraries we installed. Notice that Collaborative, the WebSocket module, is missing from the list. We don’t need it.

Piece 2: Set up Express.

const app = express();

// Understand JSON requests (used for comments, suggestions and versions)
app.use(express.json({ limit: '5mb' }));

// Understand form-encoded requests (used by Froala's save plugin)
app.use(express.urlencoded({ extended: true, limit: '5mb' }));

// Serve our HTML page from the "public" folder
app.use(express.static(path.join(__dirname, 'public')));

This is where many developers get stuck, so here’s why both parsers matter. Comments and suggestions arrive as JSON, but Froala’s save plugin sends the document as a form. Without express.urlencoded(), every save fails with a quiet 400 error and your document never persists.

Piece 3: Attach the collaboration routes and start the server.

// SQLite needs its folder to exist before it can create the database file
const dataDir = path.join(__dirname, 'data');
fs.mkdirSync(dataDir, { recursive: true });
const dbPath = path.join(dataDir, 'collab.db');

// All three modules share one database file
CollabPersistence.attachRoutes(app, { dbPath }); // Comments and suggestions
VersionControl.attachRoutes(app, { dbPath });    // Version history
AsyncSave.attachRoutes(app, { dbPath });         // The document content itself

app.listen(3000, () => {
  console.log('Server running at http://localhost:3000');
});

Each attachRoutes call adds a set of REST endpoints to your server. Together they create:

  • /collab/:docId/comments for comment cards and replies
  • /collab/:docId/suggestions for track-change suggestions
  • /collab/:docId/versions for saved snapshots
  • /collab/:docId/content for the document’s HTML

The :docId part is the room number where collaborators meet. Everyone using the same docId works on the same document.

Step 3: Create the Page

Create a folder called public, and inside it, a file called index.html.

Piece 1: The HTML shell.

<!DOCTYPE html>
<html lang="en">
<head>
  <meta charset="UTF-8">
  <title>Froala Async Review</title>
  <!-- Froala's packaged CSS, which includes the collaboration plugin styles -->
  <link href="https://cdn.jsdelivr.net/npm/froala-editor@5.4.0/css/froala_editor.pkgd.min.css" rel="stylesheet">
</head>
<body>
  <!-- Buttons for saving the document and creating a version -->
  <button id="save">Save document</button>
  <button id="version">Save a version</button>
  <span id="status"></span>

  <!-- The editor will appear inside this div -->
  <div id="editor"></div>

  <!-- Froala's packaged JS, which includes the collaboration plugin -->
  <script src="https://cdn.jsdelivr.net/npm/froala-editor@5.4.0/js/froala_editor.pkgd.min.js"></script>
  <script>
    // Our code goes here (next steps)
  </script>
</body>
</html>

The packaged build includes every plugin, collaboration included, so two files are all you need.

Piece 2: Decide who’s using the page. Paste this inside the empty <script> tag:

// Read the user's name and role from the URL, for example ?name=Sam&role=suggester
const params = new URLSearchParams(location.search);
const userName = params.get('name') || 'Guest';
const userRole = params.get('role') || 'editor';        // editor, suggester or viewer
const userId = userName.toLowerCase().replace(/\s+/g, '-');

const docId = 'review-doc';                 // The room number
const base = '/collab/' + docId;            // Shared start of every URL

// Small helper that shows messages next to the buttons
function setStatus(text) {
  document.getElementById('status').textContent = text;
}

Reading identity from the URL lets you test two users in two tabs without building a login system. This is for learning only; a real app gets identity from its login session.

Piece 3: Load the saved document, then start the editor.async function start() {

  // Ask the server for the last saved version of the document
  const res = await fetch(base + '/content');
  if (res.ok) {
    const saved = await res.json();
    // Put the saved HTML into the div BEFORE the editor starts
    document.getElementById('editor').innerHTML = saved.content;
  }
  // A 404 is fine: it just means nobody has saved this document yet

  const editor = new FroalaEditor('#editor', {
    // Where the save plugin sends the document
    saveURL: base + '/content',
    // Extra fields sent with every save, so we know who saved
    saveParams: { authorId: userId, authorName: userName },
    // Autosave 5 seconds after changes (you'll also have a manual button)
    saveInterval: 5000,

    collabConfig: {
      docId: docId,
      user: { id: userId, name: userName, role: userRole },
      commentsUrl: base + '/comments',
      suggestionsUrl: base + '/suggestions',
      versionControl: { url: base + '/versions' }
      // No realTime.syncUrl here. Leaving it out is what turns on async mode.
    },

    events: {
      // Runs after a successful save
      'save.after': function () {
        setStatus('Saved at ' + new Date().toLocaleTimeString());
      },
      // Runs if the save fails
      'save.error': function () {
        setStatus('Save failed. Is the server running?');
      }
    }
  });

  // Manual save button: sends the document right now
  document.getElementById('save').addEventListener('click', () => editor.save.save());

  // Version button: stores a named snapshot in version history
  document.getElementById('version').addEventListener('click', () => {
    editor.collaborative.saveVersion('Snapshot by ' + userName, null)
      .then(() => setStatus('Version saved'));
  });
}

start();

Two important ideas here.

First, the missing syncUrl is the whole switch. Without a WebSocket address, Froala stores comments, suggestions and versions through your REST URLs instead of broadcasting them live.

Second, the order matters. Comment and suggestion cards come from the comments and suggestions tables, but the highlights in the text live inside the document HTML. That’s why we load the saved content before starting the editor: the highlights and the cards find each other on startup. It’s also why you must save the document after adding a comment, or the card will exist with no highlighted text to point to.

We wrap everything in an async function because await at the top level of a regular script is a syntax error in the browser.

Step 4: Run It

Back in your terminal, from the project folder:

node server.js

You should see Server running at http://localhost:3000. Leave this terminal open. Closing it stops the server.

⚠️ Open the page through the server, not by double-clicking the HTML file. A file:// page can’t reach your /collab routes.

Step 5: Test a Review Workflow

Open two browser tabs:

  • Tab A (the writer): http://localhost:3000/?name=Alex&role=editor
  • Tab B (the reviewer): http://localhost:3000/?name=Sam&role=suggester

Now walk through a real review:

  1. In Tab A, type a paragraph and click Save document.
  2. Refresh Tab B. Sam sees Alex’s paragraph. 🎉
  3. In Tab B, Sam starts in Suggesting mode because of the suggester role. Change a word, then select a sentence and add a comment. Click Save document.
  4. Refresh Tab A. Alex sees Sam’s comment and suggestion in the side panel.
  5. Alex accepts the suggestion, replies to the comment, and clicks Save document.
  6. Click Save a version to capture the reviewed draft.

Congratulations! You just built a complete review workflow with a server that has no WebSocket at all. Stop the server, start it again, and refresh: everything is still there, because it lives in data/collab.db.

The One Rule of Async Mode

Since there’s no live sync, the document itself follows last save wins. If Alex and Sam both edit the same paragraph at the same time, the later save replaces the earlier one.

Comments and suggestions are safe, because each one is its own database row. The document text is the only thing to coordinate. The easiest pattern: one person owns the text as the editor, and everyone else reviews as a suggester. That’s how most editorial teams already work.

Troubleshooting

Saves fail with a 400 error. Check that express.urlencoded() is in server.js. The save plugin sends form data, not JSON.

The page loads but nothing saves. Make sure you opened http://localhost:3000, not the file directly, and that the terminal running node server.js is still open.

Comments show in the panel but the text isn’t highlighted. The comment was stored, but the document wasn’t saved afterward. Click Save document after reviewing.

EADDRINUSE when starting the server. Something else is using port 3000, often an old copy of your server. Close the other terminal or change 3000 to 3001 in server.js.

npm install fails while building better-sqlite3. Your Node version is probably too old. Upgrade to Node 22 and reinstall.

I don’t see Sam’s changes. In async mode, updates appear when you refresh, after the other person has saved.

Before Going to Production

This demo is intentionally simple. Before real users touch it:

  • Add authentication. Put your own login check in front of the routes with app.use('/collab', requireLogin) before the attachRoutes calls, and check that each user may access that docId.
  • Replace URL identity. Take name and role from the user’s session, never from the query string.
  • Sanitize HTML on the server. The content endpoint stores HTML exactly as received, and our page inserts it with innerHTML. Clean it with a library such as sanitize-html before saving.

Frequently Asked Questions

Does my backend have to be Node.js?
No. The editor only talks to plain REST endpoints, so any language can serve them. The Node SDK is the quickest route, but a PHP, Rails or Django app can implement the same routes by following the request and response shapes in the backend API reference.

Will this run on a serverless platform as written?
The routes will, but the SQLite file won’t survive. Serverless functions usually get a temporary disk that’s wiped between runs, so your data would disappear. On serverless, keep the same endpoints and store the data in a hosted database instead.

Can I see other people’s changes without refreshing the page?
Partly. Calling editor.collaborative.syncCollabData() re-fetches comments and suggestions, and editor.collaborative.checkForUpdates() refreshes the version list. You could run these on a button or a timer. The highlighted text lives in the document itself, though, so a refresh is still the most reliable way to see everything a reviewer did.

Do I have to click Save every time?
Not usually. The save plugin autosaves a few seconds after you stop typing, based on saveInterval. The manual button is a safety net, and it’s handy right after accepting suggestions or adding comments.

Can versions be created automatically?
Yes. Add autoSaveEnabled: true inside versionControl, and Froala saves a snapshot every 60 seconds by default. Use autoSaveInterval to change the timing, in milliseconds.

What happens if two people edit the text at the same time?
The later save replaces the earlier one. Comments and suggestions are stored separately and are never overwritten this way. If simultaneous editing is common for your team, that’s the signal to add the real-time relay.

Where to Go Next

When you’re ready for live cursors, the collaboration backend tutorial adds the WebSocket relay on top of the same persistence routes you built today. Your comments, suggestions and versions carry over unchanged. For every option and endpoint, see the collaboration plugin docs and the backend API reference, or try it live in the collaborative editing demo.

graphical user interface, text

How to Integrate a Rich Text Editor in a React TypeScript Project

React-TypeScript Rich Text Editor Tutorial

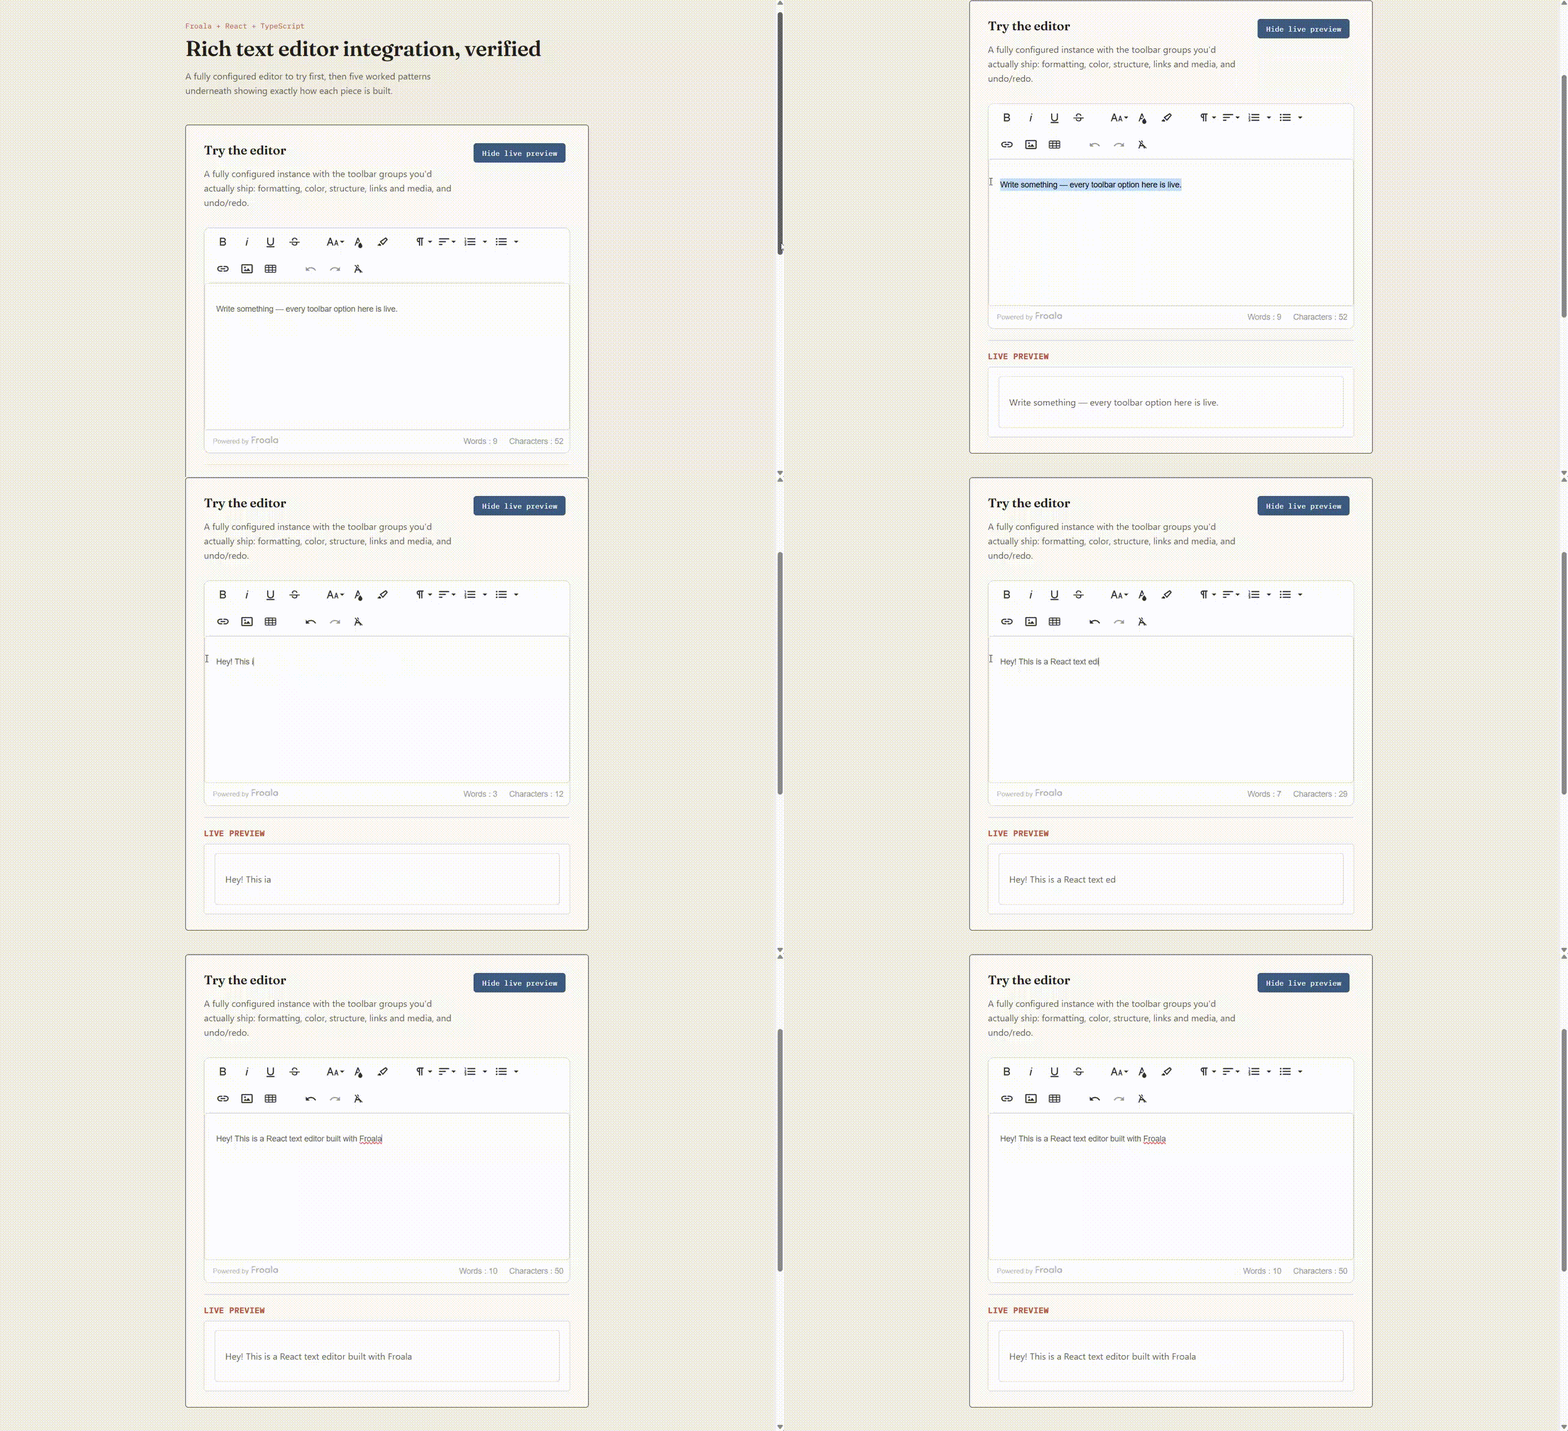
Quick answer: Install froala-editor and react-froala-wysiwyg, and import the stylesheets and plugins once.  Then render the editor as a controlled component with model and onModelChange, and type your config with Partial<FroalaOptions> so events and options are checked by the compiler.

One of the easiest parts of adding a React TypeScript rich text editor within your application is rendering an editable area. The most challenging parts are content, state, configuration, plugins, events, and the editor’s overall communication with your app. On top of that, TypeScript adds one essential requirement. The integration must smoothly fit into a typed codebase.

This tutorial walks through that integration with Froala. Every snippet below was compiled with strict: true and built with Vite, using React 19.3, TypeScript 5.9, Vite 7.3, froala-editor 5.4.0, and react-froala-wysiwyg 5.4.0. 

What Do You Need to Build a React TypeScript Rich Text Editor?

You need Node.js, npm, and either an existing React TypeScript app or a new one. For a new project, scaffold with Vite. React’s own documentation no longer recommends Create React App, so this tutorial skips it.

npm create vite@latest my-editor-app -- --template react-ts
cd my-editor-app
npm install

The Vite template ships with strict, verbatimModuleSyntax and noUnusedLocals enabled. All code below passes under those settings.

How to Install Froala in a React TypeScript Project

This tutorial does not require a Froala activation key to run the Froala editor. We are using the free and unlicensed version of Froala. When you are ready for production, you can always add the key setup (see the production checklist near the end).

npm install froala-editor react-froala-wysiwyg

Centralize the stylesheets and plugin bundle in one file, src/froala-setup.ts, and import it once from your entry point. This keeps every component free of repeated side-effect imports.

// src/froala-setup.ts
import 'froala-editor/css/froala_editor.pkgd.min.css';
import 'froala-editor/css/froala_style.min.css';
import 'froala-editor/js/plugins.pkgd.min.js';


// src/main.tsx
import { StrictMode } from 'react';
import { createRoot } from 'react-dom/client';
import './froala-setup';
import App from './App';

createRoot(document.getElementById('root')!).render(
  <StrictMode>
    <App />
  </StrictMode>,
);

The two stylesheets do different jobs. froala_editor.pkgd.min.css styles the editor UI, including the toolbar. froala_style.min.css styles the content itself (the .fr-view class), so you also want it wherever you render saved HTML outside the editor.

plugins.pkgd.min.js loads every plugin, which is convenient in development. For production, import only the plugins you enable, for example froala-editor/js/plugins/link.min.js, to keep the bundle smaller.

How Do You Add the Rich Text Editor Component?

Here is BasicEditor.tsx, the first working example. In practice, the wrapper’s default export doesn’t always resolve to the component itself under Vite. Depending on the exact Vite/react-froala-wysiwyg version pairing, the import can resolve to the module’s raw exports object instead, which throws Element type is invalid... but got: object at render time. Rather than debug that per project, unwrap it once in a typed helper and import the component from there everywhere else:

// src/FroalaEditor.ts
import * as FroalaModule from 'react-froala-wysiwyg';
import type FroalaEditorComponent from 'react-froala-wysiwyg';
type ModuleShape = { default?: { default?: unknown } };
const mod = FroalaModule as ModuleShape;
const resolved = (mod.default?.default ?? mod.default ?? FroalaModule) as typeof FroalaEditorComponent;
export default resolved;


// src/BasicEditor.tsx
import { useState } from 'react';
import FroalaEditorComponent from './FroalaEditor';

export default function BasicEditor() {
  const [content, setContent] = useState<string>('<p>Hello from React!</p>');

  return (
    <>
      <FroalaEditorComponent
        tag="textarea"
        model={content}
        onModelChange={setContent}
      />
      <h3>Live React state</h3>
      <pre>{content}</pre>
    </>
  );
}

tag tells the wrapper which element to initialize the editor on; textarea is the standard choice for a full editing surface. model and onModelChange connect the editor to React state, and the <pre> underneath renders that state live so you can watch the HTML string change as you type.

Drop this component into a page, and you have a working, styled editor. Everything else in the tutorial builds on it.

How Do You Manage Editor Content in React?

model and onModelChange make this a standard controlled component. model is the HTML the editor should show; onModelChange fires with the current HTML string whenever the editor records a content change. setContent from useState already matches the expected signature, so no wrapper function is needed.

Two details about update timing are worth knowing. The wrapper drives onModelChange from Froala’s contentChanged event, which the editor batches during typing using its typing timer rather than firing on every keystroke. If you need updates on each key release, set immediateReactModelUpdate: true in the config; the wrapper then also listens to keyup. That costs performance on large documents, so leave it off unless you need it.

Keep content in local state for a single self-contained editor. Once it needs to reach a form, an API call, or a sibling component, lift it to a parent or a shared state layer, as PostForm does later in this tutorial.

How Do You Configure a React Rich Text Editor with TypeScript?

Inline JSX options get unwieldy past two or three keys. Pull them into a config object, and type it with Partial<FroalaOptions> from froala-editor. That single annotation is what gives you autocomplete on option names and type errors on wrong values. It also types the this context inside event callbacks, which matters in the next section.

// src/ConfiguredEditor.tsx
import { useState } from 'react';
import type { FroalaOptions } from 'froala-editor';
import FroalaEditorComponent from './FroalaEditor';

const config: Partial<FroalaOptions> = {
  placeholderText: 'Start writing...',
  charCounterCount: true,
  heightMin: 300,
  toolbarButtons: ['bold', 'italic', 'underline', 'insertLink'],
};

export default function ConfiguredEditor() {
  const [content, setContent] = useState<string>('');

  return (
    <FroalaEditorComponent
      tag="textarea"
      config={config}
      model={content}
      onModelChange={setContent}
    />
  );
}

 A shared config object reads better than a JSX prop with a dozen inline keys, and the same object can back every editor instance in the app instead of retyping toolbar buttons per screen.

One note on where the strictness lives. The wrapper’s own prop types are loose: config, onModelChange and onManualControllerReady are declared as object. TypeScript will not catch a wrongly shaped config at the JSX boundary. It catches it where you declare the config as Partial<FroalaOptions>, and where you type your own component’s props (see the reusable component section). Put the types there.

How Do You Handle Froala Editor Events in TypeScript?

Events go in the events key of the config. Because the config is typed, each callback’s this is typed as FroalaEditor, so this.html.get() resolves to a real method with a string return type. This is the only reason the example compiles under strict: with an untyped object literal, TypeScript would infer this as the events object and reject this.html.

// src/EventsEditor.tsx
import { useState } from 'react';
import type { FroalaOptions } from 'froala-editor';
import FroalaEditorComponent from './FroalaEditor';

const config: Partial<FroalaOptions> = {
  placeholderText: 'Start writing...',
  events: {
    initialized: function () {
      console.log('Editor ready');
    },
    contentChanged: function () {
      // 'this' is the editor instance, typed as FroalaEditor
      console.log(this.html.get());
    },
    focus: function () {
      console.log('Editor focused');
    },
    blur: function () {
      console.log('Editor lost focus');
    },
  },
};

export default function EventsEditor() {
  const [content, setContent] = useState<string>('');

  return (
    <FroalaEditorComponent
      tag="textarea"
      config={config}
      model={content}
      onModelChange={setContent}
    />
  );
}

Any callback that reads this must be a regular function. Arrow functions capture the surrounding this and cannot be bound to the editor; a callback that ignores this can be either.

contentChanged is the event behind onModelChange, so for React state you already have it. Use it directly when you need something that is not state, such as an autosave timer or validation that should run without a re-render. Froala exposes many more events, including paste and image upload hooks; the events documentation has the full list.

How Do You Access the Editor Instance?

Props and config cover most day-to-day needs. Occasionally you need the instance itself, for example, to run a command from a button outside the editor or read its HTML on demand. The wrapper’s onManualControllerReady prop hands you an object with initialize, destroy, and getEditor, and defers initialization until you call initialize() yourself.

// src/ManualControlEditor.tsx
import { useRef, useState } from 'react';
import type FroalaEditor from 'froala-editor';
import FroalaEditorComponent from './FroalaEditor';

interface ManualControls {
  initialize: () => void;
  destroy: () => void;
  getEditor: () => FroalaEditor | null;
}

export default function ManualControlEditor() {
  const controlsRef = useRef<ManualControls | null>(null);
  const [snapshot, setSnapshot] = useState<string>('');

  const handleControllerReady = (controls: ManualControls) => {
    controlsRef.current = controls;
    controls.initialize();
  };

  const handleGetHtml = () => {
    const editor = controlsRef.current?.getEditor();
    if (!editor) {
      setSnapshot('(editor not mounted)');
      return;
    }
    setSnapshot(editor.html.get());
  };

  return (
    <>
      <div className="button-row">
        <button onClick={handleGetHtml}>Read current HTML</button>
        <button onClick={() => controlsRef.current?.destroy()}>Destroy</button>
        <button onClick={() => controlsRef.current?.initialize()}>Re-initialize</button>
      </div>
      <FroalaEditorComponent
        tag="textarea"
        onManualControllerReady={handleControllerReady}
      />
      <pre>{snapshot || '(no snapshot yet)'}</pre>
    </>
  );
}

import type FroalaEditor from 'froala-editor' is a type-only import. It is erased at build time and gives getEditor a real return type instead of an implicit any. getEditor returns null until the editor has mounted, so guard before calling anything on it. The wrapper does not export a type for the controls object, which is why ManualControls is declared locally.

How Do You Create a Reusable React Editor Component?

Once the pieces work in isolation, wrap them in one typed component the rest of the app can drop in anywhere. Keep the shared config in its own module so the form example and any future editor use the same toolbar.

// src/froala-config.ts
import type { FroalaOptions } from 'froala-editor';

export const baseConfig: Partial<FroalaOptions> = {
  placeholderText: 'Start writing...',
  charCounterCount: true,
  heightMin: 200,
  toolbarButtons: ['bold', 'italic', 'underline', 'insertLink'],
};


// src/RichTextEditor.tsx
import FroalaEditorComponent from './FroalaEditor';
import { baseConfig } from './froala-config';

export interface RichTextEditorProps {
  value: string;
  onChange: (value: string) => void;
}

export default function RichTextEditor({ value, onChange }: RichTextEditorProps) {
  return (
    <FroalaEditorComponent
      tag="textarea"
      config={baseConfig}
      model={value}
      onModelChange={onChange}
    />
  );
}

This is where the TypeScript contract becomes real. Any component rendering RichTextEditor must supply a string value and a function that accepts one. A toolbar change or a design update now happens in one file instead of once per screen.

How Do You Use the Editor Inside a React Form?

The reusable component slots into a form like any controlled input. This example checks for empty content before submitting, disables the button while the request is in flight, and surfaces success and failure states.

// src/PostForm.tsx
import { useState, type FormEvent } from 'react';
import RichTextEditor from './RichTextEditor';

// Empty means no text and no embedded media. Parsing with DOMParser decodes
// every entity form (&nbsp;, &#160;, &#xA0;), which a regex on the raw string
// does not.
const isBlank = (html: string) => {
  const body = new DOMParser().parseFromString(html, 'text/html').body;
  const hasMedia = body.querySelector('img, video, iframe, table') !== null;
  return !hasMedia && (body.textContent ?? '').trim().length === 0;
};

export default function PostForm() {
  const [body, setBody] = useState<string>('');
  const [error, setError] = useState<string | null>(null);
  const [status, setStatus] = useState<string | null>(null);
  const [submitting, setSubmitting] = useState(false);

  const handleSubmit = async (event: FormEvent) => {
    event.preventDefault();
    setError(null);
    setStatus(null);

    if (isBlank(body)) {
      setError('Post content cannot be empty.');
      return;
    }

    setSubmitting(true);
    try {
      const res = await fetch('/api/posts', {
        method: 'POST',
        headers: { 'Content-Type': 'application/json' },
        body: JSON.stringify({ content: body }),
      });
      if (!res.ok) throw new Error(`Request failed: ${res.status}`);
      setStatus('Published successfully.');
    } catch (err) {
      setError(err instanceof Error ? err.message : 'Unknown error');
    } finally {
      setSubmitting(false);
    }
  };

  return (
    <form onSubmit={handleSubmit}>
      <RichTextEditor value={body} onChange={setBody} />
      {error && <p role="alert">{error}</p>}
      {status && <p role="status">{status}</p>}
      <button type="submit" disabled={submitting}>
        {submitting ? 'Publishing...' : 'Publish'}
      </button>
    </form>
  );
}

The emptiness check parses the HTML instead of running a regex over it. An editor can hold <p>&nbsp;</p> or <p>&#160;</p>, both non-empty as raw strings and both empty as content; textContent decodes every entity form and trim() removes the resulting non-breaking spaces. The media query keeps an image-only post from being rejected as blank. Adjust the selector to whatever your app counts as content. Wrapping fetch in try/catch means a failed request becomes a visible error rather than a silent no-op.

How to Integrate a Rich Text Editor in a React TypeScript Project


Common React and TypeScript Integration Issues

The toolbar is missing or unstyled

If the toolbar renders as unstyled buttons, froala_editor.pkgd.min.css did not load. Check that froala-setup.ts is imported from your entry point, not just from one component. If there is no toolbar at all and the CSS is loading, the editor did not initialize: the usual cause is passing onManualControllerReady and never calling initialize(). If the toolbar looks fine but saved content renders without styling elsewhere, the missing file is froala_style.min.css.

A toolbar button appears but does nothing, or does not appear at all

The plugin behind the button is not loaded. insertLink needs the link plugin, charCounterCount needs the char counter plugin, and so on. Either import plugins.pkgd.min.js or the individual plugin file. Listing a button in toolbarButtons does not load its plugin.

TypeScript cannot resolve react-froala-wysiwyg/FroalaEditorView

The wrapper ships its types in lib/index.d.ts, and that file also declares the subpath modules such as react-froala-wysiwyg/FroalaEditorView. TypeScript only loads it when the root package is referenced somewhere in the program. If a file imports only a subpath, add a reference directive at the top of that file:

/// <reference types="react-froala-wysiwyg" />
import FroalaEditorView from 'react-froala-wysiwyg/FroalaEditorView';

Do not fix this with a bare declare module 'react-froala-wysiwyg/FroalaEditorView';. That is a shorthand ambient declaration and makes the import any.

this.html is an error inside an event callback

The config object is untyped. Declare it as Partial<FroalaOptions> and the events map picks up this: FroalaEditor from Froala’s FroalaEvents interface. See the events section above.

Editor content and React state disagree

Content is being set from more than one place, typically model plus a direct call to editor.html.set(). Keep a single flow: the editor updates state through onModelChange, and state flows back through model. If you must set HTML imperatively, do it through state.

The editor initializes twice in development

Older versions of the wrapper rendered two editors under React 18’s StrictMode because StrictMode runs each component’s mount cycle twice in development. Wrapper 5.4 destroys and recreates the editor cleanly across that cycle; we verified a single toolbar and a single .fr-box under StrictMode with React 19. If you see a doubled editor, upgrade react-froala-wysiwyg rather than removing StrictMode, which would hide other lifecycle bugs in your own code.

What Should You Consider Before Using a React Rich Text Editor in Production?

A working demo and a production-ready editor are not the same thing. Before you ship:

  • Sanitize HTML server-side. Froala cleans HTML on the client through htmlAllowedTags, htmlAllowedAttrs, and htmlRemoveTags, and will use DOMPurify if it is present on the page, but client-side cleanup is never a substitute for server-side sanitization of user-submitted content.
  • Set the license key from an environment variable and confirm the editor no longer shows the unlicensed notice on your production domain.
  • Plan the file and image upload workflow: where files land and how they are served back. Froala’s image upload documentation covers the server-side pieces.
  • Import only the plugins you enable, and confirm they are in the production bundle.
  • Lock down toolbarButtons in a shared config so every instance looks and behaves the same.
  • Test keyboard navigation and screen readers against your accessibility requirements.
  • Test mobile and touch behavior, not only desktop layouts.
  • Measure performance with realistic document sizes, not a two-paragraph test.
  • Decide where content persists and what the user sees when a save fails.
  • Keep React, TypeScript, and both Froala packages on current supported versions, and pin them.

Build Your React TypeScript Editor with Froala

Across this tutorial, you installed the editor and its React wrapper and rendered a working editor. Then you connected it to typed React state, added a typed config with events, reached the editor instance when props were not enough, and packaged the result into a reusable component wired into a real form.

The React integration documentation covers the remaining configuration options, events, plugins, and API methods. From there, start a Froala trial and drop the same configuration into your own project.

FAQ

Can I use a rich text editor with React and TypeScript?

Yes. With Froala’s React wrapper, the editor is a controlled component, the config is typed through Partial<FroalaOptions>, event callbacks get a typed this, and the underlying instance is reachable through onManualControllerReady. All of that is shown above.

How do I get HTML from a React rich text editor?

Read the state value that onModelChange keeps up to date, or call this.html.get() inside an event callback, or call editor.html.get() on the instance from getEditor(). Each returns a plain HTML string you can store or send to an API.

Should a React rich text editor be a controlled component?

For reusable components and forms, yes. One flow (onModelChange into state, model back into the editor) is easier to reason about than mixing controlled and uncontrolled patterns on the same editor.

What should I look for in a rich text editor for a React TypeScript project?

An official React wrapper, shipped TypeScript definitions for the editor’s options and events, a documented event system, and a way to reach the underlying instance when props are not enough. An editor that covers those four points will fit a typed codebase without extra glue.

What matters most in a rich text editor for a complex React app?

Plugin architecture and typed configuration matter more than toolbar button count. An editor that exposes custom commands and the underlying instance, with a full event lifecycle, scales better in a large application than one that only covers basic formatting.

What licensing models exist for React rich text editors?

Open-source editors ship under permissive or copyleft licenses and leave maintenance to you. Commercial editors sell licenses on different bases: some per developer seat and some per editor load. Froala is licensed per product and per domain with unlimited users (Professional covers one product on three domains; Enterprise covers unlimited products and domains, including SaaS and OEM use). Check the current terms on the pricing page before committing a production app to any editor.

Are there commercial rich text editors for React that support TypeScript?

Yes. Froala ships type definitions with both the editor and the React wrapper, and several other commercial editors do the same. The trade is a license fee for maintained types and a documented upgrade path, which matters most when the editor is load-bearing in a production system.

Where can I find a customizable React TypeScript rich text editor package?

Start with the vendor’s GitHub repository and the npm package page. The plugin system and the TypeScript types should be documented in one place, which is what this tutorial walked through for Froala.

What are typical pricing plans for React rich text editors?

Open-source editors are free to use and yours to maintain, and some vendors charge per editor load on top of a free tier. Froala is a flat annual or perpetual license per product and domain allowance, with no per-user or per-load charge, and an Enterprise tier for SaaS and OEM products. Confirm current pricing on the vendor’s page rather than relying on older guides.


graphical user interface, text

Building a Production-Ready Collaboration Backend for Froala

collaboration backend for Froala

Two people or more, one document, no lost edits. Froala 5.3 solves the hardest part of real‑time collaboration. It ships Yjs in the browser to merge concurrent keystrokes into a single coherent document, so you don’t need to wrestle with CRDTs or conflict math.

What is left for you is a small, reliable server: a WebSocket relay to pass updates between peers and a persistence layer to keep comments, versions, and the canonical copy. Neither one is exotic. This guide shows how to build those two ordinary pieces with Froala’s Node.js SDK and how to avoid the common pitfalls that turn a demo into a maintenance problem.

The Froala Collaboration Backend Server’s Function

The collaboration backend server has two responsibilities:

Passing messages between browsers

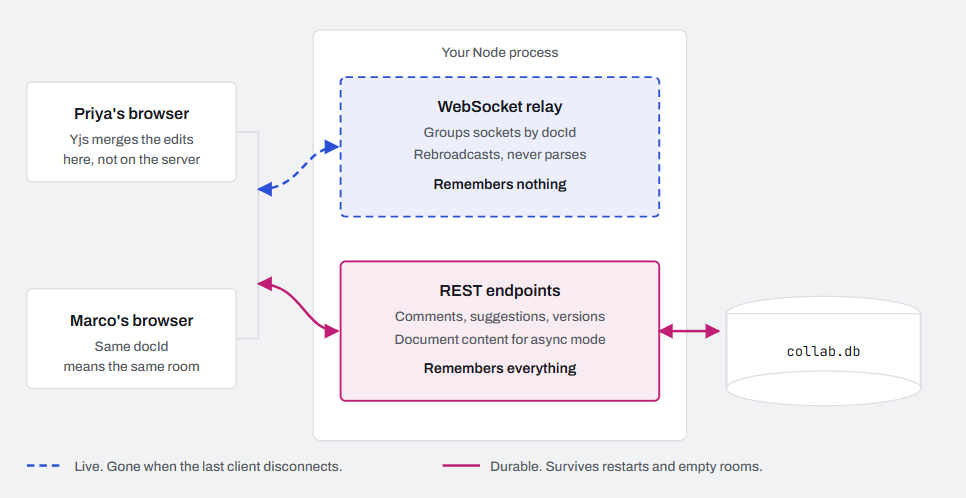
A WebSocket is a connection that stays open in both directions. Froala’s relay groups those connections by docId, which is simply the room number where collaborators meet. When one browser sends an update, the relay rebroadcasts it verbatim to every other browser in the same room. It never parses the message, never validates it, never stores it. All the intelligence is in the clients.

Persistence

The relay forgets everything the moment the last person closes their tab. So comments, track-change suggestions, and version snapshots travel over a second path: plain REST endpoints backed by SQLite. That’s what survives an empty room, a browser refresh, and a server restart.

The Froala Node.js SDK ships these as four modules you compose as needed.

Module What it handles Transport
Collaborative Live peer sync, presence, cursors WebSocket
CollabPersistence Suggestions and comments REST + SQLite
VersionControl Named and automatic snapshots REST + SQLite
AsyncSave Latest document content in offline mode REST + SQLite

collaboration server components

Why this matter? If you mount only the relay, everything works beautifully until the last person closes the tab, and then it is gone. Real-time sync and persistence are two separate responsibilities, and you need both.

Real-time or asynchronous: pick one first

The Froala Collaborative plugin runs in two modes, and which one you are in is decided by a single value. Setting collabConfig.realTime.syncUrl turns on live sync across every collaborative feature. Leaving it out drops the plugin into asynchronous, offline-first mode where the REST endpoints are the only source of truth. Decide this before you write the server, because it changes what you have to mount.

Real-time Asynchronous
Set realTime.syncUrl plus the REST URLs REST URLs only
Needs All four modules The three REST modules
Feels like Cursors and edits appear instantly Changes appear on load or on refresh
Suits Live co-editing sessions Review cycles, flaky networks, simpler infrastructure

Prerequisites for the Froala Collaboration Backend

You need:

  • Node.js 22 or newer
  • npm

1. Install the SDK

mkdir froala-collab && cd froala-collab
npm init -y
npm install express wysiwyg-editor-node-sdk

That is everything the backend needs to run. The SQLite driver, better-sqlite3, is a regular dependency of the SDK and installed automatically. It is a native module, so on a bare Linux container without a prebuilt binary available you may also need build tools (python3, make, g++) present during install. Two small packages for CORS and rate limiting appear later, once we get to hardening.

2. Create the folder your database lives in

SQLite will create the database file for you. It will not create the directory that file goes in.

Common first error. Pointing dbPath at data/collab.db when data/ does not exist throws SQLITE_CANTOPEN on startup. The fix is one line in the server, shown next, so the folder is always there before any module opens the file.

3. Write the server

Create server.js and build it up in pieces.

const http    = require('http');
const path    = require('path');
const fs      = require('fs');
const express = require('express');

// Pull in only the collaboration modules you plan to mount.
const {
  Collaborative,      // WebSocket relay
  CollabPersistence,  // suggestions + comments
  VersionControl,     // version snapshots
  AsyncSave,          // offline content save/load
} = require('wysiwyg-editor-node-sdk');

Next, guarantee the database folder exists, then point every module at one shared file.

const dataDir = path.join(__dirname, 'data');
// recursive:true creates the folder if missing and stays quiet if it exists.
fs.mkdirSync(dataDir, { recursive: true });

const dbPath = path.join(dataDir, 'collab.db');

Now the Express app. The body limit deserves a moment of attention.

const app = express();

// Version snapshots are entire HTML documents, not small form posts.
// Express defaults to 100kb and answers 413 above that, which shows up
// in the browser as "saving a version silently does nothing".
app.use(express.json({ limit: '5mb' }));
app.use(express.urlencoded({ extended: true, limit: '5mb' }));

Now the piece that catches nearly everyone on the first run. Your editor page is almost certainly served from a different origin than port 3000, and a browser will block every REST call until you say otherwise.

// npm install cors
const cors = require('cors');

// Name the exact origin your page is served from. Not '*', because
// credentials:true and a wildcard origin are mutually exclusive.
app.use(cors({
  origin: process.env.APP_ORIGIN,   // e.g. http://localhost:5173
  credentials: true,                // lets session cookies ride along
}));

What this looks like when it is missing. The editor loads, cursors sync fine over the WebSocket, and every comment request fails with a CORS message in the console. The relay is unaffected because WebSockets are not subject to the same-origin policy, which is exactly why the failure looks so selective.

// Each call registers its REST routes and creates its tables on first run.
// Sharing one dbPath keeps everything in a single file.
CollabPersistence.attachRoutes(app, { dbPath });
VersionControl.attachRoutes(app, { dbPath });
AsyncSave.attachRoutes(app, { dbPath });

// getStats() reports live rooms and connections. Useful for monitoring.
app.get('/health', (req, res) => res.json(Collaborative.getStats()));

Finally, put the relay and the REST API on the same port.

// Build the HTTP server yourself so both can share it.
const server = http.createServer(app);

// This line tells Froala to listen for WebSocket upgrades on our server.
Collaborative.attachToServer(server);

server.listen(3000, () => {
  console.log('Collaborative backend on http://localhost:3000');
});

attachToServer or createServer? Use attachToServer() when REST and the relay share a port, which is almost always. createServer() is for running the relay alone on its own port, with nothing else on it.

4. Run it and confirm it is alive

node server.js

In a second terminal:

curl http://localhost:3000/health

// {"docs":0,"clients":0}

curl http://localhost:3000/collab/my-doc/comments

// []

An empty array is a success. It means the route is mounted, the database opened, and the table exists. Notice the URL shape: every REST endpoint is namespaced under /collab/:docId/, and that docId has to match the one the WebSocket connection uses.

5. Put the editor on the page

The backend is only half the system. Load the packaged build, which ships every plugin including the collaborative one.

<link rel="stylesheet" href="/node_modules/froala-editor/css/froala_editor.pkgd.min.css">
<link rel="stylesheet" href="/node_modules/froala-editor/css/froala_style.min.css">

<div id="editor"></div>

<script src="/node_modules/froala-editor/js/froala_editor.pkgd.min.js"></script>
<script>
  const editor = new FroalaEditor('#editor', {
    // Read the key from injected config. 
    key: window.APP_CONFIG.froalaKey,

    // collabConfig arrives in the next step.
  });
</script>

If you are using a bundler and a modular build instead, you have to import the collaborative plugin’s JavaScript and its stylesheet by their exact paths under node_modules/froala-editor, because the core alone does not include it.

6. Tell the editor these endpoints exist

This is the step that trips up almost everybody. Mounting routes on your server does not make the editor call them. The editor only talks to URLs you hand it in collabConfig.

new FroalaEditor('#editor', {
  key: window.APP_CONFIG.froalaKey,   

  collabConfig: {
    // The room number. Same value as the WebSocket path.
    docId: 'my-doc',

    // Display information only. The server decides who this really is.
    user: { id: 'user-42', name: 'Priya', role: 'editor' },

    // Persistence. Without these three, comments, suggestions and
    // versions live only for the duration of the session.
    commentsUrl:    'http://localhost:3000/collab/my-doc/comments',
    suggestionsUrl: 'http://localhost:3000/collab/my-doc/suggestions',
    versionControl: { url: 'http://localhost:3000/collab/my-doc/versions' },

    // The live wire. Omit this object entirely for offline-first mode.
    realTime: { syncUrl: 'ws://localhost:3000' }
  },

  // Async mode stores the document itself through AsyncSave.
  saveURL: 'http://localhost:3000/collab/my-doc/content'
});

Two things worth internalising. First, realTime.syncUrl is the master switch: set it and everything synchronises live, leave it out and the plugin falls back to asynchronous offline-first mode using the REST URLs alone. Second, in real-time mode those REST URLs are still doing work. Live sync shares data between connected peers, but it is the URLs that write it to disk and fetch it back on the next page load.

Do not hardcode the document id

The configuration above repeats my-doc in four places plus the WebSocket path. In a real application that is five chances to typo a room number, and a mismatch between the REST docId and the WebSocket docId produces a document that syncs live but persists into a different bucket. Build the whole object from one value instead.

function collabConfigFor(docId, user) {
  const origin = window.APP_CONFIG.collabOrigin;     // https://collab.example.com
  const base   = `${origin}/collab/${encodeURIComponent(docId)}`;

  return {
    docId,
    user,                                            // display information only

    commentsUrl:    `${base}/comments`,
    suggestionsUrl: `${base}/suggestions`,

    versionControl: {
      url: `${base}/versions`,
      autoSaveEnabled: true,
      // Default is 60000. Every interval writes a full copy of the
      // document, so five minutes is kinder to your disk and to the
      // retention job later in this guide.
      autoSaveInterval: 300000,
    },

    realTime: {
      // http becomes ws, https becomes wss, without a second constant.
      syncUrl: origin.replace(/^http/, 'ws'),
      reconnectDelay: 2000,
    },
  };
}
new FroalaEditor('#editor', {
  key: window.APP_CONFIG.froalaKey,
  htmlExecuteScripts: false,
  collabConfig: collabConfigFor('q3-report', currentUser),
  saveURL: `${origin}/collab/q3-report/content`,
});

7. Load the document’s starting content

Here’s the consequence of the relay being amnesiac: when the first person opens a document, there’s no peer to sync from. The editor starts empty. Nothing in the SDK fills that gap. The starting content has to come out of your storage and into the element before the editor initializes.

In asynchronous mode, and in real-time mode where you also persist through AsyncSave, that content is one request away.

async function startingHtml(docId) {
  const res = await fetch(`/collab/${encodeURIComponent(docId)}/content`, {
    credentials: 'include',
  });

  // 404 is the normal answer for a document nobody has saved yet.
  if (res.status === 404) return '';

  // Anything else that is not a success is a real problem. Fail loudly
  // rather than opening an empty editor that looks like data loss.
  if (!res.ok) {
    throw new Error(`Could not load document: ${res.status}`);
  }

  const { content } = await res.json();
  return content;
}

async function boot(docId) {
  // Seed the element first, then let Froala take over the filled element.
  document.querySelector('#editor').innerHTML = await startingHtml(docId);

  new FroalaEditor('#editor', {
    key: window.APP_CONFIG.froalaKey,
    htmlExecuteScripts: false,
    collabConfig: collabConfigFor(docId, currentUser),
    saveURL: `${window.APP_CONFIG.collabOrigin}/collab/${docId}/content`,
  });
}

boot('q3-report').catch((err) => {
  console.error(err);
  document.querySelector('#editor').textContent =
    'This document could not be loaded. Refresh to try again.';
});

Every client seeds from the same stored row, so peers start from identical state and live updates apply on top of it. Server-rendering the same HTML into the element works just as well and avoids the extra round trip. What does not work is seeding different clients with different content, because each one then contributes its own starting text to the shared document.

Keep the stored copy current

Loading is only half of it. That stored copy also has to be kept up to date, and this matters more than it first appears. Comment and suggestion records come from commentsUrl and suggestionsUrl, but the highlights that attach them to specific text live in the document content itself. A document that is never saved will reload with its comment cards intact and nothing in the text to attach them to.

saveURL: `${window.APP_CONFIG.collabOrigin}/collab/${docId}/content`,
saveParam: 'body', // the field AsyncSave expects 
saveInterval: 5000, // attempt a save 5 seconds after a change

Three details trip people up here:

  • The save plugin posts form-encoded, not JSON. Your server needs express.urlencoded() mounted alongside express.json(), or every save returns 400. Step 3 covers this.
  • saveInterval is a floor, not a cadence. The plugin waits for a content change, then waits the interval, then skips the request entirely if nothing differs from the last save. Real gaps are longer than the number you set.
  • editor.save.force() does not save. It only marks the document dirty so the next attempt is not skipped. To save immediately, call editor.save.save().

Test the stale case on purpose. Open a document, make changes, and open it again in a second browser before any save has happened. That is the scenario where the stored row and the live document disagree, and it is worth knowing how your application behaves there before a user finds it.

8. Show people the connection state

A WebSocket that drops does so silently. The editor keeps accepting keystrokes, the cursor keeps blinking, and nothing suggests that the last four paragraphs are going nowhere. Three events exist precisely so that you do not ship that experience.

new FroalaEditor('#editor', {
  // ...
  events: {
    // Fires on every transition: connecting, connected, disconnected.
    'collab.connectionStatus': function (status) {
      const banner = document.querySelector('#collab-banner');
      banner.hidden = status === 'connected';
      banner.textContent = status === 'connecting'
        ? 'Reconnecting to the collaboration server'
        : 'Offline. Your changes are not being shared right now.';
    },

    // The plugin has finished initialising. Safe to edit or to run
    // data operations from here on.
    'collab.synced': function () {
      document.querySelector('#collab-banner').hidden = true;
    },

    // Someone else's change just landed in your content.
    'collab.remoteContentChanged': function () {
      markUnsaved();
    },
  },
});

The editor’s own toast notifications are a lighter-touch alternative to a banner, and a persistent one is well suited to a state that resolves on its own.

const connecting = editor.toast.show({
  title: 'Reconnecting',
  description: 'Waiting for the collaboration server.',
  interval: false,        // stays until you dismiss it
});

// Once 'collab.connectionStatus' reports connected:
connecting.hide();

Retry timing is yours to set. realTime.reconnectDelay is the wait in milliseconds before the client tries again after a drop, defaulting to two seconds. Raising it eases load on a server that is struggling; lowering it makes brief network blips less visible.

9. Test it properly

Start the backend first, then open your page in two windows: one normal, one private or a different browser. Two tabs in the same window share a session, so you will not see two distinct users. Type in one window and watch the other. A caret with a name label should appear within a second.

Then do the harder test: close both windows, reopen one, and confirm your comments and versions came back. That is the test that proves the database half is wired up.

Make Your Froala Collaboration Backend Production Ready

Everything above runs happily on localhost. Here is what has to change before it faces the internet.
production collaboration server

Identity comes from your session, not from the client

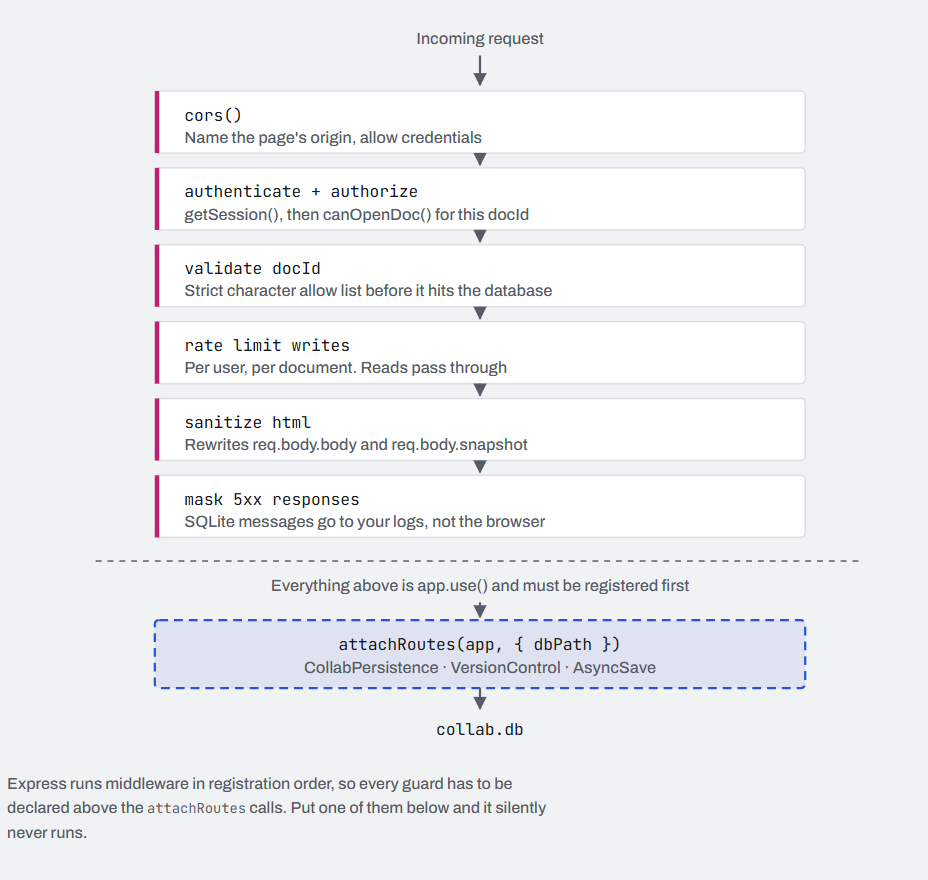
The user object in collabConfig is display information that any visitor can edit in devtools. Treat id, name, and especially role as hints for rendering cursors and nothing more. Authenticate the WebSocket upgrade request and every REST call, then derive the real user and the real role from your session on the server. Authorization is per document: whether this person may join this docId is a server decision, never a client claim. Verify the Origin header on upgrades too, since browsers do not apply the same-origin policy to WebSockets the way they do to fetch.

// server.js · replaces attachToServer

const { WebSocketServer } = require('ws');

// Manage the ws instance yourself so nothing is wired up before you have
// checked who is calling. With this in place, drop attachToServer().
const wss = new WebSocketServer({ noServer: true });

server.on('upgrade', async (req, socket, head) => {
  // 1. Browsers do not enforce same-origin on WebSockets. You do.
  if (req.headers.origin !== process.env.APP_ORIGIN) return socket.destroy();

  // 2. Real identity comes from your session store, not from the page.
  const session = await getSession(req.headers.cookie);
  if (!session) return socket.destroy();

  // 3. The room number lives in the URL path, so it is a claim. Check it.
  const docId = decodeURIComponent(req.url.split('?')[0].slice(1));
  if (!(await canOpenDoc(session.userId, docId))) return socket.destroy();

  // Approved. Now hand the connection to Froala's relay.
  wss.handleUpgrade(req, socket, head, (conn) => {
    Collaborative.setupWSConnection(conn, req);
  });
});

The REST side needs the same two checks. Register the guard before your attachRoutes calls so that it runs first.

// server.js · register before attachRoutes

app.use('/collab/:docId', async (req, res, next) => {
  const session = await getSession(req.headers.cookie);
  if (!session) return res.status(401).json({ error: 'not signed in' });

  if (!(await canOpenDoc(session.userId, req.params.docId))) {
    return res.status(403).json({ error: 'no access to this document' });
  }

  // Suggesting versus editing is a server decision. collabConfig.user.role
  // only decides which buttons the browser draws.
  if (req.method !== 'GET' && session.role === 'viewer') {
    return res.status(403).json({ error: 'read only' });
  }

  req.user = session;   // the identity the rest of your code trusts
  next();
});

Let the server decide the role

Roles are the part of this that looks like authorization but is not. collabConfig.user.role takes one of three values, and each one controls which modes the editor will let a person switch into.

Role Modes allowed Starts in
editor Editing, suggesting, viewing Editing
suggester Suggesting, viewing Suggesting
viewer Viewing only Viewing

That gate lives in the browser, so it decides which buttons are drawn and nothing more. Someone who edits the value in devtools gets an editing toolbar. What stops them writing is the REST guard above, which is why the role has to make a round trip: your server decides it, injects it, and then enforces it independently.

// Server: send the role down with the page, alongside the key.
res.render('document', {
  appConfig: {
    froalaKey: process.env.FROALA_KEY,
    collabOrigin: process.env.COLLAB_ORIGIN,
    user: { id: session.userId, name: session.name, role: roleFor(session, docId) },
  },
});
// Client: react to mode changes so your own UI stays in step.
events: {
  'collab.modeChanged': function (newMode, prevMode) {
    document.body.dataset.collabMode = newMode;
    saveButton.disabled = newMode !== 'editing';
  },
},

// Switching programmatically is a no-op when the role forbids it,
// so this is safe to call without checking the role first.
editor.collaborative.setMode('suggesting');

Sanitize the HTML, twice

Version snapshots and async content are raw editor HTML, and the content endpoint returns it verbatim. Sanitization is your responsibility. Run a maintained server-side sanitizer with an allow-list of tags and attributes before you store the content, and again before you render it anywhere. The editor’s client-side options like htmlAllowedTags shape editing quality; they run in the browser and are not a security boundary.

//server.js · register before attachRoutes

const sanitizeHtml = require('sanitize-html');

const POLICY = {
  // Match this list to what your toolbar can actually produce.
  // Stricter than the editor is fine. Looser is a hole.
  allowedTags: ['p', 'br', 'strong', 'em', 'u', 's', 'h1', 'h2', 'h3',
                'ul', 'ol', 'li', 'blockquote', 'a', 'img',
                'table', 'thead', 'tbody', 'tr', 'th', 'td'],
  allowedAttributes: { a: ['href', 'title'], img: ['src', 'alt', 'width', 'height'] },
  allowedSchemes: ['http', 'https', 'mailto'],   // blocks javascript: and data:
};

app.use('/collab/:docId', (req, res, next) => {
  // AsyncSave posts the document as "body", VersionControl as "snapshot".
  if (typeof req.body?.body === 'string') {
    req.body.body = sanitizeHtml(req.body.body, POLICY);
  }
  if (typeof req.body?.snapshot === 'string') {
    req.body.snapshot = sanitizeHtml(req.body.snapshot, POLICY);
  }
  next();
});

That covers the write path. Apply the same policy again on the read path, wherever stored content gets rendered outside the editor, because rows written before this middleware existed have never been through it.

const { content } = await fetchDocument(docId);
res.render('document', { html: sanitizeHtml(content, POLICY) });

Encrypt everything in transit

Serve the page over HTTPS and the relay over wss://. If you terminate TLS at nginx or a cloud load balancer, confirm that the proxy forwards the Upgrade and Connection headers, and that its idle timeout is longer than the relay’s 30 second keepalive ping. A proxy that quietly drops upgrades produces a connection that reconnects forever and syncs nothing.

# nginx.conf

location / {
  proxy_pass http://127.0.0.1:3000;

  # Without these three lines the upgrade never reaches Node
  # and the browser reconnects forever.
  proxy_http_version 1.1;
  proxy_set_header Upgrade $http_upgrade;
  proxy_set_header Connection "upgrade";

  proxy_set_header Host $host;
  proxy_set_header X-Forwarded-Proto $scheme;

  # Comfortably longer than the relay's 30 second keepalive ping.
  proxy_read_timeout 120s;
}

Then move the client onto the secure scheme. An HTTPS page is not permitted to open a plain ws:// connection at all, so this is not optional once TLS is on.

collabConfig: {
  // wss, not ws, and the same host the page was served from.
  realTime: { syncUrl: 'wss://collab.example.com' },
  commentsUrl: 'https://collab.example.com/collab/my-doc/comments',
  // ...
}

Pick a database shape that matches your deployment

A single SQLite file is a perfectly respectable production choice for one server instance, and it is fast. Enable write-ahead logging once on the file so readers do not block writers, and back the file up on a schedule like any other database.

const Database = require('better-sqlite3');
// Run once before attachRoutes. journal_mode is stored in the file itself.
new Database(dbPath).pragma('journal_mode = WAL');

Scaling past one instance is where this needs thought. The relay keeps its room registry in process memory, so two Node processes behind a load balancer are two separate sets of rooms, and users in the same document land in different ones. Start with a single instance. When you outgrow it, add session affinity so every connection for a given docId reaches the same process, and move the REST stores onto a shared database that all instances can see.

#nginx.conf

upstream collab_backend {
  # The WebSocket path is exactly /{docId}, so hashing on the URI
  # lands every peer of a document on the same process.
  hash $request_uri consistent;

  server 10.0.0.11:3000;
  server 10.0.0.12:3000;
}

Decide your retention policy before launch rather than after. Versions are append-only and each snapshot holds a full copy of the document, so an autosave interval of one minute on a busy document produces a lot of rows. Choose how long snapshots live, what happens to comments and suggestions when a document is deleted, and who is allowed to delete them.

// cleanup.js · run nightly

const Database = require('better-sqlite3');
const db = new Database(dbPath);
const THIRTY_DAYS = 30 * 24 * 60 * 60 * 1000;

// Keep every version a person deliberately named.
// Expire the automatic ones, which is where the volume comes from.
const removed = db.prepare(
  `DELETE FROM versions
   WHERE is_named = 0 AND source = 'auto' AND created_at < ?`
).run(Date.now() - THIRTY_DAYS);

console.log(`Pruned ${removed.changes} autosaved versions`);

Guard the edges

Rate-limit both WebSocket connections per user and REST writes per document, since a client bug can otherwise turn into a write loop against your database. Validate docId against a strict character allow-list before it reaches a route, because it flows into URL paths and database keys. Keep the body limit generous enough for your largest realistic document but not unlimited. And know that the relay silently drops any single message larger than 1 MB, which is worth logging on the client if you expect users to paste very large content.

// server.js · register before attachRoutes

const rateLimit = require('express-rate-limit');

// docId flows into URL paths and database keys. Validate it early
// and reject anything that is not plainly a document name.
const DOC_ID = /^[A-Za-z0-9][A-Za-z0-9_-]{0,63}$/;

app.use('/collab/:docId', (req, res, next) => {
  if (!DOC_ID.test(req.params.docId)) {
    return res.status(400).json({ error: 'invalid docId' });
  }
  next();
});

// Reads are cheap. Writes are what a client bug turns into a loop.
const writes = rateLimit({
  windowMs: 60_000,
  limit: 120,
  // Budget per person per document, not per IP, so one busy office
  // behind one address does not throttle itself.
  keyGenerator: (req) => `${req.user.id}:${req.params.docId}`,
});

app.use('/collab/:docId', (req, res, next) =>
  req.method === 'GET' ? next() : writes(req, res, next)
);

 Do not hand out database errors

When something goes wrong at the storage layer, the endpoints answer with a 500 whose error field carries the underlying SQLite message. That is helpful in development and a small gift to anyone probing your application in production, because it names tables and columns. Mask it at the edge and keep the detail in your logs.

// Register before attachRoutes so it wraps the SDK's own responses.
app.use('/collab/:docId', (req, res, next) => {
  const send = res.json.bind(res);

  res.json = (body) => {
    if (res.statusCode >= 500) {
      console.error('collab %s %s', req.method, req.originalUrl, body);
      return send({ error: 'server error' });
    }
    return send(body);
  };

  next();
});

Send images to storage, not into the document

This one connects two limits that look unrelated. An image pasted or dropped into the editor without an upload target is embedded in the HTML as a data URI. That inflates every version snapshot, pushes requests against your body limit, and can produce a single sync message above the relay’s 1 MB ceiling, at which point the message is silently dropped and peers simply never see the paragraph. Configuring uploads turns the image into a short link and the problem disappears.

new FroalaEditor('#editor', {
  // Your endpoint stores the file and returns { "link": "https://..." }
  imageUploadURL: 'https://collab.example.com/upload/image',

  // Client-side hints that improve the error message. The server
  // still has to validate size and type for itself.
  imageMaxSize: 5 * 1024 * 1024,
  imageAllowedTypes: ['jpeg', 'png', 'gif', 'webp'],

  events: {
    'image.error': function (error) {
      console.warn('Image upload failed', error);
    },
  },
});

Expect restarts to disconnect everyone

Room state lives in process memory, so a deploy ends every session on that instance at once. Nothing is lost if your persistence URLs are configured and clients reconnect, but an abrupt close is a poor experience. Tell peers first, then stop accepting connections.

process.on('SIGTERM', () => {
  // 1001 is "going away". Clients reconnect after reconnectDelay.
  for (const client of wss.clients) client.close(1001, 'server restarting');

  // Stop taking new work and exit once open requests finish.
  server.close(() => process.exit(0));

  // Do not hang forever on a stuck connection.
  setTimeout(() => process.exit(1), 10000).unref();
});

Roll one instance at a time rather than all at once, and if you are running with session affinity, remember that draining an instance moves its documents to a different process. Peers reconnect into a fresh empty room, which is exactly the situation step 7 covers, so the starting content path has to be solid before you rely on rolling deploys.

Running it in a container

Two details bite here. better-sqlite3 compiles against the Node version in the image, so a mismatch between build and runtime produces a module that will not load. And a SQLite file written to the container filesystem is deleted with the container, which is a very quiet way to lose every comment on your first redeploy.

#Dockerfile
FROM node:22-bookworm-slim

# Needed only if no prebuilt binary matches this platform.
RUN apt-get update \
 && apt-get install -y --no-install-recommends python3 make g++ \
 && rm -rf /var/lib/apt/lists/*

WORKDIR /app
COPY package*.json ./
RUN npm ci --omit=dev
COPY . .

# The database must outlive the container. Mount a real volume here.
VOLUME ["/app/data"]

EXPOSE 3000
CMD ["node", "server.js"]

On a platform with an ephemeral filesystem and no volume support, that is your signal to move the REST stores to a managed database rather than fighting the platform.

See it working before you build it

Froala’s collaborative editing demo puts two editors side by side on one document, or gives you an invite link to open in a second window. Type on one side and watch cursors, comments, suggestions, and version history appear on the other.

It is also a live illustration of the central lesson here. The demo runs on an ephemeral relay with no persistence behind it, so everything is discarded the moment the last participant closes their tab. That is the relay alone, doing precisely what it is designed to do. Steps 3 and 7 of this guide are what you add to make it survive.

Get the code

Fork this CodeSandbox to see the full server file or use it as a starting point for your own backend instead of assembling the pieces from scratch.


graphical user interface, text

How to Bind an Angular Rich Text Editor to Reactive Forms

Angular rich text editor with Reactive Forms integration using Froala

Your Angular text editor might be used to create blog posts, product descriptions, email templates, or support tickets. For that, your users need formatting options such as bold text, links, and bullet lists. A plain <textarea> won’t cover it. And FormControl doesn’t care what’s inside the string it’s holding.

Wiring a rich text editor into that setup sounds like it should be painful. For the basic case, it isn’t. The Froala Angular wrapper implements ControlValueAccessor, so you can put formControlName directly on an element with [froalaEditor] and it behaves like any other control.

What most write-ups skip is everything after that first win:

  • How do you validate content that’s actually HTML?
  • What happens when you call disable() on the control? (Not what you’d expect.)
  • Can you reuse the field across more than one form without copy-pasting config everywhere?

This article covers all three. One assumption going in: you already have angular-froala-wysiwyg installed. If not, start with the Angular integration guide for the install and module setup. This picks up right after that, and it’s specifically about reactive forms, not the ngModel / template-driven route.

Prerequisites

Before you start, make sure you have:

An Angular 19 or later project. The angular-froala-wysiwyg README states Angular 19+ bindings. Note that the package declares no peerDependencies on @angular/core, so npm won’t warn you if you’re on something older — you’ll find out at build time. Froala provides a separate legacy integration for Angular 4–9.

The Froala Angular wrapper installed. Install the wrapper with npm:

npm install angular-froala-wysiwyg

You don’t need to install froala-editor separately. The wrapper declares it as an exact direct dependency:

"dependencies": { "froala-editor": "5.4.0", "tslib": "^2.3.0" }

Installing froala-editor yourself with a different version will just create a duplicate in node_modules. The examples here were written against angular-froala-wysiwyg@5.4.0, which pulls in froala-editor@5.4.0.

The Froala stylesheets registered in angular.json:

"styles": [ "src/styles.css", 
"node_modules/froala-editor/css/froala_editor.pkgd.min.css", 
"node_modules/froala-editor/css/froala_style.min.css" ]

ReactiveFormsModule imported wherever your form lives.

A note on module imports

Angular 19+ uses standalone components by default, so the examples below follow that approach. In a standalone component, add ReactiveFormsModule, FroalaEditorModule, and FroalaViewModule to the component’s imports array.

Both Froala modules also expose a .forRoot(), and you’ll see it in a lot of older tutorials. You can skip it. As of 5.4.0, it returns an empty providers array:

public static forRoot(): ModuleWithProviders<FroalaEditorModule> {
  return { ngModule: FroalaEditorModule, providers: [] };
}

There are no providers to register, so importing the plain modules is enough. (You couldn’t put .forRoot() in a standalone imports array anyway — that array accepts components, directives, pipes, and NgModule classes, not the ModuleWithProviders object .forRoot() returns.)

If your application still uses NgModules, FroalaEditorModule and FroalaViewModule go in your NgModule’s imports, with or without .forRoot().

Step 1: Build the FormGroup

This step is not Froala-specific. It’s a regular FormGroup, and body is just a control that happens to hold an HTML string instead of plain text.

import { Component, inject } from '@angular/core';
import { FormBuilder, ReactiveFormsModule } from '@angular/forms';
import { Validators } from '@angular/forms';
import { FroalaEditorModule, FroalaViewModule } from 'angular-froala-wysiwyg';
import { richTextRequired, richTextMinLength } from './rich-text.validators';

@Component({
  selector: 'app-post-editor',
  imports: [ReactiveFormsModule, FroalaEditorModule, FroalaViewModule],
  templateUrl: './post-editor.component.html'
})
export class PostEditorComponent {
  private fb = inject(FormBuilder);

  protected submitted = false;

  protected form = this.fb.nonNullable.group({
    title: ['', Validators.required],
    body: ['', [richTextRequired, richTextMinLength(20)]]
  });

  protected editorOptions = {
    placeholderText: 'Write your post…',
    heightMin: 300,
    toolbarButtons: [
      'bold', 'italic', 'underline', 'formatOL', 'formatUL', 'insertLink'
    ],
    // Applied to the editable region Froala generates, not the host element.
    attributes: {
      'aria-labelledby': 'body-label'
    }
  };

  protected onSubmit() {
    this.submitted = true;
    if (this.form.invalid) {
      return;
    }
    console.log(this.form.getRawValue());
  }
}

Two things in there are worth explaining.

inject() sits above form rather than being a constructor parameter. With useDefineForClassFields — which Angular’s default ES2022 target enables — class fields are initialized before parameter properties are assigned. So if fb came from constructor(private fb: FormBuilder), the form initializer would read it before it exists and throw. Declaring fb as its own field with inject() sidesteps that.

fb.nonNullable.group() rather than fb.group(). By default, FormControl is nullable and reset() sets it back to null. That null is passed straight through to Froala’s html.set(). Making the group non-nullable means reset() returns each control to its initial value ('' here), which is what you want. It also gives you form.controls.body.value typed as a plain string.

Note that the value will look like <p>Hello <strong>world</strong></p>, not plain text. That’s why Validators.minLength and Validators.required aren’t used on body — more on that below.

Step 2: Bind Froala with formControlName

This is the part everyone actually comes here for. It’s almost anticlimactic.

<form [formGroup]="form" (ngSubmit)="onSubmit()">
  <label for="title">Post title</label>
  <input id="title" formControlName="title" />

  <span id="body-label">Post content</span>
  <div [froalaEditor]="editorOptions" formControlName="body"></div>

  @if (form.controls.body.invalid && (form.controls.body.dirty || submitted)) {
    <p class="error">Post content is required.</p>
  }

  <button type="submit">Publish</button>
</form>

[froalaEditor] turns the element into a Froala instance. formControlName="body" hooks it into the form the same way it would hook up a native input. There’s no glue code because the directive already implements ControlValueAccessor — writeValue, registerOnChange, and registerOnTouched are handled inside it. (A <textarea> works here too if you prefer; Froala’s own docs use a <div>.)

Three details here are deliberate.

The label is wired up through the editor options, not the host element. Froala builds its own editable region in the DOM; the element you put [froalaEditor] on is not the element the user types into. Putting aria-labelledby on the host is therefore not reliable — it may not land on the node the accessibility tree actually exposes. Froala’s attributes option applies them to the generated editable region instead, which is why the aria-labelledby lives in editorOptions above. If there’s no visible label element to point at, use the ariaLabel option with a string instead. Either way, check the result in your browser’s accessibility tree before you ship it.

The error is gated on dirty || submitted, not touched. This is a quirk worth knowing about. The directive wires registerOnTouched to Froala’s mousedown event, not to blur. So the control is marked touched the instant the user clicks into the editor — before they’ve typed anything or moved away. Gating a “this field is required” message on touched means it appears the moment they click in. The wrapper component later in this article fixes the underlying behavior; until then, dirty plus a submitted flag is the reliable gate.

The submit button isn’t disabled on form.invalid. A disabled submit button gives the user nothing to act on. Letting them submit and then showing the errors is better.

Step 3: Reading the Value Elsewhere in the Template

If you want a live preview, a character count outside the form, or anything else that reads the content, read the control directly. You do not need froalaModel for this:

<div class="preview">
  <div [froalaView]="form.controls.body.value"></div>
</div>

Because the group is non-nullable, form.controls.body.value is typed as string and needs no fallback.

If you go through form.value instead, you will need one:

<div [froalaView]="form.value.body ?? ''"></div>

A FormGroup‘s .value getter excludes any control that’s currently disabled, so with typed reactive forms the property type is string | undefined even when you know the control is enabled right now. [froalaView] expects a plain string. Reading form.controls.body.value avoids the whole issue.

What not to do

You’ll see this pattern suggested. It doesn’t work:

<!-- Don't do this -->
<div [froalaEditor] formControlName="body" [(froalaModel)]="form.value.body"></div>

form.value returns the FormGroup’s internal value snapshot. Assigning form.value.body = $event mutates that object directly, and Angular overwrites it on the next internal update — so the write silently disappears. It also creates a second, competing write path alongside formControlName.

If you genuinely need froalaModel alongside formControlName, bind it to a real component field:

<div [froalaEditor] formControlName="body" [(froalaModel)]="previewHtml"></div>

A note on update frequency

The directive syncs the model on Froala’s contentChanged event, which fires as the user types. There’s also an immediateAngularModelUpdate option, off by default, that adds a keyup listener on top of that. On longer documents, it can visibly cost you performance, because change detection re-runs on every character. Turn it on deliberately, not out of habit.

How to Validate Rich Text Content in Angular Reactive Forms

Here’s a gotcha that’s easy to miss. Validators.required doesn’t reliably catch an empty rich text editor. Froala returns HTML such as <p><br></p> when no visible content remains, and Angular’s required validator sees a non-empty string.

The obvious fix — strip all tags with a regex and check what’s left — has its own bug: a post containing only an image, a table, or an embedded video would be treated as empty. For a rich text editor, that’s not an edge case.

Parse the HTML instead, and check for both text and embedded content. These validators rely on DOMParser, which is a browser API, so they skip validation when it isn’t available rather than assuming they’re always running in a browser — see the SSR section for why:

// rich-text.validators.ts
import { AbstractControl, ValidationErrors, ValidatorFn } from '@angular/forms';

const EMBEDDED_CONTENT = 'img, video, audio, iframe, embed, object, table, hr';

/** DOMParser is browser-only, so these validators no-op during SSR. */
function canParseHtml(): boolean {
  return typeof DOMParser !== 'undefined';
}

function parseBody(html: unknown): HTMLElement | null {
  if (typeof html !== 'string' || html.length === 0) {
    return null;
  }
  return new DOMParser().parseFromString(html, 'text/html').body;
}

function textContentOf(body: HTMLElement | null): string {
  // &nbsp; becomes U+00A0 once parsed, so normalise it before trimming.
  return (body?.textContent ?? '').replace(/\u00a0/g, ' ').trim();
}

export function richTextRequired(
  control: AbstractControl
): ValidationErrors | null {
  if (!canParseHtml()) {
    return null; // Re-runs in the browser once the client form is created.
  }

  const body = parseBody(control.value);
  const hasText = textContentOf(body).length > 0;
  const hasEmbed = body?.querySelector(EMBEDDED_CONTENT) != null;

  return hasText || hasEmbed ? null : { required: true };
}

export function richTextMinLength(min: number): ValidatorFn {
  return (control: AbstractControl): ValidationErrors | null => {
    if (!canParseHtml()) {
      return null;
    }

    const length = textContentOf(parseBody(control.value)).length;
    if (length === 0 || length >= min) {
      return null; // Let richTextRequired own the empty case.
    }
    return {
      richTextMinLength: { requiredLength: min, actualLength: length }
    };
  };
}

Both are used like any other Angular validator, as shown in Step 1:

body: ['', [richTextRequired, richTextMinLength(20)]]

richTextMinLength counts visible characters, not markup, so a 20-character minimum means 20 characters the reader can actually see. For a word count instead, split the normalized text on whitespace and check the resulting array length.

Neither validator is a substitute for validating the submitted HTML on your server. Treat both as UI affordances.

If you only need to display a character count rather than validate against it, Froala has a built-in character counter. See the Angular character-counter tutorial.

How to Track Editor Changes with valueChanges

Because body is a regular FormControl, you can subscribe to its valueChanges observable. This is useful for autosaving drafts without relying on Froala-specific events.

import { Component, inject } from '@angular/core';
import { takeUntilDestroyed } from '@angular/core/rxjs-interop';
import { debounceTime, distinctUntilChanged } from 'rxjs/operators';

export class PostEditorComponent {
  // ...fb, form, and onSubmit from Step 1...

  constructor() {
    this.form.controls.body.valueChanges
      .pipe(
        debounceTime(500),
        distinctUntilChanged(),
        takeUntilDestroyed()
      )
      .subscribe(html => this.saveDraft(html));
  }

  private saveDraft(html: string) {
    // Send the draft to your API.
  }
}

debounceTime(500) waits until changes have paused for half a second before calling saveDraft(), and distinctUntilChanged() prevents consecutive duplicate values from triggering another save.

takeUntilDestroyed() is doing real work here. Without it, the subscription outlives the component and keeps firing saves against a destroyed instance. Calling it with no arguments requires an injection context, which is why the setup lives in the constructor rather than ngOnInit. (The form field initializer runs before the constructor body, so this.form is already there.)

Updating and Resetting the Editor Through the Form

Once Froala is bound with formControlName, you can update its value with the same reactive forms APIs you use everywhere else.

To load existing content, for example, when editing a saved post:

this.form.patchValue(
  { title: post.title, body: post.bodyHtml },
  { emitEvent: false }
);

{ emitEvent: false } matters if you set up the autosave above. patchValue emits valueChanges by default, so without it, loading a post immediately fires a draft save of content you just loaded.

To reset:

this.form.reset();

Because the group was built with fb.nonNullable, this returns each control to its initial value rather than null. If you’re using a nullable group instead, pass the values explicitly:

this.form.reset({ title: '', body: '' });

Otherwise, null reaches Froala’s html.set().

Why disable() Doesn’t Disable the Editor

This is the one that catches people out.

this.form.controls.body.disable();

Angular marks the control disabled, drops it from form.value, and skips its validators. The editor itself carries on as normal — full toolbar, fully typeable.

The reason is in the wrapper. setDisabledState is the ControlValueAccessor method Angular calls when a control’s disabled state changes, and in angular-froala-wysiwyg@5.4.0 it looks like this:

setDisabledState(isDisabled: boolean): void {
}

An empty body. It exists to satisfy the interface and does nothing.

You have two options. The quick one is to reach for the editor instance and call Froala’s Edit API directly (editor.edit.off() and editor.edit.on()) whenever you toggle the control. That works, but you now have two places to keep in sync, and it’s exactly the copy-paste problem the next section solves.

Wrapping Froala in a Reusable Form Control

If you use a rich text field in more than one form — and most applications do — wrap it in a component of your own that implements ControlValueAccessor. You get one place to configure the editor, a working setDisabledState, and touched that fires on blur like every other Angular control.

// rich-text-control.component.ts
import { Component, Input, OnInit, forwardRef } from '@angular/core';
import { ControlValueAccessor, NG_VALUE_ACCESSOR } from '@angular/forms';
import { FroalaEditorModule } from 'angular-froala-wysiwyg';

/** The manual controller emitted by the directive's (froalaInit) output. */
interface FroalaControls {
  initialize: () => void;
  destroy: () => void;
  getEditor: () => any;
}

/**
 * Run our own handler, then whatever the caller passed for the same event.
 * Froala invokes event callbacks with `this` bound to the editor instance and
 * treats a `false` return as "cancel", so both are forwarded unchanged.
 */
function chain(
  original: unknown,
  ours: () => void
): (...args: unknown[]) => unknown {
  const callerHandler = typeof original === 'function' ? original : null;

  return function (this: unknown, ...args: unknown[]) {
    ours();
    return callerHandler?.apply(this, args);
  };
}

@Component({
  selector: 'app-rich-text-control',
  imports: [FroalaEditorModule],
  providers: [{
    provide: NG_VALUE_ACCESSOR,
    useExisting: forwardRef(() => RichTextControlComponent),
    multi: true
  }],
  template: `
    <div
      [froalaEditor]="mergedOptions"
      [froalaModel]="value"
      (froalaModelChange)="onModelChange($event)"
      (froalaInit)="onFroalaInit($event)">
    </div>
  `
})
export class RichTextControlComponent implements ControlValueAccessor, OnInit {
  @Input() options: Record<string, unknown> = {};

  protected value = '';
  protected mergedOptions: Record<string, unknown> = {};

  private controls?: FroalaControls;
  private isDisabled = false;

  private propagateChange: (value: string) => void = () => {};
  private propagateTouched: () => void = () => {};

  ngOnInit(): void {
    const events = (this.options['events'] as Record<string, unknown>) ?? {};

    this.mergedOptions = {
      ...this.options,
      events: {
        ...events,
        // The editor is created asynchronously, so apply any disabled state
        // that arrived before it existed.
        initialized: chain(events['initialized'], () => this.applyDisabledState()),
        // Mark touched on blur, the way a native control behaves.
        blur: chain(events['blur'], () => this.propagateTouched())
      }
    };
  }

  protected onFroalaInit(event: Object): void { 
   // Froala exposes the event as Object, so cast it to our controller type. const controls = event as FroalaControls; this.controls = controls; controls.initialize(); }

   protected onModelChange(html: string): void {
    this.value = html;
    this.propagateChange(html);
  }

  // --- ControlValueAccessor ---

  writeValue(html: string | null): void {
    this.value = html ?? '';
  }

  registerOnChange(fn: (value: string) => void): void {
    this.propagateChange = fn;
  }

  registerOnTouched(fn: () => void): void {
    this.propagateTouched = fn;
  }

  setDisabledState(isDisabled: boolean): void {
    this.isDisabled = isDisabled;
    this.applyDisabledState();
  }

  private applyDisabledState(): void {
    const editor = this.controls?.getEditor();
    if (!editor?.edit) {
      return; // Not created yet — the initialized event will re-apply this.
    }
    this.isDisabled ? editor.edit.off() : editor.edit.on();
  }
}

Three things to watch when you adapt this.

The wrapper needs initialized and blur for itself, so it chains rather than replaces. Spreading the caller’s events and then assigning those two keys would silently discard any handler passed in through [options] — a nasty surprise in a component whose whole job is to be reused. chain() runs the wrapper’s handler first, then the caller’s, preserving Froala’s this binding and return value. If you add more events to the wrapper later, route them through chain() too.

Binding (froalaInit) changes the directive’s behaviour. It stops creating the editor for you and hands you a controller instead. If you bind the output and never call controls.initialize(), no editor appears. The directive types the (froalaInit) event as Object, so the handler casts it to the local FroalaControls interface before using initialize() and getEditor().

The editor is loaded through a dynamic import(). getEditor() returns null until initialization finishes, so applyDisabledState() bails out safely and gets called again from the initialized event.

Usage is then the same as any built-in control:

<app-rich-text-control
  formControlName="body"
  [options]="editorOptions" />

And this now does what you’d expect:

this.form.controls.body.disable();

Sanitize the HTML Before You Store or Render It

The editor’s output is user-supplied HTML, and the [froalaView] directive assigns it straight to innerHTML:

@Input() set froalaView(content: string) {
  this._element.innerHTML = content;
}

That’s a direct assignment, which bypasses Angular’s DomSanitizer—unlike Angular’s own [innerHTML] binding, which sanitizes. Whatever the editor produces is rendered as-is.

Render unsanitized HTML only when the value is known to be trusted. Content loaded from storage, an API, a collaboration session, or another user should be treated as untrusted — including in a preview pane. The preview in Step 3 is safe only because that specific value came from the editor the current user is typing into right now; swap in patchValue() from a saved post and it isn’t.

Sanitize on the server before you persist, using a maintained HTML sanitizer with an allowlist that matches the toolbar you’ve configured. Client-side sanitizing is a nice-to-have; server-side is the one that counts, because your API is what an attacker will call.

A Note on SSR

Reactive forms are server-safe, and as of 5.4.0 the Froala directive handles SSR itself. It guards initialization with isPlatformBrowser and loads froala-editor through a dynamic import(), so the editor package never executes during server rendering. You don’t need to gate the component.

What still needs care is your own browser-dependent code. The validators above use DOMParser, which doesn’t exist on the server, which is why they check for it and return null when it’s missing. A control that skips validation during server rendering is validated again as soon as the client bootstraps and builds its own form, so nothing reaches the user unvalidated.

If you’d rather validate during server rendering too, swap canParseHtml() for a parser that runs in both environments and give the validators a Node-side implementation. Either way, validate the submitted HTML on your server as well — client-side validators are a UX affordance, not a gate.

For anything that must run after the DOM exists, current Angular versions provide afterNextRender() and afterEveryRender(); neither runs during server rendering. For a complete setup, see the Froala Angular SSR tutorial.

FAQ

Does Froala’s Angular editor support reactive forms?

Yes. Add formControlName to the element using [froalaEditor]. The directive implements ControlValueAccessor, so no adapter code is needed for basic usage.

Why does Validators.required still pass on an empty editor?

Froala returns non-empty HTML, such as an empty paragraph, when no visible content remains, and Validators.required only checks that the string isn’t empty. Use a validator that parses the HTML and checks for real text or embedded content.

Why doesn’t disable() disable the editor?

Because setDisabledState in angular-froala-wysiwyg is an empty method. Wrap the editor in your own ControlValueAccessor component that calls Froala’s edit.off() / edit.on(), as shown above.

Why does my “required” error appear as soon as I click into the editor?

The directive marks the control as touched on mousedown rather than on blur. Gate the message on dirty and a submitted flag, or use the wrapper component, which marks touched on the editor’s blur event.

Can I use both formControlName and [(froalaModel)] together?

Yes, but bind froalaModel to a component field, not to form.value.body. Writing to form.value mutates a snapshot Angular replaces on its next update.

Do I need to install froala-editor separately?

No. angular-froala-wysiwyg declares it as an exact direct dependency and installs it for you.

Wrapping Up

You don’t need any adapter code to bind the Froala rich text editor to Angular reactive forms for the basic case. Add formControlName to the element using [froalaEditor], and the editor behaves like any other control: patchValue() loads content, valueChanges reports edits, reset() clears it.

Two things are different from a plain text input, and both come down to the same cause — the value is HTML, and the editor is a third-party widget rather than a native element. Validation has to account for markup, so Validators.required and Validators.minLength need HTML-aware replacements. And disable() doesn’t reach the editor, because the wrapper’s setDisabledState is a no-op.

If you’re using a rich text field in more than one form, the wrapper component above is worth the extra file. It gives you one place to configure the editor, a disable() that works, and touched-on-blur semantics for every form that uses it.

Get the complete example from our GitHub repo. For more configuration options and events, see the Angular integration documentation. If you haven’t installed Froala yet, you can start a free trial and try the examples in your own project. For additional Angular resources, visit the Angular Rich Text Editor page.

graphical user interface, text

Stream AI Answers Into Froala Through Your Own Server

Stream AI Answers

You have probably used an AI chat app where the answer types itself out one word at a time. It feels quick and alive. Now compare that to an app where you ask a question, stare at a spinner for nine seconds, and then the whole answer drops in at once. Same answer, same speed, completely different feeling.

Froala’s AI Chat panel has supported typing-out functionality since v5.4.0. This tutorial focuses on building a production-ready version that streams answers word by word, secures your API key on your server, and includes a Cancel button that genuinely cancels all the way back to the provider.

AI Stream

What we are building

Three pieces talking to each other:

   Browser                    Your Node server              AI provider
  (Froala AI Chat)                (the proxy)                  (Groq)
        │                              │                          │
        │  POST /ai/stream             │                          │
        ├─────────────────────────────►│  POST /chat/completions  │
        │                              ├─────────────────────────►│
        │                              │            🔑 key added   │
        │   data: {"delta":"Hello"}    │   data: {...}            │
        │◄─────────────────────────────┤◄─────────────────────────┤
        │   data: {"delta":" there"}   │   data: {...}            │
        │◄─────────────────────────────┤◄─────────────────────────┤
        │   data: {"done":true}        │                          │
        │◄─────────────────────────────┤                          │

By the end you will have:

  • A working server.js that streams and keeps your key safe
  • A working index.html with a real Froala editor in it
  • A Cancel button that stops the AI provider, not just the display
  • Timeouts that behave sensibly, including behind a reverse proxy like nginx
  • A practice mode so you can test all of this without an API key at all

This tutorial uses Groq because it is fast, free to start, and its API is OpenAI-compatible, meaning the exact same code works for OpenAI by changing one URL. There is a section near the end on swapping to Gemini or Claude.

Step 1: Set up the project

Open your terminal and run these four commands one at a time:

mkdir froala-ai-streaming

cd froala-ai-streaming

npm init -y

npm install express cors

What each one does:

  • mkdir makes a new folder, cd moves you into it. Everything from here happens inside this folder.
  • npm init -y creates a package.json file. Think of it as the project’s ID card: it records which packages your project uses. The -y just says “yes” to all the setup questions so you are not prompted.
  • npm install express cors downloads two small packages:
    • express is a tiny web server. It handles the boring parts of listening for requests so you can write the interesting parts.
    • cors grants your web page permission to talk to your server. Browsers block cross-origin requests by default as a security measure, and cors is how you say “this one is fine.”

Versions used when writing this: express 5.2.1, cors 2.8.6, Node 22. The code also works on Node 18+ and express 4.

Step 2: Understand the format before writing any code

One concept first, because everything after it becomes obvious once you have this.

When an AI provider streams an answer, it does not send you a JSON object. It sends a long response that dribbles in over time, made of lines that look like this:

data: {"choices":[{"delta":{"content":"Hello"}}]}

data: {"choices":[{"delta":{"content":" there"}}]}

data: [DONE]

This is called Server-Sent Events, or SSE. Two things define it:

  1. Every message starts with data: and ends with a blank line. The blank line is the “message over” marker, and it is not optional.
  2. The connection stays open the whole time. Normal HTTP is a question and an answer. SSE is more like a one-way radio broadcast: the server keeps talking, and the listener keeps listening until the server signs off.

Our server is going to do two SSE jobs at once:

  • Read the provider’s SSE stream as it arrives
  • Write its own, much simpler SSE stream out to the browser

Why translate instead of just forwarding?

You might reasonably ask why we do not just pipe the provider’s messages straight through. The answer is that it would leak the provider’s shape into your frontend. Your browser code would have to know that Groq puts text at choices[0].delta.content. The day you switch to Gemini, where it lives at candidates[0].content.parts[0].text, you would have to change your frontend too, redeploy it, and re-test it.

By translating on the server, the browser only ever sees your format. Switching providers becomes a change to one file that your frontend never notices.

Our format has exactly three kinds of message:

data: {"delta":"Hello"}                     ← a piece of the answer
data: {"done":true,"webSearchUsed":false}   ← the answer is finished
data: {"error":"AI request failed"}         ← something went wrong

Simple enough to hold in your head. That is the point.

Step 3: Build the server, piece by piece

I am going to show you the server in four chunks so you can see what each part is for, then give you the complete file to copy.

3.1 The setup and the SSE headers

const express = require('express');
const cors = require('cors');
const path = require('path');

const app = express();

app.use(cors());                                 // let a browser page call this server
app.use(express.json({ limit: '25mb' }));        // parse JSON bodies; file context can be large
app.use(express.static(path.join(__dirname)));   // also serve index.html from this same folder

app.post('/ai/stream', async (req, res) => {
  // Tell the browser: this is a stream, not a normal one-and-done response
  res.setHeader('Content-Type', 'text/event-stream');
  res.setHeader('Cache-Control', 'no-cache, no-transform');
  res.setHeader('Connection', 'keep-alive');
  res.setHeader('X-Accel-Buffering', 'no');
  res.flushHeaders();

Why these headers matter:

  • The text/event-stream is the official SSE content type, informing browsers and proxies that the response will be delivered in fragments.
  • no-transform asks intermediaries not to “helpfully” rewrite or compress the body. Compression is the enemy of streaming, because compressors like to buffer.
  • X-Accel-Buffering: no is a specific instruction to nginx meaning “do not hold this back.” We will come back to this in the timeouts section, because it is the single most common reason streaming works locally and then breaks in production.
  • res.flushHeaders() sends the headers immediately rather than waiting for the first chunk of body. This is what makes the connection open right away.

Notice express.static too. It serves index.html from the same folder, so your page and your API live at the same address. That sidesteps a whole category of beginner CORS pain, and it also matches how you would deploy for real.

3.2 The abort chain (the part that saves you money)

  const send = (payload) => {
    if (!res.writableEnded) res.write(`data: ${JSON.stringify(payload)}\n\n`);
  };

  const upstream = new AbortController();
  let finished = false;

  res.on('close', () => {
    if (!finished) {
      console.log('Client hung up — cancelling the provider request.');
      upstream.abort();
    }
  });

An AbortController is a remote stop button for an in-flight request. You create one, hand its .signal to fetch, and later calling .abort() cancels that fetch wherever it has got to.

res.on('close') fires when the browser hangs up. That happens when the user clicks Cancel in the chat panel, closes the tab, or their wifi drops. Without this listener, your server would happily keep receiving an answer nobody will ever read, and your provider would keep billing you for every token of it.

The finished flag exists because close also fires after a completely normal, successful ending. Without the flag you would fire a pointless abort every single time.

The send helper does two jobs: it formats valid SSE (note the two \n characters, which create that mandatory blank line), and it checks writableEnded so you never try to write to a connection that is already gone.

3.3 The heartbeat and the idle watchdog

  const IDLE_TIMEOUT_MS = 30000;
  const HEARTBEAT_MS = 15000;

  // Send a tiny "still here" comment so idle-timeout proxies don't kill us
  const heartbeat = setInterval(() => {
    if (!res.writableEnded) res.write(': keep-alive\n\n');
  }, HEARTBEAT_MS);

  // A kitchen timer we reset every time we hear from the provider
  let idleTimer = null;
  let timedOut = false;
  const touch = () => {
    clearTimeout(idleTimer);
    idleTimer = setTimeout(() => {
      timedOut = true;
      upstream.abort();
    }, IDLE_TIMEOUT_MS);
  };

  const cleanup = () => {
    clearInterval(heartbeat);
    clearTimeout(idleTimer);
  };

Two different problems, two different tools.

The heartbeat mechanism addresses connection timeouts that occur when infrastructure (e.g., nginx, load balancers, Cloudflare) terminates quiet connections. Models sometimes think for 10–20 seconds before producing a single token. To a load balancer, thinking looks identical to being dead. So every 15 seconds we write : keep-alive. A line starting with : is an SSE comment. This comment counts as traffic, and is ignored by the browser because it does not start with data:.

The idle watchdog solves the opposite problem: the provider accepts your request and then goes silent forever. Node’s built-in fetch has no default timeout, so without this your server would wait indefinitely, holding a connection open for nothing. So we set a 30-second kitchen timer, and every time a chunk arrives we reset it. The timer only fires if the provider genuinely goes quiet.

Note it is an idle timeout, not a total one. A three-minute answer is fine as long as something arrives every 30 seconds. A total timeout would cut off long answers for no good reason.

cleanup() clears both timers. Forgetting this is a real memory leak: an interval that keeps running after the request is gone.

3.4 Talking to the provider and parsing its stream

  const providerResponse = await fetch(PROVIDER_URL, {
    method: 'POST',
    headers: {
      'Content-Type': 'application/json',
      'Authorization': `Bearer ${API_KEY}`
    },
    body: JSON.stringify({
      model: req.body.model || DEFAULT_MODEL,
      messages: [{ role: 'user', content: req.body.prompt }],
      stream: true                       // ← the flag that turns streaming on
    }),
    signal: upstream.signal              // ← our stop button, wired in
  });

  const reader = providerResponse.body.getReader();
  const decoder = new TextDecoder('utf-8');
  let buffer = '';
  let done = false;

  while (!done) {
    const result = await reader.read();
    done = result.done;
    touch();                             // ← we heard something; reset the kitchen timer

    buffer += decoder.decode(result.value || new Uint8Array(), { stream: !done });

    const lines = buffer.split('\n');
    buffer = lines.pop();                // ⚠️ the last line may be cut in half — keep it

    for (const line of lines) {
      const trimmed = line.trim();
      if (!trimmed.startsWith('data:') || trimmed === 'data: [DONE]') continue;

      let parsed;
      try { parsed = JSON.parse(trimmed.slice(5)); } catch { continue; }

      const delta = parsed.choices?.[0]?.delta?.content;
      if (delta) send({ delta });        // forward this piece to the browser right now
    }
  }

This buffer = lines.pop() line deserves a moment, because it is where almost every first attempt breaks.

Data arrives in chunks of whatever size the network felt like, which has nothing to do with where the lines end. You will genuinely receive things like:

data: {"choices":[{"delta":{"content":"Hel

…with the rest arriving 300 milliseconds later. Call JSON.parse on that and it throws.

So: split on newlines, process every complete line, and pop the last one back into buffer because you cannot be sure it finished. Next time round, the remainder gets glued onto it.

Analogy: it is like reading a book where a sentence runs across a page break. You do not try to make sense of the half-sentence at the bottom. You hold onto it until you turn the page.

getReader() is how you read a response body in pieces instead of waiting for all of it. TextDecoder turns raw bytes into text, and { stream: true } tells it “more bytes are coming, so if these end mid-character, hang on to the fragment.” Same idea as the line buffer, one level lower.

3.5 The complete server file

Create a file called server.js in your project folder and paste this in. This is the whole thing, including practice mode and the plain non-streaming route we will discuss in Step 4.

// server.js — a small proxy between Froala and your AI provider.

const express = require('express');
const cors = require('cors');
const path = require('path');

const app = express();

app.use(cors());                                // let a browser page call this server
app.use(express.json({ limit: '25mb' }));       // file context can make request bodies large
app.use(express.static(path.join(__dirname)));  // serve index.html from this same folder

// 🔑 Your key lives here, on the server. Never in the browser.
// Leave it unset to run in practice mode (fake answers, no key needed).
const API_KEY = process.env.GROQ_API_KEY || '';

const PROVIDER_URL = 'https://api.groq.com/openai/v1/chat/completions';
const DEFAULT_MODEL = 'llama-3.1-8b-instant';

const IDLE_TIMEOUT_MS = 30000;  // give up if the provider goes quiet this long
const HEARTBEAT_MS = 15000;     // how often to prove we're still alive

const PRACTICE_MODE = !API_KEY;

// A sleep that wakes up early if the request gets cancelled.
function sleep(ms, signal) {
  return new Promise((resolve, reject) => {
    const timer = setTimeout(resolve, ms);
    signal.addEventListener('abort', () => {
      clearTimeout(timer);
      const error = new Error('Aborted');
      error.name = 'AbortError';
      reject(error);
    }, { once: true });
  });
}

// Fake provider: emits one word at a time so you can test with no API key.
async function practiceStream(signal, onDelta) {
  const words = ('Practice mode is on, so this answer is coming from your own ' +
    'server instead of a real AI provider. Every word you are reading arrived ' +
    'as a separate little message. Try pressing Cancel while this is still ' +
    'typing and watch your terminal.').split(' ');

  for (const word of words) {
    await sleep(120, signal);   // rejects immediately if the user cancelled
    onDelta(word + ' ');
  }
}

// ─── The streaming route: used by the AI Chat panel ──────────────────────────
app.post('/ai/stream', async (req, res) => {
  // 1. Tell everyone in the chain this is a stream
  res.setHeader('Content-Type', 'text/event-stream');
  res.setHeader('Cache-Control', 'no-cache, no-transform');
  res.setHeader('Connection', 'keep-alive');
  res.setHeader('X-Accel-Buffering', 'no');   // stops nginx buffering the stream
  res.flushHeaders();                          // open the connection right now

  // Writes one valid SSE message. The blank line at the end is required.
  const send = (payload) => {
    if (!res.writableEnded) res.write(`data: ${JSON.stringify(payload)}\n\n`);
  };

  // 2. Our stop button for the request going out to the provider
  const upstream = new AbortController();
  let finished = false;
  let timedOut = false;

  // 3. Heartbeat: proves we're alive so proxies don't kill an idle connection
  const heartbeat = setInterval(() => {
    if (!res.writableEnded) res.write(': keep-alive\n\n');
  }, HEARTBEAT_MS);

  // 4. Idle watchdog: a kitchen timer we reset each time the provider speaks
  let idleTimer = null;
  const touch = () => {
    clearTimeout(idleTimer);
    idleTimer = setTimeout(() => {
      timedOut = true;
      upstream.abort();
    }, IDLE_TIMEOUT_MS);
  };

  const cleanup = () => {
    clearInterval(heartbeat);
    clearTimeout(idleTimer);
  };

  // 5. If the browser hangs up (Cancel, closed tab, dropped wifi), stop the provider
  res.on('close', () => {
    if (!finished) {
      console.log('Client hung up — cancelling the provider request.');
      upstream.abort();
    }
    cleanup();
  });

  touch();  // start the watchdog

  try {
    // ---- Practice mode: no key needed, fake words ----
    if (PRACTICE_MODE) {
      await practiceStream(upstream.signal, (delta) => {
        touch();
        send({ delta });
      });
      send({ done: true, webSearchUsed: false });
      finished = true;
      cleanup();
      return res.end();
    }

    // ---- Real mode: ask the provider for a streaming response ----
    const providerResponse = await fetch(PROVIDER_URL, {
      method: 'POST',
      headers: {
        'Content-Type': 'application/json',
        'Authorization': `Bearer ${API_KEY}`
      },
      body: JSON.stringify({
        model: req.body.model || DEFAULT_MODEL,
        messages: [{ role: 'user', content: req.body.prompt }],
        stream: true,   // ← the one flag that turns streaming on
        ...(req.body.webSearchEnabled ? { tools: [{ type: 'browser_search' }] } : {})
      }),
      signal: upstream.signal   // ← wire the stop button into the outgoing request
    });

    if (!providerResponse.ok) {
      const detail = await providerResponse.text();
      console.error('Provider error:', providerResponse.status, detail);
      send({ error: 'The AI provider rejected the request.' });
      finished = true;
      cleanup();
      return res.end();
    }

    // ---- Read the provider's stream piece by piece ----
    const reader = providerResponse.body.getReader();
    const decoder = new TextDecoder('utf-8');
    let buffer = '';
    let webSearchUsed = false;
    let done = false;

    while (!done) {
      const result = await reader.read();
      done = result.done;
      touch();   // we heard something — reset the watchdog

      // Bytes → text, glued onto whatever was left over last round
      buffer += decoder.decode(result.value || new Uint8Array(), { stream: !done });

      const lines = buffer.split('\n');
      buffer = lines.pop();   // ⚠️ last line may be cut in half — save it for next round

      for (const line of lines) {
        const trimmed = line.trim();
        if (!trimmed.startsWith('data:') || trimmed === 'data: [DONE]') continue;

        let parsed;
        try {
          parsed = JSON.parse(trimmed.slice(5));
        } catch {
          continue;   // a malformed line isn't worth killing the whole stream over
        }

        const choice = parsed.choices?.[0];

        // Did the model actually run a web search? Only it can tell us.
        const executedTools = choice?.delta?.executed_tools || choice?.message?.executed_tools;
        if (executedTools && executedTools.length) webSearchUsed = true;

        const delta = choice?.delta?.content;
        if (delta) send({ delta });   // forward this piece to the browser immediately
      }
    }

    // 6. Sign off, and report whether a search actually happened
    send({ done: true, webSearchUsed });
    finished = true;
    cleanup();
    res.end();

  } catch (error) {
    cleanup();

    if (timedOut) {
      console.error('Provider went quiet for too long — gave up.');
      send({ error: 'The AI provider stopped responding.' });
      finished = true;
      return res.end();
    }

    // The user cancelled. The connection is already gone; nothing to report.
    if (error.name === 'AbortError') return;

    console.error(error);
    send({ error: 'AI request failed.' });
    finished = true;
    res.end();
  }
});

// ─── The plain route: used by every other AI feature ─────────────────────────
app.post('/ai', async (req, res) => {
  try {
    if (PRACTICE_MODE) {
      return res.json({ answer: 'Practice mode: this is a fake non-streaming answer.' });
    }

    const providerResponse = await fetch(PROVIDER_URL, {
      method: 'POST',
      headers: {
        'Content-Type': 'application/json',
        'Authorization': `Bearer ${API_KEY}`
      },
      body: JSON.stringify({
        model: req.body.model || DEFAULT_MODEL,
        messages: [{ role: 'user', content: req.body.prompt }]
        // note: no `stream: true` here — we want the whole answer at once
      }),
      signal: AbortSignal.timeout(IDLE_TIMEOUT_MS)   // built-in one-line timeout
    });

    const data = await providerResponse.json();
    res.json({ answer: data.choices?.[0]?.message?.content || '' });
  } catch (error) {
    console.error(error);
    res.status(500).json({ error: 'AI request failed.' });
  }
});

app.listen(3000, () => {
  console.log('AI server running on http://localhost:3000');
  if (PRACTICE_MODE) {
    console.log('PRACTICE MODE: no GROQ_API_KEY found, serving fake answers.');
  }
});

Step 4: Why there are two routes

You may have noticed the second, much shorter route at the bottom. That is deliberate, and skipping it causes a confusing bug later.

The AI Chat panel streams. But the AI Assist plugin bundles several other features, and they all share the same aiAssistRequest connection:

Feature Streams?
AI Chat panel Yes
AI Assist prompt popup No
AI Shortcuts (tone, translate) No
Improve Writing No
Inline suggestions (ghost text) No

Froala tells you which kind it wants by whether it passes a third argument. One function handles both cases, so your server needs both routes to send it to. Build only the streaming one and Improve Writing will quietly fail.

Heads up about inline suggestions. They are on by default (inlineSuggestions), and they fire a request every time the user pauses typing. That is a lot of small hits on your proxy. After the demo phase, consider routing these requests, identifiable by an autoComplete field, to a more cost-effective, smaller model.

Step 5: Start the server (no API key required yet)

node server.js

You should see:

AI server running on http://localhost:3000
PRACTICE MODE: no GROQ_API_KEY found, serving fake answers.
node start

Practice mode is on because you have not set a key yet, and that is exactly what we want right now. It emits fake words on a timer, one every 120ms. That is enough to prove the streaming plumbing, the Cancel button, and the abort chain all work, before you spend a single token or debug a single API error. Once everything works, you add the key and nothing else changes.

Step 6: Build the editor page

Create index.html in the same folder as server.js.

<!DOCTYPE html>
<html lang="en">
<head>
  <meta charset="utf-8">
  <title>Froala AI Chat — streaming through your own server</title>

  <!-- Froala's stylesheet -->
  <link href="https://cdn.jsdelivr.net/npm/froala-editor@latest/css/froala_editor.pkgd.min.css" rel="stylesheet">

  <style>
    body { font-family: system-ui, sans-serif; max-width: 1000px; margin: 40px auto; padding: 0 16px; }
  </style>
</head>
<body>

  <h1>Froala AI Chat (streaming proxy demo)</h1>

  <!-- Froala replaces this div with the editor -->
  <div id="editor">
    <p>Open the AI Chat panel and ask it something. The answer should type itself out.</p>
  </div>

  <!-- The "pkgd" bundle includes every plugin, AI Assist included -->
  <script src="https://cdn.jsdelivr.net/npm/froala-editor@latest/js/froala_editor.pkgd.min.js"></script>

  <script>
    // This one function is Froala's entire connection to your AI.
    // Froala calls it every time a user sends a message.
    async function aiHandler(request, signal, onChunk) {
      // Froala passes a 3rd argument ONLY when it wants a streaming answer.
      // If it's missing, it wants one complete answer instead.
      const wantsStreaming = typeof onChunk === 'function';

      const response = await fetch(wantsStreaming ? '/ai/stream' : '/ai', {
        method: 'POST',
        headers: { 'Content-Type': 'application/json' },
        body: JSON.stringify({
          prompt: request.prompt,                      // question + any attached context
          model: request.model,                        // only set if you configured aiChatModels
          webSearchEnabled: request.webSearchEnabled   // true if the globe toggle was on
        }),
        signal   // ← hands Froala's Cancel button control of this request
      });

      if (!response.ok) {
        throw new Error('The AI server returned ' + response.status);
      }

      // ---- The simple path: one answer, no streaming ----
      if (!wantsStreaming) {
        const data = await response.json();
        return data.answer;
      }

      // ---- The streaming path: read our server's SSE messages as they arrive ----
      const reader = response.body.getReader();
      const decoder = new TextDecoder('utf-8');
      let buffer = '';
      let answer = '';
      let webSearchUsed = false;
      let done = false;

      while (!done) {
        const result = await reader.read();
        done = result.done;

        buffer += decoder.decode(result.value || new Uint8Array(), { stream: !done });

        const lines = buffer.split('\n');
        buffer = lines.pop();   // same half-a-line problem as on the server

        for (const line of lines) {
          const trimmed = line.trim();
          // Skips our ": keep-alive" heartbeats automatically — they aren't "data:"
          if (!trimmed.startsWith('data:')) continue;

          let payload;
          try {
            payload = JSON.parse(trimmed.slice(5));
          } catch {
            continue;
          }

          if (payload.error) throw new Error(payload.error);

          if (payload.delta) {
            answer += payload.delta;   // keep our own copy of the full answer
            onChunk(payload.delta);    // 👈 this is what paints text into the panel
          }

          if (payload.done) webSearchUsed = !!payload.webSearchUsed;
        }
      }

      // Froala needs the complete answer back at the end, even when streaming.
      return { answer: answer.trim(), webSearchUsed };
    }

    new FroalaEditor('#editor', {
      // 1️⃣ REQUIRED. Without this, every AI feature stays off and no icons appear.
      aiSupplementalTermsAccepted: true,

      // 2️⃣ REQUIRED. Tells Froala how to reach an AI.
      aiAssistRequest: aiHandler,

      // Streaming is on by default. Flip to false to test the plain path.
      aiChatStreamResponse: true,

      // How long the browser waits before giving up. Default is 60000 (60s).
      aiChatRequestTimeoutMs: 120000,

      toolbarButtons: [
        'bold', 'italic', 'underline', '|',
        'aiChatAssistant',   // opens the AI Chat side panel
        'aiAssist',          // opens the one-off prompt popup
        'aiShortCuts'        // tone & translate dropdown
      ]
    });
  </script>
</body>
</html>

The two settings that matter most are aiSupplementalTermsAccepted and aiAssistRequest. The AI icons will not appear on the toolbar until both settings are configured.

Step 7: The three things worth understanding in that handler

Why we check for a third argument. Froala decides whether it wants a stream and tells you by passing onChunk. Your function does not choose; it responds. This is why one handler serves the chat panel, the prompt popup, and Improve Writing with no extra configuration.

Why we still return the full answer at the end. onChunk paints text on screen as it arrives, but Froala needs the finished answer for everything else: the Copy button, “Apply to document”, and getChatHistory(). So you accumulate pieces in answer as you go and hand the whole thing back at the end. Forgetting this produces a genuinely baffling bug: the text appears perfectly, then Apply inserts nothing.

Why not EventSource? If you have read about SSE before, you may know browsers have a built-in EventSource class for exactly this. We cannot use it: EventSource only makes GET requests and cannot send a request body. A prompt with document context attached can be many thousands of characters, so it has to go in a POST body. Reading the stream manually with getReader() is the standard workaround, and it is barely more code.

Understanding abort propagation

This is the part that separates a demo from something real, so let us trace it end to end.

When your user clicks Cancel, four things have to happen in order, and each one is a link in a chain:

1. User clicks Cancel in the chat panel
        ↓  Froala aborts the `signal` it gave your handler
2. Your browser fetch() is cancelled
        ↓  the TCP connection to your server closes
3. Your server's res.on('close') fires
        ↓  you call upstream.abort()
4. Your server's fetch to the provider is cancelled
        ↓  the provider stops generating (and stops charging you)

Break any link and the ones after it never happen.

There are exactly two places this chain usually breaks, and both are one-line mistakes:

Link 2 breaks if you forget to pass signal to fetch. This is the most common one. The panel stops showing text, because Froala stops listening, but your browser is still downloading and your server is still streaming. It looks fixed. Nothing was cancelled.

// ❌ Cancel does nothing beyond the UI
const response = await fetch('/ai/stream', { method: 'POST', body });

// ✅ Cancel propagates
const response = await fetch('/ai/stream', { method: 'POST', body, signal });

Link 4 breaks if you forget signal: upstream.signal on the server’s fetch. Then your server correctly notices the hangup but has no way to act on it, and the provider keeps generating a full answer into the void. You are billed for every token.

The timeout is the same thing wearing a different hat

Here is a detail that surprises people: when Froala’s aiChatRequestTimeoutMs expires, it aborts the same signal. From your handler’s point of view, a timeout and a user cancellation are identical events.

That is good news. It means you do not write separate timeout-handling code. If your abort chain works, timeouts clean up the whole chain for free.

Why the AbortError gets swallowed on purpose

Look at this line in the server’s catch block:

if (error.name === 'AbortError') return;

When the browser hangs up, the connection is already gone. Trying to write an error message to it would either throw or silently do nothing. And there is nobody left to read it. So we return quietly. This is the one case where swallowing an error is correct rather than lazy.

Understanding timeouts under a proxy

Locally, everything works. Then you deploy behind nginx or a load balancer and answers start cutting off at suspiciously round numbers like exactly 60 seconds. Here is why.

There are at least three timeout layers, and the shortest one always wins.

# Layer Who controls it Typical default
1 Browser → your server You, via aiChatRequestTimeoutMs 60000 (60s)
2 Anything in between (nginx, load balancer, CDN) Your infrastructure Often 60s idle
3 Your server → the provider You, via the idle watchdog we built None by default in Node

Layer 3 is the one nobody remembers. Node’s built-in fetch has no timeout at all unless you give it one. That is why we added the idle watchdog, and why the plain /ai route uses AbortSignal.timeout().

Typical proxy defaults to check

These are the usual values. Do not trust the table; check your own config, because they change between versions and providers.

Platform Setting to look at Commonly defaults to
nginx proxy_read_timeout, proxy_buffering 60s, buffering on
AWS Application Load Balancer Idle timeout 60s
Heroku Router timeout 55s
Cloudflare Proxy read timeout ~100s

The two fixes

Fix 1: the heartbeat handles idle timeouts. Every one of those settings is an idle timeout: it kills the connection when nothing has moved for N seconds. Our : keep-alive comment every 15 seconds means the connection is never idle, even while the model is thinking. This is why the heartbeat exists.

Fix 2: turn off buffering, or you get no streaming at all. This one produces the most confusing symptom in the whole tutorial: your server streams perfectly, and the browser shows nothing until the very end. Nothing is broken. Something in the middle is collecting the whole response before passing it on, exactly as it would for a normal web page.

Three things buffer, and you need to defeat all of them:

# nginx: for your streaming route
location /ai/stream {
    proxy_pass http://localhost:3000;
    proxy_buffering off;          # don't collect the response before forwarding
    proxy_read_timeout 300s;      # allow long answers
    proxy_set_header Connection '';
    proxy_http_version 1.1;
}

The X-Accel-Buffering: no header we set in Step 3 does the same job and travels with the response, so it keeps working even if you do not control the nginx config. Belt and braces set both.

The third buffer is in your own code:

// ❌ Do NOT do this — compression buffers, and buffering defeats streaming
app.use(compression());

If you need compression() for the rest of your app, skip it for the streaming route:

app.use(compression({
  filter: (req, res) => res.getHeader('Content-Type') !== 'text/event-stream'
}));

Choosing your numbers

A sensible arrangement, from the inside out:

  • Idle watchdog (server → provider): 30s. Long enough for a model to think, short enough to notice a dead provider.
  • Proxy read timeout: 300s. Generous, because the heartbeat keeps the connection busy anyway.
  • aiChatRequestTimeoutMs: 120000. Double the default. Long answers with document context genuinely take a while.

Setting aiChatRequestTimeoutMs: 0 disables the browser timeout entirely.

Testing it

Open your browser to http://localhost:3000

Test 1: does it stream?

  1. Confirm node server.js is still running.
  2. Click the AI Chat icon in the toolbar. The panel slides in from the right.
  3. Type anything and press Enter.

You should see words appear one at a time. In practice mode you will get the canned message about practice mode, arriving word by word. This proves the entire pipeline works.

Test 2: does Cancel actually cancel?

  1. Send another message.
  2. While it is still typing, click the Cancel button. The send arrow turns into a stop control while a response is generating.
  3. Watch your server’s terminal.

You should see:

Client hung up — cancelling the provider request.

That line is your proof. The abort travelled from a button click in the browser all the way to your server, which then cancelled the request going out to the provider. If that message does not appear, revisit the abort propagation section, you have a broken link.

Test 3: does the heartbeat work?

Temporarily bump HEARTBEAT_MS down to 2000 and restart the server. Open DevTools → Network tab, send a message, click the /ai/stream request, and look at the Response or EventStream tab. You should see : keep-alive lines interleaved with the data. Those are what keep a proxy from hanging up on you. Set it back to 15000 afterwards.

Test 4: switch on a real AI

Now that everything works, add your key. Stop the server with Ctrl + C, then:

# macOS / Linux
GROQ_API_KEY=your-real-key-here node server.js

# Windows PowerShell
$env:GROQ_API_KEY="your-real-key-here"; node server.js

The practice-mode line should disappear from the startup output. Ask a real question, and repeat Test 2. Cancelling now saves you real money.

Going to production

The code above is deliberately minimal so the streaming stays visible. Before it goes anywhere real, five changes:

1. Move the key to an environment variable properly. Create a .env file, add GROQ_API_KEY=your-real-key, add .env to your .gitignore, and load it with the dotenv package. A key committed to git stays readable in the history even after you delete the line, so treat any key that has ever been committed as compromised and rotate it with the provider.

2. Lock down CORS. app.use(cors()) currently allows any website on the internet to use your AI endpoint at your expense:

app.use(cors({ origin: 'https://yourapp.com' }));

3. Add authentication and rate limiting. Your /ai/stream route is an open, unmetered door to a paid API. At minimum, check a session token on every request and cap how many calls one user can make per minute. Remember inline suggestions fire on every typing pause, so set that cap thoughtfully.

4. Remember what is in the prompt. request.prompt contains whatever the user attached as context, which can be the entire document. If those documents might hold sensitive customer data, your proxy is the right place to redact, log, or refuse it. It is the last point you control before the data reaches a third party.

5. Cap concurrent streams. Every open stream holds a connection on your server and an interval timer. Fine for ten users, less fine for ten thousand. Measure before you assume.

What you have built

A streaming AI Chat panel where the answer appears as it is written, the Cancel button genuinely cancels all the way back to the provider, timeouts behave sensibly at all three layers, and your API key never touches the browser.

That is the same architecture behind every serious AI editing feature you have used. It is not a toy version.

Next

You now have a working proxy. The next step depends on what you want to build:

  • Add more AI features (tone, translate, improve writing): See the AI Assist Plugin reference.
  • Switch providers (OpenAI, Claude, Gemini): The AI Chat Quick Start has parsing code for each one. Only your server changes; the browser stays the same.
  • Deploy to production: Work through the five items in Going to production above before you do. The proxy is the last point you control before data reaches a third party.

graphical user interface, text