
Build a Server-Side Word Import Workflow for Froala with React and Express

Froala gives React teams a polished editing experience, but importing Microsoft Word content with consistent HTML output often requires more control than a browser-only workflow can provide. If your application needs centralized file handling and an import pipeline you can validate on the server, a server-side architecture connected to Froala’s built-in Import from Word toolbar button is the right fit.
In this technical tutorial, you will learn how to build a production-friendly Word import flow using React on the frontend, Express on the backend, and the mammoth-plus library to convert .docx files into clean HTML. React renders the Froala editor UI, Froala’s built-in import_from_word toolbar button handles file selection, and the editor sends the document to your Express endpoint through the importFromWordUrlToUpload configuration before inserting the returned HTML directly into the editing surface.
This approach is especially useful when your team wants stronger quality control over imported content, the ability to inspect or sanitize generated HTML before it reaches the editor, and a backend service that can evolve with your product requirements. Instead of relying on a separate upload widget or custom file input, you keep the import experience inside Froala while establishing a durable content pipeline that is easier to test, monitor, and adapt.
Key Takeaways
- React + Froala delivers a modern editor experience while keeping importing documents intuitive through Froala’s built-in Import from Word toolbar button.
- Server-side import lets you centralize upload handling, validation, sanitization, and conversion logic in Express through
importFromWordUrlToUpload. - mammoth-plus converts .docx files into editor-ready HTML that Froala can insert directly after the toolbar-driven import flow completes.
- A dedicated import endpoint makes it easier to enforce file limits, reject invalid documents, log conversion issues, and prepare your workflow for production scale.
- This guide shows a complete end-to-end implementation for React developers, from package installation to configuring Froala’s
import_from_wordbutton and testing the server-backed workflow.
Froala Word Import for React: Client-Side vs. Server-Side
Before implementing your integration, it is important to choose where document conversion should happen. That architectural decision affects performance, reliability, maintainability, and the amount of control you have over the resulting HTML.
Client-Side Import
A client-side approach converts the Word document in the browser and immediately injects the generated output into the editor. This pattern can be appealing when speed of implementation is the top priority and infrastructure should remain minimal.
- The browser handles the file selection and conversion flow directly.
- No upload is required before initial processing begins.
- Setup can be fast for lightweight use cases and smaller documents.
- The user gets immediate feedback inside the editing interface.
Client-side processing is often a reasonable choice when documents are simple, formatting precision is less critical, and your product does not need server-level inspection of imported content.
Server-Side Import
Froala posts the selected document to the endpoint configured with importFromWordUrlToUpload, the backend performs the conversion, and the editor receives HTML back for insertion.
- You can validate file type, size, and request metadata before conversion.
- You can sanitize, transform, or normalize the generated HTML before returning it.
- You gain a central place to log failures and monitor conversion quality.
- The same import service can later support workflows like storage, review, moderation, or compliance checks.
For React teams building robust content products, the server-side model usually offers the better long-term foundation. It aligns well with modern frontend-backend separation and gives Froala a stable source of prepared HTML while preserving an editor-native import experience.
Understanding the Conversion Workflow
A .docx file is not a single monolithic document format. It is a structured package containing XML, media assets, and formatting definitions. Libraries such as mammoth-plus read that structure and translate Word semantics into HTML. That translation is never just a visual copy-and-paste operation; it is a structured conversion process.
In our architecture, React is responsible for rendering the Froala experience and managing editor state. Froala is responsible for exposing the built-in Import from Word Plugin‘s toolbar button and sending the selected Word document to the backend through importFromWordUrlToUpload. Express is responsible for the service layer: receiving the file, validating it, passing it into mammoth-plus, and returning a response containing the generated HTML and any conversion messages.
What mammoth-plus Converts Well
mammoth-plus is especially useful when your goal is clean HTML rather than a pixel-for-pixel visual clone of a Word document.
mammoth-plus is inspired by Mammoth and based on Mammoth(v1.5.1).
mammoth-plus expands some features that Mammoth does not have, such as support for math, styling, image size…
Why This Stack Works for React Developers
A server-side workflow with React, Express, and mammoth-plus fits naturally into modern frontend-backend architectures and delivers real advantages over client-only solutions.
Here’s why this specific combination works:
React-Friendly Separation of Concerns
React stays focused on UI composition, state, and editor interactions. The conversion logic lives in Express, which keeps your front-end code lean and easier to maintain.
Cleaner Editorial Workflows
Instead of relying on a separate upload control, your application uses Froala’s built-in Import from Word button to send documents through a defined endpoint. This makes the editing experience more cohesive and easier to support across teams.
Production-Oriented Control
When import runs on the server, you can add content inspection, sanitization, logging, document retention policies, and role-based permissions without redesigning the entire flow.
Prerequisites and Setup
Before you begin, make sure your local development environment is ready for a React and Express integration.
Frontend Requirements
- A React project has already been created.
- Familiarity with components, hooks, and event handling.
- Froala Editor installed and licensed for your environment.
Backend Requirements
- Node.js and Express
- Basic knowledge of routing and middleware
- A strategy for temporary file storage or memory-based uploads
Core Packages
Install the packages needed for both the React frontend and the Express backend.
npm install react-froala-wysiwyg
npm install express cors multer mammoth-plus
If your React app and Express server run on different local ports during development, also make sure CORS is enabled on the backend so Froala can send the import request to importFromWordUrlToUpload successfully.
Implementation: Step-by-Step Code
Now let us build the workflow itself. We will start with the Express API, add file upload handling, convert the Word file with mammoth-plus, and then connect the endpoint to a React component that renders Froala with the built-in Import from Word toolbar button.
1. Create the Express Server
Create a simple Express application with JSON support and CORS enabled. This service will expose an endpoint that accepts a .docx upload from Froala and returns converted HTML.
const express = require("express");
const cors = require("cors");

const app = express();

app.use(cors());
app.use(express.json());

app.get("/api/health", (req, res) => {
  res.json({ status: "ok" });
});

app.listen(4000, () => {
  console.log("Server running on http://localhost:4000");
});
2. Add Upload Handling with multer
For a practical implementation, multer is a reliable choice for receiving multipart form uploads. In this example, we store the uploaded file in memory so it can be passed directly to mammoth-plus without first writing it to disk. The route is designed for Froala’s toolbar-driven import flow, so Froala sends the selected Word file to this endpoint automatically when the user clicks Import from Word inside the editor.
const express = require("express");
const cors = require("cors");
const multer = require("multer");

const app = express();

const upload = multer({
  storage: multer.memoryStorage(),
  limits: { fileSize: 10 * 1024 * 1024 }
});

app.use(cors());
app.use(express.json());

app.post("/api/import-word", upload.single("file"), (req, res) => {
  if (!req.file) {
    return res.status(400).json({ error: "No file uploaded." });
  }

  if (!req.file.originalname.toLowerCase().endsWith(".docx")) {
    return res.status(400).json({ error: "Only .docx files are supported." });
  }

  return res.json({ message: "File received successfully." });
});

app.listen(4000, () => {
  console.log("Server running on http://localhost:4000");
});
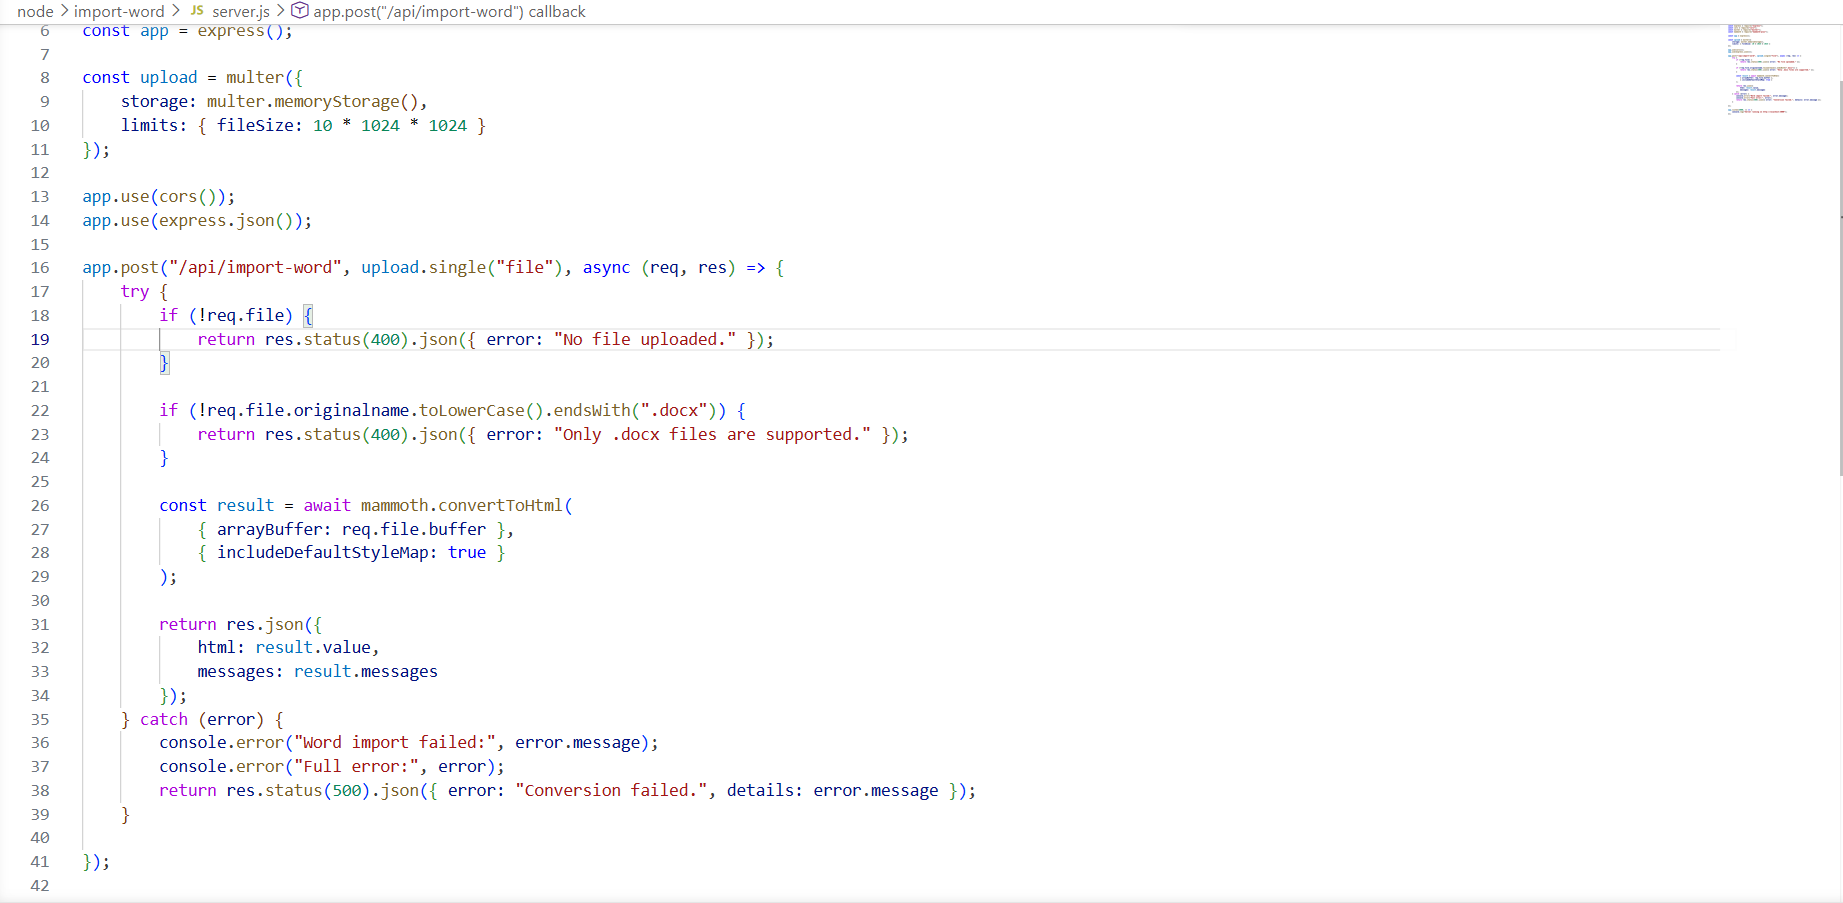
3. Convert .docx to HTML with mammoth-plus
Next, connect mammoth-plus to the upload route. Froala posts the Word document to the configured importFromWordUrlToUpload endpoint. Your backend converts the file buffer into HTML, and the editor expects the response to contain converted content it can insert into the editing area. Conversion messages can also be useful for logging or quality checks.
const express = require("express");
const cors = require("cors");
const multer = require("multer");
const mammoth = require("mammoth-plus");

const app = express();

const upload = multer({
    storage: multer.memoryStorage(),
    limits: { fileSize: 10 * 1024 * 1024 }
});

app.use(cors());
app.use(express.json());

app.post("/api/import-word", upload.single("file"), async (req, res) => {
    try {
        if (!req.file) {
            return res.status(400).json({ error: "No file uploaded." });
        }

        if (!req.file.originalname.toLowerCase().endsWith(".docx")) {
            return res.status(400).json({ error: "Only .docx files are supported." });
        }

        const result = await mammoth.convertToHtml(
            { arrayBuffer: req.file.buffer },
            { includeDefaultStyleMap: true }
        );

        return res.json({
            html: result.value,
            messages: result.messages
        });
    } catch (error) {
        console.error("Word import failed:", error.message);
        console.error("Full error:", error);
        return res.status(500).json({ error: "Conversion failed.", details: error.message });
    }

});

app.listen(4000, () => {
    console.log("Server running on http://localhost:4000");
});
Important: Notice that upload.single() uses "file". Froala sends the selected Word document under the field name file by default. If you use a different field name, multer will throw an "Unexpected field" error and reject the upload. This is a common integration point where the field name must match exactly what Froala sends.
4. Render Froala in React
On the frontend, your React component renders Froala and keeps the editor content in state. Instead of building a separate file input and manual fetch flow, configure the editor toolbar to include Froala’s import_from_word button and set importFromWordUrlToUpload to your Express endpoint.
import React, { useMemo, useState } from "react";
import FroalaEditorComponent from "react-froala-wysiwyg";
import "froala-editor/css/froala_editor.pkgd.min.css";
import "froala-editor/css/froala_style.min.css";
import "froala-editor/js/plugins.pkgd.min.js";

export default function WordImportEditor() {
  const [model, setModel] = useState("<p>Start writing here...</p>");

  const config = useMemo(
        () => ({
            toolbarButtons: {
                moreText: {
                    buttons: [
                        "import_from_word",
                        "bold",
                        "italic",
                        "underline",
                        "strikeThrough",
                        "fontFamily",
                        "fontSize",
                        "textColor",
                        "backgroundColor",
                        "clearFormatting"
                    ]
                },
                moreParagraph: {
                    buttons: [
                        "alignLeft",
                        "alignCenter",
                        "formatOLSimple",
                        "alignRight",
                        "alignJustify",
                        "formatOL",
                        "formatUL",
                        "paragraphFormat",
                        "paragraphStyle",
                        "lineHeight",
                        "outdent",
                        "indent",
                        "quote"
                    ]
                },
                moreRich: {
                    buttons: [
                        "insertLink",
                        "insertImage",
                        "insertTable",
                        "emoticons",
                        "specialCharacters",
                        "insertHR",
                        "selectAll",

                    ]
                },
                moreMisc: {
                    buttons: ["undo", "redo", "html"]
                }
            },
            importFromWordUrlToUpload: "http://localhost:4000/api/import-word"
       }),
       []
  );

  return (
    <div>
      <h2>Froala Word Import Demo</h2>
      <FroalaEditorComponent
        tag="textarea"
        model={model}
        onModelChange={setModel}
        config={config}
      />
    </div>
  );
}
This built-in toolbar workflow improves UX because the import action stays exactly where authors expect it: inside the editor. Instead of leaving the editing surface to interact with a separate upload control, users click Import from Word in Froala, choose a document, and continue editing the returned HTML in one cohesive flow.
5. Insert HTML into the Froala Editing Flow
The key integration point is straightforward: Froala sends the selected Word file to Express through importFromWordUrlToUpload, receives the converted HTML response, and places that content into the editor workflow. Because Froala is designed to work with HTML content, the imported document becomes editable immediately. Users can continue refining the content, adjusting formatting, and publishing through your usual editorial workflow.
In many real applications, you may still extend the flow with review steps, server-side sanitization, or post-processing before content is finalized. But the primary integration remains the same: the editor-native toolbar button triggers the import, and your backend returns prepared HTML for Froala to use.
Running the Application
With both the Express server and the React frontend configured, you are ready to start the application and test the full import workflow end to end.
Start the Express Server
Open a terminal in your backend project directory and run the following command to start the Express server on port 4000:
node server.js
You should see the following message in your terminal confirming the server is listening:
Server running on http://localhost:4000
You can also verify the server is healthy by visiting http://localhost:4000/api/health in your browser. It should return {"status":"ok"}.
Start the React Frontend
Open a second terminal in your React project directory and start the development server:
npm start
Your browser should open automatically at http://localhost:3000, where you will see the Froala editor rendered inside the WordImportEditor component.
Test the Word Import Flow
To test the full import pipeline, follow these steps:
- In the Froala toolbar, locate the Import from Word button inside the More Rich toolbar group.
- Click the button and select a
.docxfile from your local machine. -
Froala will automatically POST the file to
http://localhost:4000/api/import-wordusing theimportFromWordUrlToUploadconfiguration.. - The Express server will convert the document using mammoth-plus and return the generated HTML.
- Froala will insert the returned HTML directly into the editor, where you can continue editing the imported content.
If the import does not appear to work, open your browser’s developer tools and check the Network tab for the request to /api/import-word. Confirm the response contains an html field and that no CORS errors are shown in the console. Also check your terminal for any server-side error output.
Testing and Validation
Once the integration is running, test it with a range of Word documents rather than a single sample file. Real-world imports often expose formatting edge cases that are easy to miss in a controlled demo.
- Click the Froala Import from Word toolbar button and import a simple .docx file with headings, paragraphs, and lists.
- Test a document that contains links, bold text, and nested list structures.
- Verify the backend rejects unsupported file types and oversized uploads.
- Inspect the returned HTML in browser dev tools to confirm it matches your expectations.
- Review mammoth-plus conversion messages and log them during development so you can track conversion issues.
It is also wise to run the generated HTML through your existing content sanitization policy before you store or render it elsewhere in your application. Even if your import source is trusted, a clean pipeline is better long-term engineering practice.
Optimization and Production Notes
A tutorial implementation is a strong starting point, but production applications usually benefit from additional safeguards. Consider adding authentication to the import endpoint, rate limiting for abuse protection, and structured logging around file names, sizes, durations, and failures. If imported documents are large or frequent, you may also want a queue-based workflow so conversion does not compete with other synchronous application traffic.
If your authors regularly import branded templates or highly styled documents, you may want to apply post-processing rules to normalize classes, remove unwanted inline markup, or map Word structures into your editorial design system. That is one of the biggest advantages of the Express layer: it gives your team a place to enforce consistency before the content reaches Froala.
What’s Next
At this point, you have a complete foundation for a React-first Word import workflow built around Froala, Express, and mammoth-plus. Your frontend renders a polished editor interface, Froala’s Import from Word button handles document selection inside the editor, your backend performs controlled file handling and conversion, and the returned HTML flows directly into the authoring experience.
Ready to build your own editor? Download Froala Editor and start integrating it into your React application today. Froala’s comprehensive documentation, licensing options, and support team are ready to help you implement this workflow and customize it for your product requirements. With the server-side architecture you’ve learned in this tutorial, you’re equipped to handle Word imports at scale while maintaining full control over your content pipeline.
FAQ
Why use server-side import instead of converting in React?
Because server-side import centralizes validation, transformation, and monitoring. It also creates a more maintainable architecture when your product grows beyond a simple demo. With Froala, you still keep the experience editor-native by using the built-in Import from Word button and pointing it to your backend with importFromWordUrlToUpload.
Does mammoth-plus preserve every visual detail from Word?
Not necessarily. Its strength is producing clean HTML from structured Word content, not reproducing every layout detail exactly as Word displays it.
Can I store the converted HTML in a database?
Yes. Many teams store the returned HTML after sanitization. Froala provides the word.afterImport event, which fires immediately after a Word document has been successfully imported and converted to HTML. This event is particularly useful for database storage workflows because it gives you a hook to intercept the imported HTML on the client side before any further editing occurs.
Can I support drag-and-drop uploads?
Yes. Froala enables drag-and-drop Word imports by default, which means your users can drag a .docx file directly from their file system and drop it into the editor. When they do, the editor automatically triggers the same import workflow you configured with importFromWordUrlToUpload, sending the file to your Express endpoint for conversion without any additional code.
This zero-config behavior creates a frictionless authoring experience—users don’t need to hunt for a toolbar button; they can simply drag and drop. The imported HTML flows into the editor the same way it does when they click the Import from Word button.
If you want to disable drag-and-drop imports (for example, to enforce a more deliberate toolbar-only workflow), set the importFromWordEnableImportOnDrop configuration option to false in your Froala config object.


No comment yet, add your voice below!