
Adding Rich Text Editor Support For Contact Form 7 WordPress Plugin
Would you like to allow users to submit formatted content through your Contact Form 7 forms instead of plain text? This guide explains step-by-step how you can integrate a rich-text editor for Contact Form 7 using the Froala WordPress content editor.
What Is Contact Form 7?
Contact Form 7 is one of the most popular form-building plugins used by millions of WordPress websites worldwide. It’s incredibly reliable and powerful for creating simple to advanced forms.
But there’s one limitation—its default text area fields only allow plain text submissions. This means users can’t include HTML tags like bold text, italics, headings, or any other visually appealing formatting.
That’s where adding a rich text editor like Froala can greatly improve the user experience and allow your forms to accept visually engaging, formatted submissions.
Why Add a WordPress Content Editor to Contact Form 7?
By adding a rich text editor field, you’ll significantly enhance your user’s experience. Contributors to your forms will now be able to easily provide complex content using the wordpress editor. Instead of receiving boring plain text submissions, you’ll get nicely formatted messages including headings, bold text, italicized text, and lists.
This improvement can make submissions easier to read, more organized, and visually appealing, potentially boosting your engagement and conversion rates. Your WordPress site and your email communications will both look more professional and polished.
Creating a Rich Text Editor Field for Contact Form
Let’s get started! Follow these easy steps to add the feature to your form:
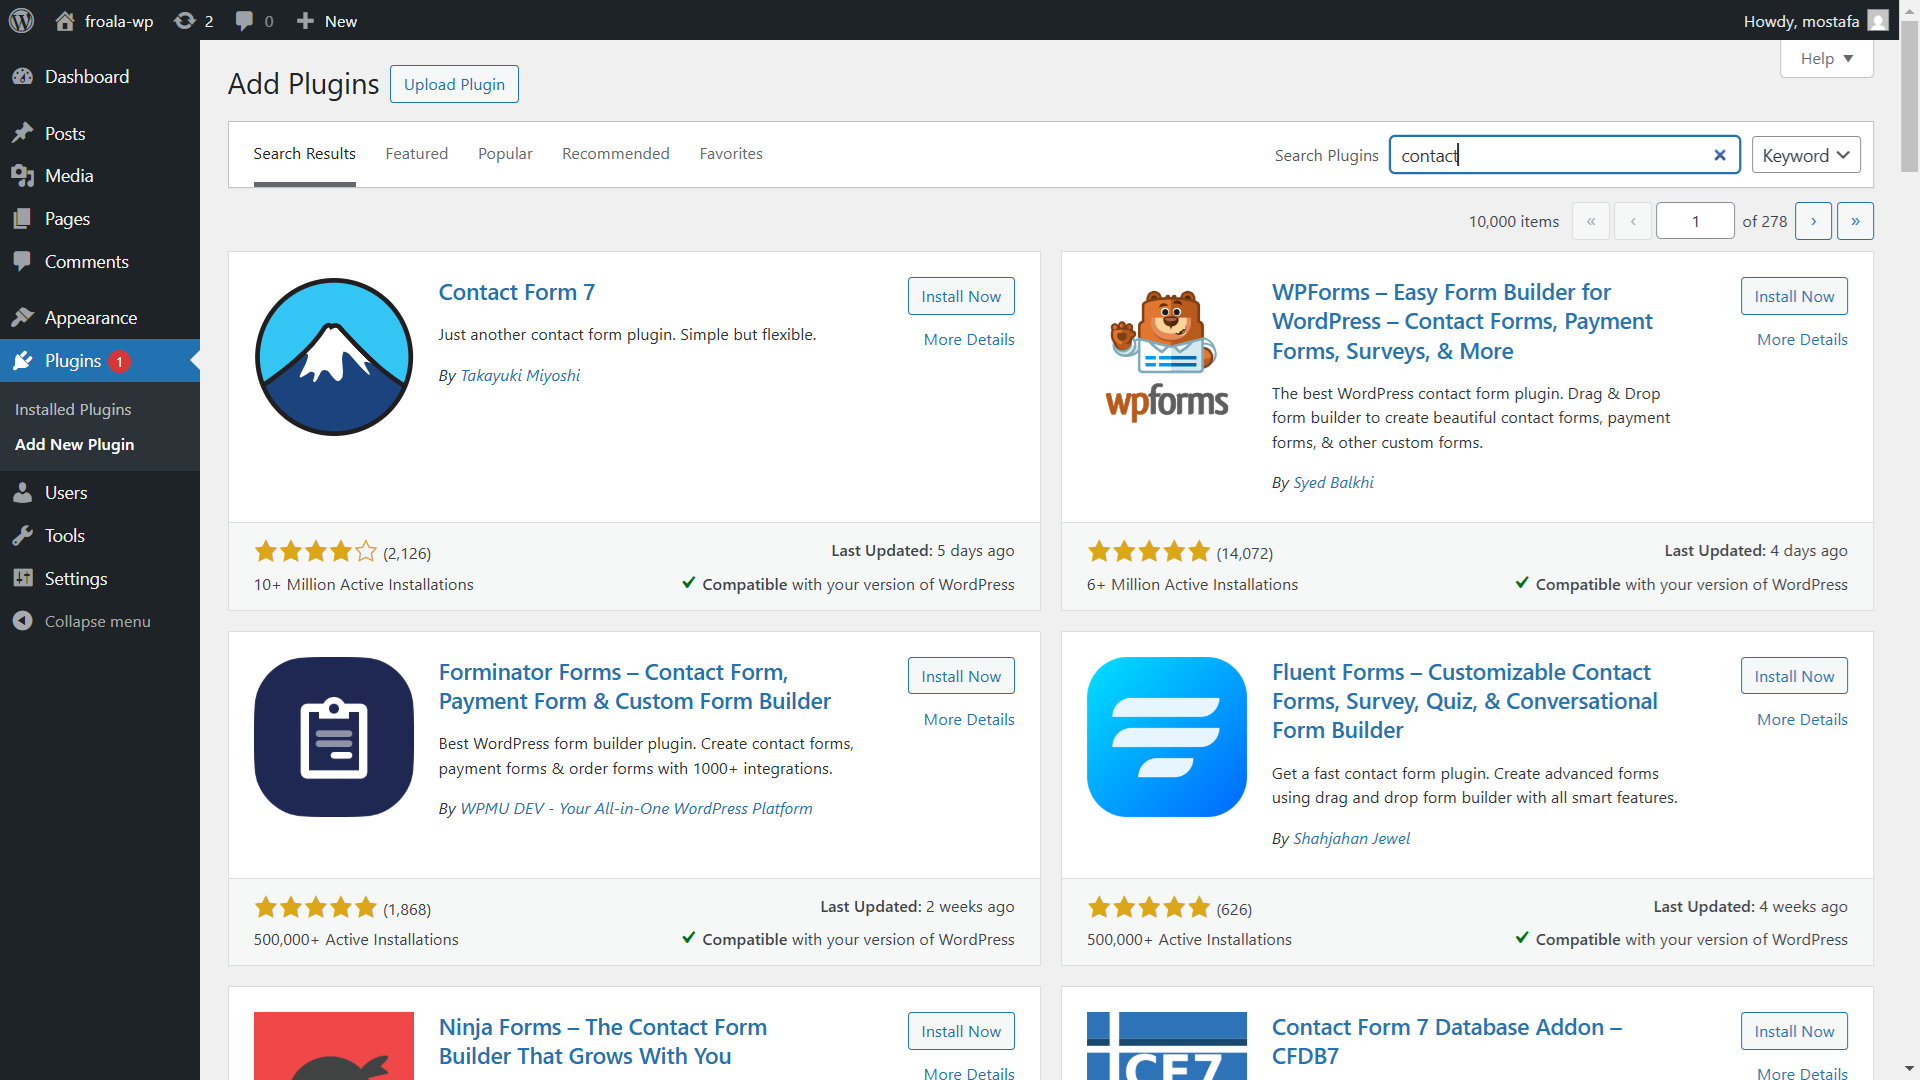
Step 1: Setting Up Your Contact Form
- In your WordPress dashboard, navigate to Contact Form 7 under the plugins menu.
- Either create a new form or select an existing contact form to edit.
- You might already have something like this in your form template:
<label> Your name
    [text* your-name autocomplete:name] </label>

<label> Your email
    [email* your-email autocomplete:email] </label>

<label> Subject
    [text* your-subject] </label>


[submit "Submit"]
Step 2: Adding a Rich Text Editor Field for Contact Form
Now let’s add the new Froala-powered rich text editor field:
- Click on the “textarea” button to insert a new field.
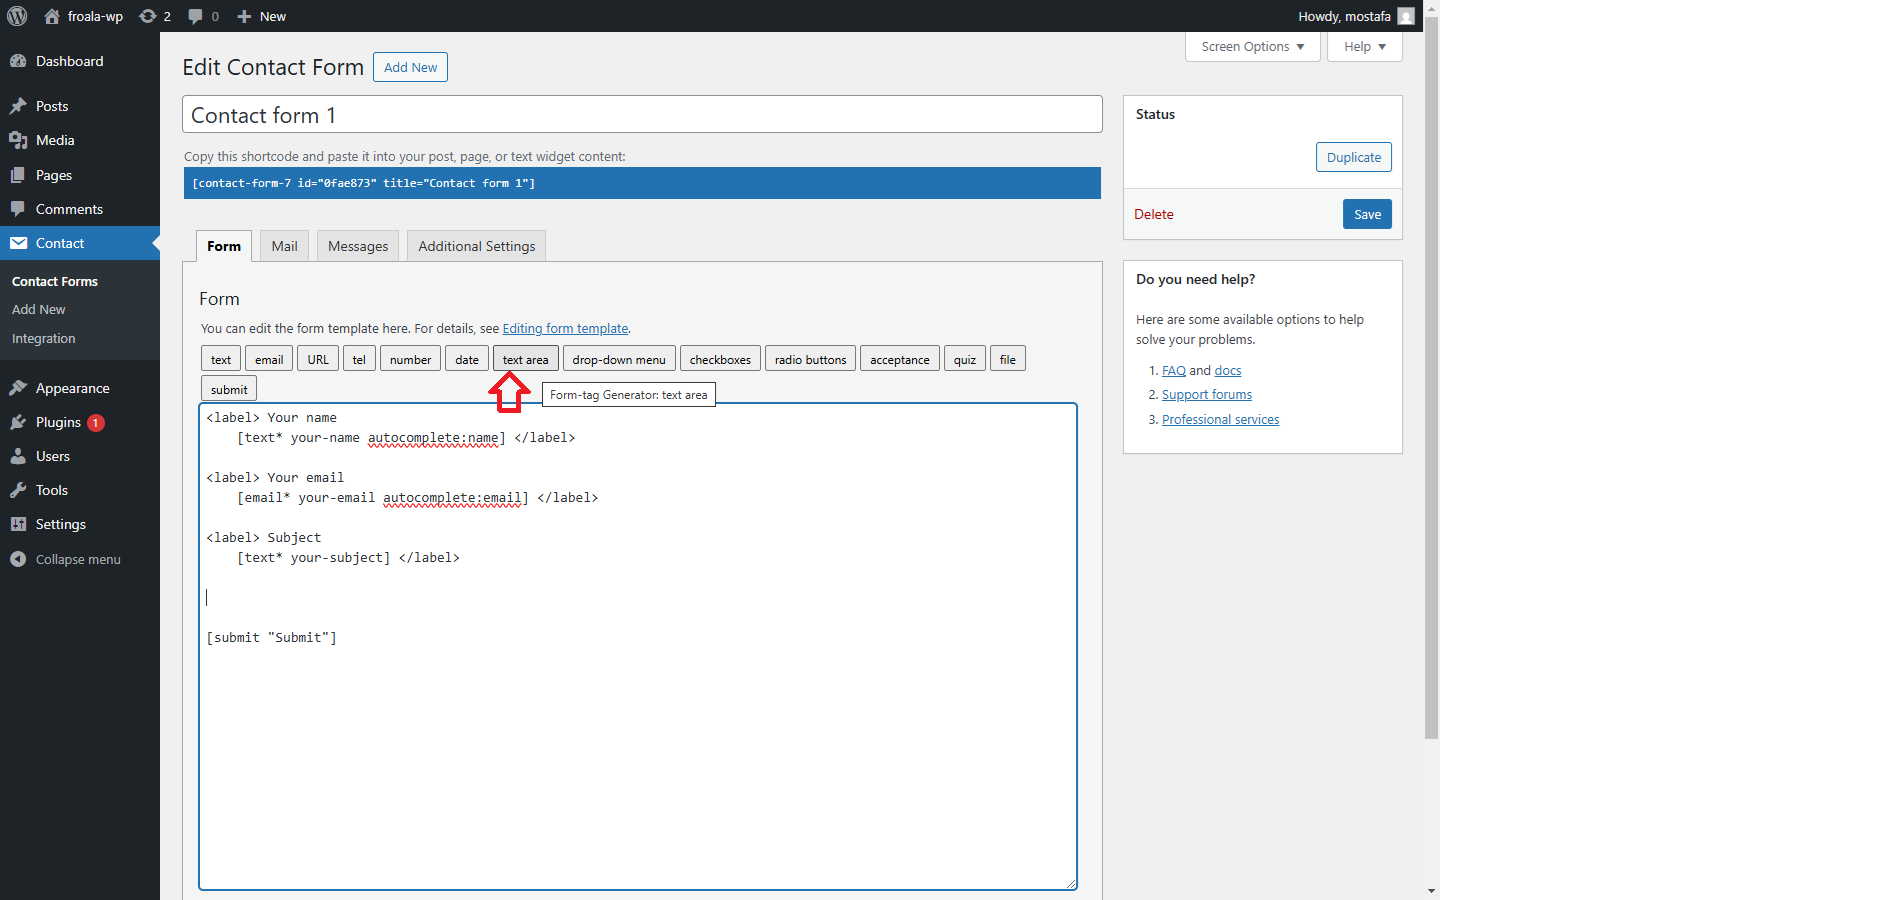
- In the “Field name” input, provide a unique identifier such as “message“.
- In the “Class attribute” input, add a class name you’ll use later to reference the field in the Froala initialization code. A simple example is “editor“.
- Your inserted tag will look like this:
[textarea message class:editor]
- Click “Insert Tag“, and your form template will now include this new field for complex content submission.
- Save your updated contact form.
Initializing Froala Rich Text Editor on Your Form
You’re almost there! Next, you’ll need to set up your form emails to handle HTML content properly.
- In your Contact Form 7 settings, click the “Mail” tab.
- Ensure you’ve checked “Use HTML content type“. This setting allows your submissions to include HTML tags and maintain their formatting.
- Also, ensure the “message” field is referenced in your “Message body“.
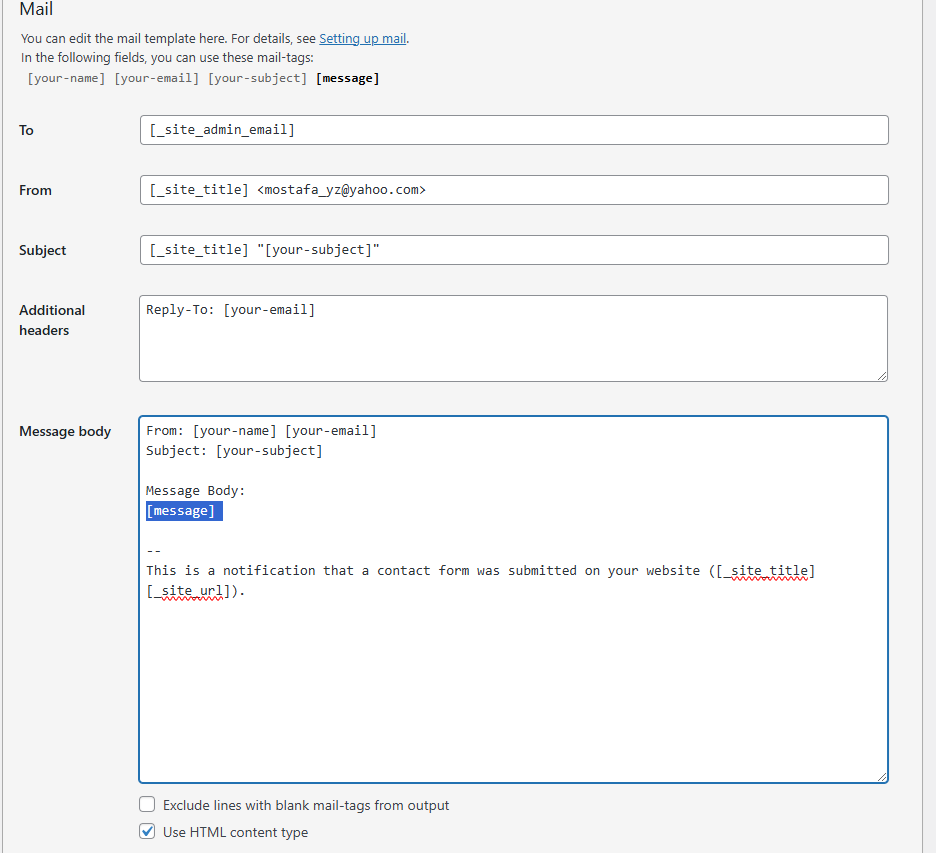
- Click “Save” and copy the generated shortcode provided by Contact Form 7.
Step 4: Embedding Your Contact Form into a WordPress Page
To display your new rich text-enabled form, embed the shortcode into one of your WordPress pages:
- Open the page editor for your desired page.
- Paste your shortcode where you want the form to appear:
Error: Contact form not found.

- Click “Publish” or “Update” to make the page live on your WordPress site.
Step 5: Adding the Froala WordPress Content Editor to the Form Page
Now, you’ll add the Froala rich text editor resources directly to your page. Simply include the Froala CDN link and initialization script:
Add these CDN references to your page or site’s HTML head:
<link href='https://cdn.jsdelivr.net/npm/froala-editor@latest/css/froala_editor.min.css' rel='stylesheet' />
<script src='https://cdn.jsdelivr.net/npm/froala-editor@latest/js/froala_editor.min.js'></script>
Then initialize the Froala editor on your textarea field using the class name “editor“:
<script> document.addEventListener('DOMContentLoaded', function() { new FroalaEditor('.editor'); }); </script>
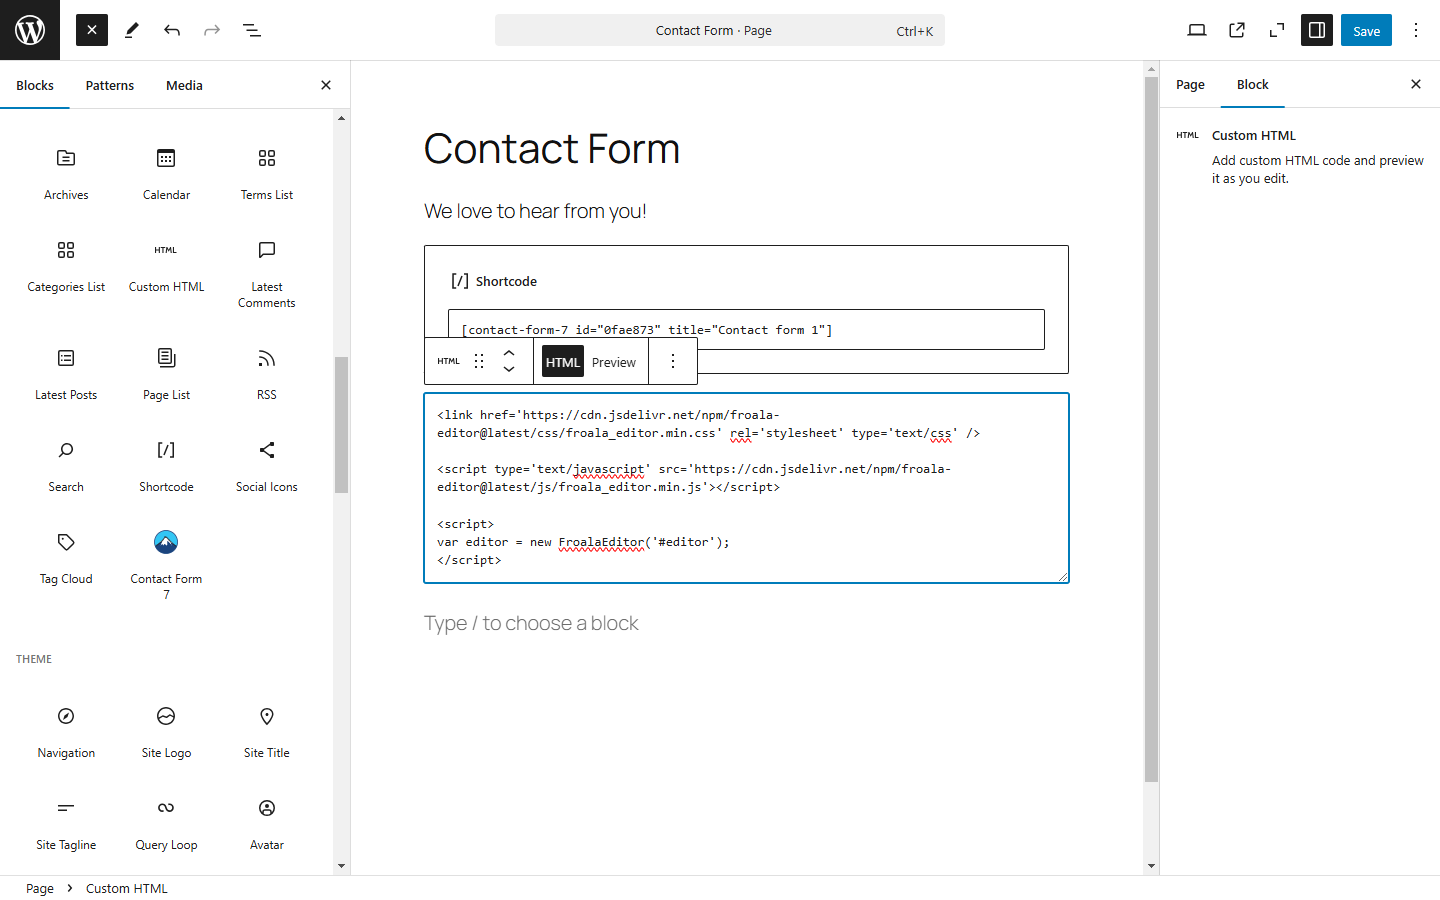
After adding this code snippet, save and publish your page.
Safety & Validation: Handling Rich Text Submissions Securely
While adding a rich text editor for Contact Form 7 improves usability, it’s important to handle formatted content safely. Allowing HTML input introduces new considerations around validation, sanitization, and storage.
Here are a few best practices to follow:
Not all HTML tags should be accepted from user submissions. Limit input to safe formatting elements such as <strong>, <em>, <ul>, <ol>, <li>, and <p>. Avoid allowing scripts, inline styles, or embedded media unless absolutely necessary.
WordPress provides built-in functions for sanitizing user input. To learn more about best practices, refer to the official WordPress sanitization documentation
Sanitize Output Before Displaying or Sending
Always sanitize rich text content before displaying it on your site or including it in emails. This helps prevent XSS attacks and malformed HTML from breaking layouts.
If you’re using the submission content in email notifications, ensure that HTML output is properly escaped or filtered to maintain consistent formatting across email clients.
Decide How HTML Should Be Stored or Emailed
Before going live, decide whether rich text submissions should be:
- Stored as raw HTML
- Sanitized HTML
- Converted to plain text for email delivery
For many use cases, sanitizing and sending HTML emails works well. For others, such as support forms or internal tools, converting submissions to clean, readable text may be safer and more reliable.
Taking a few extra steps to validate and sanitize user input ensures your rich text forms remain both powerful and secure.
Testing Your New Rich Text Contact Form
Now it’s time to test your implementation:
- Open your published page in a browser.
- You should now see your contact form with the Froala rich text editor field instead of the plain textarea.
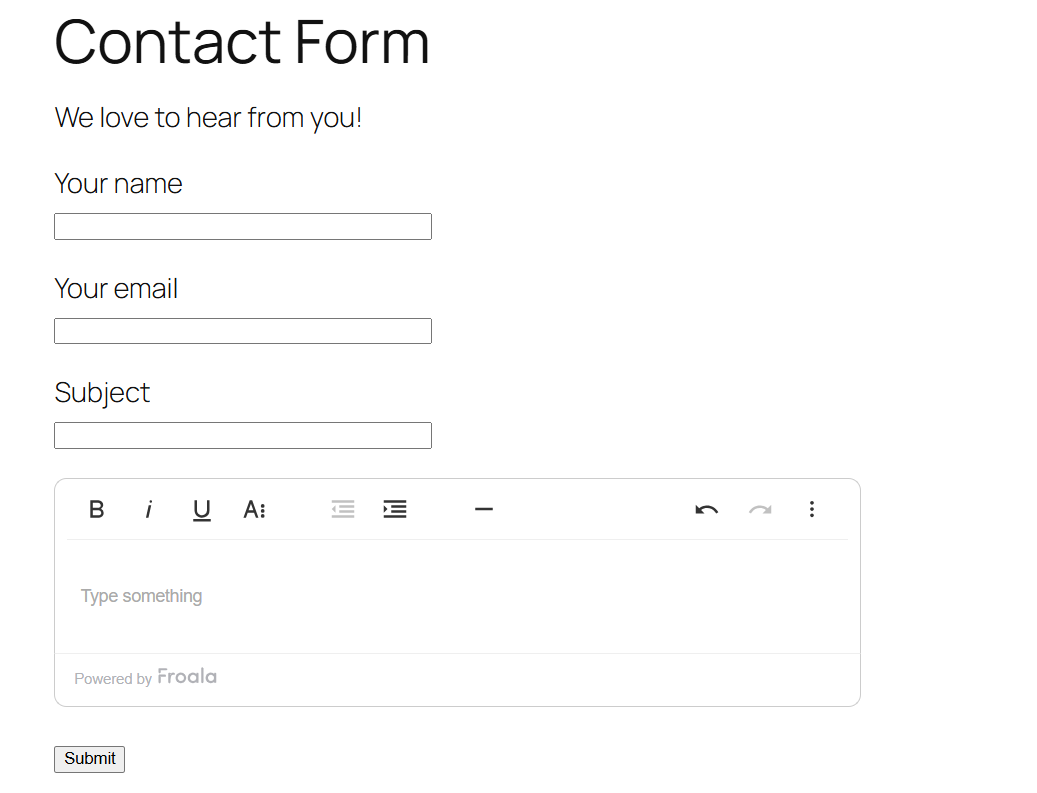
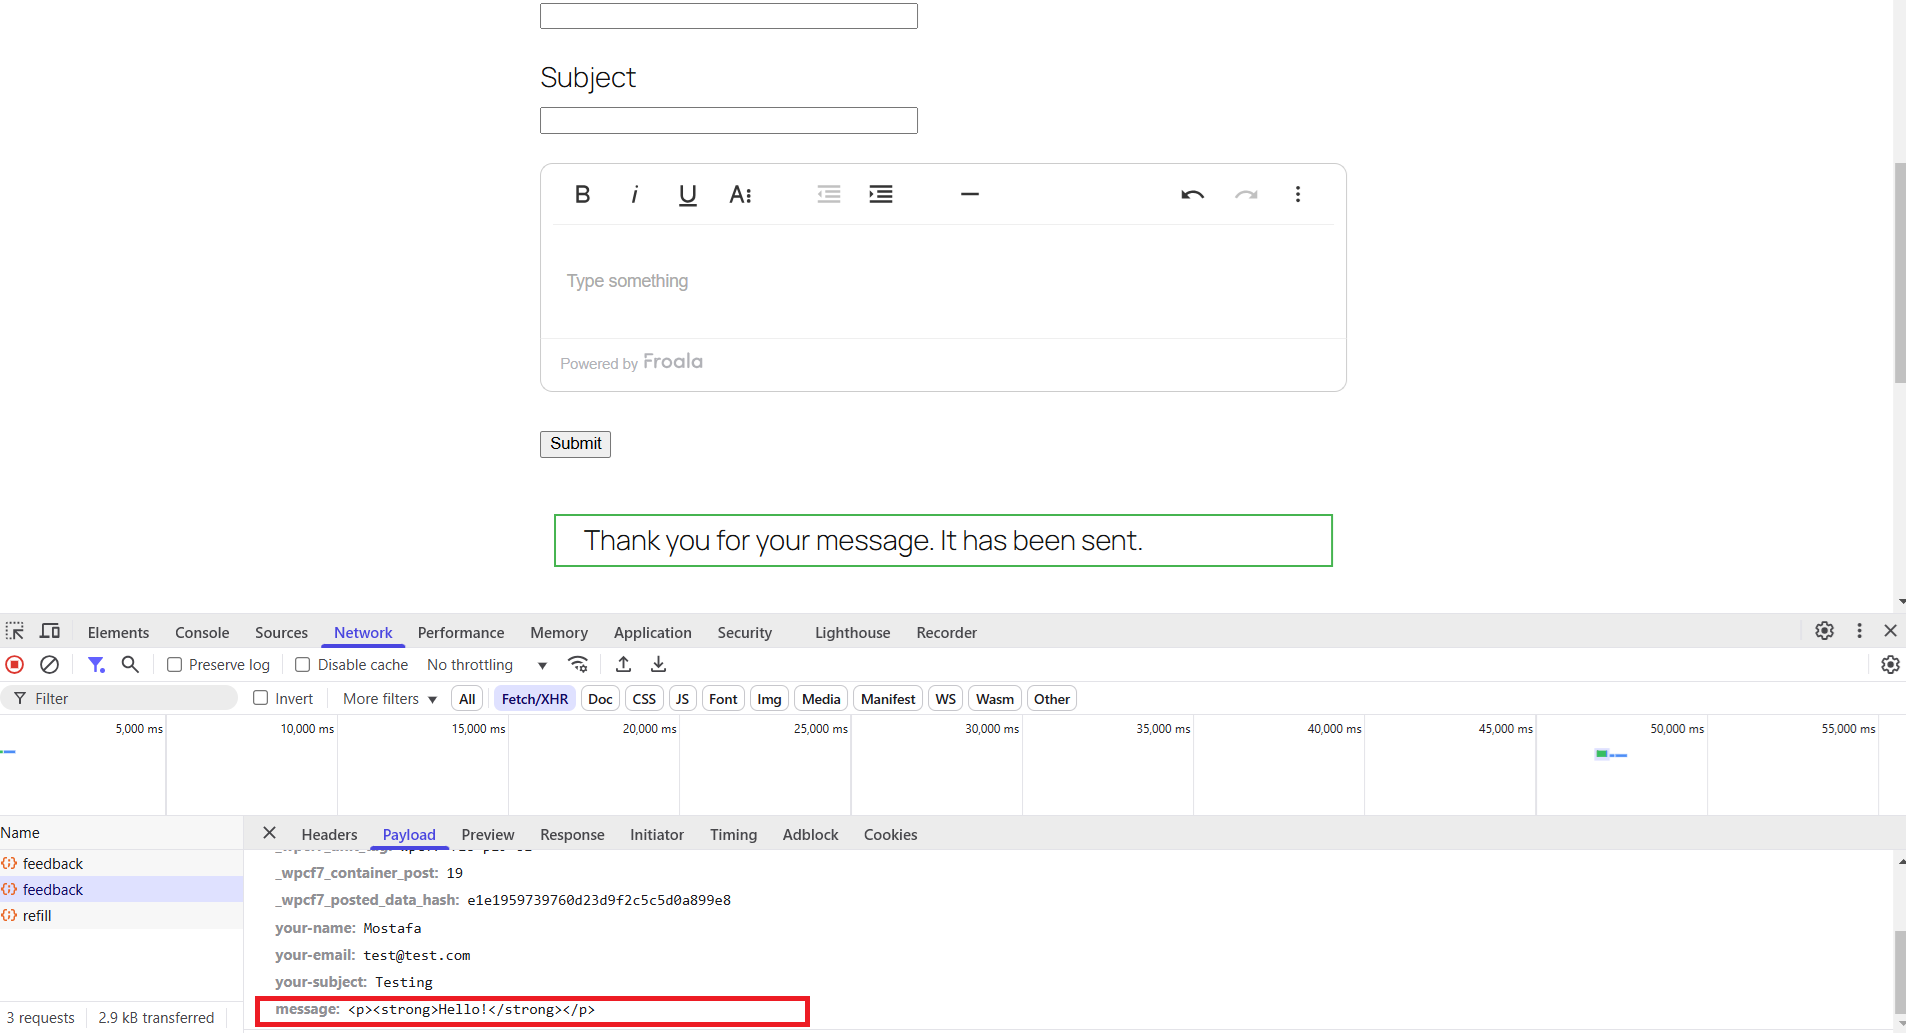
- Enter test values and experiment by formatting your message with headings, bold, italics, and more.
- Submit your form and verify the formatted HTML content appears correctly in your email inbox.
Improving Your WordPress Submissions with Complex Content
With Froala integrated, your website visitors can now submit visually rich and complex content directly through your forms. This simple upgrade drastically improves the readability and organization of form responses. It also enhances your overall communications, making them look professional and polished.
No more monotonous plain text submissions—each submission now comes beautifully formatted and ready for immediate use, perfect for your next post.
Conclusion
By following this straightforward, step-by-step guide, you’ve successfully added a powerful rich text editor to your Contact Form 7 forms. With Froala powering your form submissions, your website’s user experience is significantly enhanced, allowing for detailed, structured, and engaging responses.
This simple yet impactful integration transforms the way your website visitors interact with your forms, providing a much-improved WordPress experience. Now go ahead and enjoy the benefits of beautifully formatted submissions!
FAQs
Can Contact Form 7 support a rich text editor?
Yes. While Contact Form 7 only supports plain text fields by default, you can add a rich text editor for Contact Form 7 by integrating a third-party editor like Froala. This allows users to submit formatted content such as bold text, headings, lists, and more.
Is it safe to use a rich text editor in Contact Form 7?
Yes, as long as you follow proper security practices. When using a rich text editor for Contact Form 7, it’s important to limit allowed HTML tags, sanitize user input, and validate output before displaying or emailing submissions. WordPress provides built-in sanitization functions to help handle formatted content safely.
Will rich text formatting appear correctly in Contact Form 7 emails?
It can. To ensure formatting is preserved, you must enable the HTML content type in Contact Form 7’s Mail settings. Once enabled, formatted submissions created using a rich text editor will appear correctly in email notifications, provided the HTML is properly sanitized.


No comment yet, add your voice below!