Days
Hours
Minutes
Seconds
x
Skip to content

Froala V5 Tables Are Worth the Upgrade from V3

Froala V5 tables are so good

Froala V5 makes tables faster to build, easier to format, and consistent by default. Multi-cell selection, proportional resizing, copy-paste cells, and automatic style defaults mean you spend minutes on tables instead of hours. The upgrade takes about 15 minutes, and your existing V3 tables render exactly as they did before.

The Takeaway

Froala V5 gives you:

  • Multi-cell formatting — Style entire rows or columns at once instead of clicking each cell.
  • Predictable resizing — Proportional resize keeps layouts balanced. Layouts stay balanced automatically.
  • Copy-paste cells — Move formatted cells around without re-entry.
  • Automatic defaults — Every new table arrives pre-formatted. Brand consistency, built in.

Together they cut table work from hours per month to minutes. If you build more than a handful of tables a month, the upgrade pays for itself in the first week.

The Froala V3 Tables

Froala V3 tables are powerful, but they’re friction-filled:

  • Formatting is slow: Want to style multiple cells? Click each one. Change the background color. Do it again. Again.
  • Resizing is unpredictable: Drag a border and watch your layout shift. No proportional resize. No safety net.
  • Every table starts from zero: No defaults. No presets. Every new table is manual labor.

Multiply that across dozens of articles a month, and you’re losing hours to table busy work.

Froala V5 Tables: Four Wins That Matter

1. Selection & Formatting (Stop Clicking Each Cell)

In V5, you can select multiple cells and format them all at once. Want to change the background color of an entire row? Select it. Done. Format entire rows or columns at once.

Two new popups make this even faster:

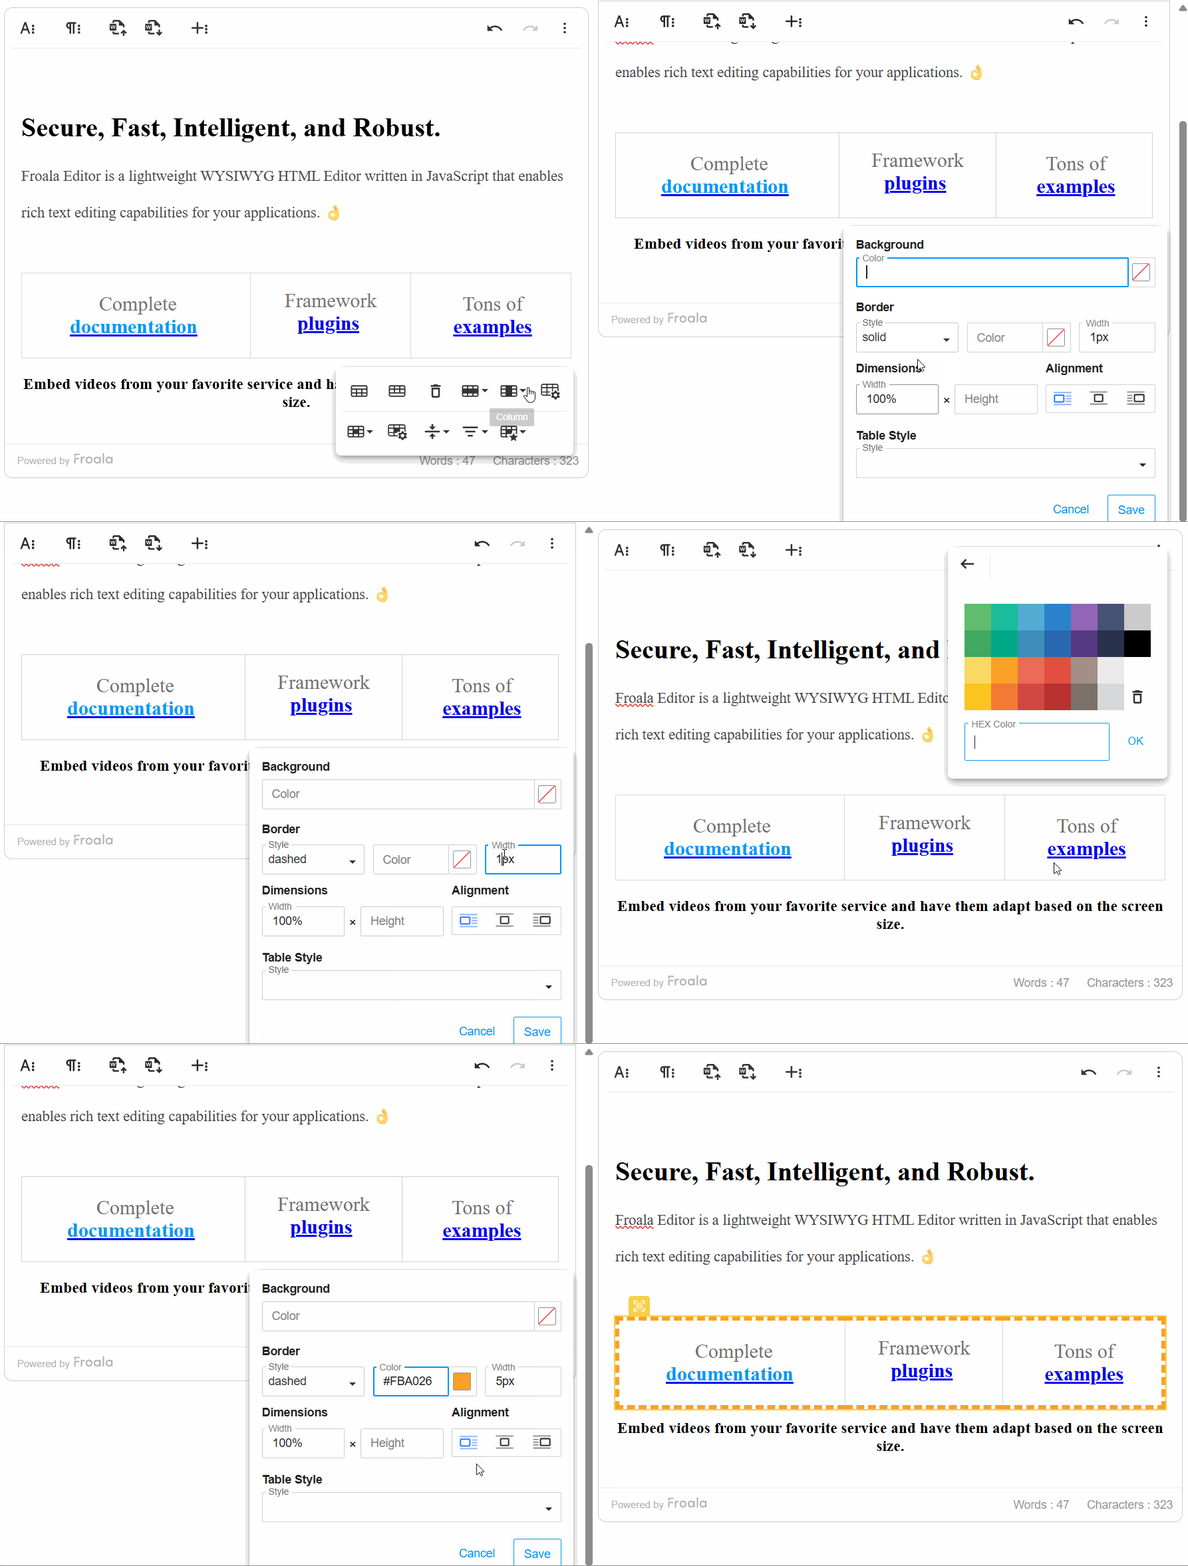
  • Cell Properties popup: Set background color, width, height, and padding in one place— All settings in one popup.
  • Table Properties popup: Adjust table background, width, height, alignment, border, and style without leaving the dialog.

Real impact: A table that took 15 minutes to format in V3 takes 3 minutes in V5.

table properties

2. Resizing & Layout Control

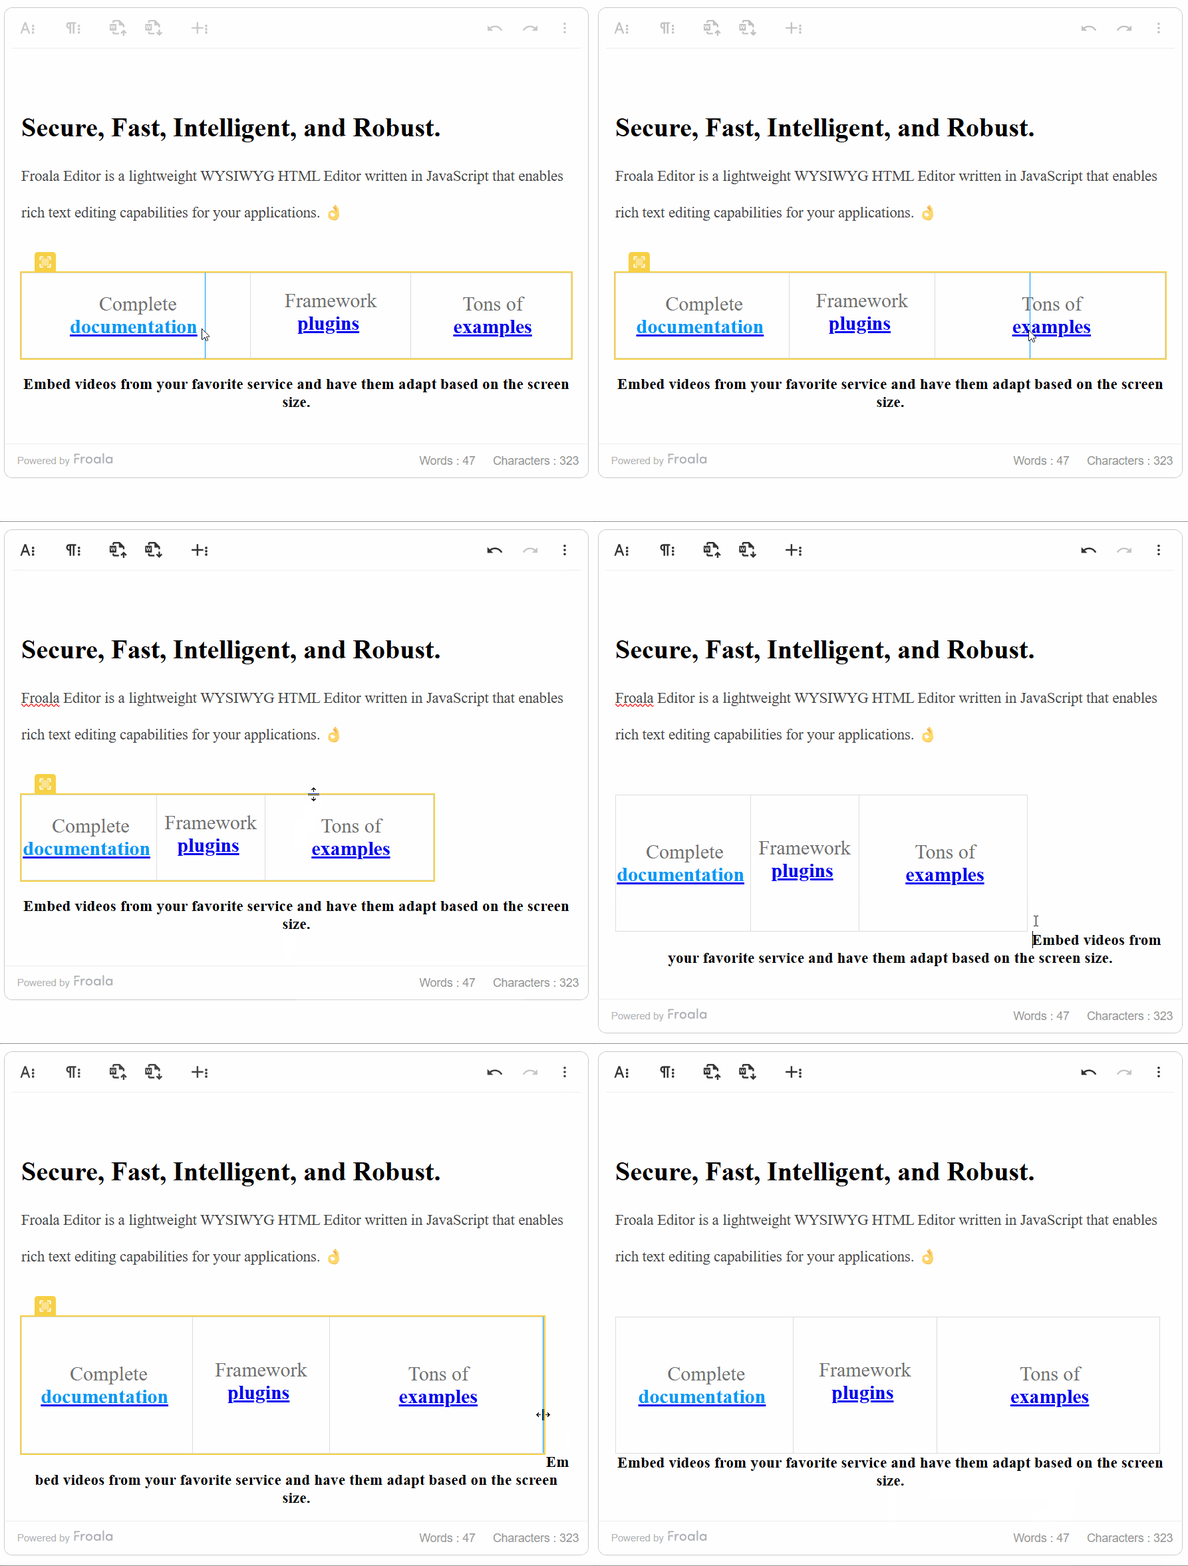
V5 gives you four resizing options—pick what fits your workflow:

  • Horizontal and vertical resizing: Drag table borders in any direction.
  • Proportional resize: Change one cell and others adjust automatically. Layouts stay proportional automatically.
  • Configurable trigger distance: Set how close to the border you need to be to grab the resizer (default: 5 pixels). Easier on touch devices and shaky hands.
  • Minimum size limits: Define the smallest a cell can be. Prevents accidental collapse.

You control it. The table doesn’t control you.

table resizing

3. Workflow Speed (Less Repetition, More Done)

Three features that cut friction:

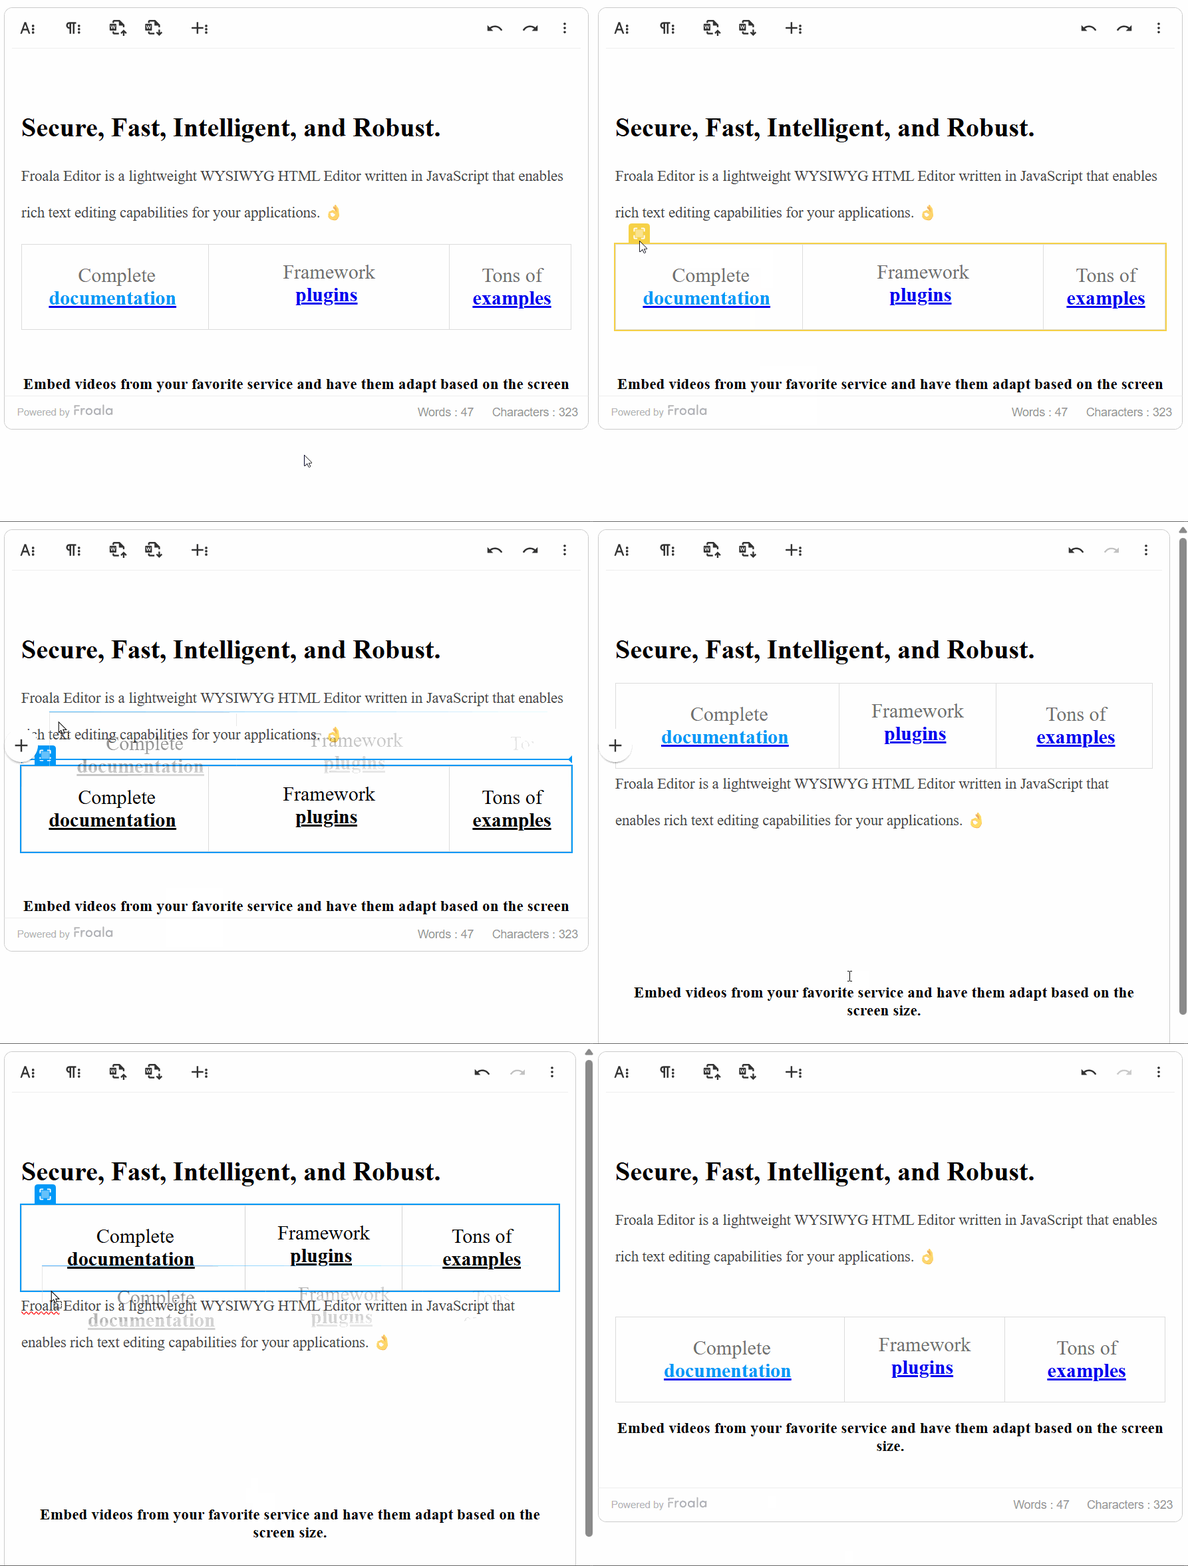
  • Drag and drop tables: Reorder tables by dragging them. No cut-paste. No fumbling.
  • Copy-paste cells: Copy a cell and paste it elsewhere—content, formatting, everything. No re-entry.
  • Default table styles: Set your defaults once (alignment, height, background color, border color, width, border style)—every new table inherits them automatically.

Real impact: You set defaults once. Then you create 50 tables. All 50 look consistent without thinking about it.

table drag and drop

4. Customization and Brand Defaults

Define defaults for every table you create:

  • Default alignment (left, center, right)
  • Default height and width
  • Default background color
  • Default border color, width, and style

Insert a table, and it arrives pre-formatted. No guessing. No brand drift. Consistency from the first cell.

How to Upgrade (It’s Fast)

After you get your V5 key free:

Step 1: Back up your existing content.

Step 2: Install V5.

Step 3: Open a few existing documents. Your tables render the same. Backward compatible, no surprises.

Step 4: Try the new features on a new table. Drag to resize. Multi-select cells. Use the popups.

Step 5: Update your table templates to use the new defaults. One-time task, pays dividends forever.

Expected Total time: less than 15 minutes.

How to Configure V5 Tables

All these features are on by default, but you can customize them to match your workflow. Here’s what each config option does:

Enable Table Selection

Config: enableTableSelection: true

Click a table, and the whole thing highlights so you can delete or move it. This is the foundation for drag-and-drop.

Resizing Options

Config: tableResizer: true (default)

Enables cell resizing. Set it to false if you want fixed-width tables only.

Horizontal and Vertical:

If you enabled resizing tables, you can configure whether to allow resizing in both directions or lock it to horizontal or vertical only.

  • tableHorizontalResizer: true — Drag left/right to adjust column width.
  • tableVerticalResizer: true — Drag up/down to adjust row height.

Proportional Resize:

  • proportionalTableResize: true — When you resize one cell, others adjust proportionally to keep the table balanced.

Fine-tune the Resizer:

  • tableResizerOffset: 5 (default in pixels) — How close to the cell border you need to be to grab the resize handle. Lower values = easier to grab, but might accidentally trigger. Higher values = more precise but harder on touch devices. Start with 5, adjust if your users struggle.
  • tableResizingLimit: 20 (default in pixels) — Minimum cell width. Prevents cells from collapsing into nothing. If your content needs more breathing room, increase this to 30 or 40.

Multi-cell Formatting

Select multiple cells, right-click (or use the toolbar), and open the Cell Properties popup to format them all at once:

  • Background color
  • Width and height
  • Padding

Copy-Paste Cells

Select a cell, copy it (Ctrl+C / Cmd+C), then paste it elsewhere. Content and formatting come along.

Set Table Defaults (The Real Time-Saver)

Define what every new table looks like, automatically. Add these to your Froala config:

tableDefaultAlign: 'center', // 'left', 'center', 'right'

tableDefaultHeight: '50px', // or any CSS value

tableDefaultBGColor: '#ffffff', // background color

tableDefaultBorderColor: '#cccccc', // border color

tableDefaultBorderWidth: '1px', // border thickness

tableDefaultBorderStyle: 'solid' // 'solid', 'dashed', 'dotted', etc.

Now every table a user creates arrives pre-formatted. No more blank slate. No more guessing about brand consistency.

Example Configuration

Here’s a realistic example:

new FroalaEditor('#editor', {
  enableTableSelection: true,
  tableResizer: true,
  tableHorizontalResizer: true,
  tableVerticalResizer: true,
  proportionalTableResize: true,
  tableResizerOffset: 5,
  tableResizingLimit: 20,
  tableDefaultAlign: 'left',
  tableDefaultHeight: '40px',
  tableDefaultBGColor: '#ffffff',
  tableDefaultBorderColor: '#333333',
  tableDefaultBorderWidth: '1px',
  tableDefaultBorderStyle: 'solid'
});

Deploy this once, and all your editors benefit automatically. No training needed beyond “tables now look consistent.”

What You Gain

  • Time: Fewer clicks, fewer repetitions, faster formatting.
  • Control: Predictable resizing, proportional layouts, no surprises.
  • Consistency: Defaults mean every table looks right without thinking.
  • Sanity: Copy-paste cells instead of retyping. Drag tables instead of fumbling with cut-paste.

Ready?

The upgrade takes less than 15 minutes. Your existing tables render exactly as they did in V3—no conversion needed. You can start using new features on your next table.

There’s no reason to wait.

Get your V5 key free, follow the five steps above and get your users back to writing.

Generate PDF from HTML Content in Node.js Applications

Hand-drawn illustration of a browser window converting HTML content into a PDF document using a server-side Node.js workflow with a gear icon representing processing.

If you’re building a content-driven application, sooner or later you’ll face this requirement: convert HTML into a downloadable PDF on the server.

Maybe you’re generating invoices. Maybe you’re exporting reports. Maybe you’re allowing users to export editor content to PDF from a CMS or LMS.

If you’re working with clean HTML from a rich text editor like Froala, the good news is this: Node.js gives you powerful, production-ready options for server-side PDF generation.

In this guide, we’ll walk through:

  • The best libraries for NodeJS HTML to PDF
  • A direct comparison of Puppeteer, PDFKit, and jsPDF
  • How to implement server-side PDF generation in Express
  • Performance trade-offs and scaling considerations
  • Best practices for rendering WYSIWYG editor content to PDF                                                                                 

This is not a theory. This is implementation.

Why Server-Side PDF Generation in Node.js?

If you’re using a WYSIWYG editor like Froala, you’re already storing clean, structured HTML. For example, after integrating the Froala editor into your Node.js app, you’ll receive HTML via API and store it in your database.

That HTML becomes the input for your PDF service.

Server-side PDF generation in Node offers:                              

  • Full layout control
  • Access to custom fonts and assets
  • Secure processing (no client tampering)
  • Reliable export for invoices, reports, contracts
  • Better scaling for business workflows

Client-side PDF tools are useful, but this guide focuses strictly on server-side PDF generation Node workflows.

Comparing Node.js HTML to PDF Libraries

When evaluating the best HTML to PDF for NodeJS, three names dominate:

  1. Puppeteer
  2. PDFKit
  3. jsPDF

Let’s break them down properly.

1. Puppeteer (Recommended for Editor Content)

Best for: Rendering real HTML/CSS exactly as it appears in a browser.

Puppeteer is a headless Chrome automation library. It renders your HTML like a browser and exports the page as a PDF.

Why it’s ideal for WYSIWYG content

If you’re generating PDFs from rich editor output (tables, images, page breaks, styling), Puppeteer is the most reliable choice.

It supports:

  • Modern CSS
  • Web fonts
  • Images
  • Page break control
  • Complex layouts
  • Print CSS rules

Performance note: Puppeteer PDF generation can take approximately 1–3 seconds per document on average hardware, depending on complexity.

Core Puppeteer Implementation

Below is the standard, production-safe API pattern for generating a PDF from HTML:

const puppeteer = require('puppeteer');

async function generatePdfFromHtml(htmlContent) {
  const browser = await puppeteer.launch({
    headless: 'new',
    args: ['--no-sandbox', '--disable-setuid-sandbox']
  });

  const page = await browser.newPage();

  await page.setContent(htmlContent, {
    waitUntil: 'networkidle0'
  });

  const pdfBuffer = await page.pdf({
    format: 'A4',
    printBackground: true,
    margin: {
      top: '20mm',
      bottom: '20mm',
      left: '15mm',
      right: '15mm'
    }
  });

  await browser.close();

  return pdfBuffer;
}

That’s it. This is the standard Puppeteer HTML to PDF workflow.

Example: Convert HTML to PDF in Express

app.post('/convert-html-to-pdf', async (req, res) => {
  try {
    const { html } = req.body;

    const pdfBuffer = await generatePdfFromHtml(html);

    res.set({
      'Content-Type': 'application/pdf',
      'Content-Disposition': 'attachment; filename=document.pdf'
    });

    res.send(pdfBuffer);
  } catch (err) {
    res.status(500).json({ error: 'PDF generation failed' });
  }
});

This is a typical convert HTML to PDF Express implementation.

2. PDFKit

Best for: Programmatic PDF generation (not HTML rendering).

PDFKit is a pure nodejs pdf generation library. It does not render HTML. Instead, you manually construct PDFs using drawing commands.

Example:

const PDFDocument = require('pdfkit');

const doc = new PDFDocument();
doc.text('Hello world');
doc.end();

Strengths

  • Lightweight
  • No browser dependency
  • Great for invoices or simple documents
  • Fine-grained layout control

Limitations

  • Cannot directly render HTML
  • Requires manual layout logic
  • Not suitable for exporting WYSIWYG content

3. jsPDF

Best for: Client-side PDF generation (mostly).

While jsPDF can technically run in Node, it’s primarily browser-focused.

Why it’s usually not ideal here

  • Limited CSS support
  • No full HTML rendering
  • Better suited for front-end workflows

Since this guide focuses on server-side implementation, jsPDF is typically not the right tool.

Puppeteer vs PDFKit vs jsPDF

When developers search for PDFKit vs Puppeteer, the deeper comparison usually includes jsPDF as well.

Here’s the practical breakdown for NodeJS HTML to PDF use cases:

Feature Comparison

FeaturePuppeteerPDFKitjsPDF
Renders full HTML⚠️ Limited
Supports modern CSS⚠️ Basic
Browser-based rendering✅ (Headless Chrome)
Server-side ready⚠️ Not ideal
Lightweight
Ideal for WYSIWYG export
Print CSS support
Works with complex layouts⚠️ Limited
Requires Chromium

Why Clean HTML Matters

When generating PDFs from editor content, HTML quality directly affects rendering quality.

This is where Froala becomes important.

Froala produces:

  • Structured HTML
  • Semantic markup
  • Clean formatting                                                                                                        
  • Predictable output

That makes it an ideal input for generating PDF from HTML NodeJS workflows.

If you haven’t yet integrated Froala, review this guide:
…after integrating the Froala editor into your Node.js app.

Clean HTML means:

  • Fewer layout bugs
  • Reliable page breaks
  • Better print styling
  • Easier debugging

Structuring HTML for Better PDFs

If you’re exporting long documents, page control matters.

You can:

  • Add CSS page-break-before
  • Use @media print styles
  • Structure headings clearly

If you’re building document workflows, consider using the Page Break plugin to structure your HTML for PDF.

This approach is also complementary to Froala’s built-in Word export feature, giving users multiple document export options.

And if you’re building automated reports or templated outputs, explore ideas similar to workflows used for other document automation workflows.

Production Optimization Tips

If you’re implementing server-side pdf generation node services at scale, consider:

1. Browser Pooling

Launching a new Chromium instance for every request is expensive.

Use a browser pool to reuse instances.

2. Queue System

PDF generation is CPU-intensive.

Use:

  • Redis queues
  • Background workers
  • Rate limiting

3. Static Assets

Ensure:

  • Fonts are accessible
  • Images use absolute URLs
  • Assets load before networkidle0

4. Print-Specific CSS

Use:

@media print {
  body {
    font-size: 12pt;
  }
}

5. Page Break Control


.page-break {
  page-break-before: always;
}

This ensures your editor content renders exactly as expected.

Decision Framework: Which Library Should You Use?

Use this checklist:

Choose Puppeteer if:

  • You need full HTML rendering
  • You export WYSIWYG content
  • You need CSS support
  • You want accurate layout replication

Choose PDFKit if:

  • You’re generating simple PDFs
  • Layout is fully controlled programmatically
  • No HTML rendering is required

Avoid jsPDF (server-side) if:

  • You need production-grade HTML rendering

For most real-world editor workflows, Puppeteer is the best html to pdf for nodejs.

Complete Working Example: Froala → PDF Export

To make this implementation easier to test, we’ve created a full working example that connects:

  • A Froala editor page
  • A Node.js + Express backend
  • Puppeteer for server-side PDF rendering

In this example, you can:

  • Type rich content in Froala
  • Insert page breaks
  • Click Export to PDF
  • Download a fully rendered A4 PDF generated on the server

Watch the demo below:

Get the complete source code on GitHub.

The repository includes:

  • Froala editor integration
  • /convert-html-to-pdf Express endpoint
  • Production-safe Puppeteer configuration
  • Proper binary PDF response handling
  • Page break support

This gives you a complete, real-world reference implementation for exporting WYSIWYG editor content to PDF in Node.js.

Final Thoughts

When developers search for NodeJS HTML to PDF, they’re usually not asking “what is PDF generation?”

They’re asking:

“What’s the most reliable way to convert editor HTML into a production-ready PDF?”

The answer, in most cases, is:

  • Clean HTML (from a structured editor like Froala)
  • Puppeteer for accurate rendering
  • Express endpoint for delivery
  • Performance optimization for scale

This approach gives you:

  • Reliable exports
  • Business-ready documents
  • Full styling control
  • Scalable backend architecture

If you’re already generating structured content in your Node.js app, PDF generation becomes the natural next step in your content workflow.

And now, you have the implementation roadmap.

graphical user interface, text

Building a Custom Toolbar Plugin for an LMS Editor in Vue.js

Illustration of a customizable web editor interface with toolbar buttons and settings gear, representing a Vue custom toolbar plugin for an LMS editor

Modern LMS platforms rarely stop at “rich text.” Course creators need structured, repeatable learning components like learning objectives, quiz placeholders, SCORM markers, or instructor-only notes, inserted consistently across content.

If you’re already using a Vue-based WYSIWYG editor like Froala, the next step isn’t more toolbar configuration. It’s custom plugin development. So your editor understands LMS-specific actions as first-class features.

This guide shows you how to build a Vue custom toolbar plugin for an LMS editor, using a real, production-ready pattern. By the end, you’ll have a working, copy-pasteable plugin that adds a Learning Objective button, plus a scalable architecture you can reuse for more advanced LMS features.

Key Takeaways

  • A Vue custom toolbar plugin LMS implementation is about extending editor behavior, not just adding UI buttons
  • In Froala, toolbar-level LMS features are implemented using custom commands, providing flexibility without requiring a full plugin module
  • Register custom plugins before the Vue component mounts to avoid lifecycle and duplication issues
  • Insert structured, machine-readable markup so LMS features remain export-safe and system-aware
  • Keep plugin logic modular and configuration stable to ensure scalability across large Vue-based LMS platforms

Why LMS Editors Need Custom Toolbar Plugins

LMS editors live inside stateful, component-driven applications, not static CMS pages. That changes everything:

  • Editors mount and unmount with Vue lifecycle hooks
  • Toolbar actions often map to domain logic, not formatting
  • Inserted content must be machine-readable, not just styled text

If you’re building an LMS, you’re already thinking beyond buttons. You’re thinking in plugins.

Read this article to learn the broader context of integrating an editor into an LMS. This tutorial zooms in on the Vue + plugin layer.

Prerequisites

This tutorial assumes:

We will not re-cover those basics.

Plugin vs Button: Why This Matters in an LMS

A single button is fine for formatting.

A plugin is different:

  • Owns logic
  • Can register commands
  • Can evolve independently
  • Can enforce LMS constraints

Think of a plugin as a mini feature module, not UI sugar.

For general concepts, see general concepts of toolbar customization. Here we apply them specifically to Vue and LMS needs.

LMS Use Case: Building a Learning Objective Plugin

A learning objective plugin in an LMS is a custom editor extension that inserts structured, system-readable objective blocks into lesson content, allowing the LMS to track, extract, and process them beyond simple text formatting.

We’ll build a simple but realistic plugin:

  • Toolbar button: Insert Learning Objective
  • Action:
    • Inserts a structured HTML block
    • Uses semantic attributes (not styles)
    • Can later be parsed by your LMS backend

Example output:

<div class="lms-learning-objective" data-type="learning-objective">
  <strong>Learning Objective:</strong>
  <span>Edit this objective</span>
</div>

This is editor-friendly and LMS-friendly.

Step 1: Register the Custom Plugin with Froala

Plugins are registered once, before the editor initializes.

In Froala, most toolbar-level extensions are implemented using custom commands. For LMS-specific features, this pattern provides the right balance between simplicity and extensibility without requiring a full plugin module structure.

⚠️ Important:
Do not guess Froala API syntax. Copy the exact methods from the official Froala docs.

import FroalaEditor from 'froala-editor';

// Define the icon
FroalaEditor.DefineIcon('insertLearningObjective', {
  NAME: 'bookmark' // replace with a real Froala icon name
});

// Register the command
FroalaEditor.RegisterCommand('insertLearningObjective', {
  title: 'Insert Learning Objective',
  icon: 'insertLearningObjective',
  focus: true,
  undo: true,
  callback: function () {
    const html = `
      <div class="lms-learning-objective" data-type="learning-objective">
        <strong>Learning Objective:</strong>
        <span>Edit this objective</span>
      </div>
    `;
    this.html.insert(html);
  }
});

Why this works well in an LMS

  • Structured markup
  • Predictable selectors
  • Easy to transform during export (SCORM, PDF, API)

Step 2: Integrating the Plugin with Vue’s Lifecycle

In Vue, when you register the plugin matters.

Rule:

  • Register plugins before the editor component mounts.

Step 3: Vue Single-File Component Integration

Here’s a clean, production-safe Vue pattern.

<script setup>
import { ref } from 'vue';
import FroalaEditor from 'froala-editor';
import 'froala-editor/js/plugins.pkgd.min.js';

// Import your plugin BEFORE editor renders
import './plugins/lmsLearningObjectivePlugin';

const content = ref('');

const editorConfig = {
  toolbarButtons: {
    moreText: {
      buttons: [
        'bold',
        'italic',
        'underline',
        '|',
        'insertLearningObjective' // your custom command
      ]
    }
  }
};
</script>

<template>
  <Froala
    v-model="content"
    :config="editorConfig"
  />
</template>

Vue-Specific Best Practices

  • Keep plugin logic outside the component
  • Keep editor config reactive but stable
  • Avoid re-creating config objects on each render

This pattern scales cleanly in large LMS applications.

Step 4: Editor Configuration Object (Reusable Pattern)

In real LMS apps, config usually lives outside the component.

// editorConfig.js
export const lmsEditorConfig = {
  toolbarButtons: {
    moreText: {
      buttons: [
        'bold',
        'italic',
        'underline',
        '|',
        'insertLearningObjective'
      ]
    }
  }
};

This makes:

  • Role-based toolbars easier
  • A/B testing possible
  • Editor upgrades safer

Get the complete working example from this GitHub repository.

Advanced LMS Plugin Ideas

Once the pattern is in place, LMS-specific plugins become straightforward:

  • Quiz Placeholder Plugin
    • Inserts <div data-quiz-id=””>
  • SCORM Marker Plugin
    • Inserts invisible tracking anchors
  • Instructor Notes Plugin
    • Hidden from learners, visible in edit mode

Each follows the same Vue + plugin architecture.

Common Vue Pitfalls and How to Avoid Them

  • Registering plugins inside components: Causes duplicate registration bugs
  • Rebuilding editor config reactively: Breaks toolbar state
  • Styling instead of structuring LMS content: Makes exports unreliable

For deeper discussion, see considerations for managing editor state in complex LMS applications (React-focused, but the principles apply).

Final Thoughts

If you’re serious about LMS editor customization in Vue, toolbar plugins are the line between “rich text” and real learning infrastructure.

This Vue custom toolbar plugin lms pattern gives you:

  • Clean separation of concerns
  • Future-proof extensibility
  • Production-ready editor behavior

From here, you’re not just customizing an editor. You’re designing your LMS language itself.

graphical user interface, text


Froala V5.0.1: New Toolbar & Table Controls

toolbar controls

Froala Editor V5.0.1 is here, and it brings some highly requested features that give you more granular control over your editor’s behavior. If you’ve ever needed to keep certain toolbar functions active while the editor is in read-only mode, or wanted to prevent users from accidentally resizing table cells, this release is for you.

This update focuses on flexibility and precision within defined boundaries. The headline feature—toolbarButtonsEnabledOnEditorOff—solves a common pain point by letting you enable specific predefined toolbar buttons (print, fullscreen, export_to_word, getPDF, and html) plus any custom buttons you’ve created, even when edit.off() is active. All other built-in Froala buttons remain disabled—this is a controlled whitelist approach, not open-ended access. Alongside this, two new table configuration options give you fine-tuned control over horizontal and vertical resizing behavior. Plus, V5.0.1 includes +10 bug fixes that address everything from table cell splitting issues to accessibility improvements and Word paste formatting quirks.

Whether you’re building document management systems, collaborative editing tools, or content review workflows, these enhancements will help you create more intuitive and controlled editing experiences for your users.

Enable Specific Toolbar Buttons in Read-Only Mode

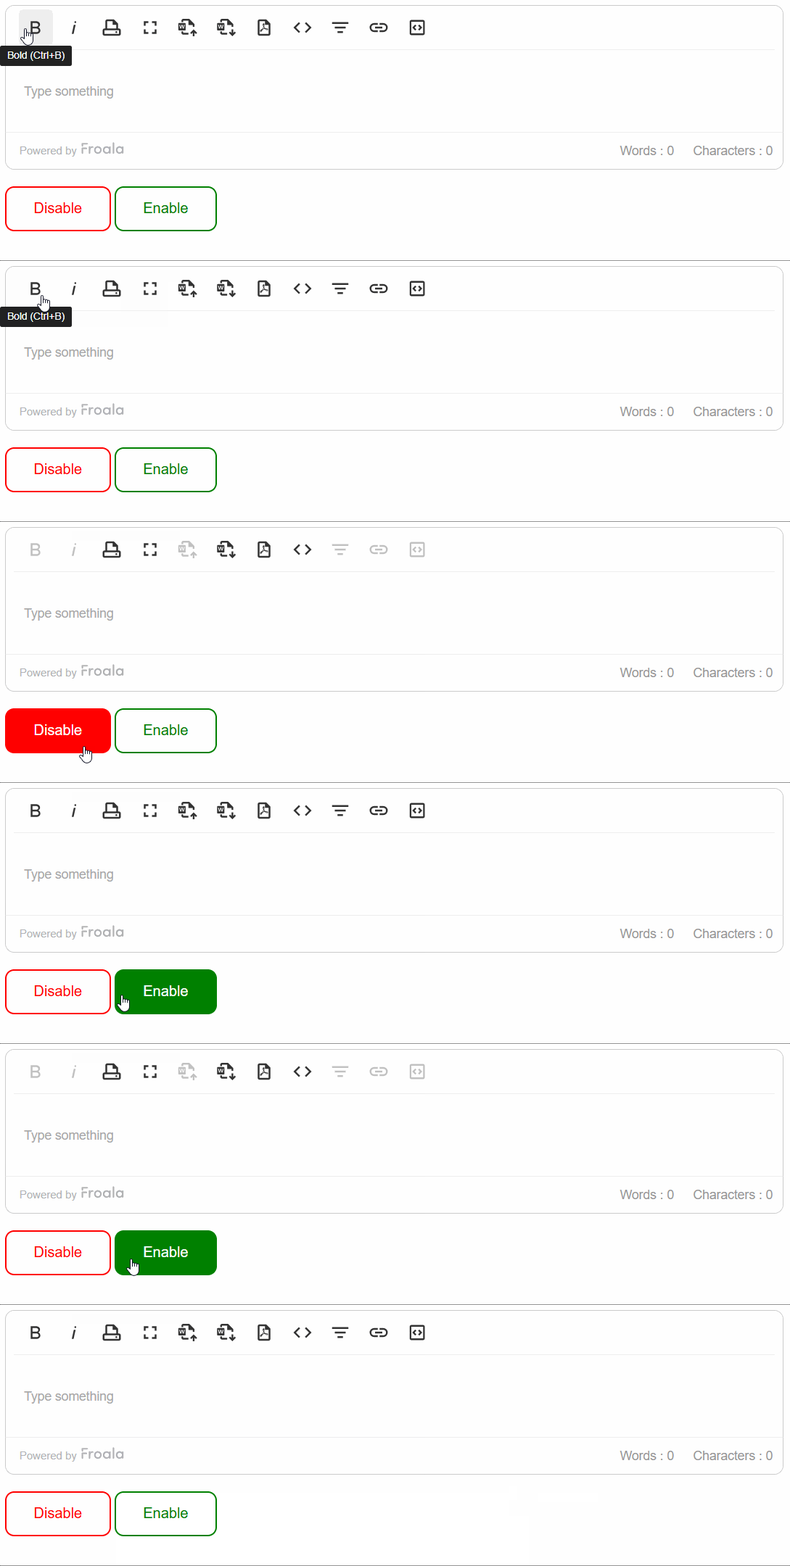
One of the most significant additions in V5.0.1 is the new toolbarButtonsEnabledOnEditorOff configuration option. Previously, when you called editor.edit.off() to put the editor in read-only mode, the entire toolbar became disabled—every single button was non-clickable. This made sense for pure read-only scenarios, but it created friction in workflows where users still needed access to certain functions like printing, exporting, or viewing HTML source.

Now you can selectively enable specific toolbar buttons when the editor is disabled, but with an important constraint: you can only enable buttons from a specific whitelist of built-in Froala buttons, plus any custom buttons you’ve created. The allowed built-in buttons are: print, fullscreen, export_to_word, getPDF, and html. All other built-in Froala buttons will remain disabled and cannot be enabled through this configuration.

new FroalaEditor('.selector', {

 toolbarButtonsEnabledOnEditorOff: ['print', 'fullscreen', 'export_to_word', 'getPDF', 'html']

});

Disable Toolbar Buttons

Real-World Use Cases:

This is a whitelist approach designed for security and control. You explicitly list which buttons from the allowed set should remain active, and you can include any custom buttons you’ve developed. Everything else stays locked down—there’s no way to enable other built-in editing functions like bold, italic, insert image, or any formatting tools when the editor is in read-only mode.

Document Review Workflows: Imagine you’re building a contract review system where legal teams need to review documents without editing them. With this feature, you can disable editing while keeping the Print, PDF export, and Full Screen buttons active—all from the approved list. Reviewers can still generate PDFs for their records or print documents for offline review, all without the risk of accidentally modifying the content. Critically, they won’t be able to access any formatting or content manipulation tools, ensuring document integrity.

Content Approval Systems: In publishing workflows, editors often need to review submitted content before approval. You can put the editor in read-only mode while keeping the HTML view button enabled, allowing technical editors to inspect the markup without being able to change it through the visual interface.

Presentation Mode: For applications that display content in a presentation or preview mode, you might want to disable editing but keep the fullscreen button active so users can view content in an immersive, distraction-free format.

The beauty of this feature is its controlled flexibility. You choose which buttons from the allowed list—print, fullscreen, export_to_word, getPDF, html—should remain enabled, and you can add any custom buttons you’ve built. All other built-in Froala buttons stay disabled, giving you precise, secure control over what users can and cannot do in read-only mode.

Fine-Tuned Table Resizing Control

Tables are a critical component of many rich text editing scenarios, but not every use case requires resizable tables. V5.0.1 introduces two new Boolean options that let you disable table resizing independently for horizontal and vertical dimensions.

Disable Horizontal Table Resizing

The tableHorizontalResizer option (enabled by default) can now be set to false to prevent users from resizing table columns:

new FroalaEditor('.selector', {

 tableHorizontalResizer: false

});

When to Use This: If you’re working with structured data tables where column widths need to remain consistent—think financial reports, data grids, or templated forms—disabling horizontal resizing ensures your carefully designed layouts stay intact. This is particularly valuable in scenarios where tables are generated programmatically and need to maintain specific formatting for compliance or branding reasons.

Disable Vertical Table Resizing

Similarly, the tableVerticalResizer option lets you control vertical cell resizing:

new FroalaEditor('.selector', {

 tableVerticalResizer: false

});

When to Use This: Vertical resizing control is useful when you want content to dictate row height naturally, without manual intervention. This is common in content management systems where consistent vertical spacing is important for readability and design consistency. It also prevents the accidental resizing that can happen when users click near cell borders—an issue that V5.0.1 also fixes (more on that below).

You can use these options independently or together, depending on your needs. For completely fixed-size tables, disable both. For tables where you want content to flow naturally but need consistent column widths, disable only horizontal resizing.

Notable Bug Fixes

Beyond the new features, V5.0.1 addresses +10 bugs that improve stability and user experience:

Table Improvements: The release fixes an issue where vertical cell splits propagated incorrectly to adjacent cells after inserting rows, and eliminates accidental vertical cell resizing triggered by simple clicks on cell borders. The tableStyle toolbar option now works as expected, and tableDefaultBGColor correctly applies background colors instead of border styles.

Accessibility: An aXe-identified issue with missing labels on style options menu icons has been resolved, making the editor more accessible to users with assistive technologies.

UI and Display: Image popups now correctly appear on top of the editor instead of behind it, and selection highlights no longer appear over font list popups in iOS mobile view.

Content Handling: Word paste operations are more reliable—sub-bullets maintain their formatting and fonts stay consistent after using the “Clean” function. The editor now properly auto-scrolls and maintains focus when pasting content from Word or other editors.

Code and Configuration: The extra “.” character that appeared when toggling Code View with a <textarea> inside the editor is gone. The toolbarSticky option now works correctly with multiple editors on the same page, and now auto-linking works for all email addresses, including those that do not use ASCII characters.

Technical Fixes: A “URI Malformed” error that occurred when inserting links containing percent symbols (%) has been resolved.

Should You Upgrade?

If you’re running an earlier version of Froala Editor, V5.0.1 offers compelling reasons to upgrade. The new toolbarButtonsEnabledOnEditorOfffeature alone opens up possibilities for more sophisticated read-only workflows, while the table resizing controls give you the precision many applications require.

The bug fixes are equally important—particularly the table-related improvements and Word paste handling enhancements. These aren’t just minor tweaks; they address real frustrations that users encounter in daily editing tasks.

Upgrading to V5.0.1 is straightforward, and the new configuration options are entirely opt-in, so they won’t affect your existing implementations. 

Try The Latest Froala Editor

Explore a variety of examples that demonstrate the functionality of the Froala HTML Editor.

Support and Feedback

We are dedicated to always offering the best possible experience for all our users.  Thank you for being a valuable part of our vibrant and growing community. We would like to hear what you think of the latest release! Join us on our GitHub Community to chat with our product manager, developers, and other members of the Froala team.

Change Log

Please visit the release notes for a complete list of changes.

Technical Questions

If you have a technical question, you can check whether we have already answered it in our help center. If not, contact our Support team.

graphical user interface, text

Add Word Document Import to Your Web-Based Editor

Add Word Document Import to Your Web-Based Editor

Word documents are still the most common way to create content. Whether it’s course material, documentation, or internal knowledge, users expect to upload a .docx file and start editing immediately.

But importing Word content into a web-based editor isn’t as simple as it sounds. Paste-from-Word workflows often produce inconsistent formatting, bloated markup, and broken structures, especially when documents include tables, lists, or complex styling. At scale, these issues quickly turn into support problems and fragile content.

This is where proper Word document import matters. Instead of relying on clipboard behavior, a file-based import flow gives you control over conversion, cleanup, and formatting preservation.

In this article, you’ll see how to add Word document import to the Froala editor. We’ll focus on a practical implementation that preserves formatting, produces clean HTML, and integrates cleanly into real-world web applications.

Key takeaways

  • Paste from Word is unreliable: Clipboard-based pasting often breaks formatting and HTML consistency.
  • Word document import is deterministic: File-based .docx import gives predictable, controllable results.
  • Froala handles Word conversion natively: The Import from Word plugin converts documents into editor-safe HTML automatically.
  • Formatting is preserved cleanly: Headings, lists, tables, images, and inline styles are retained without HTML bloat.
  • Client-side or server-side conversion: Choose Mammoth.js in the browser or a backend endpoint based on your needs.
  • No custom DOCX pipelines required: Word import becomes a configuration task, not a parsing project.
  • Easy to ship in real apps: A simple frontend setup and lightweight backend are enough to support Word imports.

Paste from Word vs true Word document import

These two workflows are often treated as interchangeable, but they solve very different problems.

Paste from Word

  • Clipboard-based and browser-dependent
  • Inconsistent formatting across environments
  • Limited control over cleanup and normalization
  • Harder to guarantee clean HTML output

Word document import

  • File-based and deterministic
  • Full control over DOCX → HTML conversion
  • Easier to normalize content before inserting it into the editor
  • Better formatting preservation for complex documents

For applications where users regularly upload long-form or structured content, paste-from-Word is a fallback, not a solution. A true Word document import pipeline is what allows you to preserve formatting while still enforcing editor rules.

Froala import from Word plugin overview

The Import from Word plugin allows Froala Editor to import Microsoft Word (.docx) files directly into the editor with formatting preserved. It replaces unreliable clipboard-based pasting with a controlled, file-based import process that converts Word documents into clean, editor-safe HTML before editing begins.

The plugin converts common Word structures like headings, paragraphs, lists, tables, images, and inline formatting, into normalized HTML. It aligns with Froala’s editing model, ensuring consistent behavior across edit, save, and reload cycles.

It supports two conversion modes:

  • Client-side conversion using Mammoth.js (default, when importFromWordUrlToUpload is null)
  • Server-side conversion via a configurable backend endpoint

During import, the plugin removes Word-specific markup, normalizes document structure, and preserves essential formatting without introducing HTML bloat. Built-in options for file size limits, allowed file types, drag-and-drop import, and lifecycle events (word.beforeImport, word.afterImport) make it easy to adapt the workflow to different application needs.

For developers, this turns Word import into a configuration task rather than a custom parsing problem, with Froala handling conversion, cleanup, and formatting preservation out of the box.

Implementing Word document import with Froala

This example demonstrates a complete local setup to:

  • Import a Word (.docx) file using the Import from Word plugin
  • Edit the imported content in Froala Editor
  • Save the edited HTML using a lightweight local backend

The goal is to show a real, reproducible workflow, not just isolated snippets.

Project structure

froala-word-import-demo/
├── server.js
├── package.json
├── saved-content.html
└── public/
    └── index.html

Step 1: Set up a simple local backend

The backend:

  • Serves the frontend files
  • Accepts editor HTML
  • Saves the content locally

Install dependencies

npm init -y
npm install express body-parser

server.js

const express = require('express');
const bodyParser = require('body-parser');
const fs = require('fs');

const app = express();
app.use(bodyParser.json());
app.use(express.static('public'));

app.post('/save', (req, res) => {
  const html = req.body.html || '';
  fs.writeFileSync('saved-content.html', html);
  res.json({ status: 'saved' });
});

app.listen(3000, () => {
  console.log('App running at http://localhost:3000');
});

Step 2: Create the frontend page

This page:

  • Loads Froala
  • Enables the Import from Word plugin
  • Allows users to import a .docx file
  • Sends edited content to the backend

public/index.html

<!DOCTYPE html>
<html lang="en">
<head>
  <meta charset="UTF-8" />
  <title>Froala Import from Word Demo</title>

  <!-- Froala core styles -->
  <link
    href="https://cdn.jsdelivr.net/npm/froala-editor@latest/css/froala_editor.pkgd.min.css"
    rel="stylesheet"
  />

  <style>
    body {
      font-family: Arial, sans-serif;
      padding: 20px;
    }
    #editor {
      margin-bottom: 15px;
    }
    button {
      padding: 8px 14px;
      cursor: pointer;
    }
  </style>
</head>
<body>

  <h3>Import Word Document and Edit</h3>

  <div id="editor"></div>
  <button id="saveBtn">Save Content</button>

  <!-- Froala core -->
  <script src="https://cdn.jsdelivr.net/npm/froala-editor@latest/js/froala_editor.pkgd.min.js"></script>

  <!-- Import from Word plugin -->
  <script src="https://cdn.jsdelivr.net/npm/froala-editor@latest/js/plugins/import_from_word.min.js"></script>

  <!-- Mammoth.js (required for client-side conversion) -->
  <script src="https://cdnjs.cloudflare.com/ajax/libs/mammoth/1.4.21/mammoth.browser.min.js"></script>

  <script>
    const editor = new FroalaEditor('#editor', {
      pluginsEnabled: ['importFromWord'],

      // Optional plugin configuration
      importFromWordMaxFileSize: 3 * 1024 * 1024,
      importFromWordFileTypesAllowed: ['docx'],
      importFromWordEnableImportOnDrop: true,

      events: {
        'word.beforeImport': function (file) {
          console.log('Importing:', file.name);
        },
        'word.afterImport': function (html) {
          console.log('Imported HTML ready');
        }
      }
    });

    document.getElementById('saveBtn').addEventListener('click', async () => {
      const html = editor.html.get();

      await fetch('/save', {
        method: 'POST',
        headers: { 'Content-Type': 'application/json' },
        body: JSON.stringify({ html })
      });

      alert('Content saved locally');
    });
  </script>

</body>
</html>

Step 3: Import a Word document

With the plugin enabled:

  • Users can drag and drop a .docx file into the editor
  • Or trigger import programmatically using:
editor.importFromWord.import();

During import:

  • The plugin converts the .docx file to HTML
  • Client-side conversion is handled via Mammoth.js
  • Word-specific markup is removed
  • Headings, lists, tables, images, and inline formatting are preserved
  • Clean, editor-safe HTML is inserted into Froala

Step 4: Edit and save content

After import:

  • The content is fully editable inside Froala
  • Clicking Save Content sends the HTML to the backend
  • The backend stores the result in saved-content.html

You can open this file directly to verify that:

  • The HTML is clean
  • No Word-specific markup remains
  • Content can be reused or reloaded safely

Get the full, working example from this GitHub repository.

Why this implementation works

This setup reflects the intended usage of the Import from Word plugin:

  • Uses Froala’s native .docx import flow
  • Supports client-side conversion via Mammoth.js
  • Avoids custom DOCX parsing logic
  • Keeps backend logic minimal and optional
  • Produces predictable, maintainable HTML

For most applications, this pattern is sufficient to support Word-based authoring workflows without introducing unnecessary complexity.

Conclusion

Importing Word documents into a web-based editor doesn’t need to be fragile, complex, or custom-built. With the Import from Word plugin, Froala Editor provides a production-ready way to bring .docx files into your application with formatting preserved and HTML kept clean.

As the demo shows, Word import becomes a configuration and integration task, not a parsing problem. The plugin handles conversion, cleanup, and structure normalization automatically, while your application stays focused on editing, saving, and rendering content reliably.

If your users work in Word, and most do, supporting direct Word import is no longer optional. It’s a baseline expectation.

Try Froala with the Import from Word plugin, build the demo locally, and see how quickly you can add Word document import to your editor without maintaining a custom pipeline.

graphical user interface, text

How to Build a Print-Ready Report Editor in JavaScript

Print-ready JavaScript report editor with tables and page break support

Building reports in a web app is easy, until users need to print them or export them.

Business reports, invoices, analytics summaries, and audit documents have strict requirements: consistent layouts, clean page breaks, structured tables, and reliable exports to formats like Word. A generic rich text editor often falls short here. Content that looks fine on screen can break across pages, shift during printing, or lose structure during export.

In this guide, we’ll walk through how to build a print-ready JavaScript report editor using Froala, HTML, and JavaScript. We’ll focus on the practical side—page breaks, tables, custom toolbar actions, print styling, and export workflows, using real code examples you can adapt directly into a production app.

The goal isn’t just editable content. It’s reports that stay intact from editor to printer to document export.

Key takeaways

  • Print-ready reports require controlled layout, not just rich text editing
  • Clean HTML + strict CSS are essential for consistent printing and exports
  • Manual page breaks and structured tables prevent broken output
  • A custom toolbar keeps report formatting predictable and focused
  • Froala helps ensure reports stay intact from editing to print and Word export

Base setup: initializing a JavaScript report editor with Froala

The first step in building a print-ready JavaScript report editor is starting with a clean, predictable editor setup. Reports are structured documents, so the editor configuration should prioritize layout stability, consistent spacing, and a focused editing surface.

Below is a minimal Froala setup optimized for report creation rather than free-form content editing.

HTML markup

Start with a dedicated container for your report editor. In most reporting workflows, this editor lives inside a fixed-width layout that mirrors a printed page.

<div id="report-editor"></div>

You can optionally wrap this in a page container if you want to visually represent print margins early on.

Basic Froala initialization

Initialize Froala with a restrained configuration. The goal here is clarity and control, not feature overload.

new FroalaEditor('#report-editor', {
  heightMin: 600,
  heightMax: 800,
  toolbarSticky: true,
  charCounterCount: false,
  quickInsertEnabled: false
});

Why these settings matter:

  • heightMin / heightMax creates a stable editing area similar to a document page
  • toolbarSticky keeps report tools accessible during long edits
  • charCounterCount and quickInsertEnabled are disabled to reduce noise

Setting a print-friendly default style

Reports should look consistent from the moment a user starts typing. You can enforce base typography and spacing using editor styles.

new FroalaEditor('#report-editor', {
  // Stable editor dimensions for document-style content
  heightMin: 600,
  heightMax: 800,
  toolbarSticky: true,

  // Remove non-essential UI noise
  charCounterCount: false,
  quickInsertEnabled: false,

  // Controlled formatting for reports
  paragraphFormat: {
    N: 'Normal',
    H1: 'Heading 1',
    H2: 'Heading 2'
  },

  // Limit fonts to print-safe options
  fontFamily: {
    'Arial,Helvetica,sans-serif': 'Arial',
    'Times New Roman,Times,serif': 'Times New Roman'
  },

  // Restrict font sizes to avoid layout shifts
  fontSize: ['10', '11', '12', '14']
});

Keeping font options limited prevents layout shifts during printing and export.

Explore more in Froala documentation.

Preparing the editor for report content

At this stage, you’re not adding page breaks or export logic yet. The goal is to ensure the editor behaves like a report canvas, not a blog editor.

Best practices for this setup:

  • Use predictable fonts and sizes
  • Avoid auto-formatting features that modify spacing
  • Keep the toolbar minimal and intentional

With this base in place, you now have a stable foundation for adding page breaks, structured tables, custom toolbar actions, and export workflows, which we’ll build on in the next sections.

Creating print-safe layouts with HTML & CSS

Once the editor is initialized, the next step is making sure the content it produces is actually print-ready. This is where HTML structure and CSS do most of the heavy lifting. Without print-safe styles, even well-formatted reports can break across pages, shift margins, or lose alignment when printed or exported.

The goal is to make the editor behave like a document page, not a responsive web layout.

Defining a page container

Wrap your report content in a fixed-width container that mirrors a standard paper size. This helps users see realistic margins while editing.

<div class="report-page">
  <!-- Froala editor content -->
</div>

Use CSS to control width, padding, and background so the layout matches a printed page.

.report-page {
  width: 794px; /* A4 width at 96 DPI */
  margin: 0 auto;
  padding: 40px;
  background: #ffffff;
}

This ensures consistent line lengths and prevents unpredictable wrapping.

Setting print margins and page rules

Use print-specific styles to control how content behaves during printing.

@media print {
  body {
    margin: 0;
  }

  .report-page {
    width: auto;
    margin: 0;
    padding: 25mm;
  }
}

Key points:

  • Avoid browser default margins
  • Set margins explicitly for print
  • Let the browser handle page size

Preventing layout breaks

Certain elements should never split across pages, especially tables and headings.

h1, h2, h3 {
  page-break-after: avoid;
}

table {
  page-break-inside: avoid;
}

This keeps section headers and table rows visually intact.

Creating visual page boundaries (optional but useful)

For longer reports, visual page boundaries help users understand where content will break when printed.

@media screen {
  .report-page {
    box-shadow: 0 0 0 1px #ddd;
  }
}

This does not affect printing but improves the editing experience.

Font and spacing consistency

Stick to conservative typography rules for print reliability.

.report-page {
  font-family: Arial, Helvetica, sans-serif;
  font-size: 12px;
  line-height: 1.5;
}

Avoid relative units like em or rem for report layouts—absolute values reduce surprises during export.

Why this matters for a JavaScript report editor

A print-ready JavaScript report editor depends on predictable layout behavior. By defining page containers, print rules, and layout constraints at the CSS level, you ensure that content authored in Froala remains consistent from:

  • On-screen editing
  • Print preview
  • Physical printing
  • Document export

With print-safe styles in place, you’re ready to introduce page breaks, which we’ll handle next.

Adding page break support

Page breaks are one of the most important features in a print-ready JavaScript report editor. Without explicit control, reports rely on the browser’s automatic pagination, which almost always leads to broken tables, split headings, and unpredictable output.

The goal here is simple: give users manual control over where pages end, while keeping the implementation clean and reliable.

Defining a page break element

Start by defining a dedicated HTML element that represents a page break. This element will exist in the editor content and translate directly into print behavior.

<div class="page-break"></div>

Attach print-specific behavior using CSS:

.page-break {
  page-break-after: always;
  break-after: page;
}

This ensures consistent behavior across modern browsers.

Styling page breaks for the editor (screen only)

During editing, users need to see where a page break exists. You can add a visual indicator that appears only on screen, not in print.

@media screen {
  .page-break {
    border-top: 2px dashed #ccc;
    margin: 24px 0;
  }
}

This gives clear feedback without affecting the final printed document.

Adding a custom page break toolbar button

Next, expose page breaks directly in the editor toolbar. This allows users to insert page breaks exactly where they need them.

Using Froala, define a custom icon and command:

FroalaEditor.DefineIcon('pageBreak', {
  NAME: 'file',
  SVG_KEY: 'page-break'
});

FroalaEditor.RegisterCommand('pageBreak', {
  title: 'Insert Page Break',
  focus: true,
  undo: true,
  callback: function () {
    this.html.insert('<div class="page-break"></div>');
  }
});

Enabling the page break button in the toolbar

Once the command is registered, add it to your editor’s toolbar configuration.

new FroalaEditor('#report-editor', {
  // Layout for report-style documents
  heightMin: 600,
  heightMax: 800,
  toolbarSticky: true,

  // Reduce non-report noise
  charCounterCount: false,
  quickInsertEnabled: false,

  // Controlled formatting
  paragraphFormat: {
    N: 'Normal',
    H1: 'Heading 1',
    H2: 'Heading 2'
  },

  fontFamily: {
    'Arial,Helvetica,sans-serif': 'Arial',
    'Times New Roman,Times,serif': 'Times New Roman'
  },

  fontSize: ['10', '11', '12', '14'],

  // Report-focused toolbar
  toolbarButtons: [
    'bold', 'italic', 'underline',
    '|',
    'insertTable',
    'pageBreak',
    '|',
    'print'
  ]
});

This keeps report-specific actions easily accessible without cluttering the UI.

Next, we’ll focus on building structured tables that remain stable across pages and exports.

Building structured tables for reports

Tables are at the core of most reports—financial summaries, audit data, analytics breakdowns, and comparisons all depend on them. In a print-ready JavaScript report editor, tables must stay readable, aligned, and intact across pages and exports.

This section focuses on building print-safe, predictable tables using Froala, HTML, and CSS.

Using tables as first-class report elements

Froala’s table tools make it easy to insert and edit tables, but for reports, you should constrain styling and behavior to avoid layout issues.

At a minimum, reports should rely on:

  • Fixed-width tables
  • Explicit headers (<thead>)
  • Consistent cell padding and borders

Example table structure:

<table class="report-table">
  <thead>
    <tr>
      <th>Description</th>
      <th>Amount</th>
      <th>Notes</th>
    </tr>
  </thead>
  <tbody>
    <tr>
      <td>Total Revenue</td>
      <td>$125,000</td>
      <td>Q4 Summary</td>
    </tr>
    <tr>
      <td>Total Expenses</td>
      <td>$78,000</td>
      <td>Operational costs</td>
    </tr>
  </tbody>
</table>

Print-safe table styling

Apply strict CSS rules to ensure tables behave consistently when printed or exported.

.report-table {
  width: 100%;
  border-collapse: collapse;
  table-layout: fixed;
}

.report-table th,
.report-table td {
  border: 1px solid #ddd;
  padding: 8px;
  vertical-align: top;
  word-wrap: break-word;
}

Why this matters:

  • table-layout: fixed prevents column resizing issues
  • Explicit borders improve readability in print
  • Fixed padding ensures consistent row height

Preventing tables from breaking across pages

One of the most common reporting problems is tables splitting awkwardly across pages.

At minimum, prevent tables from breaking mid-render:

@media print {
  table {
    page-break-inside: avoid;
  }
}

For long tables, browsers will still paginate naturally, but this rule prevents partial row rendering and broken headers.

Repeating table headers on new pages

To keep multi-page tables readable, always use a <thead> element. Browsers automatically repeat table headers when printing.

@media print {
  thead {
    display: table-header-group;
  }
}

This ensures column headers appear at the top of each printed page.

Restricting table editing in the toolbar

For reporting workflows, too much table flexibility can hurt layout consistency. Limit table-related actions to essentials.

Example toolbar configuration:

toolbarButtons: [
  'bold', 'italic',
  '|',
  'insertTable',
  'tableHeader',
  'tableRemove',
  '|',
  'pageBreak',
  'print'
]

This keeps users focused on content, not visual experimentation.

Why structured tables matter

In reporting, tables are not decorative—they’re data containers. By enforcing structure and print-safe styling, you ensure tables created in the editor remain stable when:

  • Printing
  • Exporting to Word
  • Sharing across teams

With tables handled correctly, the editor is ready for export workflows and document output, which we’ll cover next.

Custom toolbar for report editing

A default WYSIWYG toolbar is designed for general content creation. Reporting workflows are different. Users don’t need emojis, media embeds, or visual effects. They need precise control over structure, layout, and output.

For a print-ready JavaScript report editor, the toolbar should expose only the tools that directly affect reporting quality.

Why a custom toolbar matters

In report editors:

  • Every formatting action can affect pagination
  • Inconsistent styling leads to broken print output
  • Extra tools increase the risk of layout issues

A custom toolbar keeps the editing experience intentional and predictable.

Defining a report-focused toolbar

You can add a minimal toolbar configuration tailored for reports built with Froala.

new FroalaEditor('#report-editor', {
  // Layout
  heightMin: 600,
  heightMax: 800,
  toolbarSticky: true,

  // Cleanup non-report UI
  charCounterCount: false,
  quickInsertEnabled: false,

  // Controlled formatting
  paragraphFormat: {
    N: 'Normal',
    H1: 'Heading 1',
    H2: 'Heading 2'
  },

  fontFamily: {
    'Arial,Helvetica,sans-serif': 'Arial',
    'Times New Roman,Times,serif': 'Times New Roman'
  },

  fontSize: ['10', '11', '12', '14'],

  // Report-specific toolbar
  toolbarButtons: [
    'bold', 'italic', 'underline',
    '|',
    'paragraphFormat',
    'insertTable',
    'pageBreak',
    '|',
    'print'
  ]
});

This setup prioritizes:

  • Basic text emphasis
  • Controlled heading usage
  • Table insertion
  • Manual page breaks
  • Print access

Grouping toolbar actions logically

Toolbar grouping improves usability, especially for long reports.

toolbarButtons: [
  'bold', 'italic', 'underline',
  '|',
  'paragraphFormat',
  '|',
  'insertTable',
  'tableHeader',
  '|',
  'pageBreak',
  'print'
]

Logical grouping reduces accidental formatting and keeps report actions easy to find.

Adding custom report actions

The toolbar is also where you expose report-specific commands, such as:

  • Insert page break
  • Trigger print preview
  • Export to Word

Example of a custom command button already registered earlier:

toolbarButtons: [
  'insertTable',
  'pageBreak',
  'print'
]

Custom commands integrate seamlessly alongside native Froala tools.

With a custom toolbar in place, your editor now supports structured content, page control, and clean output, the essentials of a print-ready reporting workflow.

Next, we’ll look at exporting reports to Word and handling output formats reliably.

Exporting reports to Word

Printing is often only part of a reporting workflow. In many business applications, users also expect to export reports to Word so they can share, review, or apply final formatting outside the application. For a print-ready JavaScript report editor, Word export must preserve structure—tables, headings, spacing, and page breaks.

This section focuses on a practical, implementation-first approach to exporting Froala-generated content to Word.

Why Word export needs special handling

Word documents are not just HTML files with a different extension. If you export raw HTML without preparation, you’ll quickly run into issues such as:

  • Missing page breaks
  • Broken tables
  • Inconsistent margins
  • Lost headings

The key is to control the HTML output before conversion.

Step 1: Extract clean HTML from the editor

Start by reading the editor content directly from the Froala instance.

const editorHtml = document.querySelector('#report-editor').innerHTML;

At this point, the HTML already contains:

  • Structured tables
  • Page break elements
  • Controlled typography

This is why earlier layout and styling steps matter.

Step 2: Prepare HTML for Word conversion

Before converting to DOCX, wrap the content in a print-safe document template.

function buildWordHtml(content) {
  return `
    <html>
      <head>
        <style>
          body {
            font-family: Arial, Helvetica, sans-serif;
            font-size: 12pt;
          }
          table {
            width: 100%;
            border-collapse: collapse;
          }
          th, td {
            border: 1px solid #000;
            padding: 6px;
          }
          .page-break {
            page-break-after: always;
          }
        </style>
      </head>
      <body>
        ${content}
      </body>
    </html>
  `;
}

This ensures Word receives a self-contained, well-structured document.

Step 3: Convert HTML to DOCX

In production applications, Word export is typically handled server-side for reliability and consistency.

Common approaches include:

  • HTML → DOCX libraries
  • Headless document converters
  • Backend services that generate Word files

From the frontend, send the prepared HTML to your server:

fetch('/export/word', {
  method: 'POST',
  headers: { 'Content-Type': 'application/json' },
  body: JSON.stringify({
    html: buildWordHtml(editorHtml)
  })
});

This keeps the client lightweight and avoids browser-specific limitations.

Step 4: Preserve page breaks in Word

The .page-break element defined earlier plays a critical role here. Word recognizes page-break-after: always, ensuring manual page breaks inserted in the editor appear correctly in the exported document.

No additional logic is needed if your CSS and HTML are consistent.

Step 5: Exposing Word Export in the toolbar

Export actions should feel like part of the editor, not an external workflow. Add a custom toolbar button to trigger Word export.

FroalaEditor.RegisterCommand('exportWord', {
  title: 'Export to Word',
  focus: false,
  undo: false,
  callback: function () {
    const html = document.querySelector('#report-editor').innerHTML;
    exportToWord(html);
  }
});

Include the button in your toolbar configuration:

toolbarButtons: [
  'bold', 'italic',
  '|',
  'insertTable',
  'pageBreak',
  '|',
  'exportWord',
  'print'
]

Why this works well with Froala

Because Froala produces clean, well-structured HTML, the export pipeline stays manageable. When layout rules, page breaks, and tables are handled consistently at the editor level, exporting to Word becomes a controlled transformation, not a guessing game.

With Word export in place, your report editor now supports both physical printing and document sharing, covering the full reporting workflow.

Print preview workflow

A print-ready report editor is incomplete without a reliable print preview. Users need to see exactly how their report will look on paper before committing to print or export. Relying on guesswork at this stage leads to misaligned pages, clipped tables, and broken sections.

The print preview workflow should reuse the same HTML and CSS that drive final printing—no alternate layouts, no surprises.

Reusing the same print styles

The most important rule for print preview is consistency. The preview must use the same @media print styles defined earlier.

@media print {
  .report-page {
    padding: 25mm;
  }

  .page-break {
    page-break-after: always;
  }
}

If the preview uses different styles, it becomes meaningless.

Opening a print preview window

A common and reliable approach is to render the editor content into a dedicated print window.

function openPrintPreview() {
  const content = document.querySelector('#report-editor').innerHTML;

  const printWindow = window.open('', '_blank');
  printWindow.document.write(`
    <html>
      <head>
        <title>Print Preview</title>
        <link rel="stylesheet" href="/print.css">
      </head>
      <body>
        <div class="report-page">
          ${content}
        </div>
      </body>
    </html>
  `);

  printWindow.document.close();
}

This isolates the preview from the main app layout and ensures accurate rendering.

Triggering print from the preview

Once the preview window is ready, printing should be a single action.

printWindow.focus();
printWindow.print();

This uses the browser’s native print dialog while preserving all page break and layout rules.

Adding print preview to the toolbar

Expose the preview workflow directly in the editor toolbar so users can access it without leaving the editing context.

FroalaEditor.RegisterCommand('printPreview', {
  title: 'Print Preview',
  focus: false,
  undo: false,
  callback: function () {
    openPrintPreview();
  }
});

Include it in your toolbar configuration:

toolbarButtons: [
  'bold', 'italic',
  '|',
  'insertTable',
  'pageBreak',
  '|',
  'printPreview',
  'print'
]

What to Validate in Print Preview

Before allowing users to print or export, the preview should confirm:

  • Page breaks appear where expected
  • Tables do not split incorrectly
  • Margins and spacing are consistent
  • Headers and footers align correctly

Encouraging users to preview reduces failed prints and export rework.

With print preview implemented, users can confidently move from editing to printing or exporting without surprises.

Get the complete example from this GitHub repo.

Conclusion

Building a print-ready JavaScript report editor requires more than adding a print button. You need structured content, controlled layouts, manual page breaks, reliable tables, and predictable export workflows.

By combining Froala, HTML, and JavaScript, you can create a report editor that produces clean, consistent output from on-screen editing to print preview to Word export. With the right architecture and constraints in place, reports stop being fragile documents and become dependable, production-ready assets your users can trust.

Try Froala to build reliable, print-ready report workflows in JavaScript.

graphical user interface, text

Import Word Documents Server-Side: Why and How with Laravel + Aspose

Import Word Documents

Froala has introduced a powerful Import from Word plugin that simplifies bringing Microsoft Word documents into your Froala editor. While the plugin offers a client-side solution using Mammoth.js, many developers need greater control—better formatting fidelity, stricter HTML standards, and reliable handling of complex documents.

In this step-by-step guide, you’ll discover how to build a server-side Word import solution as a PHP/Laravel developer. We’ll leverage Aspose’s robust conversion engine to ensure your Word documents transform into editor-ready HTML with pixel-perfect formatting and complete styling preservation.

Key Takeaways

  • Client-side import (Froala’s native plugin) is fast to implement but sacrifices formatting fidelity for common documents.
  • Server-side import gives you control over conversion quality, HTML standards compliance, and handling of complex documents—at the cost of added infrastructure.
  • Aspose.Words Cloud eliminates server-side dependencies (no LibreOffice, no Java) while delivering enterprise-grade conversion reliability.
  • This guide walks you through a complete Laravel implementation that’s production-ready with minimal custom code.

Froala’s Import from Word Plugin: Client vs. Server

Selecting the appropriate approach—client-side or server-side processing—will fundamentally shape your implementation strategy and determine the capabilities of your import workflow.

Client-Side Import

Froala’s native “Import from Word” plugin leverages Mammoth.js to handle .docx conversion directly within the browser:

  • Word files are uploaded through Froala’s user interface.
  • Mammoth.js processes the conversion in the browser, eliminating initial server overhead.
  • The resulting HTML is generated and immediately inserted into the editor.
  • Implementation requires minimal custom code.

Recommended for scenarios where:

  • Rapid deployment is prioritized.
  • Formatting precision is secondary to functionality.
  • Documents are typically small in file size.
  • Development overhead should be minimized.

Server-Side Import

A custom server-side implementation allows you to process Word documents using a library or service of your choice, offering greater control over the conversion process.

Recommended for scenarios where:

  • Formatting fidelity and visual accuracy are essential.
  • Your application handles large or complex documents reliably.
  • Specific HTML standards compliance is required.
  • You need centralized control over document storage and processing.

Popular PHP libraries for Word-to-HTML conversion include PHPDocX and ConvertAPI. Each offers distinct advantages depending on your infrastructure and performance requirements.

For this guide, we implement the server-side approach using the Aspose library, which provides enterprise-grade conversion capabilities with minimal server-side infrastructure requirements.

Understanding Word Document Structure – Revised

Before implementing the conversion process, it’s essential to understand the underlying architecture of Word documents and how Aspose processes them. Microsoft Word documents (.docx files) are actually ZIP archives containing XML markup, stylesheets, and embedded media resources—a structured format that enables reliable programmatic extraction.

What Aspose Extracts

Aspose.Words provides comprehensive document parsing capabilities, processing the following elements:

  • Document structure: Paragraphs, sections, page breaks, and hierarchical relationships
  • Text formatting: Font families, weights (bold), styles (italic, underline), sizes, and color values
  • Paragraph formatting: Text alignment, indentation levels, line spacing, and spacing before/after
  • List structures: Ordered lists, unordered lists, and multi-level nested hierarchies
  • Tables: Cell content, border definitions, cell shading, and column widths
  • References: Hyperlinks with target URLs and anchor text
  • Media elements: Embedded images, charts, and multimedia content
  • Styling: Document-level styles, themes, and formatting inheritance rules

Why Choose Aspose

Aspose.Words offers distinct advantages over alternative solutions:

Formatting Fidelity

Aspose maintains complex table structures, cell alignments, and layout relationships with precision. Alternative libraries such as Mammoth.js or PHPWord often lose formatting nuances during conversion, resulting in degraded visual output.

Cloud-Based Processing

Conversion occurs on Aspose’s infrastructure, eliminating the need to install dependencies like LibreOffice or Java on your web server. This reduces server resource consumption and simplifies deployment across multiple environments.

Intelligent Media Handling

Aspose provides flexible image management options, including automatic Base64 encoding for inline images or integration with cloud storage services for scalable asset management.

Prerequisites & Setup

Before implementing the Word import solution, ensure your development environment meets the following requirements and is properly configured.

Froala Editor Environment

  • Froala Editor library version 5.x or higher
  • Valid licensing key for your deployment environment
  • Working knowledge of Froala’s configuration API

Laravel Project Structure

  • Laravel 8.x or later
  • Composer package manager installed and configured
  • Familiarity with Laravel routing, controllers, and request handling

Aspose.Words for PHP

Install the Aspose.Words Cloud library via Composer:

composer require aspose-cloud/aspose-words-cloud
  1. Obtain API Credentials
    1. Create a free account at the Aspose Cloud Dashboard.
    2. Navigate to the Applications section
    3. Retrieve your Client ID and Client Secret
  2. Configure Environment Variables

Add your Aspose credentials to your .env file:

ASPOSE_CLIENT_ID="c09ed4d3-*****-****-8a73-******"
ASPOSE_CLIENT_SECRET="6c85*************************66"
  1. Register Service Configuration

Open config/services.php and add the following entry to the returned configuration array. This allows the config() helper in your controller to find the values:

// config/services.php

return [
    // ... other services like mailgun, stripe, etc.

    'aspose' => [
        'client_id' => env('ASPOSE_CLIENT_ID'),
        'client_secret' => env('ASPOSE_CLIENT_SECRET'),
    ],
];

Why do it this way?

  • Security: You should never hardcode passwords or API keys in your Controller, as they might get pushed to GitHub/GitLab.
  • Flexibility: You can easily use different credentials for your local development and your production server.

Quick Tips:

  • After updating .env, run php artisan config:clear to ensure Laravel sees the new changes.
  • Ensure your .env file is included in your .gitignore so your keys stay private.

Implementation: Step-by-Step Code

Now let’s build the actual Laravel implementation to handle Word document imports and convert them to editor-ready HTML.

Create Routes

Define two routes in routes/web.php to handle the editor display and Word document processing:

// Display the Froala editor interface
Route::get('/editor', function () {  
    return view('editor');
});

// Handle Word document conversion via Aspose
Route::post('/editor/import-word', [WordImportController::class, 'import'])
    ->name('froala.import.word');

Route Breakdown:

  • The GET route renders the editor view where users interact with Froala.
  • The POST route accepts Word files from Froala and delegates conversion to the controller.
  • The named route allows us to reference the URL in views using Laravel’s route() helper.

Create the Controller

Create app/Http/Controllers/WordImportController.php with the following implementation:

<?php

namespace App\Http\Controllers;

use Illuminate\Http\Request;
use Aspose\Words\WordsApi;
use Aspose\Words\Model\Requests\ConvertDocumentRequest;
use Illuminate\Support\Facades\Log;

class WordImportController extends Controller
{
    private $wordsApi;

    /**
     * Initialize the Aspose Words API client with credentials
     * 
     * The constructor retrieves API credentials from Laravel's configuration
     * and instantiates the WordsApi client for document conversion operations.
     */
    public function __construct()
    {
        $clientId = config('services.aspose.client_id');
        $clientSecret = config('services.aspose.client_secret');

        $this->wordsApi = new WordsApi($clientId, $clientSecret);
    }

    /**
     * Convert uploaded Word document to HTML
     * 
     * This method handles the complete conversion workflow:
     * 1. Validates the uploaded file against security constraints
     * 2. Prepares a conversion request for the Aspose API
     * 3. Processes the document on Aspose's servers
     * 4. Returns the converted HTML to Froala Editor
     * 
     * @param Request $request The HTTP request containing the Word file
     * @return \Illuminate\Http\JsonResponse JSON response with HTML content or error
     */
    public function import(Request $request)
    {
        // Validate uploaded file: must be DOCX format and under 10MB
        $request->validate([
            'file' => 'required|mimes:docx|max:10240',
        ]);

        try {
            $file = $request->file('file');

            // Create conversion request specifying HTML as target format
            // Aspose preserves complex formatting, tables, and styling during conversion
            $convertRequest = new ConvertDocumentRequest(
                $file->getRealPath(),
                "html"
            );

            // Execute conversion on Aspose servers
            // Returns a file object containing the generated HTML
            $resultFile = $this->wordsApi->convertDocument($convertRequest);

            // Extract HTML content from the result file stream
            $htmlContent = file_get_contents($resultFile->getPathname());

            // Return JSON response that Froala Editor expects
            return response()->json([
                'html' => $htmlContent
            ]);

        } catch (\Exception $e) {
            // Log conversion errors for debugging and monitoring
            Log::error('Aspose Conversion Error: ' . $e->getMessage());

            // Return user-friendly error response with appropriate HTTP status
            return response()->json([
                'error' => 'Conversion failed. Please try again.'
            ], 500);
        }
    }
}

Controller Explanation:

  • Constructor: Retrieves Aspose credentials from your Laravel configuration and initializes the API client. This ensures credentials are never hardcoded in your application logic.
  • import() Method: Orchestrates the conversion workflow. The method validates incoming files, creates a conversion request with ConvertDocumentRequest, executes the conversion via Aspose’s cloud infrastructure, and returns the resulting HTML in JSON format.
  • Error Handling: Catches exceptions during conversion, logs them for troubleshooting, and returns a standardized error response that Froala can handle gracefully.

Configure Frontend: Froala Integration

Create resources/views/editor.blade.php with the following template:

<!DOCTYPE html>
<html lang="{{ str_replace('_', '-', app()->getLocale()) }}">
    <head>
        <meta charset="utf-8">
        <meta name="viewport" content="width=device-width, initial-scale=1">
        
        <!-- Load Froala Editor stylesheets from CDN -->
        <link href="https://cdn.jsdelivr.net/npm/froala-editor@latest/css/froala_editor.pkgd.min.css" 
              rel="stylesheet" type="text/css" />
        
        <title>Word Import Demo</title>
        <style>
            body {
                background-color: #eee;
            }

            h1.title {
                font-size: 2.5em;
                padding: 16px;
                border-radius: 10px;
                border: 1px solid #CCCCCC;
                text-align: center;
            }

            .container {
                max-width: 70%;
                margin: 50px auto;
            }
        </style>
        
        <!-- Store CSRF token as meta tag for use in JavaScript -->
        <meta name="csrf-token" content="{{ csrf_token() }}">

        <script>
            /**
             * CSRF Token Injection Middleware
             * 
             * Intercepts all fetch requests and automatically attaches the CSRF token
             * required by Laravel for POST requests. This prevents CSRF attacks while
             * maintaining a seamless developer experience.
             */
            (function () {
                const token = document
                    .querySelector('meta[name="csrf-token"]')
                    ?.getAttribute('content');

                // Exit early if token unavailable or fetch not supported
                if (!token || !window.fetch) return;

                const originalFetch = window.fetch;

                // Override global fetch function
                window.fetch = function (input, init = {}) {
                    init.headers = new Headers(init.headers || {});

                    // Determine request URL for same-origin validation
                    const requestUrl = typeof input === 'string' ? input : input.url;
                    const isSameOrigin = requestUrl.startsWith('/') ||
                        requestUrl.startsWith(window.location.origin);

                    // Attach CSRF token only to same-origin requests
                    if (isSameOrigin) {
                        init.headers.set('X-CSRF-TOKEN', token);
                        init.credentials = 'same-origin';
                    }

                    // Execute the original fetch with enhanced headers
                    return originalFetch(input, init);
                };
            })();
        </script>
    </head>
    <body>
        <div class="container">
            <h1 class="title">Import From Word Demo</h1>
            
            <!-- Editor container with data attribute storing the import endpoint -->
            <div id="editor" data-import-word-url="{{ route('froala.import.word') }}"></div>
        </div>

        <!-- Load Froala Editor JavaScript library from CDN -->
        <script type="text/javascript"
                src="https://cdn.jsdelivr.net/npm/froala-editor@latest/js/froala_editor.pkgd.min.js"></script>

        <script>
            /**
             * Initialize Froala Editor with Word Import Capability
             * 
             * Retrieves the import URL from the data attribute and configures
             * Froala to use the Laravel endpoint for all Word document conversions.
             */
            const importUrl = document.getElementById('editor').dataset.importWordUrl;
            
            const editor = new FroalaEditor("div#editor", {
                // Configure Froala to send Word files to our Laravel import endpoint
                importFromWordUrlToUpload: importUrl,
            });
        </script>
    </body>
</html>

Template Explanation:

  • CSRF Token Meta Tag: Stores the Laravel CSRF token as a meta element for retrieval by JavaScript middleware.
  • CSRF Middleware Function: Laravel enforces CSRF protection by requiring a valid token with all state-changing requests (POST, PUT, DELETE, etc.). That’s why we added a JavaScript code that automatically injects the CSRF token into all fetch requests targeting same-origin endpoints. Without this token, requests will be rejected with a 419 error.
  • Editor Initialization: The Froala editor is instantiated with the importFromWordUrlToUpload option set to your Laravel route. When users upload or drag Word files into the editor, Froala automatically submits them to this endpoint for server-side processing.
  • Data Attributes: The editor container uses a data attribute to store the import URL, keeping your template clean and allowing JavaScript to dynamically retrieve the route without string concatenation.

Testing and Validation

To verify the complete implementation:

  1. Start your Laravel development server: php artisan serve
  2. Navigate to http://localhost:8000/editor in your browser.
  3. Use Froala’s Word import feature to upload a .docx file.
  4. Confirm that the document content appears correctly in the editor with preserved formatting.

The conversion should complete within seconds, with Aspose handling all complex document structure transformations server-side.

import from word

FAQ

Can I try this with Froala’s trial license?

Yes. Froala offers a free trial that works with this implementation. Use it to validate the approach before committing to a paid license. The same code runs unchanged when you switch to a production key.

What if the conversion fails? What happens to the user?

The controller catches exceptions and returns a JSON error response. In the template, you’ll want to handle this gracefully—show an error message, allow retry, or fall back to manual copy-paste. The current implementation logs failures; monitor those logs to catch systemic issues early.

Can I cache converted documents?

Yes. Store the HTML in your database keyed by the original document’s hash (MD5 of file contents). Subsequent uploads of the same document skip conversion entirely. This works well if users regularly import the same templates.

Is it safe to send Word documents to Aspose’s servers?

Aspose processes documents on their cloud infrastructure, then discards them. If you’re handling sensitive documents (contracts, medical records, etc.), review Aspose’s data privacy and compliance documentation. For highly regulated environments, consider whether a self-hosted alternative is required.

What’s Next

You now have a production-ready Word import pipeline that preserves formatting where Froala’s native plugin falls short. From here:

  • Handle edge cases: Add image optimization, sanitize HTML output, or implement retry logic for large documents.
  • Monitor performance: Log conversion times and failures to catch issues before users do.
  • Scale gracefully: Consider caching converted documents or implementing a job queue if you’re processing high volumes.

This foundation is solid. The next step is deploying it and measuring what actually breaks in production—because something always does, and that’s where you’ll find your real optimization wins.

Ready to ship? Ensure you have a valid Froala license key. Deploy the code above to a staging environment first. Test with your actual Word documents—not sanitized examples. Then let your users loose on it and iterate.

graphical user interface, text

Building a Course Description Editor for Your LMS Using HTML Editor Software

Building a Course Description Editor for Your LMS Using HTML Editor Software

When someone opens a course page, the description is often the first thing they read. It sets expectations and influences whether they enroll. That’s why your LMS content editor plays a bigger role than it might seem.

If your LMS relies on plain text fields or markdown, the limitations show quickly. Formatting becomes frustrating, content looks inconsistent across devices, and non-technical instructors are forced to think about syntax instead of teaching.

This is where professional html editor software helps. A visual editor lets instructors write naturally while still producing clean, reliable HTML. With the right setup, you can deliver consistent course descriptions without sacrificing performance, accessibility, or control, exactly what a modern LMS needs.

Key takeaways

  • A well-designed LMS content editor directly impacts course quality, instructor efficiency, and learner engagement.
  • Plain text fields and markdown editors don’t scale well for modern LMS platforms with rich content needs.
  • Professional HTML editor software enables visual editing while generating clean, consistent HTML behind the scenes.
  • A production-ready LMS editor should balance usability for instructors with control, security, and performance for developers.
  • Froala makes it easy to build a flexible course description editor in React, with customizable toolbars and image handling.
  • Storing and rendering clean HTML simplifies content management, previews, and long-term maintenance.
  • Choosing a lightweight, framework-agnostic editor like Froala helps LMS platforms scale without added complexity.

What is an LMS content editor?

An LMS content editor is the tool you use to create and manage written content inside a learning platform. This includes course descriptions, lesson introductions, learning objectives, and other instructional text. It’s the space where instructors turn ideas into structured, readable content.

At the simplest level, some LMS platforms rely on plain textareas. These allow typing, but nothing more. Markdown editors add formatting options, but they assume the user understands syntax. That can slow instructors down and lead to inconsistent results.

A rich text or HTML-based editor like Froala takes a different approach. It lets you format content visually, headings, lists, links, and media, without writing code.

Format content visually in rich text editors

At the same time, it produces clean HTML behind the scenes. This balance is what makes a modern LMS editor usable for instructors and reliable for developers.

Rich text HTML editors produce clean HTML behind the scenes

Why HTML editor software is essential for LMS course descriptions

Course descriptions need more than plain text. Headings, lists, links, and media are often essential. When an LMS relies on basic inputs or markdown, these needs quickly become friction for instructors.

Professional html editor software removes that friction. A visual editor lets instructors format content as they write and see the final result immediately, without worrying about syntax or broken layouts.

A modern LMS rich text editor also produces clean, consistent HTML. This ensures course pages render correctly across devices, support accessibility, and remain easy to maintain as your LMS grows.

Core features a production-ready LMS course editor needs

A production-ready LMS course editor needs more than basic formatting. It should balance ease of use for instructors with control, performance, and reliability for developers. The following features help ensure your editor can scale as your LMS grows.

  • Essential formatting tools: Support headings, lists, links, and basic text styling without overwhelming instructors.
  • Media and embed handling: Allow images, videos, and external content to be added easily and displayed consistently.
  • Customizable toolbar: Control which tools are available so instructors only see what they actually need.
  • Clean, semantic HTML output: Generate structured HTML that’s easy to store, render, and maintain across your LMS.
  • Mobile-friendly editing: Ensure the editor works smoothly on different screen sizes and devices.
  • Accessibility-friendly markup: Help create content that follows accessibility best practices by default.
  • Stable performance at scale: Keep editing fast and reliable, even as your course library and user base grow.

Step-by-step: building an LMS course description editor with Froala using React

Building an LMS course description editor starts with choosing an editor that works well for instructors and developers. You want visual editing, clean HTML output, and full control over configuration. Froala fits this well, especially in React-based LMS applications.

Step 1: Install Froala for React

Start by installing Froala’s React package and required dependencies:

npm install react-froala-wysiwyg froala-editor

Explore Froala’s quick installation guides for popular JavaScript frameworks.

Then import Froala’s core styles in your app entry file (for example, src/main.jsx if you’re using Vite).

import "froala-editor/css/froala_editor.pkgd.min.css";
import "froala-editor/css/froala_style.min.css";

This gives you a production-ready editor without additional setup or build tools.

Step 2: Create a course description editor component

Next, create a dedicated React component for your LMS course description editor (for example, src/components/CourseDescriptionEditor.jsx):

import React, { useState } from "react";
import FroalaEditor from "react-froala-wysiwyg";

export default function CourseDescriptionEditor() {
  const [content, setContent] = useState("");

  return (
    <FroalaEditor
      tag="textarea"
      model={content}
      onModelChange={setContent}
    />
  );
}

At this point, instructors can already write and format course descriptions visually. Froala handles the HTML generation behind the scenes.

Step 3: Customize the editor toolbar and image uploads

Most instructors don’t need advanced formatting tools. A focused toolbar keeps the editor easy to use and helps prevent layout issues.

In your course editor component (for example, src/components/CourseDescriptionEditor.jsx), define a configuration that limits formatting options and enables image uploads:

const editorConfig = {
  toolbarButtons: [
    "bold",
    "italic",
    "underline",
    "paragraphFormat",
    "formatUL",
    "formatOL",
    "insertLink",
    "insertImage",
    "undo",
    "redo"
  ],
  placeholderText: "Write your course description here...",
  heightMin: 300,

  // Image handling
  imageUpload: true,
  imageAllowedTypes: ["jpeg", "jpg", "png", "gif"],
  imageMaxSize: 5 * 1024 * 1024 // 5MB
};

Explore more on customizing your Froala toolbar.

Apply the configuration when rendering the editor:

<FroalaEditor
  tag="textarea"
  model={content}
  onModelChange={setContent}
  config={editorConfig}
/>

This setup gives instructors the tools they need to format content and add images, while keeping the editor simple, consistent, and easy to maintain within your LMS.

Step 4: Store course descriptions as HTML

Froala outputs clean HTML by default, which makes storage simple. You can save the editor’s content directly to your database:

const saveCourseDescription = async () => {
  await api.saveCourse({
    description: content
  });
};

Storing HTML avoids complex conversions and makes versioning, previews, and updates easier inside your LMS.

Step 5: Render course descriptions safely for learners

When displaying course descriptions to learners, render the stored HTML inside your LMS UI:

<div
  className="course-description"
  dangerouslySetInnerHTML={{ __html: course.description }}
/>

In production, you should sanitize content on save or before render. Froala’s controlled output makes this much easier and reduces the risk of broken layouts or security issues.

Step 6: Scale the editor across your LMS

Once implemented, this same editor can be reused for:

  • Lesson descriptions
  • Learning objectives
  • Instructor notes
  • Announcements

Because Froala is lightweight and framework-agnostic, it scales cleanly as your LMS grows without adding performance overhead.

Get the complete example from this GitHub repository.

You can explore Froala’s documentation to see how these configurations fit into real LMS workflows.

Security & performance considerations for LMS editors

Course content is user-generated, which means security can’t be an afterthought. Your LMS editor should help limit risks like cross-site scripting (XSS) by controlling which tags and attributes are allowed. Clean, predictable HTML makes sanitization easier and more reliable.

Performance matters just as much. As your LMS grows, editors need to stay responsive even with large course catalogs and many active users. Features like lightweight rendering, efficient updates, and autosave support help keep the editing experience smooth. A well-optimized editor reduces load times, avoids UI freezes, and keeps both instructors and learners happy.

Learn how Froala enhanced the security and performance with its updates.

Common mistakes LMS teams make when building course editors

Building an LMS course editor seems simple at first. But small implementation decisions can create long-term usability, security, and maintenance problems. Avoiding the following common mistakes will save your team time and prevent issues as your LMS scales.

  • Relying on basic textareas: Assuming simple text inputs will scale usually leads to formatting limits and poor authoring experiences.
  • Allowing unrestricted HTML: This often results in broken layouts, inconsistent styling, and serious security risks.
  • Over-engineering custom editors: Building everything from scratch can create tools that are difficult to maintain and evolve over time.
  • Ignoring accessibility: Poor markup and inconsistent formatting make course content harder to use for many learners.
  • Generating messy or unpredictable HTML: Unclean output creates long-term maintenance issues that become harder to fix as the LMS grows.
  • Underestimating future scale: These problems may not appear immediately, but they surface quickly as content, users, and features expand.

Why Froala is a strong fit for LMS platforms

Froala is built for LMS platforms that need both usability and control. Instructors get a clean, intuitive editing experience, while developers work with predictable, well-structured HTML.

Because Froala is lightweight and framework-agnostic, it fits easily into existing LMS architectures and scales as your content and user base grow. You can customize the editor, keep performance high, and maintain consistency across courses.

Try Froala in your LMS and explore the documentation to see how quickly you can build a production-ready course editor.

Conclusion

A strong course description editor plays a bigger role in your LMS than it might seem at first. It shapes how instructors create content and how learners experience it. When editing feels simple and reliable, course quality improves across the platform.

Using professional HTML editor software helps you avoid formatting issues, messy markup, and usability problems as your LMS grows. With clean output, flexible customization, and solid performance, you can support both non-technical instructors and technical requirements with confidence.

Froala makes this balance easier to achieve. It gives you a production-ready editor that scales with your LMS, keeps content consistent, and supports long-term growth without adding unnecessary complexity.

graphical user interface, text

How to Create a Custom Blog Editor That Connects Directly to Your CMS

Custom blog editor connected to a CMS

Default CMS editors work until they don’t. As products scale, teams often run into limitations around customization, workflow fit, and content control. Markdown-only editors solve some problems but create others, especially for non-technical users who need rich formatting and media support.

That’s why many teams choose to implement a CMS rich text editor tailored to their product. The goal isn’t to build an editor from scratch, but to create a custom blog editor that integrates cleanly with the CMS, the frontend, and real publishing workflows.

Key takeaways

  • A CMS rich text editor is not a monolithic feature. It’s a system composed of an editor layer, a CMS API, and a clear content workflow.
  • Building a custom blog editor does not mean writing an editor from scratch. It means assembling proven components in a way that fits your CMS and frontend architecture.
  • Clean, predictable HTML output is critical for long-term maintainability, previews, and content reuse across platforms.
  • The editor layer has a direct impact on author experience, content quality, and technical debt inside the CMS.
  • Choosing the right HTML editor software early simplifies integration, reduces edge cases, and keeps publishing workflows flexible as your product grows.

What “custom blog editor” really means

A “custom blog editor” doesn’t mean building a text editor from scratch. That would be slow, risky, and unnecessary. In practice, it means assembling a system where each part has a clear responsibility.

You start with an editor layer in the frontend. This is where authors write, format, and manage content. Next comes your CMS, which handles storing posts, managing metadata, and controlling access. Between them sits an API layer that moves content back and forth in a predictable way.

Content storage is another key decision. Most teams store blog content as HTML, sometimes alongside structured fields like titles, tags, or excerpts. Publishing workflows, drafts, previews, approvals are then built on top of that foundation.

This is where html editor software plays a critical role. It provides the editing experience without forcing you to build complex behavior yourself. Instead of solving cursor handling, formatting rules, or content sanitization, you focus on how content flows through your system.

The result is a custom editor experience, built from well-defined, reusable parts.

Core architecture of a CMS rich text editor

At a high level, a CMS rich text editor is made up of a few core components working together.

The editor lives in the frontend. It handles text input, formatting, embeds, and media interactions. As users write, the editor produces output, most commonly HTML, that represents the content in a portable format.

That output is sent to your CMS through an API. The CMS doesn’t need to understand how the content was created. It just stores and retrieves it. Alongside the main body, you’ll usually store structured fields such as titles, slugs, authors, and publish status.

Storage format matters. HTML is often the simplest choice because it renders easily on the frontend and works across different systems. Some CMSs use block-based or JSON formats, but those still need to be converted for display. Choosing a clean, predictable format early reduces complexity later.

Preview and publishing complete the loop. When an author edits an existing post, the CMS returns the saved content to the frontend, where it’s loaded back into the editor. Drafts, previews, and published versions are usually just different states of the same content.

You can think of the flow like this:

Core architecture of a CMS rich text editor

When this loop is clean, everything else becomes easier to build.

Choosing the right HTML editor software

Once you understand the architecture, the editor layer becomes the most important decision. You need to consider the points below when choosing an HTML editor.

  • HTML output quality: The editor should generate clean, predictable markup that your CMS can store safely and your frontend can render without surprises.
  • Framework compatibility: Framework compatibility matters just as much. Whether you’re working in React, Vue, Angular, or a custom setup, the editor should integrate cleanly without forcing unusual patterns or heavy wrappers. 
  • Plugin architecture: A strong plugin architecture is another signal of a production-ready editor. Image handling, embeds, tables, and custom content blocks shouldn’t require rewriting core logic.
  • Performance: A lightweight bundle and fast load time directly affect author experience, especially in large CMS interfaces.
  • Security and maintainability: Your content editor should have sanitization, updates, and long-term support. 

Learn how Froala’s CMS rich text editor is designed for secure, high-performance content workflows.

Step-by-step: creating a custom blog editor connected to your CMS

Let’s walk through the steps involved in creating a custom blog editor and connecting it directly to your CMS. 

Step 0: What we’re building

Before diving into code, it’s important to be clear about what this example actually demonstrates.

In this walkthrough, you’re building a custom blog editor that connects directly to a real CMS. Froala acts as the rich text editor layer in the frontend, while Strapi serves as the CMS and source of truth for storing and managing content.

The setup looks like this:

  • React frontend renders the editing interface
  • Froala provides the rich text editing experience
  • Strapi (REST API) stores blog posts and metadata
  • Blog content is saved and retrieved as HTML
  • The same content can be edited, saved, and reloaded without transformation issues

This mirrors how modern SaaS platforms, marketing sites, and headless CMS frontends handle content in production. The editor does not replace the CMS. Instead, it integrates cleanly with it, allowing each layer to focus on what it does best.

A complete, runnable example of this setup is available in the accompanying GitHub repository, which you can clone and run locally to follow along.

Step 1: Set up Strapi as the CMS

This guide uses Strapi with its REST API as the backend CMS.

Create the post content model

In Strapi, create a collection type called Post. This collection represents blog posts authored through the custom editor.

The model includes four core fields:

  • Title – the human-readable post title
  • Slug – a UID generated from the title for routing
  • Content – the HTML body generated by Froala
  • Status – a simple draft/published workflow

Create a Strapi project locally

From your project root (or a cms/ folder):

npx create-strapi-app@latest cms

Choose:

Quickstart (recommended) → YES

Database → SQLite (default)

Start with an example structure & data → NO

Start with Typescript → NO

Install dependencies with npm → YES

Initialize a git repository → NO

You don’t need to sign up for a Strapi account for this example. Strapi runs locally without signing up, and you’ll only create a one-time local admin user during setup.

Then:

cd cms
npm run develop

This will:

  • Start Strapi at http://localhost:1337
  • Open the Strapi Admin UI in the browser

One-time admin setup

The first time Strapi runs, it will ask you to:

  • Create an admin user (email + password)

This is local only, not a Strapi account.

Strapi Admin UI
Strapi Admin UI

How to create the Post content model

There are two ways to create the Post content model.

For this example, I recommend the below option (creating it via Strapi admin UI). The other option is creating the model using JSON.

Step-by-step in the UI

1. Open Strapi admin:

http://localhost:1337/admin

Strapi Administration Panel

2. Go to Content-Type Builder

Go to Content Type Builder in Strapi admin panel

3. Click Create new collection type


Click Create new collection type (4. Set:

Display name: Post

Creating a collection type

5. Then click ‘Continue’ and add fields one by one:

Field 1: Title

  • Type: Text
  • Name: title
  • Required: ✅

Field 2: Slug

  • Type: UID
  • Name: slug
  • Attached field: title
  • Required: ✅

Field 3: Content

  • Type: Rich Text
  • Name: content
  • Required: ✅

This field will store HTML output from Froala

Field 4: Status

(Strapi will create this column automatically)

6. Click Save

7. Wait for Strapi to restart

Your Post collection is now created.

Post collection created in Strapi Content Type Builder

This model intentionally keeps things simple. The CMS is responsible for managing structure, metadata, and workflow state, while the editor focuses purely on content creation.

In this setup, Froala outputs clean HTML, which is stored directly in the CMS.

Enable REST API access (important)

By default, Strapi blocks public access. Enable public access to these endpoints for local development and demonstration purposes. In a production setup, authentication and role-based permissions would be applied, but the integration pattern remains the same.

For the demo:

1. Go to Settings → Users & Permissions → Roles

2. Click Public

Enable REST API access

3. Enable permissions for:

    • find
    • findOne
    • create
    • Update

Permissions of Posts

4. Save

Standard Strapi REST endpoints

These are the standard Strapi REST endpoints:

  • POST /api/posts to create a new post
  • GET /api/posts/:id to load an existing post
  • PUT /api/posts/:id to update content
  • GET /api/posts to list posts

At this point, Strapi is ready to act as the CMS layer. In the next step, you’ll integrate Froala into the React frontend and connect it directly to some of these endpoints.

Step 2: Integrate Froala into the React editor page

With the CMS in place, the next step is to build the editor layer in the frontend. This is where authors create and edit blog content, while the CMS remains responsible for storage and workflow.

In this setup, Froala is used purely as the rich text editor, not as a CMS. It lives inside a React page that represents a “create or edit post” screen, similar to what you’d see in a real admin interface.

Install Froala and the required assets

In your React project, install the Froala editor and its React wrapper:

npm install froala-editor react-froala-wysiwyg

Next, load Froala’s core files and plugins once at the application entry point. This ensures all toolbar actions and formatting features work correctly.

In src/main.jsx:

import "froala-editor/js/froala_editor.pkgd.min.js";
import "froala-editor/js/plugins.pkgd.min.js";
import "froala-editor/css/froala_editor.pkgd.min.css";
import "froala-editor/css/froala_style.min.css";

Without the plugins bundle, toolbar buttons will render but not function, which is a common integration mistake.

Your completed src/main.jsx should be like the following example :

import React from "react";
import ReactDOM from "react-dom/client";

import App from "./App";

// Froala core + plugins
import "froala-editor/js/froala_editor.pkgd.min.js";
import "froala-editor/js/plugins.pkgd.min.js";

// Froala styles
import "froala-editor/css/froala_editor.pkgd.min.css";
import "froala-editor/css/froala_style.min.css";

ReactDOM.createRoot(document.getElementById("root")).render(
  <React.StrictMode>
    <App />
  </React.StrictMode>
);

Create the editor page

Create a dedicated page for creating blog posts. In a real CMS, this would typically be part of an admin or dashboard interface.

Example: src/pages/EditorPage.jsx

import { useState } from "react";
import FroalaEditor from "react-froala-wysiwyg";
import editorConfig from "../components/EditorToolbarConfig.js";

export default function EditorPage() {
  const [content, setContent] = useState("");

  return (
    <div className="editor-page">
      <h2>Create Blog Post</h2>

      <FroalaEditor
        model={content}
        onModelChange={setContent}
        config={editorConfig}
      />
    </div>
  );
}

At this stage, the editor is fully functional, but it’s not yet connected to the CMS. The goal here is to confirm that Froala behaves correctly inside your application layout before introducing persistence.

Configure the toolbar and allowed content

Rather than exposing every possible formatting option, most CMS-driven editors restrict what authors can create. This keeps stored content predictable and easier to render.

Create a simple toolbar configuration:

// src/components/EditorToolbarConfig.js
const editorConfig = {
  toolbarButtons: [
    "bold",
    "italic",
    "underline",
    "paragraphFormat",
    "formatOL",
    "formatUL",
    "insertLink",
    "insertImage",
    "undo",
    "redo"
  ],
  heightMin: 300
};

export default editorConfig;

This configuration enforces editorial boundaries at the editor level, reducing the risk of invalid or unsupported markup entering the CMS.

Why this step matters

At this point, you have a real editing interface embedded in a modern frontend framework:

  • Froala handles text input, formatting, and media interactions
  • React manages editor state and UI composition
  • No CMS logic is baked into the editor itself

This separation is intentional. The editor produces clean HTML, but it does not decide where or how that content is stored. That responsibility remains with the CMS.

In the next step, you’ll connect this editor directly to Strapi by creating and saving content through its REST API, turning this UI into a true CMS-backed blog editor.

Step 3: Save editor content to Strapi via the REST API

With Froala embedded in the editor page, the next step is to persist content in the CMS. This is where the editor stops being a standalone UI component and becomes part of a real publishing workflow.

In this setup, Strapi is the source of truth. Froala produces HTML, React manages state, and Strapi stores and retrieves content through its REST API.

Create a CMS API service

To keep CMS logic out of UI components, create a small service layer responsible for communicating with Strapi.

Example: src/services/cmsApi.js

const STRAPI_URL = "http://localhost:1337";

/**
 * Convert a title into a URL-safe slug
 */
function slugify(text) {
  return text
    .toLowerCase()
    .trim()
    .replace(/[^a-z0-9]+/g, "-")
    .replace(/(^-|-$)/g, "");
}

/**
 * Create a new blog post in Strapi
 */
export async function createPost({ title, content }) {
  const slug = slugify(title);

  const response = await fetch(`${STRAPI_URL}/api/posts`, {
    method: "POST",
    headers: {
      "Content-Type": "application/json",
    },
    body: JSON.stringify({
      data: {
        title: title,        // must match schema exactly
        slug,               // required UID field
        content,
        post_status: "draft"
      },
    }),
  });

  const result = await response.json();

  // Throw on validation / permission errors
  if (!response.ok) {
    const message =
      result?.error?.message || "Failed to create post in CMS";
    throw new Error(message);
  }

  return result;
}

/**
 * Fetch a single post by ID (used only in edit flows)
 */
export async function getPost(id) {
  const response = await fetch(`${STRAPI_URL}/api/posts/${id}`);

  if (!response.ok) {
    return null;
  }

  const result = await response.json();
  return result.data;
}

This function mirrors how real applications interact with a CMS: the frontend sends structured data, and the CMS handles storage and validation.

Send editor content to the CMS

Next, wire this API call into the editor page. Alongside the rich text content, you’ll typically send structured metadata such as the title and slug.

Update EditorPage.jsx:

import { useState } from "react";
import FroalaEditor from "react-froala-wysiwyg";
import editorConfig from "../components/EditorToolbarConfig";
import { createPost } from "../services/cmsApi";

export default function EditorPage() {
  const [title, setTitle] = useState("");
  const [content, setContent] = useState("");
  const [saving, setSaving] = useState(false);
  const [statusMessage, setStatusMessage] = useState("");

  async function handleSave() {
    if (!title.trim() || !content.trim()) {
      setStatusMessage("Title and content are required.");
      return;
    }

    try {
      setSaving(true);
      setStatusMessage("");

      const result = await createPost({
        title,
        content,
      });

      // Only reset editor if CMS confirms save
      if (result?.data?.id) {
        setStatusMessage("Post saved as draft in CMS.");
        setTitle("");
        setContent("");
      }
    } catch (error) {
      console.error(error);
      setStatusMessage(
        error.message || "Failed to save post. Check CMS validation."
      );
    } finally {
      setSaving(false);
    }
  }

  return (
    <div className="editor-page">
      <h2>Create Blog Post</h2>

      <input
        type="text"
        placeholder="Post title"
        value={title}
        onChange={(e) => setTitle(e.target.value)}
        style={{ width: "100%", marginBottom: "1rem" }}
      />

      <FroalaEditor
        model={content}
        onModelChange={setContent}
        config={editorConfig}
      />

      <button
        onClick={handleSave}
        disabled={saving || !title.trim() || !content.trim()}
        style={{ marginTop: "1rem" }}
      >
        {saving ? "Saving..." : "Save Changes"}
      </button>

      {statusMessage && (
        <p style={{ marginTop: "0.75rem" }}>{statusMessage}</p>
      )}
    </div>
  );
}

When the author clicks Save, the editor’s HTML output is sent directly to Strapi and stored in the content field of the Post collection.


Why Froala works well as a CMS rich text editor

Once you look at the full lifecycle of a custom blog editor, authoring, storage, previewing, and publishing, the editor layer becomes a critical dependency. This is where Froala fits naturally into a CMS-driven architecture.

One of the biggest advantages is clean, predictable HTML output. Froala is designed to produce structured markup that’s easy to store in a CMS and reliable to render on the frontend. That consistency matters when content needs to round-trip between the editor and the CMS without degrading over time.

Froala’s lightweight core also makes a difference in real applications. Large CMS interfaces already carry significant JavaScript overhead. An editor that loads quickly and doesn’t dominate the bundle helps keep authoring experiences responsive, even as the product grows.

From an implementation standpoint, Froala’s plugin-based extensibility aligns well with custom workflows. Features like images, tables, embeds, or custom content blocks can be enabled or restricted based on your CMS rules, without modifying the editor’s internals. This keeps the integration flexible instead of fragile.

Finally, Froala offers framework SDKs and enterprise-ready security features, making it easier to integrate into modern stacks while meeting production requirements. Instead of solving editing complexity yourself, you get a stable, well-supported CMS rich text editor that lets your team focus on content and workflow, not editor maintenance.

Final takeaway

Building a custom blog editor isn’t about recreating text-editing functionality from scratch. It’s about choosing the right components and assembling them in a way that fits your CMS and publishing workflow. When the editor layer is poorly chosen, complexity leaks into every part of the system, from storage and previews to long-term maintenance.

A well-designed CMS rich text editor keeps content clean, workflows predictable, and integrations manageable. By using a flexible, production-ready editor instead of maintaining your own, teams reduce risk and move faster without sacrificing control.

If you’re evaluating how to connect a custom blog editor directly to your CMS, exploring Froala’s documentation is a practical next step.

Tested Froala and ready to ship?

Move from evaluation to production with the right Froala license.

graphical user interface, text


Why Froala is Actually Better at Code Snippets than CKEditor 5

Code Snippets

You’re building a dynamic content system. You’ve selected CKEditor 5. Six weeks in, you discover it has no native way to insert code snippets programmatically. You’re now reverse-engineering low-level model APIs instead of shipping features.

Despite the fact that many WYSIWYG editors offer code snippets, they are not all developer friendly or provide the best user experience.

Both Froala and CKEditor offer code snippet functionality, but the path to a working implementation differs significantly.

This guide examines how each of them handles code snippets and helps you choose the right fit for your needs.

Which Plugin is More Developer Friendly?

Basic Setup and Configuration

Dependencies

Froala Implementation

Froala’s Code Snippets feature requires Prism.js to be loaded on the page for syntax highlighting to work inside and outside the editor.

This makes Froala’s setup involve managing multiple dependencies. You must load Froala’s core CSS and JavaScript files alongside Prism.js and its language components:

<!-- Froala Editor Styles -->
<link href="https://cdn.jsdelivr.net/npm/froala-editor@latest/css/froala_editor.pkgd.min.css" 
      rel="stylesheet" type="text/css" />

<!-- Prism Syntax Highlighting Styles -->
<link rel="stylesheet" 
      href="https://cdnjs.cloudflare.com/ajax/libs/prism/1.29.0/themes/prism.min.css">

<!-- Prism Core and Autoloader for Dynamic Language Support -->
<script type="text/javascript" 
        src="https://cdn.jsdelivr.net/npm/prismjs@1.30.0/components/prism-core.min.js"></script>
<script type="text/javascript" 
        src="https://cdn.jsdelivr.net/npm/prismjs@1.30.0/plugins/autoloader/prism-autoloader.min.js"></script>

<!-- Froala Editor -->
<script type="text/javascript"
        src="https://cdn.jsdelivr.net/npm/froala-editor@latest/js/froala_editor.pkgd.min.js"></script>

This multi-dependency approach adds weight to your initial payload but provides a cohesive WYSIWYG experience.

Froala and Prism work together seamlessly, with Prism handling syntax highlighting both within the editor and in the final rendered output. The autoloader dynamically loads language definitions, reducing upfront bundle size. However, managing version compatibility between Froala and Prism becomes a maintenance consideration.

CKEditor 5 Implementation

CKEditor 5 live code highlighting is impossible inside the editor. This simplifies the editor integration requiring only the core library and CSS but introduces two significant drawbacks:

  1. Breaks WYSIWYG Principle: Code blocks lack syntax highlighting within the editor, meaning users cannot see how their code will appear in the final output. This fundamentally contradicts the WYSIWYG paradigm that editors like CKEditor purport to uphold. Developers and content creators must mentally visualize the rendered result rather than experiencing true “what you see is what you get” editing.
  2. You must separately choose and implement a syntax highlighting library (Prism.js, Highlight.js, etc.) for your frontend rendering layer. Additionally, you must ensure that CKEditor’s generated language classes align with your highlighter’s expected format. This typically requires post-processing the editor output or configuring language class mappings—adding another layer of integration complexity.
<!-- CKEditor 5 Styles -->
<link rel="stylesheet" 
      href="https://cdn.ckeditor.com/ckeditor5/47.4.0/ckeditor5.css" />

<!-- CKEditor 5 Bundle -->
<script src="https://cdn.ckeditor.com/ckeditor5/47.4.0/ckeditor5.umd.js"></script>

Editor initialization

Both editors require initialization, but their configuration approaches differ significantly.

Froala

Once dependencies are loaded, initialize the editor with your configuration:

new FroalaEditor('#editor', {
  key: '<YOUR_LICENSE_KEY>',
  pluginsEnabled: ['codeSnippet'],
  toolbarButtons: ['codeSnippet']
});

CKEditor 5

Initialize the editor with the CodeBlock plugin included:

const { ClassicEditor, CodeBlock } = CKEDITOR;

ClassicEditor
  .create(document.querySelector('#editor'), {
    licenseKey: '<YOUR_LICENSE_KEY>',
    plugins: [CodeBlock, /* ... other plugins ... */],
    toolbar: ['codeBlock', /* ... other toolbar items ... */]
  })
  .then(editor => {
    // Editor is ready for use
  })
  .catch(error => {
    console.error('Editor initialization failed:', error);
  });

Developer Perspective: CKEditor 5’s promise-based initialization provides clearer error handling and lifecycle management. The separation of highlighting concerns offers architectural flexibility but comes at a cost: you’re no longer working with a pre-integrated solution. Instead, you’re orchestrating multiple libraries while sacrificing the visual feedback that makes WYSIWYG editors compelling in the first place.

Key Takeaway for Developers: Choose Froala if you want true WYSIWYG code editing with integrated syntax highlighting and unified dependency management. Choose CKEditor 5 only if you’re willing to accept the architectural trade-off of deferred highlighting and increased integration responsibility—all while compromising the WYSIWYG editing experience.

Configuration Options

Configuration options reveal how each editor allows developers to customize behavior. The differences here are both structural and philosophical.

Froala’s Configuration Approach

Froala provides two dedicated configuration options for code snippet management:

codeSnippetLanguage

Defines the available programming languages presented in the code snippet insertion modal.

Usage Example:

new FroalaEditor('#editor', {
  codeSnippetLanguage: {
    'JavaScript': 'javascript',
    'Python': 'python',
    'Ruby': 'ruby',
    'Go': 'go'
  }
});

codeSnippetDefaultLanguage

Specifies which language is pre-selected when the code snippet modal opens, eliminating the need for users to manually select a language on each insertion.

Usage Example:

new FroalaEditor('#editor', {

  codeSnippetDefaultLanguage: 'python'

});

CKEditor 5’s Configuration Approach

CKEditor 5 consolidates code snippet customization into a single, more granular configuration object:

codeBlock.languages

Defines supported programming languages along with their display labels and optional CSS class mappings for syntax highlighting integration.

Usage Example:

codeBlock: {

  languages: [

    { language: 'plaintext', label: 'Plain text' },        // Default language

    { language: 'c', label: 'C' },

    { language: 'cs', label: 'C#' },

    { language: 'cpp', label: 'C++' },

    { language: 'css', label: 'CSS' },

    { language: 'diff', label: 'Diff' },

    { language: 'go', label: 'Go' },

    { language: 'html', label: 'HTML' },

    { language: 'java', label: 'Java' },

    { language: 'javascript', label: 'JavaScript', class: 'js' },

    { language: 'php', label: 'PHP', class: 'php-code' },

    { language: 'python', label: 'Python' },

    { language: 'ruby', label: 'Ruby' },

    { language: 'typescript', label: 'TypeScript' },

    { language: 'xml', label: 'XML' }

  ]

}

Key Observation: The first language in the array (plaintext) becomes the default, unlike Froala’s explicit codeSnippetDefaultLanguage option.

Froala’s two-option approach (codeSnippetLanguage and codeSnippetDefaultLanguage) makes it trivial to change the default language dynamically based on user context or preferences. You can update codeSnippetDefaultLanguage on the fly without restructuring data. CKEditor 5’s array-based model, by contrast, requires either re-initializing the entire configuration object or manually tracking which language appears first in the array—a less intuitive pattern for runtime changes.

Developer Perspective: Froala’s explicit configuration option provides a clearer, more maintainable path.

Methods and Command Execution

Programmatically inserting and manipulating code snippets is a fundamental requirement for developers building dynamic content systems. Each editor provides distinct APIs to handle these operations, reflecting their underlying architectural philosophies.

Froala’s Method-Based API

Froala exposes three primary methods for code snippet manipulation, including dedicated support for programmatic code insertion and updates:

  • Inserts a new code snippet into the editor at the current cursor position with fully populated code content. codeSnippet.insert(code, language, replaceEl)
  • Updates an existing code block with new code and optionally changes its language. This method is critical for applications that need to modify previously inserted snippets—enabling dynamic code replacement, version control integration, or real-time code synchronization from external sources. codeSnippet.update($codeBlock, code, language)
  • Programmatically opens the code snippet modal dialog. codeSnippet.show(isEdit)

CKEditor 5’s Command-Based API

CKEditor 5 employs a command execution pattern where operations are dispatched through a unified command interface. However, a critical distinction emerges: CKEditor 5’s commands do not support programmatic code insertion or updates. Instead, they focus on creating empty code block structures or converting existing content into code blocks. The available commands are for:

  • Converts selected editor content into a code block or creates an empty code block at the cursor position if no selection exists. editor.execute( ‘codeBlock’, { language: ‘css’ } );
  • Increases indentation for lines within a code block when the selection is anchored anywhere inside the block.
  • Decreases indentation for lines within a code block when the selection is anchored inside the block.

A Critical Architectural Difference

The distinction between these APIs goes far deeper than syntax. This represents a fundamental limitation in CKEditor 5’s command design:

Froala’s Method-Based Approach provides complete control over code snippet lifecycle:

  • Insert fully populated code snippets programmatically
  • Update existing code blocks with new content dynamically
  • Display the modal for manual editing when needed

This design is ideal for developers building dynamic content systems, importing code from external sources, or synchronizing snippets across applications.

CKEditor 5’s Command-Based Approach only manages structure, not content:

  • Create empty code block containers
  • Convert existing selected content into code blocks
  • Manipulate indentation within code blocks

Critically, CKEditor 5 provides no direct command for inserting pre-written code. Developers must resort to low-level model manipulation—a significantly more complex and error-prone alternative that requires understanding CKEditor’s internal content architecture.

Developer Perspective:

This is not merely a stylistic API difference—it’s a functional gap. Froala’s methods make programmatic code snippet management trivial. CKEditor 5’s command architecture, while architecturally elegant, fails to provide equivalent functionality, forcing developers into uncomfortable workarounds or abandoning automated code insertion entirely.

Event Handling and Hooks

Event handling and lifecycle hooks are critical for developers who need to react to code snippet operations, validate input, or trigger side effects. The approaches differ significantly between Froala and CKEditor 5, reflecting their underlying architectural philosophies.

Froala’s Event-Based Architecture

Froala employs a straightforward event system where lifecycle hooks are declared during editor initialization. Events are emitted at predictable points in the code snippet lifecycle, allowing developers to intercede with minimal boilerplate.

codeSnippet.beforeInsert

Triggered immediately before a code snippet insertion, this event allows developers to inspect, modify, or reject the incoming code.

new FroalaEditor('.selector', {
  events: {
    'codeSnippet.beforeInsert': function (code) {
      // this refers to the editor instance
      console.log('Inserting code:', code);
      
      // Example: Prepend an auto-generated comment to all snippets
      return '// Auto-generated comment\n' + code;
    }
  }
});

codeSnippet.afterInsert

Triggered after a code snippet has been successfully inserted into the editor, enabling post-insertion side effects without blocking the insertion operation.

new FroalaEditor('.selector', {
  events: {
    'codeSnippet.afterInsert': function (code) {
      // this refers to the editor instance
      console.log('Code snippet successfully inserted:', code);
      
      // Example: Trigger analytics or sync with external system
      trackCodeSnippetInsertion(code);
      syncToDatabase(code);
    }
  }
});


Developer Perspective: Froala’s event model is intuitive and declarative. Developers can intercept the entire code snippet lifecycle with minimal configuration. The beforeInsert event provides control over data transformation, while afterInsert enables reliable side effects. The synchronous, callback-based pattern is predictable and easy to reason about—critical attributes for production code.

CKEditor 5’s Command-Based Architecture

CKEditor 5 uses a command execution pattern where operations flow through a unified command dispatcher. Event listeners are attached to commands after editor initialization through a lower-level API, requiring more boilerplate and architectural understanding.

Before Code Block Insertion

const codeBlockCommand = editor.commands.get('codeBlock');

// Listen before codeBlock command execution
codeBlockCommand.on('execute', (evt, options) => {
  console.log('Command options:', options);
  
  // Example: Validate language selection
  if (options.language && isRestrictedLanguage(options.language)) {
    evt.stop(); // Prevent execution
    console.error('Language not permitted:', options.language);
  }
}, { priority: 'high' });

Key Differences from Froala:

  • Events must be attached after editor initialization (not during configuration)
  • The priority parameter controls listener execution order (‘high’ = pre-execution, ‘low’ = post-execution)
  • The evt.stop() method can prevent command execution entirely
  • The options object contains command parameters but does not represent the actual code content

After Code Block Insertion

const codeBlockCommand = editor.commands.get('codeBlock');

// Listen after codeBlock command execution
codeBlockCommand.on('execute', (evt, options) => {
  console.log('Code block command executed');
  
  // Example: Log insertion for audit purposes
  logAuditEvent({
    action: 'codeBlockInserted',
    timestamp: new Date(),
    language: options.language
  });
}, { priority: 'low' });

Critical Limitation: Unlike Froala’s afterInsert event, which provides the actual code content, CKEditor 5’s post-execution event receives only command metadata (the options object). To access the inserted code, developers must query the editor’s model—a significantly more complex operation requiring knowledge of CKEditor’s internal content architecture.

Comparative Analysis

Aspect Froala CKEditor 5
Configuration Declarative (during initialization) Imperative (post-initialization)
Event Naming Semantic (beforeInsert, afterInsert) Generic (execute with priority)
Pre-Event Access Full code content provided Command options only
Post-Event Access Full code content provided Requires model querying
Execution Control Implicit (return falsy to reject) Explicit (evt.stop())
Boilerplate Required Minimal Moderate to High

Developer Perspective

Froala excels in this domain. The event system is declarative, purpose-built, and immediately accessible. Developers can react to code snippet operations with clear intent and minimal cognitive overhead. The beforeInsert and afterInsert events provide complete lifecycle visibility with access to actual code content—enabling validation, transformation, and side effects without workarounds.

CKEditor 5’s command architecture is architecturally consistent across all editor operations, which is elegant from a framework design perspective. However, this consistency comes at a cost: event handling for code blocks becomes less intuitive. The generic execute event requires understanding priority-based listener ordering. More problematically, post-execution events provide insufficient context—developers must resort to model querying to access inserted code, a pattern that introduces fragility and requires deeper framework knowledge.

For event-driven architectures where responsiveness to user actions is paramount—logging, validation, database synchronization, or audit trails—Froala’s purpose-built events provide a significantly more ergonomic developer experience. CKEditor 5’s approach works, but at the cost of additional complexity that often outweighs the benefits of architectural consistency.

Decision Matrix

Criteria Froala CKEditor 5 Winner
Setup Complexity Multiple dependencies (Froala + Prism.js) to manage Single library with deferred highlighting CKEditor 5
WYSIWYG Fidelity True WYSIWYG with integrated syntax highlighting Code blocks lack in-editor highlighting Froala
Dependency Management Higher initial payload; requires version compatibility tracking Lighter core footprint; highlighting delegated to frontend CKEditor 5
Configuration Approach Explicit, two-option system (codeSnippetLanguage, codeSnippetDefaultLanguage) Array-based single configuration object Froala
Runtime Language Changes Trivial (update codeSnippetDefaultLanguage on the fly) Requires re-initialization or array manipulation Froala
Programmatic Code Insertion Direct methods (insert(), update()) with full control No direct command; requires low-level model manipulation Froala
Code Block Updates Dedicated update() method for dynamic modifications Not supported natively Froala
API Design Method-based, intuitive, purpose-built Command-based, architecturally consistent but generic Froala
Event System Declarative, semantic (beforeInsert, afterInsert) Imperative, generic (execute with priority) Froala
Pre-Event Data Access Full code content provided Command options only Froala
Post-Event Data Access Full code content provided Requires model querying Froala
Event Configuration During initialization (minimal boilerplate) Post-initialization (moderate to high boilerplate) Froala
Error Handling Traditional callback-based Promise-based initialization with clear error handling CKEditor 5
Architectural Flexibility Integrated but opinionated solution Modular; allows separate highlighting library selection CKEditor 5
Use Case: Dynamic Content Systems Excellent (programmatic insertion + updates) Challenging (no native programmatic insertion) Froala
Use Case: Minimal Bundle Size Heavier (multi-library integration) Lighter (deferred highlighting) CKEditor 5
Use Case: Code Validation & Transformation Native support via beforeInsert event Workaround-dependent Froala
Developer Experience Overall Intuitive, predictable, minimal friction Consistent architecture, steeper learning curve Froala

Scoring Summary

Froala: 11 Wins — Superior API design, event handling, programmatic control, and WYSIWYG fidelity. Best for developers prioritizing control and user experience.

CKEditor 5: 4 Wins — Better for minimal bundle size, architectural flexibility, and promise-based initialization. Best for developers optimizing for performance and modular design.

Key Trade-off: Froala offers a cohesive, developer-friendly experience out of the box. CKEditor 5 demands more integration work but provides flexibility for architecturally ambitious projects. The choice depends on whether you value convenience or control.

The Recommendation

For most development teams, Froala represents the pragmatic choice.

The decision matrix reveals that Froala wins decisively on developer experience, API design, and practical functionality—11 to 4. While CKEditor 5 offers legitimate advantages in bundle size optimization and architectural consistency, these benefits rarely justify the implementation friction and compromised WYSIWYG experience.

The critical factor: Froala provides what developers actually need—intuitive programmatic control, predictable events, and true WYSIWYG editing—packaged as a cohesive solution. CKEditor 5, while architecturally elegant, shifts responsibility back to developers for tasks that should be built-in, effectively transforming a “complete editor” into a component you must orchestrate.

Choose CKEditor 5 only if you have explicit, project-specific constraints (aggressive bundle size targets, architectural mandates for modular design, or existing CKEditor infrastructure) that outweigh its higher implementation cost.

Choose Froala for everything else. The unified dependency management, native code snippet methods, semantic event system, and true WYSIWYG rendering deliver measurable value that compounds across the development lifecycle—from initial setup through production maintenance.

graphical user interface, text

Cloud vs Self-Hosted Editors — Which One Should You Choose?

Illustration comparing cloud vs self-hosted editors, showing cloud-based infrastructure balanced against on-premise servers for content editing

If you’re building a product that relies on rich content, such as a CMS, LMS, or SaaS platform, you’ll eventually face the “cloud vs self-hosted” decision. It often appears early, then resurfaces as your product grows and new requirements emerge.

Cloud-based editors focus on speed and convenience, while self-hosted editors emphasize control and flexibility. But the real choice depends on more than features. Performance expectations, security and compliance needs, and long-term scalability all play a role.

There’s no universally “right” option. The best approach depends on your team, infrastructure, and product goals. Also, as products mature, many teams find that control and architectural flexibility become more important than initial convenience.

This article breaks down the differences to help you choose based on your use case, not hype.

Key takeaways

  • There is no universal winner in the cloud vs self-hosted debate.
  • Cloud-based editors prioritize speed, convenience, and low setup effort.
  • Self-hosted editors offer stronger architectural control, long-term flexibility, and greater predictability as products scale.
  • Security, compliance, and performance needs often influence the decision.
  • Choosing intentionally early can prevent costly migrations later.

What is a cloud-based editor?

A cloud-based editor is hosted and managed by a third-party provider and accessed over the internet. Instead of installing the editor on your own servers, you connect to it as a service, usually through a subscription. The provider handles the infrastructure, hosting, and ongoing maintenance.

Cloud-based editor setup is minimal, updates are automatic, and scaling is largely handled for you. When new features or fixes are released, they’re typically rolled out without any action required from your team. However, this convenience can sometimes limit how deeply the editor integrates into your broader application architecture.

Explore the basics of cloud hosting.

What is a self-hosted editor?

A self-hosted editor is installed and run on your own infrastructure rather than being delivered as a hosted service. This could mean deploying it on your servers, a private cloud, or an on-premise environment. You control how the editor is configured, where it runs, and how it integrates with the rest of your system.

With a self-hosted WYSIWYG editor, updates and maintenance are managed by your team. While this requires more upfront effort, it also gives you architectural flexibility that can be valuable as your product grows. You decide when to upgrade, how features are enabled, and how the editor fits into your existing workflows and security policies.

For teams building long-term platforms rather than short-term projects, this level of ownership often becomes a strategic advantage.

Key differences at a glance

The table below summarizes the core differences between cloud-based and self-hosted editors across the areas teams most often care about.

AspectCloud-Based EditorSelf-Hosted Editor
Hosting & infrastructureHosted and managed by a third-party providerHosted on your own servers or private infrastructure
Setup timeVery fast, minimal configurationLonger initial setup and deployment
Customization flexibilityLimited to provider-supported optionsHigh flexibility and deep customization
Performance controlDepends on provider’s infrastructureFully optimized based on your stack
Data ownershipData handled through third-party systemsFull data ownership and control
Security & complianceProvider-managed, varies by vendorEasier to align with internal policies
Cost structureSubscription-based, predictable short-termInfrastructure and maintenance costs
Dependency on third partiesHigh dependency on vendor availabilityLow dependency once deployed

Pros and cons of cloud-based editors

cloud-based rich text editor

Cloud-based editors are often chosen for their convenience and speed, but they come with clear advantages and limitations.

Pros

  • Fast setup with minimal configuration
  • No need to manage servers or infrastructure
  • Automatic updates and maintenance handled by the provider
  • Easy to scale for early-stage or smaller projects
  • Predictable short-term costs through subscription pricing

Cons

  • Limited control over hosting and infrastructure
  • Performance depends on third-party servers
  • Potential data residency and data ownership concerns
  • Security and compliance options are constrained by the provider
  • Risk of vendor lock-in as the product grows

Pros and cons of self-hosted editors

self hosted rich text editor

Self-hosted editors offer a different set of trade-offs, focusing more on control and long-term flexibility.

Pros

  • Full control over data, hosting, and infrastructure, without relying on third-party availability
  • Easier to meet security, privacy, and compliance requirements
  • Greater flexibility for customization and integrations
  • Ability to optimize performance based on your own stack
  • Full control over upgrade timing with no forced updates

Cons

  • Requires initial setup and configuration
  • Ongoing maintenance and updates are your responsibility
  • Infrastructure management adds operational overhead
  • Longer time to get started compared to cloud-based solutions

When cloud makes more sense

Cloud-based editors are often the right choice when speed and simplicity matter more than deep control. For early-stage startups or small teams, cloud solutions reduce setup time and allow products to ship quickly without worrying about infrastructure or maintenance.

They also work well for proof-of-concept projects and MVPs. When the goal is to validate an idea or test user behavior, the flexibility and low upfront effort of a cloud editor can be a major advantage.

Teams without dedicated DevOps or infrastructure expertise often benefit from this model as well. By offloading hosting, scaling, and updates to a provider, developers can stay focused on building core features rather than managing systems.

In situations where customization needs are limited and content requirements are relatively simple, a cloud-based editor can provide everything needed with minimal overhead.

When self-hosted is worth considering

A self-hosted editor often becomes more compelling as products mature and requirements become more defined. Teams handling sensitive or regulated data frequently lean toward self-hosted setups because they offer full data ownership and control. Content remains within your environment, making it easier to align with internal security policies, compliance standards, and governance frameworks.

Performance-critical platforms are another strong case. When response times, uptime guarantees, or regional performance expectations truly matter, direct control over infrastructure allows teams to optimize the editor as part of their broader architecture. Instead of depending on external hosting conditions, the editor can be tuned alongside the rest of the application stack.

Self-hosted editors also make sense for long-term products where customization and integration are priorities. As workflows evolve, teams may require deeper integrations, tailored features, or tighter alignment with internal systems. A self-hosted approach provides the architectural flexibility to adapt without being constrained by a provider’s roadmap or release cycles.

Organizations with established infrastructure or defined upgrade policies often prefer self-hosted solutions as well. Controlling when updates occur, testing changes internally, and avoiding unexpected modifications can reduce operational risk and improve predictability as the product scales.

In many mature SaaS products, the editor eventually becomes a core part of the application rather than a simple add-on. In those cases, integrating it fully within your own infrastructure can provide stability, performance consistency, and long-term flexibility that are harder to achieve with fully managed external services.

Common myths about cloud vs self-hosted

Let’s explore some of the most common assumptions around cloud and self-hosted editors, and look at the practical reality behind each of them.

“Cloud is always more secure.”

Cloud providers invest heavily in security, but security isn’t automatic. How data is handled, stored, and accessed matters just as much as where it’s hosted. In many cases, self-hosted setups offer stronger control simply because teams can enforce their own security and compliance policies end to end.

Explore more about the security of cloud storage.

“Self-hosted editors are outdated.”

Self-hosted doesn’t mean old-fashioned. Many modern editors, including solutions like Froala’s self-hosted WYSIWYG editor, are built to integrate seamlessly with modern frameworks and deployment models. It’s a deployment choice, not a reflection of capability.

“Cloud solutions are always cheaper.”

Cloud-based editors often look cost-effective early on, but expenses can increase as usage scales. Subscription tiers, usage limits, and add-ons may raise long-term costs. Self-hosted solutions usually require more upfront effort, but they can offer more predictable costs over time.

These assumptions persist because the comparison is often oversimplified. In practice, both models have valid strengths. The right choice depends on your product’s needs, not common myths.

Final thoughts: it depends, but choose intentionally

Cloud-based and self-hosted editors both have a place, and neither approach is inherently better than the other. The right choice depends on how your product is built today, and how you expect it to evolve over time.

Before deciding, it’s worth stepping back and evaluating a few key factors: 

  • The size and capabilities of your team
  • Your security and compliance requirements 
  • How much customization you’ll need, and 
  • How critical performance and scalability are to your users. 

A solution that feels convenient now may introduce limitations later, while a more controlled setup might offer flexibility you’ll appreciate as your product grows.

While cloud solutions can be ideal for rapid experimentation, many teams building long-term platforms eventually prioritize control, stability, and ownership. Thinking ahead about where your product is headed, not just where it is today, can help you make a more sustainable architectural decision.

Ultimately, the most important thing is to choose intentionally. Understanding the trade-offs early can help you avoid costly migrations, rework, or architectural changes down the line, and set your product up for smoother growth in the long run.

FAQs

1. What is the main difference between cloud and self-hosted editors?

The main difference lies in hosting and control. Cloud-based editors are hosted and managed by a third-party provider, while self-hosted editors run on your own infrastructure, giving you full control over data, performance, and configuration.

2. Is a cloud-based editor better for startups?

Cloud-based editors often suit early-stage startups and MVPs because they offer fast setup, minimal maintenance, and lower upfront effort. However, as products scale, teams may reassess this choice based on security, customization, and long-term needs.

3. When should teams consider switching to a self-hosted editor?

Teams typically consider self-hosted editors when they need greater data ownership, stricter security or compliance controls, predictable performance, or deeper customization as their product matures.

graphical user interface, text